Update 19th May 2022 - you’ll see references to a limit of one event per minute in this tutorial. It appears that this limit has now been removed. I’ve not yet tested this myself, and when I do I’ll update the tutorial to reflect my findings.
I’m seeing quite a few posts from people who are finding it difficult to get notifications working in Blynk IoT, and who don’t understand how to use “flag” variables to limit the number of notifications that are sent for any given alert situation.
I thought I’d write this guide to help cover-off some of these topics.
Note that this topic is aimed at sending notifications from a C++ sketch, and doesn’t relate to the “Send In-App Notification” action that can be used in automations.
I have covered using the HTTP(S) API as an alternative method of logging events towards the end of this topic, and this can be used in both Node-Red and other Blynk libraries, but this is only included to make users aware of this additional method of logging events/sending notifications and to signpost them to other relevant resources.
Blynk IoT Events, Notifications and Limitations
The way that notifications work in Blynk IoT is very different to how they worked in Blynk Legacy, so let’s start with the basics and discuss some of the things that can lead to confusion…
Blynk now uses Events, which are a new concept.
There are built-in events of “online” and “offline” which are triggered automatically, and these events can be seen in the Timeline on the web dashboard or the app.
You can also define your own event types, and trigger the logging of events in these user defined event types from your sketch.
Each user defined event type will only allow one event to be logged per minute, and if you try to log events to the same event type more frequently then these will simply be ignored (lost). Once the one minute timer has elapsed for that event type then the next event you send will be logged as normal.
There is a combined limit on all user defined events of 100 events per device in any 24 hour period, so you need to use events carefully (the built-in events of “online” and “offline” don’t count towards this 100 event limit).
You could use Events to log information that you might previously written into a Table widget or even the Terminal widget.
For example, you might log events ro record situations like “Irrigation System Started”, “Irrigation Complete”, “Pool Cleaning Started”, “Pool Cleaning Completed” etc.
These could be logged to one user defined event type, or multiple event types depending on what you want to achieve.
This is the Add/Edit Event screen…
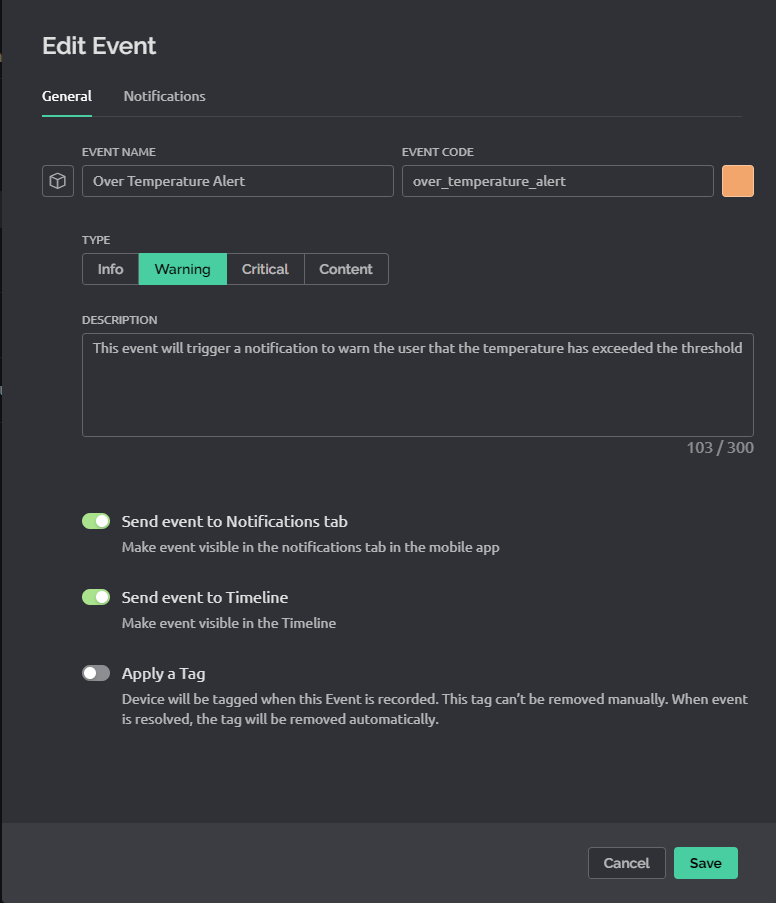
I suggest that you turn on the options to “Send event to Notifications tab” and “Send event to Timeline” as shown above, because these allow much better visibility of the events and therefore allow for easier debugging during initial testing.
In addition, an event can be used to trigger a notification.
The Add/Edit Event dialog has an additional tab called “Notifications”…
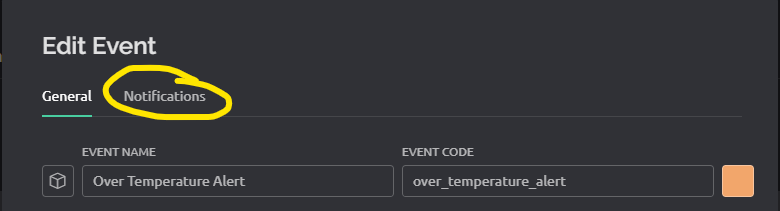
Clicking this tab allows Notifications to be enabled for this Event…
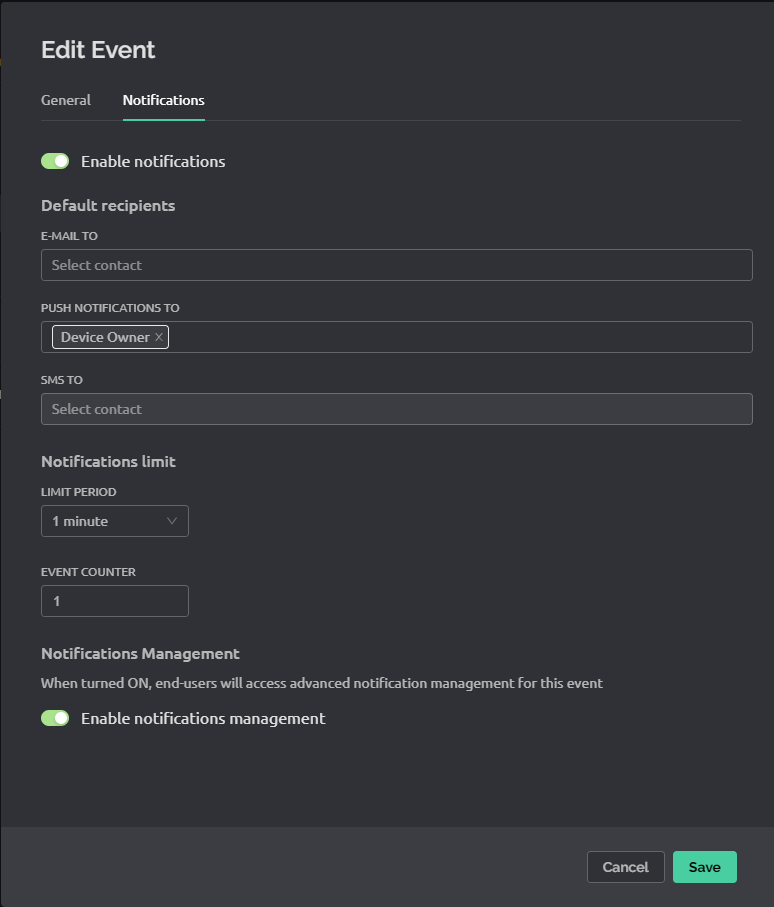
It’s important to click the “PUSH NOTIFICATIONS TO” field and select Device Owner, and I’d recommend setting the LIMIT PERIOD to 1 minute and the EVENT COUNTER to 1 at least during initial testing and until you understand more about what these settings do. I’ll cover what these settings do in more detail later.
As I said earlier, there is a limit of 100 events being logged during any 24 hour period. This is per device, so if you have multiple event types associated with that device then it’s the total number of all event types that is counted.
Notifications are also limited to 100 notifications per device per 24 hour period, but as each notification requires an event to trigger it, you can’t really reach this limit without first reaching your event limit.
In the possible use-case I described above, where you want to record events like “Irrigation System Started”, “Irrigation Complete”, “Pool Cleaning Started”, “Pool Cleaning Completed” etc. then you could log these to a single event type, maybe called “Garden Maintenance”. You don’t need notifications to tell you about these things, you just want to be able to review the log to see that they occurred and how long they took to complete.
If you needed to send a notification if something didn’t go as expected (such as the water being off so the irrigation system couldn’t start) then you’d use a different event type for this, which is linked to a notification.
How to log Events and trigger Notifications
Events are logged from the C++ sketch running on your device using the Blynk.logEvent command.
The first thing to watch out for is that this requires the EVENT CODE to be used, not the EVENT NAME
In the example I’m using here, the event code is “over_temperature_alert”

To log an event (an in this case send the associated notification) the command is:
Blynk.logEvent("over_temperature_alert");
You can also send an additional (optional) custom description like this…
Blynk.logEvent("over_temperature_alert", "Hello, this is my custom description");
In the example sketch that I’ve included below, you’ll see that I use this custom description in a more sensible way…
Blynk.logEvent("over_temperature_alert", String("The temperature is ") + t);
Note that the maximum length for this custom description is 300 characters.
This seems like a good place to explain more about how the event name, custom description and also the device name are used in notifications and the event timeline.
The role of Device Name, Event Name and Custom Description
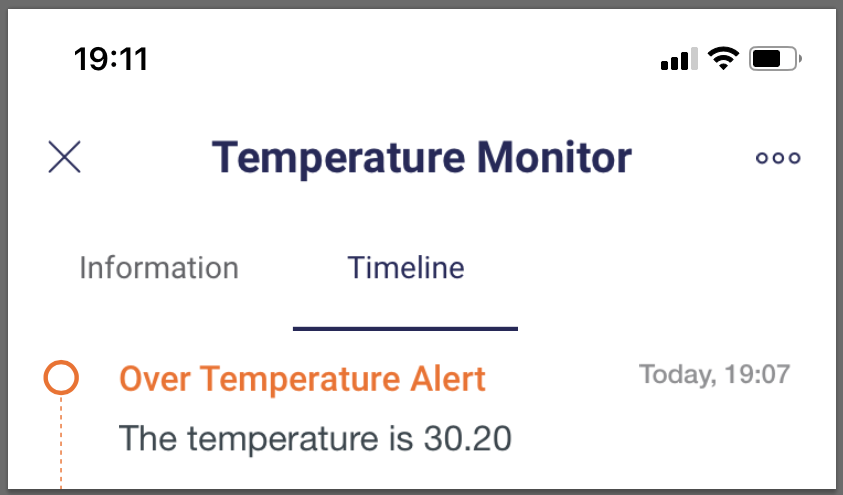
This is what a notification looks like on an iPhone when it’s locked…
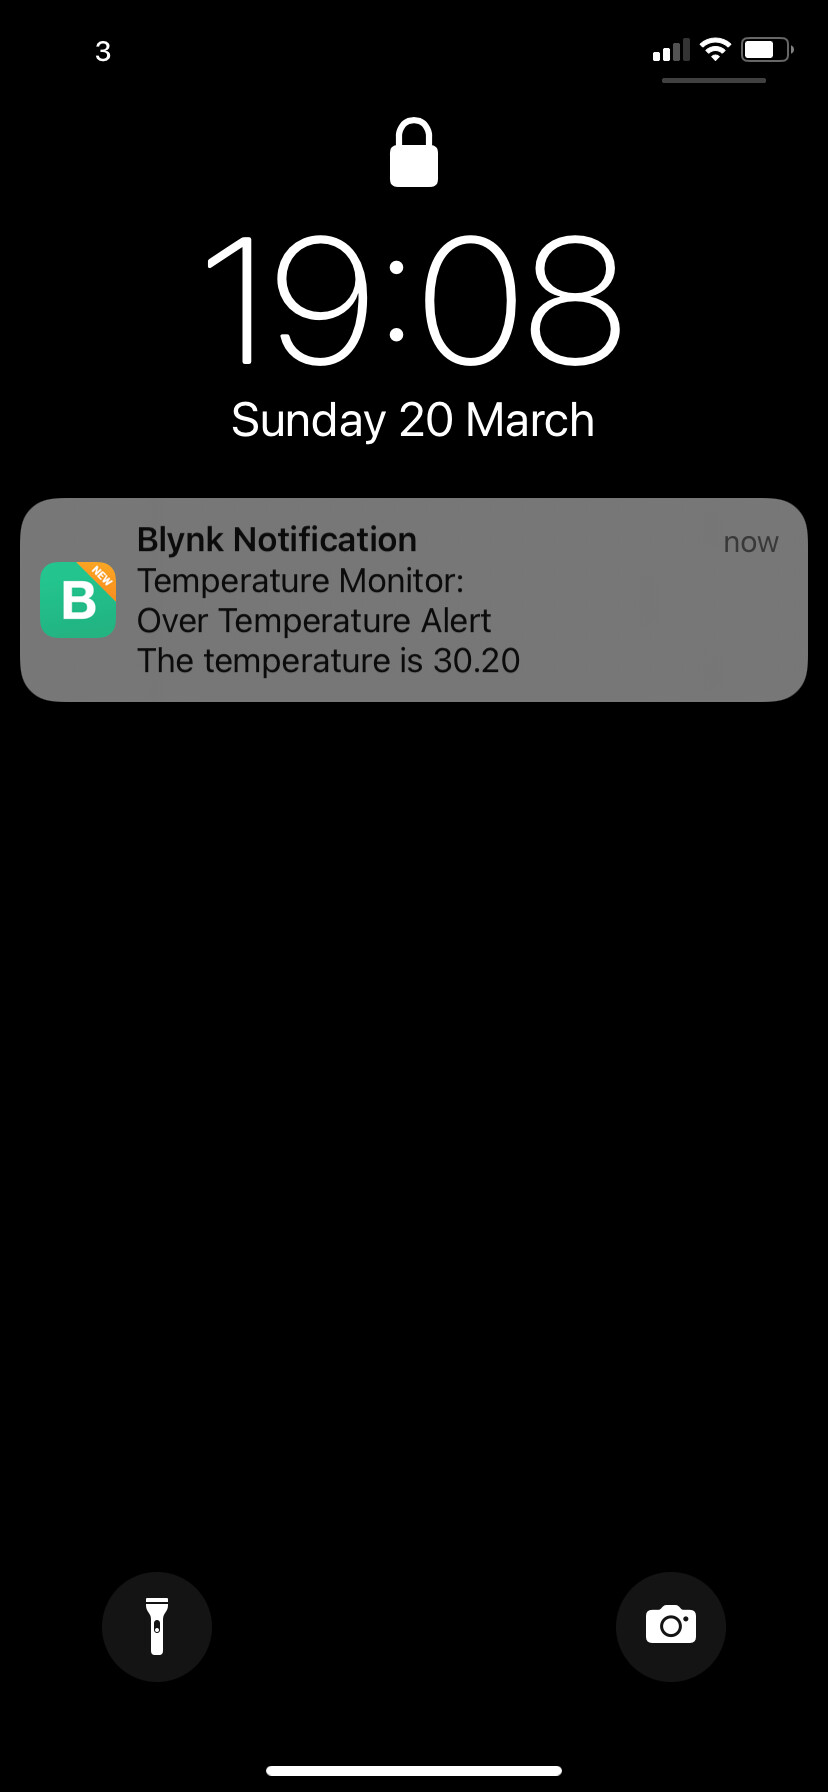

The “Temperature Monitor” text is the device name.
“Over Temperature Alert” is the Event Name (this time it’s the name, not the code that’s used)
“The temperature is 30.20” is the optional custom description that was used in the Blynk.logEvent command…
Blynk.logEvent("over_temperature_alert", String("The temperature is ") + t);
If this optional parameter is omitted from the Blynk.logEvent command then this line of text will be omitted from the alert.
As you can see, choosing sensible names for the device and event (or editing the existing names) will help to make your notifications much more meaningful.
The Event relating to this notification looks like this in the Timeline of the web console…

This is the Timeline in the app…
and this is the Notifications tab in the app…

These Timeline and Notification views of the event are only visible if you turn on the options to “Send event to Notifications tab” and “Send event to Timeline” in the event configuration screen and this is why I’d suggest that these options are enabled, at least during the initial testing phase.
Understanding the Notification Limit Period and Event Counter options
I mentioned these earlier, and this seems like a good time to explain them in more detail.
This is actually covered very well in the official documentation, which is here:
but I’ll explain it here as well, along with the drawbacks as I see them…
Limit Period
This limits how frequently notifications can be sent. If it’s left at the default 1 hour then once the first notification has been sent, you’ll have to wait at least 1 hour before the next one will be sent.
Any notifications that are triggered during this 1 hour waiting period will be ignored, but those associated events will still be logged, and will count towards your 100 events in 24 hours limit.
This means that if you log one event per minute, with an associated notification that has the Limit Period set to 1 hour, you would received a notification when the first event was logged, another when the 60th event was logged, but after 100 minutes you would have exceeded your event quota, to you wouldn’t get any more notifications for 23 hours.
The solution is, in my opinion, to set the Limit Period to 1 minute and limit the number of events that you are logging via the code in your sketch. I’ll explain how to do that later.
Event Counter
I find the name of this a bit confusing. It implies (to me at least) that this should show how many events/notifications have been sent, but in reality it’s purpose is very different.
This field allows you to specify how many events need to be received before a notification will be sent.
If you set this to 10 then the first nine Blynk.logEvents won’t trigger a notification, and the first notification will be sent when the tenth event is logged.
The next nine events (numbers 11 to 19) will also be ignored, and the second notification will be sent when the twentieth event has been logged, and so on.
Obviously this will produce unexpected results if you were trying to test a notification and had set this field to 10, but didn’t realise that you had to log ten events before one notification would be sent.
Obviously, it’s also very easy to use-up your 100 events in 24 hours when you’re using this option, especially if you use it in conjunction with the Limit Period option.
Once again, my preference is to leave this set to 1, so that each event logged will generate a notification, and to limit the number of events that you are logging via the code in your sketch.
Using “flag” variables in your sketch to limit event logging and notifications
Before we get too far into the coding side of things, I want to explain a bit about the general principals of how you can use “flag” variables within your sketch to apply a logical test that can be used to limit unnecessary events logging and associated notifications being sent.
This is something that has many other uses in programming too, such as getting a Blynk Timer to ignore a timed event if you have switched into “manual override” mode.
Obviously, “flag” isn’t a variable type within C++, its just a term we use to indicate that a logical marker has been set to a particular state so that we can check that marker and decide whether to do one thing or another.
In this case, let’s assume that we are monitoring the temperature of an object and we want to be notified if its temperature rises above a certain threshold. We want to receive one notification as soon as an over temperature event has occurred, but we don’t need to keep receiving additional notifications once every minute until the over temperature event is resolved.
The one notification we receive will alert us to the issue, then we can open the app to monitor the current temperature readings, and possibly take action to resolve the problem.
However, once the temperature has dropped below the safe threshold again, we do want to be alerted about future over temperature events, as these may be some time in the future and/or may need additional action to resolve the repeat issue.
To achieve this, we will use a Boolean (logical true or false) variable as our flag that will let us check if an alert has already been sent for this over temperature event.
In this example, I’ll call this Boolean variable alert_sent and we’ll set it to true when we use the Blynk.logEvent command to log the event that will trigger the notification.
We’ll also ‘clear’ the flag (set it back to false) when the temperature drops down to, or below, the threshold that we’ve set. This way, future over temperature events will trigger new notifications.
Our code will check to see if the temperature is above the threshold, AND our alert_sent flag is false (no notification sent yet).
If both of these conditions are met then we’ll trigger a notification and set our alert_sent flag to true
In addition, if the temperature is at or below the threshold then we’ll clear our alert_sent flag by setting it to false
An example snippet of code would look like this:
bool alert_sent = false;  // Flag to track if an alert has been sent for an over-temp event
float threshold = 30.00;  // We will send an alert if the temperature exceeds this value

void check_temp()
{
  if(reading > threshold && alert_sent == false)
  {
    // we get here if the temperature reading is above the threshold and no alert has been sent yet for this over-temp situation
      Blynk.logEvent("over_temperature_alert",  String("The temperature is ") + reading); // trigger the notification
      alert_sent = true; // set the flag to indicate that an alert has been sent for this over-temp situation
  }
  else if (reading <= threshold)
  {
    // we get here if the temperature reading is below or equal to the threshold
    alert_sent = false; // reset (clear) the flag so that a future over-temp situation will trigger an alert
  }
}
The same principal could be used to handle the manual override of an automated heating controller.
Image a system where the controller turns a boiler on when the room temperature falls below a set-point and off again when it exceeds the set-point, but we want to temporarily override that automated function for say 1 hour via a manual override button. We could use a manual_override flag and set it to true when we want to ignore the room temperature readings, then set the manual_override flag back to false again after a 1 hour timeout timer has expired.
Our control loop of code would check the state of the manual_override flag, as well as comparing the room temperature to the set-point. Only if the manual_override flag is false is the boiler controlled according to the comparison of the room temperature and the set point value.
An example sketch
In this fully working example (for an ESP8266 with a DHT sensor connected to pin D2) we take temperature and humidity reading from the DHT sensor every 10 seconds and send an alert notification if the temperature exceeds the threshold.
No further alerts will be sent until; the temperature had dropped to less than or equal to the threshold, at which point the alert_sent flag will be cleared and new alert notifications could be triggered.
#define BLYNK_TEMPLATE_ID "REDACTED"
#define BLYNK_DEVICE_NAME "REDACTED"
#define BLYNK_AUTH_TOKEN "REDACTED"

#define BLYNK_PRINT Serial

#include <ESP8266WiFi.h>
#include <BlynkSimpleEsp8266.h>
#include <DHT.h>

char ssid[] = "REDACTED";
char pass[] = "REDACTED";

char auth[] = BLYNK_AUTH_TOKEN;

#define DHTPIN 2              // DHT Data pin attached to GPIO2 (Pin D4) on the NodeMCU

float t_threshold = 30.0;     // We will send an alert if the temp exceeds this value
bool alert_sent = false;      // Flag to track if an alert has been sent for an over-temp event

// Uncomment whatever type of DHT sensor you're using!
//#define DHTTYPE DHT11       // DHT 11
#define DHTTYPE DHT22        // DHT 22, AM2302, AM2321
//#define DHTTYPE DHT21       // DHT 21, AM2301

DHT dht(DHTPIN, DHTTYPE);
BlynkTimer timer;

void take_DHT_reading()
{
  float h = dht.readHumidity();
  float t = dht.readTemperature(); // or dht.readTemperature(true) for Fahrenheit

  if (isnan(h) || isnan(t))
  {
    Serial.println("Failed to read from DHT sensor!");
    return;
  }

  Serial.print("Humidity    = ");
  Serial.println(h);
  Serial.print("Temperature = ");
  Serial.println(t);
  Serial.println();

  // Send the readings to Blynk...
  Blynk.virtualWrite(V5, h);
  Blynk.virtualWrite(V6, t);

  if(t > t_threshold && alert_sent == false)
  {
    // we get here if the temp is above the threshold and no alert has been sent yet for this over-temp situation

    Blynk.logEvent("over_temperature_alert",  String("The temperature is ") + t); // trigger the notification
    alert_sent = true; // set the flag to indicate that an alert has been sent for this over-temp situation
    Serial.println("Blynk Alert Notification sent!");
    Serial.println();
  }
  else if(t <= t_threshold && alert_sent == true)
  {
    // we get here if the temp is less than or equal to the threshold
    // but it was previously above the threshold
    // We now want to clear the alert_sent flag so that new alerts can be sent if the temp
    // exceeds the threshold again

    alert_sent = false; // reset the flag so that a future over-temp situation will trigger an alert

    Serial.println("Temperature is now equal to or below the threshold");
    Serial.println("New over-temperature events will trigger a new alert notification");
    Serial.println();
  }
}

void setup()
{
  // Debug console
  Serial.begin(74880);

  Blynk.begin(auth, ssid, pass);
  dht.begin();

  // Setup a function to be called every second
  timer.setInterval(10000L, take_DHT_reading); // take a reading from the DHT sensor every 10 seconds
}

void loop()
{
  Blynk.run();
  timer.run();
}
For these notifications to work, you need to set-up an event and corresponding notification EXACTLY as shown “Blynk IoT Events, Notifications and Limitations” section of this post.
Banana skins to avoid!
Here is a quick checklist of things to look for if your notifications aren’t working as expected (or aren’t working at all!)…
Event Name versus Event Code
The simplest mistake to make is to put the Event Name rather than the Event Code in the Blynk.logEvent command. I’ve emphasised the need to use the code several times already, but it’s the first thing to check.
Notification Settings
Ensure that you’ve added the Device Owner as the recipient of the push notifications, that that you have Limit Period set to 1 minute and Event Counter set to 1.
You should also check that you have “Send event to Notifications Tab” and “Send Event to Timeline” in the Event settings.
Don’t forget the Limitations…
- Maximum one event per minute for each user defined event type
- Maximum of 100 events in total per 24 hour period for each device (excluding online/offline events)
- The maximum length for this custom description is 300 characters
Check the Timeline
Take a look at the device Timeline in the web console (don’t forget to refresh it first) and ensure that you are looking at the correct timescale (selecting 1 Day or 1 Week is a good idea, and that the event type filter is set to “All”…

The numbers will show you if you’ve exceeded the 100 event per 24 hour limit (the 1 next to “Warning” and “All” in the screenshot show that I’ve received 1 warning type event in the past day).
If you are seeing the events being logged, but aren’t receiving any notifications on your mobile device (and you’ve checked the event Notification settings as described above) then take a look at the phone settings…
Phone Settings
- Check for “Do Not Disturb”
I spent quite a long time trying to figure out why I wasn’t receiving notifications on my iPhone, only to realise that it was late at night and my night-time Do Not Disturb settings had kicked-in, blocking my notifications. - Check for permissions
Ensure that the new Blynk app has the correct permissions for notifications, and that your phone is set-up to show notifications on the lock screen (obviously the way that this works will vary according to the phone’s OS).
Using the HTTP(s) API to log Events and send Notifications
Blynk IoT has an HTTP(s) API call for logging events and sending related notifications.
The API is documented here:
and it’s worth reading the API troubleshooting section here if you are experiencing issues that may relate to the Geo DNS issue:
As with the C++ library, the API requires the Event Code rather than description, and allows the use of an optional custom description. Note - please see post #2 in this topic for information about a bug (or different behaviour) when using the HTTPS API to add custom descriptions to events that don’t have notifications enabled
One thing to look out for is that the custom description can’t include spaces. If you wanted to use &description=Hello World then you’d need to replace the space with the %20 character like this:
&description=Hello%20World
If you want to log events or send notifications from Node-Red then you need to use the API for that, and exactly how to do this is discussed here in detail here…
PLEASE - Don’t post general Event/Notification questions in this topic
As usual, I’ll leave this topic open for constructive comments, as I’d like to know if there are any mistakes, ambiguities or important areas that I’ve forgotten to cover.
However, I’d like the topic to be a simple reference for others to follow, so don’t want it to be cluttered-up with “I can’t get notifications working, please help me” type of comments. If you post these types of comments then they will simply deleted.
Pete.
