Using the MCP23017 IO Expansion Board

EDIT NOVEMBER 2021…

Anyone interested in controlling multiple relays may also want to take a look at this topic, which uses a pre-built 16-way relay board and 2x 74hc595 shift registers:

END OF EDIT
.

I had a project recently where I wanted to use 5 physical buttons, with built-in LED indicators, to control 5 relays. That meant having 15 GPIOs available, so I built the project around an ESP32 dev board. I also needed a few more GPIO pins for other sensors, so by the time I was done I was on the verge or running out of pins.

A post about the MCP23017 IO Expansion Board caught my attention and when I investigated these a bit further, I decided to order a couple of the Waveshare MCP23017 boards. These cost around $4 each.

The boards use I2C to give an additional 16 pins, and multiple boards can be daisy-chained together if needed. Up to 8 boards can be daisy-chained in this way to give up to 128 additional GPIOs!

I started-off using one board on its own, then moved-on to daisy-chaining a second board once I’d learned a bit more about how they work and some of their quirks.
This first post concentrates on describing a bit about the boards when operated individually, then in the second post I discuss what I found when I daisy-chained two boards together.

The Waveshare MCP23017 hardware

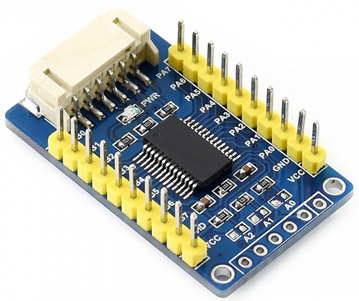
The boards can operate on 3.3 or 5v logic levels and are just a bit larger than a Wemos D1 Mini.
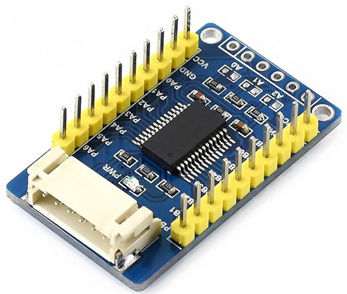
image image
image
image

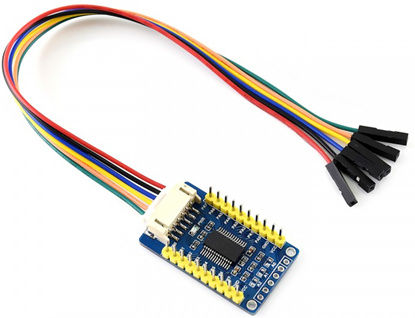
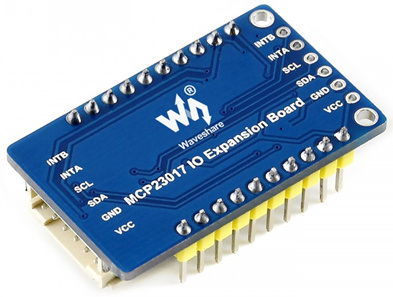
They have a socket at one end, with a lead that has Dupont connectors on it which makes it easy to connect to your MCU, and plated-through holes at the other end to allow you to solder in a connector (which isn’t provided) to allow another board to be daisy-chained off of the first one. I used right angle pins when soldered into these connectors, but regular header pins would also work fine.

There are two rows of 0.1” pitch pins on each side and these are labelled PA0-PA7 and PB0-PB7, plus GND and VCC pins.

The test scenario

The scenario I’m going to cover in this mini tutorial is very simple – having eight physical pushbutton switches connected to one side of the expander board (PA0-PA7), and an 8-way active LOW relay board connected to the other side (PB0-PB7).
Pushing one of these physical switches will toggle the corresponding relay. I’ve also added 8 switch widgets connected to virtual pins in the Blynk app and these will mirror the state of the relays and allow the relays to be controlled individually from the app.
When the NoderMCU connects/reconnects to Blynk the state of the relays will be synchronised with the switch widget settings in the app via the BLYNK_CONNECTED() callback function.

The expander board will be connected to a NodeMCU board using the standard SCL (D1) and SDA (D2) pins and powered from the NodeMCU. The relay board is powered separately but shares a common ground with the NodeMCU/mcp expander.

I chose to use the Adafruit MCP23017 library. This appears to be the same as the one provided by Waveshare (with the exception that the library name and the mcp object used in the code are prefixed with “Adafruit_”). Neither of the libraries and the documentation are great, although I guess that the guys from Adafruit may be a bit more proactive about developing theirs in future.
Here’s a link to the library:

I’m using version 1.0.6 (you can find the version number in the library.properties file).

Interrupts
I wanted to use interrupts to detect when one of the physical buttons on the mcp expander is pressed, as scanning a large number of buttons in sequence would be fairly impractical. The facility to use interrupts was one of the things that attracted me to these MCP23017 boards, along with the I2C interface, so that’s where I started playing around.

The theory is that one pin of the NodeMCU is used to detect an interrupt that occurs on any of the MCP23017 boards, then the MCP23017 is interrogated to find out which pin, on which expander board was responsible for triggering the interrupt.
Unfortunately, I couldn’t get any of the interrupt code examples to work, even after updating them to use the ICACHE_RAM_ATTR attribute on the ISR callback function. The examples were also very badly written (certainly from a Blynk friendliness point of view) as all the processing is done in the void loop() once an interrupt is detected.

After stripping the code back to the bare essentials I managed to make some headway, then discovered the first quirk of using these boards – when an interrupt is detected it needs to be cleared before additional interrupts can be handled. This is hinted-at in the documentation and the code examples, but the method used to clear the interrupt isn’t compatible with the NodeMCU instruction set.

It turns-out that the way to clear the interrupt is simply to perform an mcp.digitalRead on the pin that triggered the interrupt.

The second quirk is that if you don’t successfully clear the interrupt register using the mcp.digitalRead() command then the only way of clearing it is to remove the power from the MCP23017 board.
Simply resetting the NodeMCU or re-flashing it with updated code will not clear the MCP23017’s interrupt register. As I have the expander boards powered from my NodeMCU, it was a case of pulling the power from the NodeMCU to clear the MCP23017’s interrupt register, and re-starting the IDE’s serial monitor to be able to see debug messages.

I thought I had this problem solved by putting an mcp.digitalRead() command in my interrupt service routine, but I found that I was still having issues. It turned-out that I was stopping interrupts on the NodeMCU while the ISR executed, but this didn’t stop interrupts occurring on the expander board, which weren’t being detected and therefore not being cleared.

Eventually I added a function called clear_mcp_interrupts() which loops through all of the expander board’s pins that have interrupts attached and does an mcp.digitalRead() on each one in turn. This seemed to be quite a clunky solution, but it worked well and doesn’t seem to slow-down the responsiveness of the boards (at least with two boards and 16 interrupts in total).

I then added a call to this clear_mcp_interrupts() function in void setup() so that all interrupts can be reset simply by rebooting the NodeMCU.

As I said earlier, the 16 GPIO pins on the MCP23017 are arranged in two banks, one on each side of the board. They are labelled PA0 to PA7 for bank A and PB0 to PB7 for bank B.

There are two interrupt output lines that could be used to connect to pins on the NodeMCU, one for each bank of pins and these are labelled INTA and INTB. .However, there is a way to tie these together in the code, so that an interrupt generated by any of the pins on either bank will trigger both the INTA and INTB outputs, so that only one of these interrupt lines needs to be used.
There doesn’t seem to be any reason to use the two separate interrupt lines, and some other makes of MCP23017 boards only appear have one of these available, so I’m a bit confused about why we would need two of them.

I’m sticking with using just one (it doesn’t matter which) and initialising the mcp.setupInterrupts() command in a way that ties both banks together.
Interrupts can be defined as RISING, FALLING or CHANGE as usual, although there seems to be a relationship with this and the way that the mcp.setupInterrupts() command works that I haven’t quite gotten to grips with yet (but that doesn’t matter for this example)

When an interrupt triggers you can find out which pin was responsible by using the mcp.getLastInterruptPin() command.

You can also get the value of the pin using the mcp.getLastInterruptPinValue() command. This isn’t much use when using RISING (in which the value will always be 1) or FALLING (in which the value will always be 0), but it may be useful when using CHANGE interrupts.
As I’m only using FALLING interrupts in this sketch the mcp.getLastInterruptPinValue() command doesn’t make an appearance and I haven’t explored anything other than FALLING interrupts so far

Now, here’s the bit I don’t understand yet…
The mcp.setupInterrupts() command has three parameters. These are Mirroring, OpenDrain and Polarity.

Mirroring is simple – if it’s set to true then the INTA and INTB interrupt lines are tied together, they mirror each other.
The documentation for the other two parameters is very confusing (for me at least) and here’s what I’ve found in the comments of the examples and in the libraries:

OpenDrain says that if set to false the INTA/B will not be floating and the library says “will set the INT pin to value [presumably if false] or open drain [presumably if true]”. I have no idea what this means in practice, as the only way that I’ve managed to get FALLING interrupts to work is with this set to true, so that’s the setting I’m using.

Polarity if set to LOW then interrupts will be signalled with a LOW
This presumably means that when set to LOW the INTA or INTB lines will go from HIGH to LOW when an interrupt is detected on any of the interrupt pins.
As I’m using INTA connected to GPIO14 on my NodeMCU and have a FALLING interrupt attached to GPIO14 to tell me when an interrupt has occurred from one of the expander pins, leaving this set to LOW is as far as I’ve gone with this setting.

I’m therefore using the following command in my sketch, with FALLING interrupts:

mcp.setupInterrupts(true,false,LOW);

So INTA/B are mirrored, INTA/B are not floating and an interrupt is signalled with a LOW signal.
I guess if you use anything other than FALLING interrupts on either your expander pins or your NodeMCU then you may need to re-visit this bit of the code.

I2C addresses
By default, the Waveshare board uses 0x27 as the I2C address. This can be changed by adding solder bridges to pads labelled A0, A1 and A2 on the top of the board. If you are daisy-chaining multiple MCP23017 boards together then each board must have a unique address.
In the same way, if you are using other devices or sensors on your I2C bus then either the address of the MCP23017 or the other device(s) may need to be changed to avoid a conflict. In the code example below for a single expander board I’m using the default address of 0x27 (none of the contacts at A0, A1 or A2 are bridged).

Below is a table of how the I2c address can be changed by bridging different combinations of the A0, A1 and A2 pads…

Addr(BIN) Addr(hex) ID A2 A1 A0
0100111 0x27 7 0 0 0 <--- Default for the WaveShare Board
0100110 0x26 6 0 0 1
0100101 0x25 5 0 1 0
0100100 0x24 4 0 1 1
0100011 0x23 3 1 0 0
0100010 0x22 2 1 0 1
0100001 0x21 1 1 1 0
0100000 0x20 0 1 1 1

Initialising the expander pins
Pins are initialised with an mcp.pinMode statement in a very similar way to how you’d initialise a regular GPIO pin in your void setup()

They can also be pulled-up (although the syntax for this is a little odd – see below), and defined as having an interrupt attached to them (the syntax is ‘setup’ as opposed to the ‘attach’ that you’d use with a regular GPIO pin).

Here’s why I find the pullUp syntax a little odd…
This command turns on the internal 10k pullup resistor:
mcp.pullUp(mcp_pin_PA3, HIGH);

Presumably, mcp.pullUp(mcp_pin_PA3, LOW); has the opposite effect pull it LOW – I’ve not tested this.
Either way, I’d have preferred to see opposing pullUP and pullDOWN commands, or at least seen true or false as the pullUp parameters rather than HIGH or LOW – but maybe I’m just being picky.

Wiring it all up
NodeMCU Expansion Board A

3v3 VCC (Red wire)
GND GND (Black Wire)
D2 (GPIO4) SDA (Blue wire)
D1 (GPIO5) SCL (Yellow wire)
D5 (GPIO14) INTA (Orange wire
Not Connected INTB (Green wire)

Eight physical buttons are connected to pins PA0 to PA7 and the other side of the buttons are connected to GND on the expansion board

Relay Board Expansion Board A

In1 PB0
In2 PB1
In3 PB2
In4 PB3
In5 PB4
In6 PB5
In7 PB6
In8 PB7
GND GND

Relay board VCC and GND are connected to a separate 3.3v supply

Eight Blynk button widgets in push mode are connected to virtual pins V0 to V7.

Enough talking, let’s see the code
This code originally looked a bit different, but when I started daisy-chaining the boards together I learned a few things that lead me to change the single-board code to make it easier to adapt to working with multiple boards daisy-chained together.

In the syntax example I’ve used above, I’ve used the mcp object, but actually you have to define a separate object for each board in the daisy-chain. To make things slightly less confusing, I’ve used mcp_A, mcp_B etc. as the object names. In this single board example I’m just using mcp_A as the object name.

#define BLYNK_PRINT Serial
#include <ESP8266WiFi.h>
#include <BlynkSimpleEsp8266.h>

#include <Wire.h>
#include "Adafruit_MCP23017.h"  // https://github.com/adafruit/Adafruit-MCP23017-Arduino-Library

char auth[] = "REDACTED";
char ssid[] = "REDACTED";
char pass[] = "REDACTED";


// Connect pin SCL of the expander (mcp_A) to SCL (D1)
// Connect pin SDA of the expander (mcp_A) to SDA (D2)
// Connect pin INTA or INTB of the expander (mcp_A) to ESP8266 pin D5 (GPIO14)
// don't solder A0,A1,A2 (default ID of 7) on the expander (mcp_A)
// Connect 8 physical momentary push buttons to mcp_A pins 0 to 7 inclusive (labelled PA0 to PA7), with the other side of the button connected to GND
// Connect an 8-way Active LOW relay board to mcp_A pins 8 to 15 inclusive (labelled PB0 to PB7 inclusive)
// Attach Blynk button widgets (in Switch mode) to virtual pins 0 to 7 inclusive. These mirror the physical momentary buttons of mcp_A pins PA0 to PA7

    /*
    The begin() param can be 0 to 7, the default param is 7 (no solder bridges on A0, A1 & A2) giving an address of 0x27.
    Addr(BIN)  Addr(hex)   ID   A2  A1  A0
    010 0111    0x27        7      0   0   0   <--- Default for WaveShare Board
    010 0110    0x26        6      0   0   1
    010 0101    0x25        5      0   1   0 
    010 0100    0x24        4      0   1   1
    010 0011    0x23        3      1   0   0
    010 0010    0x22        2      1   0   1 
    010 0001    0x21        1      1   1   0 
    010 0000    0x20        0      1   1   1 
    */

// Create the mcp object
Adafruit_MCP23017 mcp_A;

// Define the interrupt pin on the MCU
int esp_interrupt_pin=14; // GPIO14 (D5)

volatile unsigned long last_interrupt; // Used to store the time in millis of the last interrupt, for debouncing
int debounce_delay = 100;              // The minimum delay in milliseconds between button presses, for debouncing

volatile uint8_t pin_num;   // when an interrupt is detected and decoded the pin which generated the interrupt is stored here 

// Define friendly names for the pins...

// These mcp_A pins will have physical buttons connected to them, with the other side connected to ground.
//  the pins will be pulled-up when we declare them later...
byte mcp_A_pin_PA0=0;
byte mcp_A_pin_PA1=1;
byte mcp_A_pin_PA2=2;
byte mcp_A_pin_PA3=3;
byte mcp_A_pin_PA4=4;
byte mcp_A_pin_PA5=5;
byte mcp_A_pin_PA6=6;
byte mcp_A_pin_PA7=7;

// These mcp_A pins will be connected to an 8-way relay board, which is Active LOW
//  so the relays activate when the pin is pulled LOW.
//  These pins will also be pulled-up and initialised as HIGH when we declare them later...
byte mcp_A_pin_PB0=8;
byte mcp_A_pin_PB1=9;
byte mcp_A_pin_PB2=10;
byte mcp_A_pin_PB3=11;
byte mcp_A_pin_PB4=12;
byte mcp_A_pin_PB5=13;
byte mcp_A_pin_PB6=14;
byte mcp_A_pin_PB7=15;


// Interrupt handler for pins mcb_A pins 0-7
void ICACHE_RAM_ATTR intCallBack()
{
  noInterrupts();
  pin_num = mcp_A.getLastInterruptPin();

  if(millis()-last_interrupt>=debounce_delay)  // Debounce routine
  {
    // for debugging only...
    Serial.println("_-_-_-_-_-_-_-_-_-_-_-_-_-_-_-");
    Serial.println("A button has been pressed!!!");
    Serial.print("Pin = ");
    Serial.println(pin_num);
    Serial.println("_-_-_-_-_-_-_-_-_-_-_-_-_-_-_-");
    Serial.println();
    
    process_button_press();  // Call the function that will activate the correct relay etc. 
  }
  last_interrupt=millis();
  interrupts();
  clear_mcp_interrupts(); // Call the function that clears all of the interrupt registers
}


void process_button_press()
{
  int current_pin_state = mcp_A.digitalRead(pin_num + 8);     // Get the current state of the pin
  mcp_A.digitalWrite(pin_num + 8, !current_pin_state);        // Write the opposite state to the pin to toggle it

  // This code assumes that we have Blynk button widgets (in Switch mode) on virtual pins that are numbered the same
  // as the ones used for the physical buttons (V0 = MCP Pin 0, V1 = MCP Pin 1 etc)

  // As the relays are Active LOW then we need to write the opposite state to the Blynk switch widget than we do to the MCP pin...
  // Relay = Off (HIGH or 1) then Blynk button widget = 0
  // Relay = On (LOW or 0) then Blynk button widget = 1
  Blynk.virtualWrite(pin_num, current_pin_state);
}

BLYNK_WRITE_DEFAULT()
{
  int widget_pin = request.pin;      // Which virtual pin triggered this BLYNK_WRITE_DEFAULT callback?
  int widget_value = param.asInt();  // Get the value from the virtual pin (O = off, 1 = on)

  mcp_A.digitalWrite(widget_pin + 8, !widget_value);            // Write the opposite state to the pin on mcp_A to toggle the relay
}


void setup(){
  
  Serial.begin(74880);

  pinMode(esp_interrupt_pin,INPUT); // Initialise the MCU pin used for the Interrupt line (INTA or INTB on the Waveshare board)
 
  mcp_A.begin(7); // default address, no solder pads bridged
  
  // We mirror INTA and INTB, so that only one line is required between MCP and Arduino for int reporting
  // The INTA/B will not be Floating 
  // INTs will be signalled  with a LOW
  mcp_A.setupInterrupts(true,false,LOW);

  // In this next section I could have used the friendly names (0-15) defined in the declarations, but chose to stick with the
  // names screen-printed on the mcp board to aid wiring and debugging. 

  
  // In the following blocks of code we declare each of our pins that will be used for interrupts (Pins 0-7) on mcb_A
  // If other pins have interrupts assigned to them then they must be added to the clear_mcp_interrupts() function

  // configuration for a button PA0 on mcb_A
  // interrupt will trigger when the pin is taken to ground by a pushbutton
  mcp_A.pinMode(mcp_A_pin_PA0, INPUT);
  mcp_A.pullUp(mcp_A_pin_PA0, HIGH);  // turn on a 100K pullup internally
  mcp_A.setupInterruptPin(mcp_A_pin_PA0,FALLING);  
  
  // configuration for a button PA1 on mcb_A
  // interrupt will trigger when the pin is taken to ground by a pushbutton
  mcp_A.pinMode(mcp_A_pin_PA1, INPUT);
  mcp_A.pullUp(mcp_A_pin_PA1, HIGH);  // turn on a 100K pullup internally
  mcp_A.setupInterruptPin(mcp_A_pin_PA1,FALLING); 

  // configuration for a button PA2 on mcb_A
  // interrupt will trigger when the pin is taken to ground by a pushbutton
  mcp_A.pinMode(mcp_A_pin_PA2, INPUT);
  mcp_A.pullUp(mcp_A_pin_PA2, HIGH);  // turn on a 100K pullup internally
  mcp_A.setupInterruptPin(mcp_A_pin_PA2,FALLING); 

  // configuration for a button PA3 on mcb_A
  // interrupt will trigger when the pin is taken to ground by a pushbutton
  mcp_A.pinMode(mcp_A_pin_PA3, INPUT);
  mcp_A.pullUp(mcp_A_pin_PA3, HIGH);  // turn on a 100K pullup internally
  mcp_A.setupInterruptPin(mcp_A_pin_PA3,FALLING); 

  // configuration for a button PA4 on mcb_A
  // interrupt will trigger when the pin is taken to ground by a pushbutton
  mcp_A.pinMode(mcp_A_pin_PA4, INPUT);
  mcp_A.pullUp(mcp_A_pin_PA4, HIGH);  // turn on a 100K pullup internally
  mcp_A.setupInterruptPin(mcp_A_pin_PA4,FALLING); 

  // configuration for a button PA5 on mcb_A
  // interrupt will trigger when the pin is taken to ground by a pushbutton
  mcp_A.pinMode(mcp_A_pin_PA5, INPUT);
  mcp_A.pullUp(mcp_A_pin_PA5, HIGH);  // turn on a 100K pullup internally
  mcp_A.setupInterruptPin(mcp_A_pin_PA5,FALLING); 

  // configuration for a button PA6 on mcb_A
  // interrupt will trigger when the pin is taken to ground by a pushbutton
  mcp_A.pinMode(mcp_A_pin_PA6, INPUT);
  mcp_A.pullUp(mcp_A_pin_PA6, HIGH);  // turn on a 100K pullup internally
  mcp_A.setupInterruptPin(mcp_A_pin_PA6,FALLING); 
  
  // configuration for a button PA7 on mcb_A
  // interrupt will trigger when the pin is taken to ground by a pushbutton
  mcp_A.pinMode(mcp_A_pin_PA7, INPUT);
  mcp_A.pullUp(mcp_A_pin_PA7, HIGH);  // turn on a 100K pullup internally
  mcp_A.setupInterruptPin(mcp_A_pin_PA7,FALLING); 


  // In the following blocks of code we declare each of our pins that will be used to control the relays (Pins 8-15) on mcb_A

  // configuration for a button PB0 on mcb_A
  mcp_A.pinMode(mcp_A_pin_PB0, OUTPUT);
  mcp_A.pullUp(mcp_A_pin_PB0, HIGH);  // turn on a 100K pullup internally
  mcp_A.digitalWrite(mcp_A_pin_PB0, HIGH);

  // configuration for a button PB1 on mcb_A
  mcp_A.pinMode(mcp_A_pin_PB1, OUTPUT);
  mcp_A.pullUp(mcp_A_pin_PB1, HIGH);  // turn on a 100K pullup internally
  mcp_A.digitalWrite(mcp_A_pin_PB1, HIGH);

  // configuration for a button PB2 on mcb_A
  mcp_A.pinMode(mcp_A_pin_PB2, OUTPUT);
  mcp_A.pullUp(mcp_A_pin_PB2, HIGH);  // turn on a 100K pullup internally
  mcp_A.digitalWrite(mcp_A_pin_PB2, HIGH);

  // configuration for a button PB3 on mcb_A
  mcp_A.pinMode(mcp_A_pin_PB3, OUTPUT);
  mcp_A.pullUp(mcp_A_pin_PB3, HIGH);  // turn on a 100K pullup internally
  mcp_A.digitalWrite(mcp_A_pin_PB3, HIGH);

  // configuration for a button PB4 on mcb_A
  mcp_A.pinMode(mcp_A_pin_PB4, OUTPUT);
  mcp_A.pullUp(mcp_A_pin_PB4, HIGH);  // turn on a 100K pullup internally
  mcp_A.digitalWrite(mcp_A_pin_PB4, HIGH);

  // configuration for a button PB5 on mcb_A
  mcp_A.pinMode(mcp_A_pin_PB5, OUTPUT);
  mcp_A.pullUp(mcp_A_pin_PB5, HIGH);  // turn on a 100K pullup internally
  mcp_A.digitalWrite(mcp_A_pin_PB5, HIGH);

  // configuration for a button PB6 on mcb_A
  mcp_A.pinMode(mcp_A_pin_PB6, OUTPUT);
  mcp_A.pullUp(mcp_A_pin_PB6, HIGH);  // turn on a 100K pullup internally
  mcp_A.digitalWrite(mcp_A_pin_PB6, HIGH);
    
  // configuration for a button PB7 on mcb_A
  mcp_A.pinMode(mcp_A_pin_PB7, OUTPUT);
  mcp_A.pullUp(mcp_A_pin_PB7, HIGH);  // turn on a 100K pullup internally
  mcp_A.digitalWrite(mcp_A_pin_PB7, HIGH);

  clear_mcp_interrupts(); // Call the function that clears all of the interrupt registers

  Blynk.begin(auth, ssid, pass);

  // Here we attach an interrupt to the MCU pin that will be used to listen for interrupts from the mcp_A...
  attachInterrupt(digitalPinToInterrupt(esp_interrupt_pin),intCallBack,FALLING);
}


void clear_mcp_interrupts()
{
  for(int loop=0;loop<=7;loop++) // Loop through the 8 pins on mcp_A that have interrupts attached
  {
    mcp_A.digitalRead(loop);    // Read the pin to clear the interrupt register for that pin
  }
  // If interrupts are assigned to other pins then they must be added to this function 
}


BLYNK_CONNECTED()
{
  // This code runs when the MCU connects or re-connects to the Blynk server
  // We want to get the latest widget switch values and update the relays so that they match this

  // Loop through pins 0-7 and do a Blynk.syncVirtual
  // If more pins are used that relate to additional mcps, or different patterns of virtual pins are used on the existing mcps
  // the this for loop range will need to be adjusted...
  
  for(int loop=0;loop<=7;loop++) 
  {
    Blynk.syncVirtual(loop); // This forces the BLYNK_WRITE_DEFAULT callback function to trigger for each virtual pin in turn 
  }
}

 
void loop()
{
  Blynk.run();
}

The next post will cover using multiple MCP23017 boards daisy-chained together…

Pete.
4 Likes

This second post looks at expanding on the code used in post #1 to add a second daisy-chained MCP23017 to the first one.

I2C addresses when using multiple boards

As stated before, it’s possible to have up to 8 boards linked together, to give a total of 128 GPIO pins. If you feel that masochistic then I’ve added comments that allow you to see where blocks of code would need to be duplicated (and adjusted slightly in some cases) to increase the number of boards used.

Each board MUST have a unique I2C address and these are set by adding solder bridges to the pads labelled A0, A1 and A2 as described in the first post.

Interrupts when using multiple boards

This is probably the worst documented aspect of these boards.

I’ve found a method that works, but have no idea if it’s the ‘proper’ way of doing things…

As I said in post #1, you have to define a separate object for each board. I’ve used mcp_A, mcp_B etc. as the object names.

When an interrupt occurs, you get the expander pin number that triggered the interrupt by reading the getLastInterruptPin(), but you have to do this for each board in the daisy-chain. If the interrupt occurred on one of the pins on the board that that you are interrogating then you’ll get a result of 0-15, depending on which pin it was, or 255 if it wasn’t on that board.

This means you have to cycle through the boards using x = mcp_A. getLastInterruptPin(), x = mcp_B. getLastInterruptPin() etc until x<255.

You then know which board, and which pin on that board triggered the interrupt.

Don’t forget what I said about needing to clear the interrupt register of the appropriate pin on the appropriate board by doing a mcp_x.digitalRead()

This is done in the clear_mcp_interrupts() function, so every board/pin combination which has an interrupt attached to it must be included in this function.

The multiple board test scenario

To keep things simple, I’ve just echoed the test scenario I used in the first post – Board A works exactly the same way as in post #1 - pins PA0-PA7 have physical pushbuttons attached, pins PA0-PA7 have active LOW relays attached, virtual pins 0-7 have button widgets in push mode attached that mirror the physical buttons on PA0-PA8.

Board B is almost identical - pins PA0-PA7 have physical pushbuttons attached, pins PA0-PA7 have active LOW relays attached. The only difference is that because we’ve already used virtual pins 0-7, we use virtual pins 8-15 to mirror the physical buttons on Board B PA0-PA8.

In reality of course, the code would be much simpler if all 16 pins on Board A had physical pins attached and used interrupts to trigger the operation of the relays, all of which would be connected to Board B. I’ve not restructured it to work in that way, as I wanted to show how to handle interrupts from multiple boards as described above.

Some of the code initialisation operations could be performed using for loops, arrays or simply shorthand declarations. I’ve not chosen to go down that route with this example, as it makes the code harder to unpick and adapt to different scenarios. It is starting to get cumbersome with just 2 boards giving 32 extra GPIOs, but hopefully most people won’t feel the need to go much bigger than this.

Splitting the code into multiple tabs would also make it easier to navigate, but that also makes it more difficult to share here, so I’ve kept everything in one place.

Wiring it all up for multiple boards

NodeMCU Expansion Board A

3v3 VCC (Red wire)
GND GND (Black Wire)
D2 (GPIO4) SDA (Blue wire)
D1(GPIO5) SCL (Yellow wire)
D5 (GPIO14) INTA (Orange wire
Not Connected INTB (Green wire)

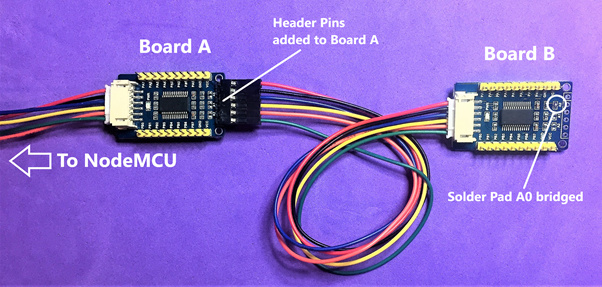
Solder a 6-pin 0.1” header into the plated-through holes on Expansion Board A, and connect the corresponding pins on Expansion Board B:

Expansion Board A Expansion Board B

VCC VCC (Red wire)
GND GND (Black Wire)
SDA SDA (Blue wire)
SCL SCL (Yellow wire)
INTA INTA (Orange wire
INTB INTB (Green wire

image

Eight physical buttons are connected to pins PA0 to PA7 on Expansion Board A and the other side of the buttons are connected to GND on the expansion board

Eight physical buttons are connected to pins PA0 to PA7 on Expansion Board B and the other side of the buttons are connected to GND on the expansion board

Relay Board A Expansion Board A

In1 PB0
In2 PB1
In3 PB2
In4 PB3
In5 PB4
In6 PB5
In7 PB6
In8 PB7
GND GND

Relay Board A VCC and GND are connected to a separate 3.3v supply

Relay Board B Expansion Board B

In1 PB0
In2 PB1
In3 PB2
In4 PB3
In5 PB4
In6 PB5
In7 PB6
In8 PB7
GND GND

Relay Board B VCC and GND are connected to a separate 3.3v supply (the same one as used for Relay Board A, but separate from the NodeMCU power supply)

Eight Blynk button widgets in push mode are connected to virtual pins V0 to V7 to control the relays on Expansion Board A

Eight Blynk button widgets in push mode are connected to virtual pins V8 to V15 to control the relays on Expansion Board B

The multiple board code


#define BLYNK_PRINT Serial
#include <ESP8266WiFi.h>
#include <BlynkSimpleEsp8266.h>

#include <Wire.h>
#include "Adafruit_MCP23017.h"  // https://github.com/adafruit/Adafruit-MCP23017-Arduino-Library

char auth[] = "REDACTED";
char ssid[] = "REDACTED";
char pass[] = "REDACTED";

// Connect pin SCL of the first expander (mcp_A) to SCL (D1)
// Connect pin SDA of the first expander (mcp_A) to SDA (D2)
// Connect pin INTA or INTB of the first expander (mcp_A) to ESP8266 pin D5 (GPIO14)
// don't solder A0,A1,A2 (default ID of 7) on the first expander (mcp_A)
// Connect 8 physical momentary push buttons to mcp_A pins 0 to 7 inclusive (labelled PA0 to PA7), with the other side of the button connected to GND
// Connect an 8-way Active LOW relay board to mcp_A pins 8 to 15 inclusive (labelled PB0 to PB7 inclusive)
// Attach Blynk button widgets (in Switch mode) to virtual pins 0 to 7 inclusive. These mirror the physical momentary buttons of mcp_A pins PA0 to PA7


// Solder 0.1" pitch pins to the connections at the far end of mcp_A and 
// connect the corresponding wires from mcp_B on to these (INTB to INTB, INTA to INTA etc)
// solder A0 (to give an ID of 6) on the second expander (mcp_B)
// Connect 8 physical momentary push buttons to mcp_B pins 0 to 7 inclusive (labelled PA0 to PA7), with the other side of the button connected to GND
// Connect a second 8-way Active LOW relay board to mcp_B pins 8 to 15 inclusive (labelled PB0 to PB7 inclusive)
// Attach Blynk button widgets (in Switch mode) to virtual pins 8 to 15 inclusive. These mirror the physical momentary buttons of mcp_B pins PA0 to PA7

// If additional mcp boards are added (C, D, E etc) then connectors need to be soldered to the previous board in the daisy chain to allow them to connect together
// and each board needs to have a unique I2C address/ID, see below for details..

    /*
    The begin() param can be 0 to 7, the default param is 7 (no solder bridges on A0, A1 & A2) giving an address of 0x27.
    Addr(BIN)  Addr(hex)   ID   A2  A1  A0
    010 0111    0x27        7      0   0   0   <--- Default for WaveShare Board
    010 0110    0x26        6      0   0   1
    010 0101    0x25        5      0   1   0 
    010 0100    0x24        4      0   1   1
    010 0011    0x23        3      1   0   0
    010 0010    0x22        2      1   0   1 
    010 0001    0x21        1      1   1   0 
    010 0000    0x20        0      1   1   1 
    */


// Create the instances of the mcp objects
Adafruit_MCP23017 mcp_A;
Adafruit_MCP23017 mcp_B;
// duplicate the above code if additional mcp boards are added to the daisy chain 

// Define the interrupt pin on the MCU
int esp_interrupt_pin=14; // GPIO14 (D5)

volatile unsigned long last_interrupt; // Used to store the time in millis of the last interrupt, for debouncing
int debounce_delay = 100;              // The minimum delay in milliseconds between button presses, for debouncing


volatile int mcp_device_ID; // when an interrupt is detected and decoded the device which generated the interrupt is stored here 
volatile uint8_t pin_num;   // when an interrupt is detected and decoded the pin which generated the interrupt  is stored here 


// Define friendly names for the pins...

// These mcp_A pins will have physical buttons connected to them, with the other side connected to ground.
//  the pins will be pulled-up when we declare them later...
byte mcp_A_pin_PA0=0;
byte mcp_A_pin_PA1=1;
byte mcp_A_pin_PA2=2;
byte mcp_A_pin_PA3=3;
byte mcp_A_pin_PA4=4;
byte mcp_A_pin_PA5=5;
byte mcp_A_pin_PA6=6;
byte mcp_A_pin_PA7=7;

// These mcp_A pins will be connected to an 8-way relay board, which is Active LOW
//  so the relays activate when the pin is pulled LOW.
//  These pins will also be pulled-up and initialised as HIGH when we declare them later...
byte mcp_A_pin_PB0=8;
byte mcp_A_pin_PB1=9;
byte mcp_A_pin_PB2=10;
byte mcp_A_pin_PB3=11;
byte mcp_A_pin_PB4=12;
byte mcp_A_pin_PB5=13;
byte mcp_A_pin_PB6=14;
byte mcp_A_pin_PB7=15;

// These mcp_B pins will have physical buttons connected to them, with the other side connected to ground.
//  the pins will be pulled-up when we declare them later...
byte mcp_B_pin_PA0=0;
byte mcp_B_pin_PA1=1;
byte mcp_B_pin_PA2=2;
byte mcp_B_pin_PA3=3;
byte mcp_B_pin_PA4=4;
byte mcp_B_pin_PA5=5;
byte mcp_B_pin_PA6=6;
byte mcp_B_pin_PA7=7;

// These mcp_B pins will be connected to an 8-way relay board, which is Active LOW
//  so the relays activate when the pin is pulled LOW.
//  These pins will also be pulled-up and initialised as HIGH when we declare them later...
byte mcp_B_pin_PB0=8;
byte mcp_B_pin_PB1=9;
byte mcp_B_pin_PB2=10;
byte mcp_B_pin_PB3=11;
byte mcp_B_pin_PB4=12;
byte mcp_B_pin_PB5=13;
byte mcp_B_pin_PB6=14;
byte mcp_B_pin_PB7=15;

// duplicate the above definitions if additional mcp boards are added to the daisy chain 


// Interrupt handler for pins mcb_A pins 0-7 and mcb_B pins 0-7
void ICACHE_RAM_ATTR intCallBack()
{
  noInterrupts();

  // If the interrupt occurred on mcp_A then reading the mcp_A interrupt register will return the pin number
  // (0-15 or 0-7 in this case as we aren't using interrupts on pins 8-15),
  // otherwise it will return 255.
  // Therefore a value >15 means that the interrupt didn't occur on mcp_A but on one of the other mcp boards in the daisy chain so we
  // repeat the process for each board until we get a value in the range of 0 to 15
  // To later reference which board the interrupt came from we use mcp_device_ID

  
  if (mcp_A.getLastInterruptPin()<15)
  {
    pin_num = mcp_A.getLastInterruptPin();
    mcp_device_ID = 7;
  }

  else if (mcp_B.getLastInterruptPin()<15)
  {
    pin_num = mcp_B.getLastInterruptPin();
    mcp_device_ID = 6;
  }
  // if more boards are added to the daisy chain then this else..if logic would be continued.


  if(millis()-last_interrupt>=debounce_delay)  // Debounce routine
  {
    // for debugging only...
    Serial.println("_-_-_-_-_-_-_-_-_-_-_-_-_-_-_-");
    Serial.println("A button has been pressed!!!");
    Serial.print("Device = ");
    Serial.println(mcp_device_ID);    
    Serial.print("Pin = ");
    Serial.println(pin_num);
    Serial.println("_-_-_-_-_-_-_-_-_-_-_-_-_-_-_-");
    Serial.println();
    
    process_button_press();  // Call the function that will activate the correct relay etc. 
  }
  last_interrupt=millis();
  interrupts();
  clear_mcp_interrupts(); // Call the function that clears all of the interrupt registers 
}


void process_button_press()
{
  switch(mcp_device_ID)
  {
     case 7: //mcp_A
     {
       // This code assumes that the switch on mcp_A pin 0 controls the relay on mcp_A pin 8
       // so we just add 8 to the number of the pin that triggered the interrupt
       int current_pin_state = mcp_A.digitalRead(pin_num + 8);     // Get the current state of the pin
       mcp_A.digitalWrite(pin_num + 8, !current_pin_state);        // Write the opposite state to the pin to toggle it
  
       // This code assumes that we have Blynk button widgets (in Switch mode) on virtual pins that are numbered the same
       // as the ones used for the physical buttons (V0 = MCP Pin 0, V1 = MCP Pin 1 etc)
  
       // As the relays are Active LOW then we need to write the opposite state to the Blynk switch widget than we do to the MCP pin...
       // Relay = Off (HIGH or 1) then Blynk button widget = 0
       // Relay = On (LOW or 0) then Blynk button widget = 1
       Blynk.virtualWrite(pin_num, current_pin_state);
     }
     break;
  
     case 6: //mcp_B
     {
       // This is basically the same as the code for mcp_A
       // with 8 switches controlling 8 relays
       // The input pins are still called 0-7 and the output pins 8-15,
       // so we still have a difference of 8 between the switch pin and the corresponding relay pin
       // we'll use virtual pins 8-15 for the button widgets that mirror the physical buttons,
       // so this time we need to add 8 to the pin number to give us the corresponding virtual pin number
       int current_pin_state = mcp_B.digitalRead(pin_num + 8);     // Get the current state of the pin
       mcp_B.digitalWrite(pin_num + 8, !current_pin_state);        // Write the opposite state to the pin to toggle it     

       // As the relays are Active LOW then we need to write the opposite state to the Blynk switch widget than we do to the MCP pin...
       // Relay = Off (HIGH or 1) then Blynk button widget = 0
       // Relay = On (LOW or 0) then Blynk button widget = 1
       Blynk.virtualWrite(pin_num +8, current_pin_state);         // this time we add 8 to the virtual pin number
     }
     break;
  
    // additional case statements would be added if more expander boards are added to the daisy chain,
    // assuming that interrupts are used on those additional boards
  }
}

BLYNK_WRITE_DEFAULT()
{
  int widget_pin = request.pin;      // Which virtual pin triggered this BLYNK_WRITE_DEFAULT callback?
  int widget_value = param.asInt();  // Get the value from the virtual pin (O = off, 1 = on)

  if(widget_pin>=0 && widget_pin<=7)  // if it was a virtual pin in the range 0-7 then it's a command meant for mcp_A
  {
    mcp_A.digitalWrite(widget_pin + 8, !widget_value);            // Write the opposite state to the pin on mcp_A to toggle the relay
  }

   if(widget_pin>=8 && widget_pin<=15) // if it was a virtual pin in the range 8-15 then it's a command meant for mcp_B
  {
    mcp_B.digitalWrite(widget_pin + 8, !widget_value);            // Write the opposite state to the pin on mcp_B to toggle the relay
  } 

  // additional if statements would be added if more expander boards are added to the daisy chain,
  // assuming that interrupts are used on those additional boards
}


void setup(){
  
  Serial.begin(74880);

  pinMode(esp_interrupt_pin,INPUT); // Initialise the MCU pin used for the Interrupt line (INTA or INTB on the Waveshare board)
 
  mcp_A.begin(7); // default address, no solder pads bridged
  mcp_B.begin(6); // solder pad A0 bridged
  // duplicate the above code if more expander boards are added to the daisy chain

  
  // We mirror INTA and INTB, so that only one line is required between MCP and Arduino for int reporting
  // The INTA/B will not be Floating 
  // INTs will be signalled with a LOW
  mcp_A.setupInterrupts(true,false,LOW);
  mcp_B.setupInterrupts(true,false,LOW); 
  // duplicate the above code if more expanders are added to the daisy chain (assuming that more pins with interrupts are needed on these boards)

  // In this next section I could have used the friendly names (0-15) defined in the declarations, but chose to stick with the
  // names screen-printed on the mcp board to aid wiring and debugging. 

  
  // In the following blocks of code we declare each of our pins that will be used for interrupts (Pins 0-7) on mcb_A
  // If other pins have interrupts assigned to them then they must be added to the clear_mcp_interrupts() function

  // configuration for a button PA0 on mcb_A
  // interrupt will trigger when the pin is taken to ground by a pushbutton
  mcp_A.pinMode(mcp_A_pin_PA0, INPUT);
  mcp_A.pullUp(mcp_A_pin_PA0, HIGH);  // turn on a 100K pullup internally
  mcp_A.setupInterruptPin(mcp_A_pin_PA0,FALLING);  
  
  // configuration for a button PA1 on mcb_A
  // interrupt will trigger when the pin is taken to ground by a pushbutton
  mcp_A.pinMode(mcp_A_pin_PA1, INPUT);
  mcp_A.pullUp(mcp_A_pin_PA1, HIGH);  // turn on a 100K pullup internally
  mcp_A.setupInterruptPin(mcp_A_pin_PA1,FALLING); 

  // configuration for a button PA2 on mcb_A
  // interrupt will trigger when the pin is taken to ground by a pushbutton
  mcp_A.pinMode(mcp_A_pin_PA2, INPUT);
  mcp_A.pullUp(mcp_A_pin_PA2, HIGH);  // turn on a 100K pullup internally
  mcp_A.setupInterruptPin(mcp_A_pin_PA2,FALLING); 

  // configuration for a button PA3 on mcb_A
  // interrupt will trigger when the pin is taken to ground by a pushbutton
  mcp_A.pinMode(mcp_A_pin_PA3, INPUT);
  mcp_A.pullUp(mcp_A_pin_PA3, HIGH);  // turn on a 100K pullup internally
  mcp_A.setupInterruptPin(mcp_A_pin_PA3,FALLING); 

  // configuration for a button PA4 on mcb_A
  // interrupt will trigger when the pin is taken to ground by a pushbutton
  mcp_A.pinMode(mcp_A_pin_PA4, INPUT);
  mcp_A.pullUp(mcp_A_pin_PA4, HIGH);  // turn on a 100K pullup internally
  mcp_A.setupInterruptPin(mcp_A_pin_PA4,FALLING); 

  // configuration for a button PA5 on mcb_A
  // interrupt will trigger when the pin is taken to ground by a pushbutton
  mcp_A.pinMode(mcp_A_pin_PA5, INPUT);
  mcp_A.pullUp(mcp_A_pin_PA5, HIGH);  // turn on a 100K pullup internally
  mcp_A.setupInterruptPin(mcp_A_pin_PA5,FALLING); 

  // configuration for a button PA6 on mcb_A
  // interrupt will trigger when the pin is taken to ground by a pushbutton
  mcp_A.pinMode(mcp_A_pin_PA6, INPUT);
  mcp_A.pullUp(mcp_A_pin_PA6, HIGH);  // turn on a 100K pullup internally
  mcp_A.setupInterruptPin(mcp_A_pin_PA6,FALLING); 
  
  // configuration for a button PA7 on mcb_A
  // interrupt will trigger when the pin is taken to ground by a pushbutton
  mcp_A.pinMode(mcp_A_pin_PA7, INPUT);
  mcp_A.pullUp(mcp_A_pin_PA7, HIGH);  // turn on a 100K pullup internally
  mcp_A.setupInterruptPin(mcp_A_pin_PA7,FALLING); 


  // In the following blocks of code we declare each of our pins that will be used to control the relays (Pins 8-15) on mcb_A

  // configuration for a button PB0 on mcb_A
  mcp_A.pinMode(mcp_A_pin_PB0, OUTPUT);
  mcp_A.pullUp(mcp_A_pin_PB0, HIGH);  // turn on a 100K pullup internally
  mcp_A.digitalWrite(mcp_A_pin_PB0, HIGH);

  // configuration for a button PB1 on mcb_A
  mcp_A.pinMode(mcp_A_pin_PB1, OUTPUT);
  mcp_A.pullUp(mcp_A_pin_PB1, HIGH);  // turn on a 100K pullup internally
  mcp_A.digitalWrite(mcp_A_pin_PB1, HIGH);

  // configuration for a button PB2 on mcb_A
  mcp_A.pinMode(mcp_A_pin_PB2, OUTPUT);
  mcp_A.pullUp(mcp_A_pin_PB2, HIGH);  // turn on a 100K pullup internally
  mcp_A.digitalWrite(mcp_A_pin_PB2, HIGH);

  // configuration for a button PB3 on mcb_A
  mcp_A.pinMode(mcp_A_pin_PB3, OUTPUT);
  mcp_A.pullUp(mcp_A_pin_PB3, HIGH);  // turn on a 100K pullup internally
  mcp_A.digitalWrite(mcp_A_pin_PB3, HIGH);

  // configuration for a button PB4 on mcb_A
  mcp_A.pinMode(mcp_A_pin_PB4, OUTPUT);
  mcp_A.pullUp(mcp_A_pin_PB4, HIGH);  // turn on a 100K pullup internally
  mcp_A.digitalWrite(mcp_A_pin_PB4, HIGH);

  // configuration for a button PB5 on mcb_A
  mcp_A.pinMode(mcp_A_pin_PB5, OUTPUT);
  mcp_A.pullUp(mcp_A_pin_PB5, HIGH);  // turn on a 100K pullup internally
  mcp_A.digitalWrite(mcp_A_pin_PB5, HIGH);

  // configuration for a button PB6 on mcb_A
  mcp_A.pinMode(mcp_A_pin_PB6, OUTPUT);
  mcp_A.pullUp(mcp_A_pin_PB6, HIGH);  // turn on a 100K pullup internally
  mcp_A.digitalWrite(mcp_A_pin_PB6, HIGH);
    
  // configuration for a button PB7 on mcb_A
  mcp_A.pinMode(mcp_A_pin_PB7, OUTPUT);
  mcp_A.pullUp(mcp_A_pin_PB7, HIGH);  // turn on a 100K pullup internally
  mcp_A.digitalWrite(mcp_A_pin_PB7, HIGH);


  // In the following blocks of code we declare each of our pins that will be used for interrupts (Pins 0-7) on mcb_B
  // If other pins have interrupts assigned to them then they must be added to the clear_mcp_interrupts() function

  // configuration for a button PA0 on mcb_B
  // interrupt will trigger when the pin is taken to ground by a pushbutton
  mcp_B.pinMode(mcp_B_pin_PA0, INPUT);
  mcp_B.pullUp(mcp_B_pin_PA0, HIGH);  // turn on a 100K pullup internally
  mcp_B.setupInterruptPin(mcp_B_pin_PA0,FALLING);  

  // configuration for a button PA1 on mcb_B
  // interrupt will trigger when the pin is taken to ground by a pushbutton
  mcp_B.pinMode(mcp_B_pin_PA1, INPUT);
  mcp_B.pullUp(mcp_B_pin_PA1, HIGH);  // turn on a 100K pullup internally
  mcp_B.setupInterruptPin(mcp_B_pin_PA1,FALLING);  

  // configuration for a button PA2 on mcb_B
  // interrupt will trigger when the pin is taken to ground by a pushbutton
  mcp_B.pinMode(mcp_B_pin_PA2, INPUT);
  mcp_B.pullUp(mcp_B_pin_PA2, HIGH);  // turn on a 100K pullup internally
  mcp_B.setupInterruptPin(mcp_B_pin_PA2,FALLING);  

  // configuration for a button PA3 on mcb_B
  // interrupt will trigger when the pin is taken to ground by a pushbutton
  mcp_B.pinMode(mcp_B_pin_PA3, INPUT);
  mcp_B.pullUp(mcp_B_pin_PA3, HIGH);  // turn on a 100K pullup internally
  mcp_B.setupInterruptPin(mcp_B_pin_PA3,FALLING);  

  // configuration for a button PA4 on mcb_B
  // interrupt will trigger when the pin is taken to ground by a pushbutton
  mcp_B.pinMode(mcp_B_pin_PA4, INPUT);
  mcp_B.pullUp(mcp_B_pin_PA4, HIGH);  // turn on a 100K pullup internally
  mcp_B.setupInterruptPin(mcp_B_pin_PA4,FALLING);  

  // configuration for a button PA5 on mcb_B
  // interrupt will trigger when the pin is taken to ground by a pushbutton
  mcp_B.pinMode(mcp_B_pin_PA5, INPUT);
  mcp_B.pullUp(mcp_B_pin_PA5, HIGH);  // turn on a 100K pullup internally
  mcp_B.setupInterruptPin(mcp_B_pin_PA5,FALLING);  

  // configuration for a button PA6 on mcb_B
  // interrupt will trigger when the pin is taken to ground by a pushbutton
  mcp_B.pinMode(mcp_B_pin_PA6, INPUT);
  mcp_B.pullUp(mcp_B_pin_PA6, HIGH);  // turn on a 100K pullup internally
  mcp_B.setupInterruptPin(mcp_B_pin_PA6,FALLING);  

  // configuration for a button PA7 on mcb_B
  // interrupt will trigger when the pin is taken to ground by a pushbutton
  mcp_B.pinMode(mcp_B_pin_PA7, INPUT);
  mcp_B.pullUp(mcp_B_pin_PA7, HIGH);  // turn on a 100K pullup internally
  mcp_B.setupInterruptPin(mcp_B_pin_PA7,FALLING);  

  // In the following blocks of code we declare each of our pins that will be used to control the relays (Pins 8-15) on mcb_B

  // configuration for a button PB0 on mcb_B
  mcp_B.pinMode(mcp_B_pin_PB0, OUTPUT);
  mcp_B.pullUp(mcp_B_pin_PB0, HIGH);  // turn on a 100K pullup internally
  mcp_B.digitalWrite(mcp_B_pin_PB0, HIGH);

  // configuration for a button PB1 on mcb_B
  mcp_B.pinMode(mcp_B_pin_PB1, OUTPUT);
  mcp_B.pullUp(mcp_B_pin_PB1, HIGH);  // turn on a 100K pullup internally
  mcp_B.digitalWrite(mcp_B_pin_PB1, HIGH);

  // configuration for a button PB2 on mcb_B
  mcp_B.pinMode(mcp_B_pin_PB2, OUTPUT);
  mcp_B.pullUp(mcp_B_pin_PB2, HIGH);  // turn on a 100K pullup internally
  mcp_B.digitalWrite(mcp_B_pin_PB2, HIGH);

  // configuration for a button PB3 on mcb_B
  mcp_B.pinMode(mcp_B_pin_PB3, OUTPUT);
  mcp_B.pullUp(mcp_B_pin_PB3, HIGH);  // turn on a 100K pullup internally
  mcp_B.digitalWrite(mcp_B_pin_PB3, HIGH);

    // configuration for a button PB4 on mcb_B
  mcp_B.pinMode(mcp_B_pin_PB4, OUTPUT);
  mcp_B.pullUp(mcp_B_pin_PB4, HIGH);  // turn on a 100K pullup internally
  mcp_B.digitalWrite(mcp_B_pin_PB4, HIGH);

    // configuration for a button PB5 on mcb_B
  mcp_B.pinMode(mcp_B_pin_PB5, OUTPUT);
  mcp_B.pullUp(mcp_B_pin_PB5, HIGH);  // turn on a 100K pullup internally
  mcp_B.digitalWrite(mcp_B_pin_PB5, HIGH);

  // configuration for a button PB6 on mcb_B
  mcp_B.pinMode(mcp_B_pin_PB6, OUTPUT);
  mcp_B.pullUp(mcp_B_pin_PB6, HIGH);  // turn on a 100K pullup internally
  mcp_B.digitalWrite(mcp_B_pin_PB6, HIGH);

  // configuration for a button PB7 on mcb_B
  mcp_B.pinMode(mcp_B_pin_PB7, OUTPUT);
  mcp_B.pullUp(mcp_B_pin_PB7, HIGH);  // turn on a 100K pullup internally
  mcp_B.digitalWrite(mcp_B_pin_PB7, HIGH);

  // duplicate the above code if more expander boards are added to the daisy chain and use the correct
  // mode definition etc for the type of use for that pin (input, output, input with interrupt etc)
  // If other board/pin combinations have interrupts assigned to them then they must be added to the clear_mcp_interrupts() function

  clear_mcp_interrupts(); // Call the function that clears all of the interrupt registers
  
  Blynk.begin(auth, ssid, pass);

  // Here we attach an interrupt to the MCU pin that will be used to listen for interrupts from the mcp_A...
  attachInterrupt(digitalPinToInterrupt(esp_interrupt_pin),intCallBack,FALLING);
  // It's not necessary to do this for the other mcp's, as it's only mcp_A that's directly connected to the NodeMCU's interrupt pin
}

void clear_mcp_interrupts()
{
  for(int loop=0;loop<=7;loop++) // Loop through the 8 pins on mcp_A that have interrupts attached
  {
    mcp_A.digitalRead(loop);    // Read the pin to clear the interrupt register for that pin
  }

  // This could have been added to the same loop as above, but kept separate for transparency...
  for(int loop=0;loop<=7;loop++) // Loop through the 8 pins on mcp_B that have interrupts attached
  {
    mcp_B.digitalRead(loop);    // Read the pin to clear the interrupt register for that pin
  }

  // If interrupts are assigned to other board/pin combinations then they must be added to this function 
}

BLYNK_CONNECTED()
{
  // This code runs when the MCU connects or re-connects to the Blynk server
  // We want to get the latest widget switch values and update the relays so that they match this

  // Loop through pins 0-15 and do a Blynk.syncVirtual
  // If more pins are used that relate to additional mcps, or different patterns of virtual pins are used on the existing mcps
  // the this for loop range will need to be adjusted...
  
  for(int loop=0;loop<=15;loop++) 
  {
    Blynk.syncVirtual(loop); // This forces the BLYNK_WRITE_DEFAULT callback function to trigger for each virtual pin in turn 
  }
}

 
void loop()
{
  Blynk.run();
}

Enjoy!

Pete.

5 Likes

Really cool. Thank you for such a detailed explanation. Will definitely help everyone.

1 Like

So marvellous code, illustrations and explanation I hope I can do just 50% of that.
That’s why I have to drop everything I’m currently doing to add some little mods to your code.
Hope you don’t mind.

#define BLYNK_PRINT Serial
#include <ESP8266WiFi.h>
#include <BlynkSimpleEsp8266.h>

#include <Wire.h>
#include "Adafruit_MCP23017.h"  // https://github.com/adafruit/Adafruit-MCP23017-Arduino-Library

char auth[] = "REDACTED";
char ssid[] = "REDACTED";
char pass[] = "REDACTED";

// For more info, See https://community.blynk.cc/t/using-the-mcp23017-io-expansion-board/44525
// Connect pin SCL of the first expander (mcp_A) to SCL (D1)
// Connect pin SDA of the first expander (mcp_A) to SDA (D2)
// Connect pin INTA or INTB of the first expander (mcp_A) to ESP8266 pin D5 (GPIO14)
// don't solder A0,A1,A2 (default ID of 7) on the first expander (mcp_A)
// Connect 8 physical momentary push buttons to mcp_A pins 0 to 7 inclusive (labelled PA0 to PA7), with the other side of the button connected to GND
// Connect an 8-way Active LOW relay board to mcp_A pins 8 to 15 inclusive (labelled PB0 to PB7 inclusive)
// Attach Blynk button widgets (in Switch mode) to virtual pins 0 to 7 inclusive. These mirror the physical momentary buttons of mcp_A pins PA0 to PA7

// Solder 0.1" pitch pins to the connections at the far end of mcp_A and
// connect the corresponding wires from mcp_B on to these (INTB to INTB, INTA to INTA etc)
// solder A0 (to give an ID of 6) on the second expander (mcp_B)
// Connect 8 physical momentary push buttons to mcp_B pins 0 to 7 inclusive (labelled PA0 to PA7), with the other side of the button connected to GND
// Connect a second 8-way Active LOW relay board to mcp_B pins 8 to 15 inclusive (labelled PB0 to PB7 inclusive)
// Attach Blynk button widgets (in Switch mode) to virtual pins 8 to 15 inclusive. These mirror the physical momentary buttons of mcp_B pins PA0 to PA7

// If additional mcp boards are added (C, D, E etc) then connectors need to be soldered to the previous board in the daisy chain to allow them to connect together
// and each board needs to have a unique I2C address/ID, see below for details..

/*
  The begin() param can be 0 to 7, the default param is 7 (no solder bridges on A0, A1 & A2) giving an address of 0x27.
  Addr(BIN)  Addr(hex)   ID   A2  A1  A0
  010 0111    0x27        7      0   0   0   <--- Default for WaveShare Board
  010 0110    0x26        6      0   0   1
  010 0101    0x25        5      0   1   0
  010 0100    0x24        4      0   1   1
  010 0011    0x23        3      1   0   0
  010 0010    0x22        2      1   0   1
  010 0001    0x21        1      1   1   0
  010 0000    0x20        0      1   1   1
*/

#define MCP23017_I2C_ADDRESS_0     0x20
#define MCP23017_I2C_ADDRESS_1     0x21
#define MCP23017_I2C_ADDRESS_2     0x22
#define MCP23017_I2C_ADDRESS_3     0x23
#define MCP23017_I2C_ADDRESS_4     0x24
#define MCP23017_I2C_ADDRESS_5     0x25
#define MCP23017_I2C_ADDRESS_6     0x26                       // solder pad A0 bridged
#define MCP23017_I2C_ADDRESS_7     0x27                       // default address, no solder pads bridged

#define MCP23017_ID_0     ( MCP23017_I2C_ADDRESS_0 & 0x07 )
#define MCP23017_ID_1     ( MCP23017_I2C_ADDRESS_1 & 0x07 )
#define MCP23017_ID_2     ( MCP23017_I2C_ADDRESS_2 & 0x07 )
#define MCP23017_ID_3     ( MCP23017_I2C_ADDRESS_3 & 0x07 )
#define MCP23017_ID_4     ( MCP23017_I2C_ADDRESS_4 & 0x07 )
#define MCP23017_ID_5     ( MCP23017_I2C_ADDRESS_5 & 0x07 )
#define MCP23017_ID_6     ( MCP23017_I2C_ADDRESS_6 & 0x07 )     // solder pad A0 bridged
#define MCP23017_ID_7     ( MCP23017_I2C_ADDRESS_7 & 0x07 )     // default address, no solder pads bridged

typedef struct
{
  Adafruit_MCP23017 mcp;
  int               device_ID;
} Adafruit_MCP23017_Array;

// To add more devices, just add more instances of Adafruit_MCP23017 and entries in Adafruit_MCP23017_Array
// For example, see the commented lines

// Create the instances of the mcp objects
Adafruit_MCP23017 mcp_0;
Adafruit_MCP23017 mcp_1;
// Uncomment this and the below line to add one more device and so on. Remember to change device_ID
//Adafruit_MCP23017 mcp_2;

Adafruit_MCP23017_Array mcpArray[  ] =
{
  { mcp_0, MCP23017_ID_7 },
  { mcp_1, MCP23017_ID_6 },
  // this line
  //{ mcp_2, MCP23017_ID_5 },
};

#define NUM_MCP23017   ( sizeof(mcpArray) / sizeof(Adafruit_MCP23017_Array) )

// duplicate the above code if additional mcp boards are added to the daisy chain

// Define the interrupt pin on the MCU
int esp_interrupt_pin = 14; // GPIO14 (D5)

volatile unsigned long last_interrupt; // Used to store the time in millis of the last interrupt, for debouncing
int debounce_delay = 100;              // The minimum delay in milliseconds between button presses, for debouncing

volatile int mcp_board;     // when an interrupt is detected and decoded the device which generated the interrupt is stored here
volatile int mcp_device_ID; // when an interrupt is detected and decoded the device which generated the interrupt is stored here
volatile uint8_t pin_num;   // when an interrupt is detected and decoded the pin which generated the interrupt  is stored here

// Define friendly names for the pins...

// These mcp_A pins will have physical buttons connected to them, with the other side connected to ground.
//  the pins will be pulled-up when we declare them later...

enum
{
  mcp_pin_P0 = 0,
  mcp_pin_P1,
  mcp_pin_P2,
  mcp_pin_P3,
  mcp_pin_P4,
  mcp_pin_P5,
  mcp_pin_P6,
  mcp_pin_P7,
  mcp_pin_P8,
  mcp_pin_P9,
  mcp_pin_P10,
  mcp_pin_P11,
  mcp_pin_P12,
  mcp_pin_P13,
  mcp_pin_P14,
  mcp_pin_P15,
  mcp_pin_max

} MCP23017_PIN;

#define NUM_RELAY_PER_MCP23017    ( mcp_pin_max / 2 )

// duplicate the above definitions if additional mcp boards are added to the daisy chain

BLYNK_CONNECTED()
{
  // This code runs when the MCU connects or re-connects to the Blynk server
  // We want to get the latest widget switch values and update the relays so that they match this

  // Loop through pins 0-15 and do a Blynk.syncVirtual
  // If more pins are used that relate to additional mcps, or different patterns of virtual pins are used on the existing mcps
  // the this for loop range will need to be adjusted...

  // Loop through pins 0-NUM_RELAY_PER_MCP23017 of NUM_MCP23017 boards, and do a Blynk.syncVirtual
  for (int board = 0; board < NUM_MCP23017; board++)
  {
    for (int v_pin = 0; v_pin < NUM_RELAY_PER_MCP23017; v_pin++)
    {
      Blynk.syncVirtual(v_pin); // This forces the BLYNK_WRITE_DEFAULT callback function to trigger for each virtual pin in turn
    }
  }
}

BLYNK_WRITE_DEFAULT()
{
  int widget_pin = request.pin;      // Which virtual pin triggered this BLYNK_WRITE_DEFAULT callback?
  int widget_value = param.asInt();  // Get the value from the virtual pin (O = off, 1 = on)

  // if it was a virtual pin in the range 0-7 then it's a command meant for mcp_A
  // if it was a virtual pin in the range 8-15 then it's a command meant for mcp_B
  // Write the opposite state to the pin on mcp_A to toggle the relay
  mcpArray[ (int) (widget_pin / NUM_RELAY_PER_MCP23017) ].mcp.digitalWrite(widget_pin + NUM_RELAY_PER_MCP23017, !widget_value);
}

void clear_mcp_interrupts()
{
  for (int board = 0; board < NUM_MCP23017; board++)
  {
    for (int mcp_pin = mcp_pin_P0; mcp_pin <= mcp_pin_P7; mcp_pin++) // Loop through the 8 pins on mcp_A that have interrupts attached
    {
      mcpArray[ board ].mcp.digitalRead(mcp_pin);    // Read the pin to clear the interrupt register for that pin
    }
  }
}

// Interrupt handler for pins mcb_A pins 0-7 and mcb_B pins 0-7
void ICACHE_RAM_ATTR intCallBack()
{
  noInterrupts();

  // If the interrupt occurred on mcp_A then reading the mcp_A interrupt register will return the pin number
  // (0-15 or 0-7 in this case as we aren't using interrupts on pins 8-15),
  // otherwise it will return 255.
  // Therefore a value >15 means that the interrupt didn't occur on mcp_A but on one of the other mcp boards in the daisy chain so we
  // repeat the process for each board until we get a value in the range of 0 to 15
  // To later reference which board the interrupt came from we use mcp_device_ID

  for (int board = 0; board < NUM_MCP23017; board++)
  {
    if (mcpArray[ board ].mcp.getLastInterruptPin() < mcp_pin_max)
    {
      pin_num = mcpArray[ board ].mcp.getLastInterruptPin();
      mcp_device_ID = mcpArray[ board ].device_ID;
      mcp_board = board;
      break;
    }
  }

  if (millis() - last_interrupt >= debounce_delay) // Debounce routine
  {
    // for debugging only...
    Serial.println("_-_-_-_-_-_-_-_-_-_-_-_-_-_-_-");
    Serial.println("A button has been pressed!!!");
    Serial.print("Device = ");
    Serial.println(mcp_device_ID);
    Serial.print("Pin = ");
    Serial.println(pin_num);
    Serial.println("_-_-_-_-_-_-_-_-_-_-_-_-_-_-_-");
    Serial.println();

    process_button_press();  // Call the function that will activate the correct relay etc.
  }
  last_interrupt = millis();
  interrupts();
  clear_mcp_interrupts(); // Call the function that clears all of the interrupt registers
}

void process_button_press()
{
  // This code assumes that the switch on mcp_A pin 0 controls the relay on mcp_A pin 8 (= NUM_RELAY_PER_MCP23017)
  // so we just add 8 to the number of the pin that triggered the interrupt
  int current_pin_state = mcpArray[ mcp_board ].mcp.digitalRead(pin_num + NUM_RELAY_PER_MCP23017);     // Get the current state of the pin
  mcpArray[ mcp_board ].mcp.digitalWrite(pin_num + NUM_RELAY_PER_MCP23017, !current_pin_state);        // Write the opposite state to the pin to toggle it

  // This code assumes that we have Blynk button widgets (in Switch mode) on virtual pins that are numbered the same
  // as the ones used for the physical buttons (V0 = MCP Pin 0, V1 = MCP Pin 1 etc)

  // As the relays are Active LOW then we need to write the opposite state to the Blynk switch widget than we do to the MCP pin...
  // Relay = Off (HIGH or 1) then Blynk button widget = 0
  // Relay = On (LOW or 0) then Blynk button widget = 1
  Blynk.virtualWrite(pin_num, current_pin_state);

  // additional case statements would be added if more expander boards are added to the daisy chain,
  // assuming that interrupts are used on those additional boards
}

void setup() 
{

  Serial.begin(115200);

  pinMode(esp_interrupt_pin, INPUT); // Initialise the MCU pin used for the Interrupt line (INTA or INTB on the Waveshare board)

  for (int board = 0; board < NUM_MCP23017; board++)
  {
    mcpArray[ board ].mcp.begin(mcpArray[ board ].device_ID);

    // We mirror INTA and INTB, so that only one line is required between MCP and Arduino for int reporting
    // The INTA/B will not be Floating
    // INTs will be signalled with a LOW
    mcpArray[ board ].mcp.setupInterrupts(true, false, LOW);
  }

  // duplicate the above code if more expanders are added to the daisy chain (assuming that more pins with interrupts are needed on these boards)

  // In this next section I could have used the friendly names (0-15) defined in the declarations, but chose to stick with the
  // names screen-printed on the mcp board to aid wiring and debugging.

  // In the following blocks of code we declare each of our pins that will be used for interrupts (Pins 0-7) on mcb_A
  // If other pins have interrupts assigned to them then they must be added to the clear_mcp_interrupts() function

  for (int board = 0; board < NUM_MCP23017; board++)
  {
    for ( int mcp_pin = mcp_pin_P0; mcp_pin < mcp_pin_max; mcp_pin++)
    {
      // configuration for a button PA0 on mcb_A
      // interrupt will trigger when the pin is taken to ground by a pushbutton
      mcpArray[ board ].mcp.pinMode(mcp_pin, INPUT);
      mcpArray[ board ].mcp.pullUp(mcp_pin, HIGH);                  // turn on a 100K pullup internally
      mcpArray[ board ].mcp.setupInterruptPin(mcp_pin, FALLING);
    }
  }

  // duplicate the above code if more expander boards are added to the daisy chain and use the correct
  // mode definition etc for the type of use for that pin (input, output, input with interrupt etc)
  // If other board/pin combinations have interrupts assigned to them then they must be added to the clear_mcp_interrupts() function

  clear_mcp_interrupts(); // Call the function that clears all of the interrupt registers

  Blynk.begin(auth, ssid, pass);

  // Here we attach an interrupt to the MCU pin that will be used to listen for interrupts from the mcp_A...
  attachInterrupt(digitalPinToInterrupt(esp_interrupt_pin), intCallBack, FALLING);
  // It's not necessary to do this for the other mcp's, as it's only mcp_A that's directly connected to the NodeMCU's interrupt pin
}

void loop()
{
  Blynk.run();
}

2 Likes

Thanks Pete for keeping it simple. Something us self taught C’ers can understand. I understand the array style with loop checking but can’t follow it clearly yet…

1 Like

I thought I’d follow-up with a few thoughts on these expansion boards and where I might use them in future, and what their pros and cons are compared to simply using an ESP32 (or two)…

As I said to begin with, my original project required 5 switches with built-in LEDs, 5 relays and a handful of other sensors. It was possible to do this with an ESP32, but I had to avoid the pins that output something at startup, especially for the relay connections.

Are these really needed?
Most of my home automation projects use remotely located ESP devices to do things like control a lamp, take environmental readings, send IR signals interface to a solar controller etc, These are scattered around the house in the locations where they can best do this job, and many are built-in to off-the-shelf devices like Sonoffs (that are running custom firmware of course).
I’m not a great fan of centralising everything in one location, so the times when everything needs to be n one physical location, with banks of relays, switches and flashing lights is fairly limited (unless you happen to live on the Starship Enterprise of course :grinning:).
My 5 relay scenario is the first time I’ve really needed to do something like this, and I think it will be a while before I have a similar challenge, but obviously everyone uses these devices for different things. An ESP32 with one expander board would obviously give the best (or is that the worst) of both worlds as the expander needs only three pins to provide an additional 16 GPIOs. This would allow you to use a combination of ESP32 and expansion board GPIOs, provided you can retain your sanity when coding the native and expanded GPIOs.

Physical layout considerations
The biggest issue I find with the ESP32 is that the GPIO numbers seem to be scattered around the board as randomly as physically possible. This means that either your wiring will turn into a total rats nest, or you’ll use GPIO numbers that aren’t sequential in your code.
The beauty of these Waveshare expander boards is that the pins are arranged sequentially in two banks and this leans itself to using a couple of 10-pin Dupont headers and rainbow ribbon cable to wire everything up. Obviously you still have the capacity to turn this in to a jungle of wires if that’s you ‘thing’, but for the OCD sufferers amongst us it does allow the wiring to be much neater.

If (like me) you like to put 0.1" header sockets onto circuit boards and give the option to easily plug/unplug your MCU onto the board then these expander boards work very well for that type of layout. The only drawback is that the address pads aren’t broken-out to pins, so if you’re using multiple boards plugged-in to a board you cant simply swap them around or plug in a replacement without first first altering the solder pad settings.

The boards do have two mounting holes in the corner farthest from the plug, so fixing them this way is also an option. once you have several of these boards floating around on the desk, or crammed into an enclosure along with relays etc, then some sort of physical restraint is needed if you don’t want sparks flying everywhere (trust me in that one :dizzy_face:)

I’m not sure what type of connector is used on the expander boards, but it’s not actually necessary to use this connector at all if you’re mounting the boards onto a PCB. The socket at one end of the board and the plated-through holes at the other end have straight through connections, so that don’t actually need to be chained together as i’ve shown in the photo. They are parallel bus devices, so multiple boards could all be connected onto bus rails on the PCB just using pins soldered into the plated-through holes.

Documentation and Library support
If you look at the GitHub page for the Adafruit MCP23017 library you’ll see that one person in particular has forked the code several times to add additional features. One of these removed the need to create multiple instances of the mcp object in the code, and instead enumerate the references to the various mcp boards attached to the daisy-chain. I’d toyed with the idea of trying this forked code, but decided to wait until the changes are incorporated into the main library.

Multiple ESP32’s versus multiple Expanders
You could of course use multiple ESP32s, each with their own connection to the Wi-Fi system and Blynk auth code to operate multiple devices. This has a number of advantages (the coding is maybe simpler, providing no bridging is needed) and the hardware is more familiar. I guess the cost of using this approach is slightly higher, but not to a point that makes it prohibitive.

Here’s a few pros and cons of using these expander boards, based on my analysis…

Pros:

  • Expander pins are logically laid-out and easily accessible on the boards.
  • The boards lend themselves to being incorporated onto circuit boards, with the minor exception of the pads used to set the addresses.
  • They are cheap and appear to be readily available.
  • They are 3.3 and 5v compatible, so will work with most common MCUs.
  • The functionality is good.
  • Interrupts are available on all pins.
  • Only 3 GPIOs are required on the MCU to give upto 128 extra GPIOs.

Cons:

  • Limited documentation and working code examples (hopefully some of that is addressed by this topic).
  • The library is rather clunky and illogical in some ways.
  • The process of reading and clearing interrupts can be a bit messy, especially when using multiple boards, but this would be simpler if all the devices that generate interrupts could be confined to one expander board.
    The library may change in future, and if it doesn the there is no guarantee of backwards compatibility with the methods hat I’ve used in my code.

Conclusion
Would I use these expander boards in my projects in future - 100% yes, assuming that I have a need for lots of GPIOs.

Pete.

1 Like

sorry for the question, but does it work using only the mcp23017 microchip? I’m testing one here and I couldn’t use the codes I used, like synchronizing physical buttons, for example

The BLYNK_CONNECTED and corresponding BLYNK_WRITE_DEFAULT routines will work for any board, provided you structure your virtual PIN numbers logically.

If you’re having problems then post the code you’re using, but in a different topic. Please keep this topic about the MCP23017 expansion board.

Pete.

2 posts were split to a new topic: ESP8266-01 and MCP23017 port expander

A post was merged into an existing topic: ESP8266-01 and MCP23017 port expander