RC Rover conversion
This latest addition to my utilization of Blynk with old and musty Arduinos is another rover type project.
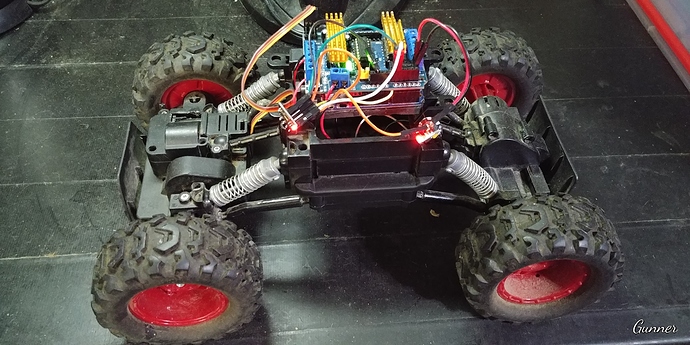
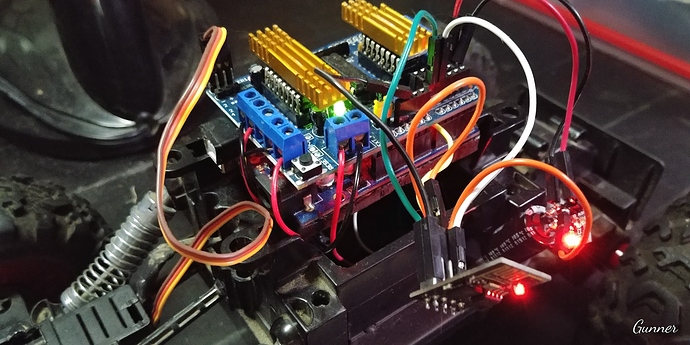
I have an old RC rock crawler that stopped crawling… I took it apart to see if I could fix it, and decided to simply replace the brains instead.
I first had to replace the DC motor and clutch type steering with a servo… a lot of plastic hacking and fitting that I didn’t bother photographing at the time 
Then for simplicity, I used an old motor/servo shield. Even though I am only using two of the four DC channels and one of the two servo channels.
Even though there are 1 1/2 pins available (pin 13 being used with onboard LED), and I didn’t want to hack the rest for access to Serial pins for the ESP… so I simply used Analog ports for that purpose 
I used some code I found (leaving in all the comments and references/functions even if unused in my example).
I also tested an alternative Softserial library - link in the code
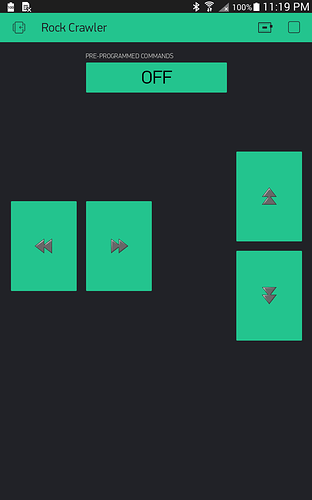
Then merged in some basic Blynk code for simple FORWARD - BACKWARD & LEFT - RIGHT control.
I started out with a small 2 point steering routine for testing, and I left that in with a button control to activate it… if you add in more semi-auto commands, just keep aware that you might need to toss in a Blynk.run() midway to keep that connection stable.
I also implemented some basic timed kill routines that will stop the rover if it loses contact to the server or App… or you stop pressing buttons after a few seconds… keep steering and it keeps resetting the time out timer.
My code implements servo detaching to keep from jittering when motionless… due to some sort of timing conflict with Blynk.
This rover is 4 wheel drive with two separate DC motors for front and back… so I ran each motor off of a single motor channel (all channels use a piggybacked L293D IC chip for extra current handling).
Arduino and motors are powered by 9v (original 6xAA battery pack on the rover)
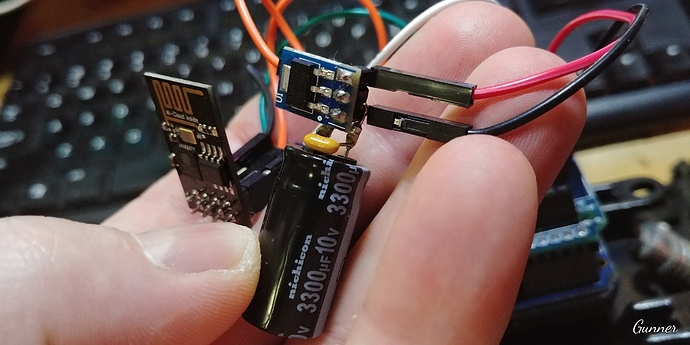
The ESP is powered from the Arduino’s 5v line via a 3.3v regulator (AMS1117) with a large capacitor for surge reserve.
And at the moment… all components are just flapping in the breeze  but this handles better than I anticipated even over a rutted field of grass & weeds.
This code is NOT polished in any way and there is a lot of unnecessary bloat from the original code, but it will give someone something to start off with, if they accept the challenge.
// Modded by Gunner for a simple Blynkified Rover control
// July/Aug 2018

// Simple Motor Shield sketch
// By arduino.cc user "Krodal".
// June 2012
//
// Open Source / Public Domain
//
// A simple sketch for the motor shield,
// without using the Adafruit library.
//
// The outputs can be used for DC-motors
// (either full H-bridge or just On and Off), lights,
// relays, solenoids, etc.
// But stepper motors can not be used !
// Servo motors can be used with the default Servo library.
//
// A maximum of 4 DC motors can be used with full-bridge,
// or a maximum of 8 normal outputs, or a combination.
// Two servo motors can always be used, they use the +5V
// of the Arduino board, so the voltage regulator could
// get hot.
//
// Tested with an Ebay clone with the Arduino Uno.
//
// Parts of the code are from an old Adafruit Motor Shield
// library, which was public domain at that time.
// This code is also public domain
//
// This simplified program is using the normal
// Arduino library functions as much as possible.
//
// The motors will make a whistling sound,
// due to the analogWrite() PWM frequency.
// The Adafruit library is specifically designed to avoid
// this, so use the Adafruit library for a better result.
//
//
//
// Connector usage
// ---------------
// The order is different than what you would expect.
// If the Arduino (Uno) board is held with the USB
// connector to the left, the positive (A) side is
// at the top (north), and the negative (B) side is
// the bottom (south) for both headers.
//
//   Connector X1:
//     M1 on outside = MOTOR1_A   (+) north
//     M1 on inside  = MOTOR1_B   (-)
//     middle        = GND
//     M2 on inside  = MOTOR2_A   (+)
//     M2 on outside = MOTOR2_B   (-) south
//
//   Connector X2:
//     M3 on outside = MOTOR3_B   (-) south
//     M3 on inside  = MOTOR3_A   (+)
//     middle        = GND
//     M4 on inside  = MOTOR4_B   (-)
//     M4 on outside = MOTOR4_A   (+) north
//
//
//         -------------------------------
//         | -+s                         |
//         | -+s                         |
//    M1 A |                             | M4 A
//    M1 B |                             | M4 B
//    GND  |                             | GND
//    M2 A |                             | M3 A
//    M2 B |                             | M3 B
//         |                       ..... |
//         -------------------------------
//                + -
//
//
//
// Pin usage with the Motorshield
// ---------------------------------------
// Analog pins: not used at all
//     A0 ... A5 are still available
//     They all can also be used as digital pins.
//     Also I2C (A4=SDA and A5=SCL) can be used.
//     These pins have a breadboard area on the shield.
// Digital pins: used: 3,4,5,6,7,8,9,10,11,12
//     Pin 9 and 10 are only used for the servo motors.
//     Already in use: 0 (RX) and 1 (TX).
//     Unused: 2,13
//     Pin 2 has an soldering hole on the board,
//           easy to connect a wire.
//     Pin 13 is also connected to the system led.
// I2C is possible, but SPI is not possible since
// those pins are used.
//

//#define BLYNK_PRINT Serial // This prints to Serial Monitor
#define BLYNK_MSG_LIMIT 0
#include <ESP8266_Lib.h>  // ESP-01 Link
#include <BlynkSimpleShieldEsp8266.h>  // ESP-01 Link

char auth[] = "xxxxxxxxxx";
char ssid[] = "xxxxx";
char pass[] = "xxxxx";
char server[] = "xxx.xxx.xxx.xxx";  // IP for your Local Server
int port = 8080;

#include <NeoSWSerial.h>  // https://github.com/SlashDevin/NeoSWSerial
NeoSWSerial EspSerial(14, 15);  // RX, TX - using Analog pins A0 & A1
#define ESP8266_BAUD 9600
ESP8266 wifi(&EspSerial);

#include <Servo.h>

// Arduino pins for the shift register
#define MOTORLATCH 12
#define MOTORCLK 4
#define MOTORENABLE 7
#define MOTORDATA 8

// 8-bit bus after the 74HC595 shift register
// (not Arduino pins)
// These are used to set the direction of the bridge driver.
#define MOTOR1_A 2
#define MOTOR1_B 3
#define MOTOR2_A 1
#define MOTOR2_B 4
#define MOTOR3_A 5
#define MOTOR3_B 7
#define MOTOR4_A 0
#define MOTOR4_B 6

// Arduino pins for the PWM signals.
#define MOTOR1_PWM 11
#define MOTOR2_PWM 3
#define MOTOR3_PWM 6
#define MOTOR4_PWM 5
#define SERVO1_PWM 10
#define SERVO2_PWM 9

// Codes for the motor function.
#define FORWARD 1
#define BACKWARD 2
#define BRAKE 3
#define RELEASE 4

BlynkTimer timer;
int failSafetimer;

// Declare classes for Servo connectors of the MotorShield.
Servo servo_1;
//Servo servo_2;


void setup()
{
  pinMode(14, INPUT_PULLUP);  // Setup Analog Pin for Digital Input use - RX
  pinMode(15, OUTPUT);  // Setup Analog Pin for Digital Output use -TX
  // Serial.begin(9600);  // Debug monitor
  EspSerial.begin(ESP8266_BAUD);
  delay(10);
  // Serial.println("Connecting to ESP");
  wifi.setDHCP(1, 1, 1); //Enable dhcp in station mode and save in flash of esp8266
  Blynk.config(wifi, auth, server, port);
  if (Blynk.connectWiFi(ssid, pass)) {
    Blynk.connect();
  }
  servo_1.attach(SERVO1_PWM);
  //servo_2.attach(SERVO2_PWM);
  servo_1.write(90);  // Straighten
  delay(250);
  servo_1.detach();  // To stop jittering when Blynk communicates
}


void FailSafe() {
  motor(1, RELEASE, 0);  // Back motor
  motor(2, RELEASE, 0);  // Front motor
  servo_1.detach();
}


BLYNK_WRITE(V0) {  // Pre-programmed commands - change as required
  if (param.asInt()) {
    servo_1.attach(SERVO1_PWM);
    servo_1.write(30);  // Turn
    delay(750);
    motor(1, FORWARD, 255);  // Back motor
    motor(2, FORWARD, 255);  // Front motor
    delay(1500);
    // Be friendly to the motor: stop it before reverse.
    motor(1, RELEASE, 0);  // Back motor
    motor(2, RELEASE, 0);  // Front motor
    servo_1.write(90);  // Straighten
    delay(500);
    servo_1.write(150);  // Turn
    delay(750);
    motor(1, BACKWARD, 255);  // Back motor
    motor(2, BACKWARD, 255);  // Front motor
    delay(1500);
    motor(1, RELEASE, 0);  // Back motor
    motor(2, RELEASE, 0);  // Front motor
    servo_1.write(90);  // Straighten
    delay(750);
    servo_1.detach();
  }
}


BLYNK_WRITE(V1) {  // Move Forward
  if (param.asInt()) {
    failSafetimer = timer.setTimeout(3000L, FailSafe);
    motor(1, FORWARD, 255);  // Back motor
    motor(2, FORWARD, 255);  // Front motor
  } else {
    timer.deleteTimer(failSafetimer);
    motor(1, RELEASE, 0);  // Back motor
    motor(2, RELEASE, 0);  // Front motor
  }
}


BLYNK_WRITE(V2) {  // Move Backward
  if (param.asInt()) {
    failSafetimer = timer.setTimeout(3000L, FailSafe);
    motor(1, BACKWARD, 255);  // Back motor
    motor(2, BACKWARD, 255);  // Front motor
  } else {
    timer.deleteTimer(failSafetimer);
    motor(1, RELEASE, 0);  // Back motor
    motor(2, RELEASE, 0);  // Front motor
  }
}


BLYNK_WRITE(V3) {  // Turn Right
  if (param.asInt()) {
    timer.restartTimer(failSafetimer);
    servo_1.attach(SERVO1_PWM);
    servo_1.write(150);  // Turn
    delay(250);
  } else {
    timer.restartTimer(failSafetimer);
    servo_1.attach(SERVO1_PWM);
    servo_1.write(90);  // Turn
    delay(250);
    servo_1.detach();
  }
}


BLYNK_WRITE(V4) {  // Turn Left
  if (param.asInt()) {
    timer.restartTimer(failSafetimer);
    servo_1.attach(SERVO1_PWM);
    servo_1.write(30);  // Turn
    delay(250);
  } else {
    timer.restartTimer(failSafetimer);
    servo_1.attach(SERVO1_PWM);
    servo_1.write(90);  // Turn
    delay(250);
    servo_1.detach();
  }
}


BLYNK_APP_DISCONNECTED() {
FailSafe();
}


void loop()
{
  Blynk.run();
  timer.run();
}


// Initializing
// ------------
// There is no initialization function.
//
// The shiftWrite() has an automatic initializing.
// The PWM outputs are floating during startup,
// that's okay for the Motor Shield, it stays off.
// Using analogWrite() without pinMode() is valid.
//


// ---------------------------------
// motor
//
// Select the motor (1-4), the command,
// and the speed (0-255).
// The commands are: FORWARD, BACKWARD, BRAKE, RELEASE.
//
void motor(int nMotor, int command, int speed)
{
  int motorA, motorB;

  if (nMotor >= 1 && nMotor <= 4)
  {
    switch (nMotor)
    {
      case 1:
        motorA   = MOTOR1_A;
        motorB   = MOTOR1_B;
        break;
      case 2:
        motorA   = MOTOR2_A;
        motorB   = MOTOR2_B;
        break;
      case 3:
        motorA   = MOTOR3_A;
        motorB   = MOTOR3_B;
        break;
      case 4:
        motorA   = MOTOR4_A;
        motorB   = MOTOR4_B;
        break;
      default:
        break;
    }

    switch (command)
    {
      case FORWARD:
        motor_output (motorA, HIGH, speed);
        motor_output (motorB, LOW, -1);     // -1: no PWM set
        break;
      case BACKWARD:
        motor_output (motorA, LOW, speed);
        motor_output (motorB, HIGH, -1);    // -1: no PWM set
        break;
      case BRAKE:
        // The AdaFruit library didn't implement a brake.
        // The L293D motor driver ic doesn't have a good
        // brake anyway.
        // It uses transistors inside, and not mosfets.
        // Some use a software break, by using a short
        // reverse voltage.
        // This brake will try to brake, by enabling
        // the output and by pulling both outputs to ground.
        // But it isn't a good break.
        motor_output (motorA, LOW, 255); // 255: fully on.
        motor_output (motorB, LOW, -1);  // -1: no PWM set
        break;
      case RELEASE:
        motor_output (motorA, LOW, 0);  // 0: output floating.
        motor_output (motorB, LOW, -1); // -1: no PWM set
        break;
      default:
        break;
    }
  }
}


// ---------------------------------
// motor_output
//
// The function motor_ouput uses the motor driver to
// drive normal outputs like lights, relays, solenoids,
// DC motors (but not in reverse).
//
// It is also used as an internal helper function
// for the motor() function.
//
// The high_low variable should be set 'HIGH'
// to drive lights, etc.
// It can be set 'LOW', to switch it off,
// but also a 'speed' of 0 will switch it off.
//
// The 'speed' sets the PWM for 0...255, and is for
// both pins of the motor output.
//   For example, if motor 3 side 'A' is used to for a
//   dimmed light at 50% (speed is 128), also the
//   motor 3 side 'B' output will be dimmed for 50%.
// Set to 0 for completelty off (high impedance).
// Set to 255 for fully on.
// Special settings for the PWM speed:
//    Set to -1 for not setting the PWM at all.
//
void motor_output (int output, int high_low, int speed)
{
  int motorPWM;

  switch (output)
  {
    case MOTOR1_A:
    case MOTOR1_B:
      motorPWM = MOTOR1_PWM;
      break;
    case MOTOR2_A:
    case MOTOR2_B:
      motorPWM = MOTOR2_PWM;
      break;
    case MOTOR3_A:
    case MOTOR3_B:
      motorPWM = MOTOR3_PWM;
      break;
    case MOTOR4_A:
    case MOTOR4_B:
      motorPWM = MOTOR4_PWM;
      break;
    default:
      // Use speed as error flag, -3333 = invalid output.
      speed = -3333;
      break;
  }

  if (speed != -3333)
  {
    // Set the direction with the shift register
    // on the MotorShield, even if the speed = -1.
    // In that case the direction will be set, but
    // not the PWM.
    shiftWrite(output, high_low);

    // set PWM only if it is valid
    if (speed >= 0 && speed <= 255)
    {
      analogWrite(motorPWM, speed);
    }
  }
}


// ---------------------------------
// shiftWrite
//
// The parameters are just like digitalWrite().
//
// The output is the pin 0...7 (the pin behind
// the shift register).
// The second parameter is HIGH or LOW.
//
// There is no initialization function.
// Initialization is automatically done at the first
// time it is used.
//
void shiftWrite(int output, int high_low)
{
  static int latch_copy;
  static int shift_register_initialized = false;

  // Do the initialization on the fly,
  // at the first time it is used.
  if (!shift_register_initialized)
  {
    // Set pins for shift register to output
    pinMode(MOTORLATCH, OUTPUT);
    pinMode(MOTORENABLE, OUTPUT);
    pinMode(MOTORDATA, OUTPUT);
    pinMode(MOTORCLK, OUTPUT);

    // Set pins for shift register to default value (low);
    digitalWrite(MOTORDATA, LOW);
    digitalWrite(MOTORLATCH, LOW);
    digitalWrite(MOTORCLK, LOW);
    // Enable the shift register, set Enable pin Low.
    digitalWrite(MOTORENABLE, LOW);

    // start with all outputs (of the shift register) low
    latch_copy = 0;

    shift_register_initialized = true;
  }

  // The defines HIGH and LOW are 1 and 0.
  // So this is valid.
  bitWrite(latch_copy, output, high_low);

  // Use the default Arduino 'shiftOut()' function to
  // shift the bits with the MOTORCLK as clock pulse.
  // The 74HC595 shiftregister wants the MSB first.
  // After that, generate a latch pulse with MOTORLATCH.
  shiftOut(MOTORDATA, MOTORCLK, MSBFIRST, latch_copy);
  delayMicroseconds(5);    // For safety, not really needed.
  digitalWrite(MOTORLATCH, HIGH);
  delayMicroseconds(5);    // For safety, not really needed.
  digitalWrite(MOTORLATCH, LOW);
}


 …
…
