Using C++ on a Raspberry Pi with Blynk

This post is in response to recent posts regarding Blynk and Raspberry Pi’s.

Most of the example sketches you will see are written for Arduino’s and ESP’s. If you have “javascript” skills there’s a small selection of scripts that can be used with nodejs on the Pi. However there are some Blynkers that are much more familiar with C++ than they are with JS.

In the “linux” directory of the Blynk libraries there is a shell script and a Makefile for compiling C code for the Pi and other linux devices. I will concentrate on the Pi here.

Copy the following files for safe keeping:

build.sh
main.cpp

If you haven’t already set up wiringPi on your Pi run the original shell script with:

./build.sh raspberry

Now edit the build.sh shell script to remove all the one off stuff (like installing wiringPi etc) so it looks something like this:

#!/bin/bash
//
case "$1" in
raspberry)
    make clean all target=raspberry
    exit 0
    ;;
linux)
    make clean all
    exit 0
    ;;
esac

echo "Please specify platform: raspberry, linux"
exit 1

We will now modify main.cpp so it compiles the following project.

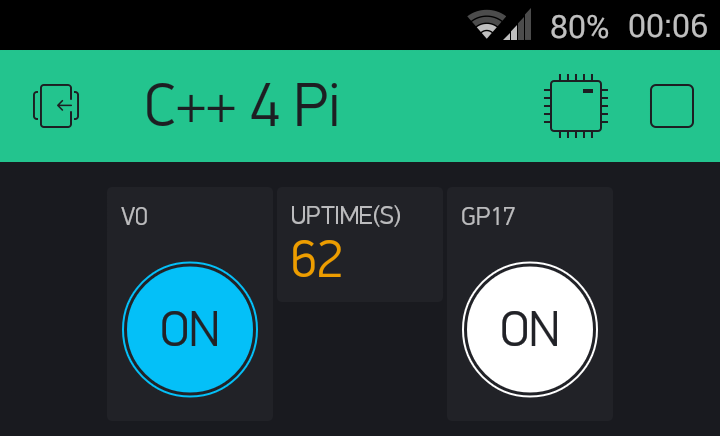
It’s basically a PushData for Pi, with a few extras, using wiringPi so you can select “GPIO” pins directly in the project. Without messing around with various libraries the revised main.cpp is as follows:

// Blynk "gp" numbers are BCM numbers, so gp17 is physical pin 11 
// #define BLYNK_DEBUG
#define BLYNK_PRINT stdout
#ifdef RASPBERRY
 #include <BlynkApiWiringPi.h>
#else
 #include <BlynkApiLinux.h>
#endif
#include <BlynkSocket.h>
#include <BlynkOptionsParser.h>

static BlynkTransportSocket _blynkTransport;
BlynkSocket Blynk(_blynkTransport);

#include <BlynkWidgets.h>

unsigned int uptime;      		// 1 second intervals
unsigned int pinStatus;   		// status of BCM 17
unsigned int lastpinStatus = 0; // to toggle

void myTimerEvent()       		// button widget on V0 or direct access gp17 button
{
  uptime = (millis() / 1000);
  Blynk.virtualWrite(V1, uptime);
  pinStatus = digitalRead(17);
  if(pinStatus != lastpinStatus){
	lastpinStatus = pinStatus;
	printf("GP17 pin status: %i\n", pinStatus);
	if(pinStatus == 1){    // this is to synchronise V1 button if gp17 button is pressed
		Blynk.virtualWrite(V0, 1);
	}
	else{
		Blynk.virtualWrite(V0, 0);
	}
  }
}

void setup()
{
  //nothing to go here yet
}

BLYNK_WRITE(V0)  // button set at PUSH frequency
{
  if(param[0] == 1){
	printf("V1 turned device ON\n");
	digitalWrite (17, HIGH) ;  
  }
  else{
	printf("V1 turned device OFF\n");
	digitalWrite (17, LOW) ;
  }
}

void loop()
{
  Blynk.run();
  if(millis() >= uptime + 1){  // 1 second intervals
	myTimerEvent();
  }
}

int main(int argc, char* argv[])
{
    const char *auth, *serv;
    uint16_t port;
    parse_options(argc, argv, auth, serv, port);
    Blynk.begin(auth, serv, port);
    while(true) {
		loop();
    }
    return 0;
}

Once you have saved the revised main.cpp just run the script again:

./build.sh raspberry

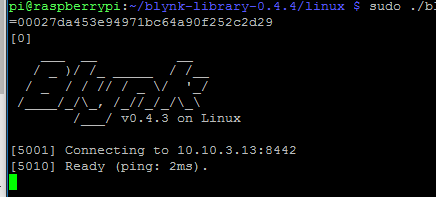
and then start your connection to Blynk by replacing xxxxxxxxx with your token:

sudo ./blynk --token=xxxxxxxxxxxxx

Those 2 commands and a few button presses in the app will look like this:

  pi@pizero:~/blynk0.4.4/libraries/Blynk/linux $ ./build.sh raspberry                                                            rm main.o BlynkDebug.o ../src/utility/BlynkHandlers.o blynk
    g++ -I ../src/ -I ./ -DLINUX -c -O3 -w -DRASPBERRY main.cpp -o main.o
    g++ -I ../src/ -I ./ -DLINUX -c -O3 -w -DRASPBERRY BlynkDebug.cpp -o BlynkDebug.o
    g++ -I ../src/ -I ./ -DLINUX -c -O3 -w -DRASPBERRY ../src/utility/BlynkHandlers.cpp -o ../src/utility/BlynkHandlers.o
    g++ main.o BlynkDebug.o ../src/utility/BlynkHandlers.o -lrt -lpthread -s -lwiringPi -o blynk
    pi@pizero:~/blynk0.4.4/libraries/Blynk/linux $ sudo ./blynk --token=xxxxxxxxxxxxx
    [1]
    ___  __          __
   / _ )/ /_ _____  / /__
  / _  / / // / _ \/  '_/
 /____/_/\_, /_//_/_/\_\
        /___/ v0.4.4 on Linux

[5001] Connecting to blynk-cloud.com:8442
[5374] Ready (ping: 101ms).
GP17 pin status: 1
GP17 pin status: 0
V1 turned device ON
GP17 pin status: 1
V1 turned device OFF
GP17 pin status: 0
V1 turned device ON
GP17 pin status: 1
12 Likes

Thank you @Costas

The only issue I ended up with was that even though I downloaded 0.4.4:

wget https://github.com/blynkkk/blynk-library/archive/v0.4.4.tar.gz

It extracted out to 0.4.3 (using Windows for ease of display here - was downloaded and extracted on RPi)

How did you get the latest library for Linux?

The procedure for 0.4.4, which obviously keeps changing for anyone reading this in a week or two’s time, is:

mkdir blynk0.4.4
cd blynk0.4.4
wget https://github.com/blynkkk/blynk-library/releases/download/v0.4.4/Blynk_Release_v0.4.4.zip
unzip *.zip

For future releases just visit https://github.com/blynkkk/blynk-library/releases and obtain the url for the zip.

How are you and others picking up old libraries?

1 Like

Looks like a bad tar @Dmitriy and @vshymanskyy

@Gunner yes I spotted it.

@Dmitriy and @vshymanskyy the tar for 0.4.4 shows 0.4.3 in library.properties and library.json. In fact looking at the dates of the headers it’s all 0.4.3.

That explains all the 0.4.3’s that keep popping up on the forum. Which archive is used by Arduino library manager that I recommend not using?

1 Like

@Costas So as this is C++ and seems almost like working with Arduino, does that mean that it can use some of the same basic libraries and code?

Meanwhile I have the example slightly tweaked to also trip some relays and fade an LED as well as run the client automatically at reboot… finally, coding progress with RPi. Unfortunately, I don’t have a CodeShield type hat to easily provide hardware and sensors to the RPi… and have to keep aware of the 3.3v tolerance when I add my own.

ps, I am learning to really dislike PATH inconsistencies; dozens of ways, some work, some don’t, some work sometimes… arrrggg :stuck_out_tongue: 
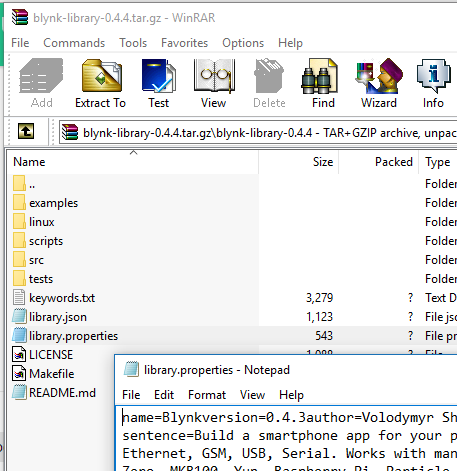
Where is the darn master PATH file stored, so I can edit it and clean it up?? Google hasn’t given it up yet.

On the Pi it’s probably an enviroment variable. It usually resides in your bash_profile (~/.bash_profile or something similar.

Thanks, I will look. I only recently realized that ~/. is just a place holder for part of the path… kept messing me up when looking for stuffs.

Linux, the best way to wrap your head into a pretzel :confounded:

The most difficult aspect, if you ask me, is the user rights system. A Windows operator is basically always local administrator. Linux is a lot more strict with that.

But that is another discussion and I’m not sure this is the right place for that. Though I’d love to help ppl with the Linux parts, I’m not sure there is an appropriate category for that here. Maybe the RasPi needs a separate category, what’d you think @Dmitriy ? Since it’s a kind of “different” product from your basic MCU.

That is why I created this thread. The elitists slate the Arduino implementation of C++ but it’s something that many, many people, me included, are very familiar with. I made the basic example look as much like an Arduino sketch as I was able, even including some parts that are not technically needed.

Yes and no. Obviously a Raspberry Pi is not an Arduino but the underlying C++ code within the libraries can be compiled for most platforms. Arduino made the linking of libraries and compilation so seamless that many users are not aware of the basic processes that are involved. I’m certainly not knocking Arduino for that.

If you study the Makefile you will see the basics of how additional libraries and the required paths are included in the compilation but it’s not a straightforward process and takes some time to get up and running. I just wanted to offer the basic GPIO control as a starter and you will see the millis() hack for timed intervals rather than the preferred SimpleTimer used with Arduino.

I too struggle with paths but I did post a reference to bash_profile a few days ago. More to follow later …

http://serverfault.com/questions/166383/how-set-path-for-all-users-in-debian long story short, there are a couple nice hints here :slight_smile:

Ah ha! that’s why it looked so strange… but I hadn’t gotten around to digging into it more.

Yup, They both empowered and spoiled the non-elite with quasi coding powers :smiley:

The different versions of linux have broadly similar approaches for the path but as per the recent RPI3 thread at Problem installing in RPi3: onoff library and later - #44 by Costas the syntax to “permanently” add an entry to the path on a Raspberry Pi takes the following syntax:

echo 'export PATH=$PATH:/opt/nodejs/bin/' >> ~/.bashrc

Having changed the path you can simply edit the .baschrc file with nano at a later date if you wish.

I thought it was time to update my RPi client to latest 0.4.6 library.

However, after downloading, unzipping and much fussing about to get the files where I wanted them. I ran my script just fine… but it still says 0.4.3 both as it starts and according to the Admin Page. But the library.properties clearly says 0.4.6.

More typos <–hopeful wishing?? or do I actually have to go through all that file modding and script building after each library upgrade? (ok, similar to Arduino - but much more painful :unamused: )

Of course, that will be real fun this time around, since the upgrade overwrote the main.cpp which of course had my customised script :rage: --> LINUX. Must remember to rename main.cpp to something else next time.

Hey, sorry for that… Yes it’s arduino library removing stuff during updates… So you should build outside the Arduino ide for linux… I will add a note to the docs.

Wait, what? Are you saying I “could - but shouldn’t” build my wiringPi code using Arduino IDE?? I coded everything in the CLI using Nano… a pain, but I didn’t know I could do easily otherwise… I didn’t think it would compile/verify in the IDE anyhow, so I didn’t bother trying.

Or am I just misinterpreting something? Probable… just hearing the work Linux scrambles my brain :stuck_out_tongue_winking_eye:

)))
well, no. AFAIK you can’t run Arduino sketches on raspberry hardware directly.
Sorry, I have misunderstood the way you lost your main.cpp file.

So everytime when I want to run a blynk project/example I’ve to edit main.cpp file, then build and connect it to my blynk app by the project’s token, right?

@fabianpi yes if you want to use C++ but Blynk also has the javascript (node) client.