Project Recommendation ESP8266 and Blynk

Hello, I am new to this area and I would need your guidance. So, I want to build a project with ESP8266 12F and Blynk application.
The project should do the following:
The ESP monitors the state of a magnetic contact ( open / closed door ) and the state of a pushbutton ( the ringer button ) .

When they change their state I receive a sms message on my phone. From the Blynk application on the phone, I can order 3 relays, two will be on-off command and the third one will be ordered for 2-3 seconds, say.
In other words, when someone calls the gate to be announced on the phone and I can turn on my door in the blynk application. The door is provided with intercom and electromagnetic yala. The other two push buttons in the application will light the gate light.
Do you think you can guide me?

Thank you very much.

We are users helping users… so no one is likely to make it for you (and there are many ways to make what you discribe), but we can try to assist with your initial learning about Blynk.

Start with the basics. Blink an LED with a Button Widget, then use a Display widget to show the state change of a GPIO with a physical button. Then try it with Virtual Pins, and so on.

You will build find yourself increasing your “Lego” building blocks of code and knowledge until making your project is possible.

If you are describing it correctly, then this is a basic ESP8266 chip… and you will be better suited to start with this chip built into a development board like a NodeMCU or Wemos D1 Mini, with easy access pins and USB programming and power.

Then start reading and experimenting with the available Documentation and basic examples.

Hello Gunner,

First of all, I did not want anyone to do this project for me. I was thinking that there is a colleague who has already done this project and would like to share it with other community colleagues. Secondly, thank you very much for the clues presented by you, I will begin to read first, because in Blync I see a lot of new things, beautiful and especially of the future.
Once again, thank you

Hello, I have a question.
In a simple project to open a door with the Blynk application, to command on/off a led / relay command can be given from 2-3 phones?
If possible an informative link.

Thank you in advance.

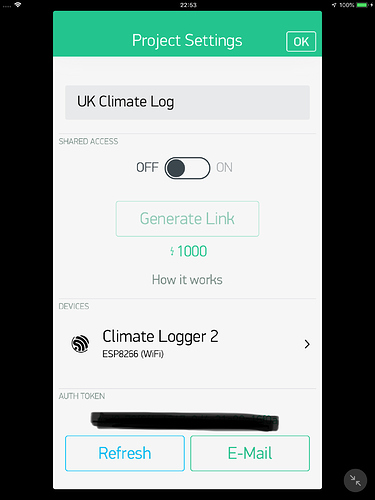
If you share your project with other people the are able to use the project without being able to edit it.

Sharing costs 1000 units of energy, regardless of how many shared users access the project.
Once shared, you can edit the project as often as you wish, and these changes are reflected in the shared project.

Pete.

Thank you very much for the answer.
This project will be to open a door, my son and my wife and I.
I am glad that this is possible.
Can you help me with information, or where to look for?

Sincerely, I salute!

Sharing is done from this screen in the app:

You’ll need to a NodeMCU and a relay.
Is your gate release AC or DC?
Do you have a power supply near the gate?

Pete.

Consider webhooks to Telegram for your notifications. I’ve been using this method for a couple of months now and they are working great. Advantages are that you can add or remove anyone you wish to the chat group you want to receive the messages/alerts

Yes, the gate has a 12v power supply that I will lower to 3.3v. And yes, I have NodeMCU (ESP12E).
I found a project already done, but I’m struggling to change it. He is made to command a 3-wire servomotor and I need to command an on / off relay but the bad part is that I do not know programming, I try to change with tutorials.
Once more, thanks for the information.

I hear another wonderful thing, really want to be notified and at the same time can send an order to open the door. Can you share the project you already use?
Thank you.

This was my starting point GitHub - Gianbacchio/ESP8266-TelegramBot: Telegram Bot Library for ESP8266 on Arduino IDE. Telegram bots are quite versatile. It’s possible to send commands to send digital i/o high or low, have user access levels, request data from sensors etc. But pleased be advised, Telegram bots are seen publicly so you need to make sure that your telegram chat ID is included in some kind of authentication check before allowing commands to be sent. I’ve integrated Blynk to control user access and user access levels ie. some may only be allowed to receive sensor data but others with higher user access may activate things.

Keep in mind, the project must be running on your smart device (e.g., smart phone) in order for your son and wife to access it from their smart device.

And you have a pretty attractive project worth trying!
Thanks for your guidance.

You didn’t answer this question. When your current gate release operates (assuming you have one) does it just click when opened and closed, or does it buzz while it’s activated?

If you have some code already then post it (correctly formatted with backticks) and we’ll tell you if it’s a good starting point.

Pete

That’s exactly what I want, anyway, it’s enough!

However, I still have a question: now the application runs in the background and the messages do not come, the messages come only when I access the application interface, is it correct?

My advice would be to get the remote gate release working correctly, then add-in features like notifications at a later date.

Pete.

Hello, the project is already hardware, and it’s already working that I need to add or change the on / off relay function instead of the servomotor.
If I post here the Arduino code, could someone help me explain how to change the function of the servomotor in the relay?

A beautiful day!

The reason I keep asking about your type of gate release is that I I have had issues with AC releases before - read this for more info:

It depends on the code.
If it’s not well written then it may not be suitable for adapting for use with Blynk, which is why I said:

One thing we will need to know is whether the relay you’re using is active HIGH or LOW, and which GPIO pin you plan to connect it to.

Pete.

Hello,
sorry for forgetting to answer your question.
To be understood correctly, can I post here the link from where I took the project? which I used for a few months until the servomotor was damaged.
Now I have installed an access control system rfid and for it I need to change the side of the servomotor with a simple push button push button that will actuate the button on the access control keypad which will drive the electromagnet on/off for 1-3 seconds.

A beautiful day!

Good evening,
I’ve watched Part 2, 3, 4 and I see there are many interesting things to learn. The man who lives learning!

Regarding the question:
One thing we will need to know is whether the relay you’re using is active HIGH or LOW, and which GPIO pin you plan to connect it to

The relay used will be LOW, when it will receive the command
for opening the door will go into HIGH.
and GIPO 12 will be for relay control.

The old code used would be:

#define BLYNK_PRINT Serial    // Comment this out to disable prints and save space
#include <ESP8266WiFi.h>
#include <BlynkSimpleEsp8266.h>
#include <Servo.h>  // servo library

#ifdef DEBUG_ENABLED
#define BLYNK_PRINT Serial
#define BB_DEBUG(msg) {\
  Serial.print("[" + String(millis()) + "] "); \
  Serial.println(msg); }
#else
#define BB_DEBUG(msg)
#endif

////////////////////
// Blynk Settings //
////////////////////

char BlynkAuth[] = "a78c0645e3274129a832ffa2da999510";  // cloud
char WiFiNetwork[] = "Michele";
char WiFiPassword[] = "jenniferlopez";

///////////////////////
// Hardware Settings //
///////////////////////
#define LED_PIN    5
#define SERVO_PIN  12

#define DOOR_STATE_VIRTUAL        V25
#define SERIAL_VIRTUAL            V21
#define LOCK_BUTTON_PIN           0
#define BUTTON_VIRTUAL            V26


Servo servo1;
int pos;

void unlock() {
  if (pos == 0) {
    pos = 15;
    servo1.write(pos);
    delay(20);
  }
}

void lock() {
  if (pos == 15) {
    pos = 0;
    servo1.write(pos);
    delay(20);
  } 
}

void toggle() {
  if (pos == 0) {
    pos = 15;
  } else {
    pos = 0;
  }

  servo1.write(pos);
  delay(20);
}

/* 12 12 12 12 12 12 12 12 12 12 12 12 12
 12 Experiment 12: Terminal            12
 12 Widget(s):                         12
 12  - Terminal: V21, On, On           12
 12 12 12 12 12 12 12 12 12 12 12 12 12 */
String emailAddress = "";
String boardName = "Blynk Lock";

WidgetTerminal terminal(SERIAL_VIRTUAL);

BLYNK_WRITE(SERIAL_VIRTUAL)
{
  String incoming = param.asStr();
  Serial.println(incoming);
  
  if (incoming.charAt(0) == '!')
  {
    String emailAdd = incoming.substring(1, incoming.length());
    for (int i=0; i<emailAdd.length(); i++)
    {
      if (emailAdd.charAt(i) == ' ')
        emailAdd.remove(i, 1);
    }
    terminal.println("Your email is:" + emailAdd + ".");
    emailAddress = emailAdd;
    terminal.flush();
  }
  if (incoming.charAt(0) == '$')
  {
    String newName = incoming.substring(1, incoming.length());

    boardName = newName;
    terminal.println("Board name set to: " + boardName + ".");
    terminal.flush();
  }
}


/* 14 14 14 14 14 14 14 14 14 14 14 14 14
 14 Experiment 14: Push                14
 14 Widget(s):                         14
 14  - Push: Off, On (iPhone)          14
 14  - Value: DoorState, V25, 1sec     14
 14  - Button: PushEnable, V26, Switch 14
 14 14 14 14 14 14 14 14 14 14 14 14 14 */
#define DOOR_SWITCH_PIN 16
#define NOTIFICATION_LIMIT 60000
unsigned long lastDoorSwitchNotification = 0;
uint8_t lastSwitchState = 255;

BLYNK_READ(DOOR_STATE_VIRTUAL)
{
  uint8_t switchState = digitalRead(DOOR_SWITCH_PIN); // Read the door switch pin
  // Pin 16 is pulled low internally. If the switch (and door) is open,
  // pin 16 is LOW. If the switch is closed (door too), pin 16 is HIGH.
  // LOW = open
  // HIGH = closed
  if (switchState) {
    Blynk.virtualWrite(DOOR_STATE_VIRTUAL, "Close"); // Update virtual variable
    digitalWrite(LED_PIN, 0);
  }
  else {
    Blynk.virtualWrite(DOOR_STATE_VIRTUAL, "Open");
    digitalWrite(LED_PIN, 255);
  }
    
  if (lastSwitchState != switchState) // If the state has changed
  {
    if (switchState) // If the switch is closed (door shut)
    {
      BB_DEBUG("Notified closed.");
      
      if (lastDoorSwitchNotification && (lastDoorSwitchNotification + NOTIFICATION_LIMIT > millis()))
      {
        int timeLeft = (lastDoorSwitchNotification + NOTIFICATION_LIMIT - millis()) / 1000;
        BB_DEBUG("Can't notify for " + String(timeLeft) + "s");
        terminal.println("Door closed. Can't notify for " + String(timeLeft) + "s");
        terminal.flush();
      }
      else
      {
        Blynk.notify("Door closed\r\nFrom: " + boardName + "\r\n[" + String(millis()) + "]");
        terminal.println("Door closed!");
        terminal.flush();
        lastDoorSwitchNotification = millis();
      }
    }
    else
    { 
      BB_DEBUG("Notified opened.");
      // Send the notification
      if (lastDoorSwitchNotification && (lastDoorSwitchNotification + NOTIFICATION_LIMIT > millis()))
      {
        int timeLeft = (lastDoorSwitchNotification + NOTIFICATION_LIMIT - millis()) / 1000;
        BB_DEBUG("Can't notify for " + String(timeLeft) + "s");
        terminal.println("Door open. Can't notify for " + String(timeLeft) + "s");
        terminal.flush();
      }
      else
      {
        Blynk.notify("Door open\r\nFrom: " + boardName + "\r\n[" + String(millis()) + "]");
        terminal.println("Door opened!");
        terminal.flush();
        lastDoorSwitchNotification = millis();
      }
    }
    lastSwitchState = switchState;
  }  
}


BLYNK_WRITE(V26)
{
  int pinValue = param.asInt(); // assigning incoming value from pin V26 to a variable
  // You can also use:
  // String i = param.asStr();
  // double d = param.asDouble();
  Serial.print("V26 Button value is: ");
  Serial.println(pinValue);

  toggle();
}

void setup()
{
  // Initialize hardware
  Serial.begin(9600); // Serial
  pinMode(LED_PIN, OUTPUT); // LED output

  // Set up the pin 16 door switch input:
  pinMode(DOOR_SWITCH_PIN, INPUT_PULLDOWN_16);
  lastSwitchState = digitalRead(DOOR_SWITCH_PIN);

  // Initialize Blynk
  Blynk.begin(BlynkAuth, WiFiNetwork, WiFiPassword);
//  Blynk.begin(BlynkAuth, WiFiNetwork, WiFiPassword, IPAddress(192,168,1,4));

  servo1.attach(SERVO_PIN);
  pos = 15;
  servo1.write(pos);

  
}

void loop()
{
  // Execute Blynk.run() as often as possible during the loop
  Blynk.run(); 


}

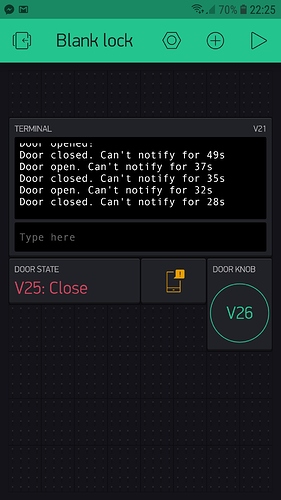
Buttons used in the application:

I asked but did not answer. Is it normal that the application running in the background does not receive sound notifications? These only appear when I enter the application!

Thank you.