Can someone help me I am not getting the temperature in the app, already checked everything and everything is correct… In the same project I have a suite and this works perfectly, only the temperature I do not receive. I using MKR 1000
Well if it’s all correct then surely it will work?
Jokes aside, we need more info than that I’m afraid.
2 Likes
Well, obviously everything isn’t correct, or it would be working.
It’s impossible to say what the problem is unless you provide full details of your project, including your code (correctly formatted with triple backticks of course).
Pete.
3 Likes
Here’s the Code:
#include <SPI.h>
#include <WiFi101.h>
#include <BlynkSimpleMKR1000.h>
#include <SimpleTimer.h>
#include "DHT.h"

#define BLYNK_PRINT Serial    // Comment this out to disable prints and save space
#define DHTPIN 2    // what pin we're connected to
#define DHTTYPE DHT11   // DHT 11

DHT dht(DHTPIN, DHTTYPE);
// You should get Auth Token in the Blynk App.
// Go to the Project Settings (nut icon).
char auth[] = "ssssssss";

SimpleTimer timer;

// Your WiFi credentials.
// Set password to "" for open networks.
char ssid[] = "sssssss";
char pass[] = "sssssss";

void TimerEvent()
{
  int h = dht.readHumidity();
  int t = dht.readTemperature();
  Blynk.virtualWrite(V6, h);
  Blynk.virtualWrite(V5, t);
}

void setup()
{
  Serial.begin(115200);
  Blynk.begin(auth, ssid, pass, "46.101.143.225", 80);
  timer.setInterval(1000L, TimerEvent);
  dht.begin();
}

void loop()
{
  Blynk.run();
  timer.run();

}
DHT22 and suppose DHT11, need at least 2sec for a complete measurement.
Try to increase interval to 2000ms
1 Like
Thanks for the tip friend, but it did not work.
The strange thing is that the button on/off works.
And when I withdraw the DTH11 signal pin the serial monitor accuses “Fail Read”…
???
I’ve edited your post and replaced the characters that you used with backticks.
Please use the correct symbols in future.
Triple backticks look like this:
```
I’d try the following:
Add a serial print of the temperature and humidity variables and see what this shows in your serial monitor
Review how you’ve set-up the gauge widgets in your app. Post a screenshot of the configuration if you’re unsure.
You’re doing nothing with the output from your button widget in your code, so all you’re seeing is the widget doing what it should do. This tells you nothing about your code or the connection to your device.
Pete.
Pretty sure you need to declare h and t as float, not int 
int h = dht.readHumidity();
int t = dht.readTemperature();
1 Like
a- Thanks for editing for me… Sorry, but I’m a beginner… I’m not going to miss anymore. Hope.
I added the serial print and showed the result zero, the same as in Blynk. See how the code came with my change.:
#define BLYNK_PRINT Serial    // Comment this out to disable prints and save space
#include <SPI.h>
#include <WiFi101.h>
#include <BlynkSimpleMKR1000.h>
#include <SimpleTimer.h>
#include "DHT.h"
//#include <EduIntro.h> // acrescentei

#define DHTPIN 2    // what pin we're connected to
#define DHTTYPE DHT11   // DHT 11
DHT dht(DHTPIN, DHTTYPE);
// You should get Auth Token in the Blynk App.
// Go to the Project Settings (nut icon).
char auth[] = "xxxxxxxxxx";

SimpleTimer timer;

// Your WiFi credentials.
// Set password to "" for open networks.
char ssid[] = "Novo-de-cima";
char pass[] = "xxxxxxxxx";

void TimerEvent()
{
  int h = dht.readHumidity();
  int t = dht.readTemperature();
  int C;
  C = dht.readTemperature(); //acrescentei
  Blynk.virtualWrite(V6, h);
  Blynk.virtualWrite(V5, t);
  Serial.println(C); //acrescentei
}

void setup()
{
  Serial.begin(115200);
  //Blynk.begin(auth, ssid, pass);
  // Or specify server using one of those commands:
  //Blynk.begin(auth, ssid, pass, "blynk-cloud.com", 80);
  Blynk.begin(auth, ssid, pass, "46.101.143.225", 80);
  timer.setInterval(2000L, TimerEvent);
  dht.begin();
}

void loop()
{


  Blynk.run();
  timer.run();

}
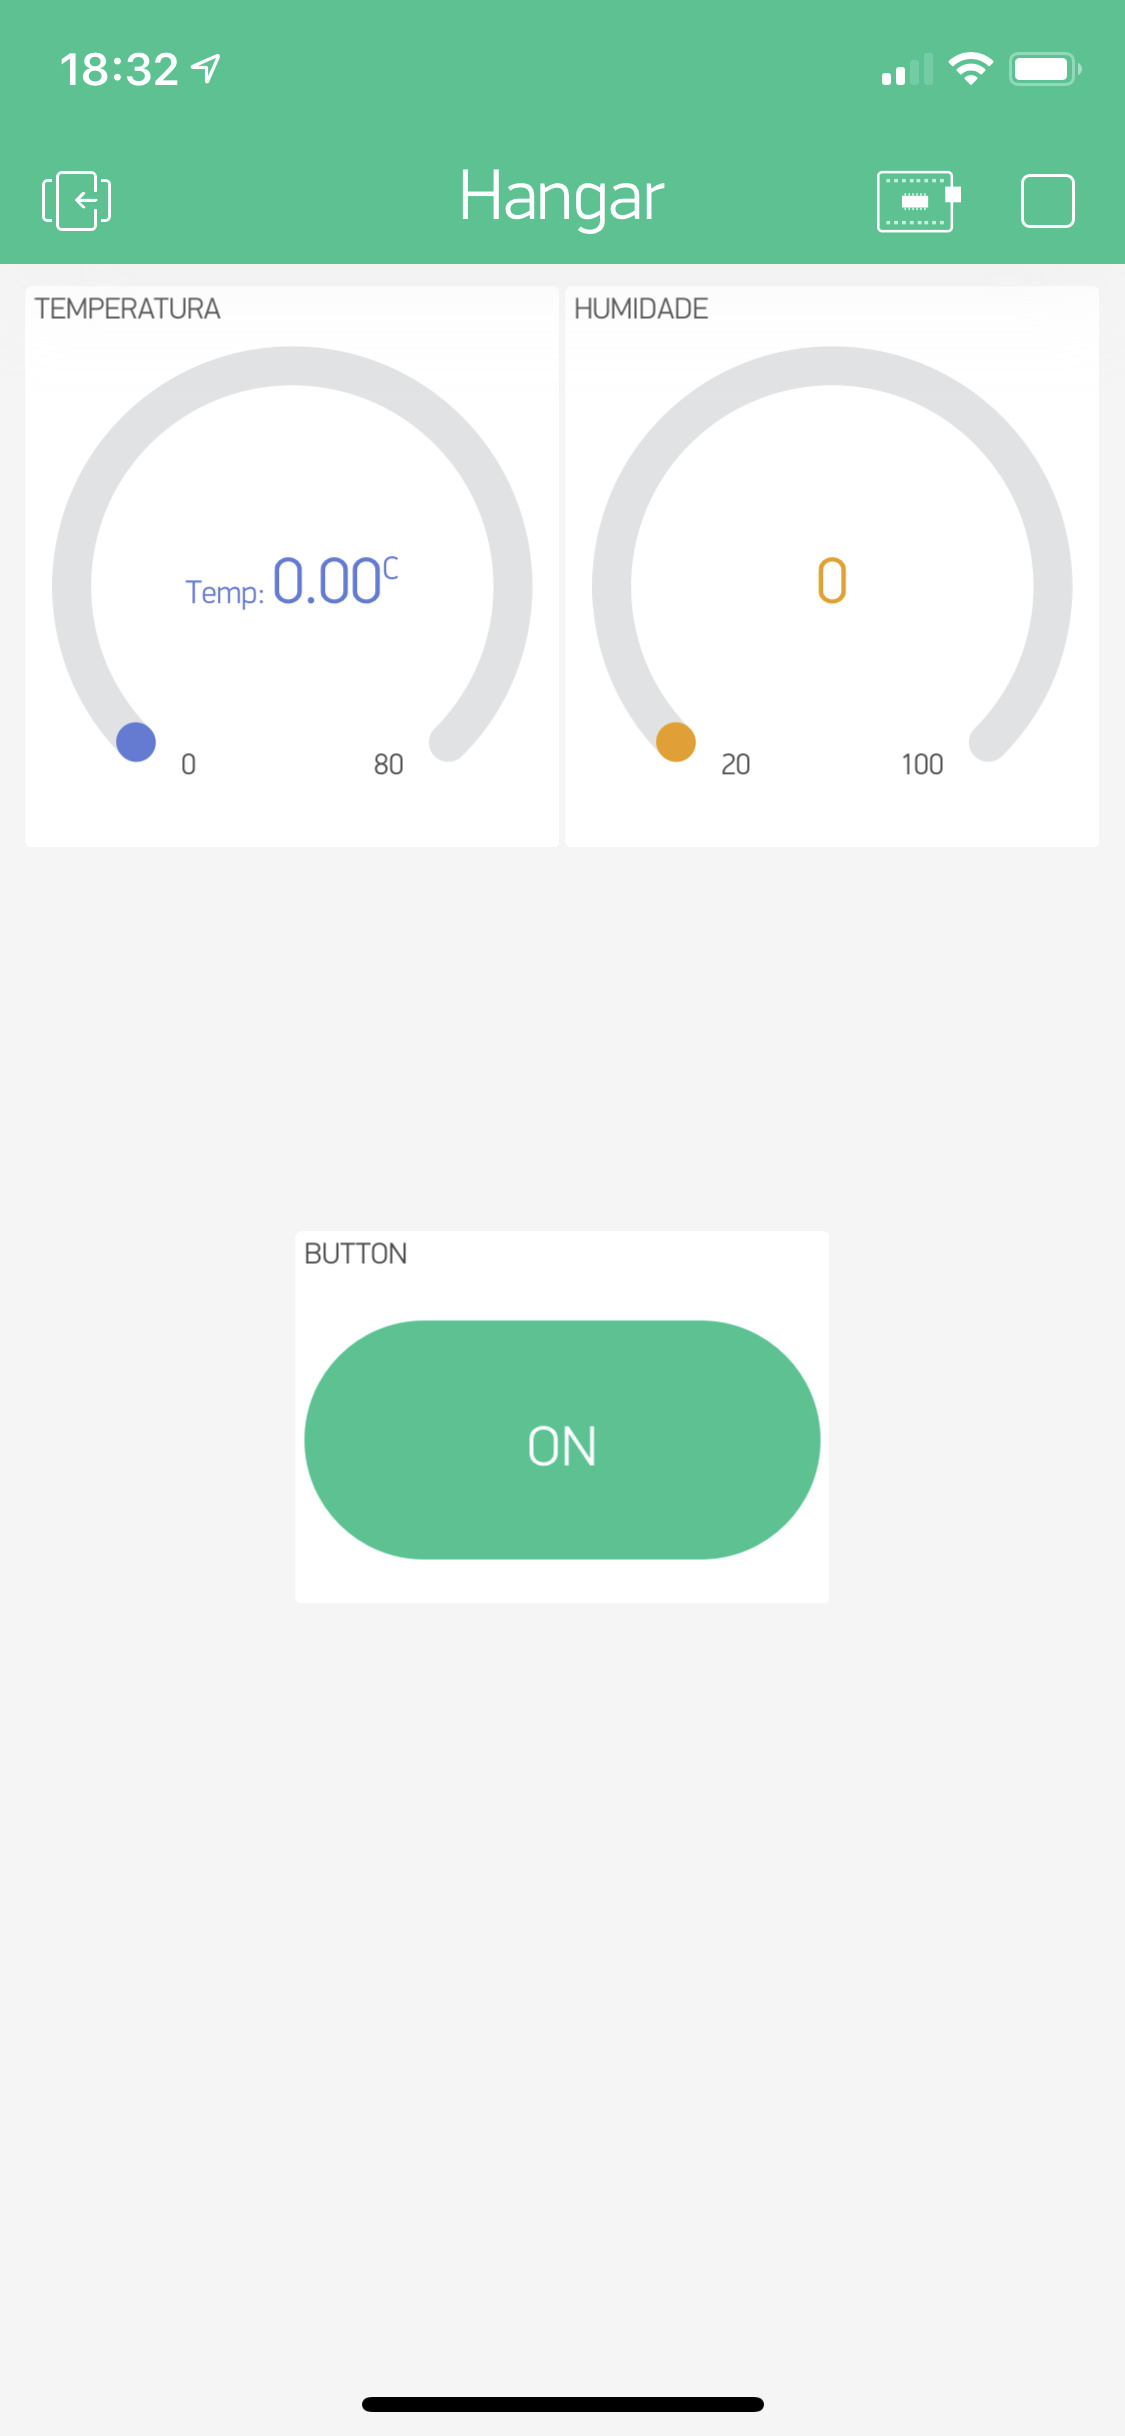
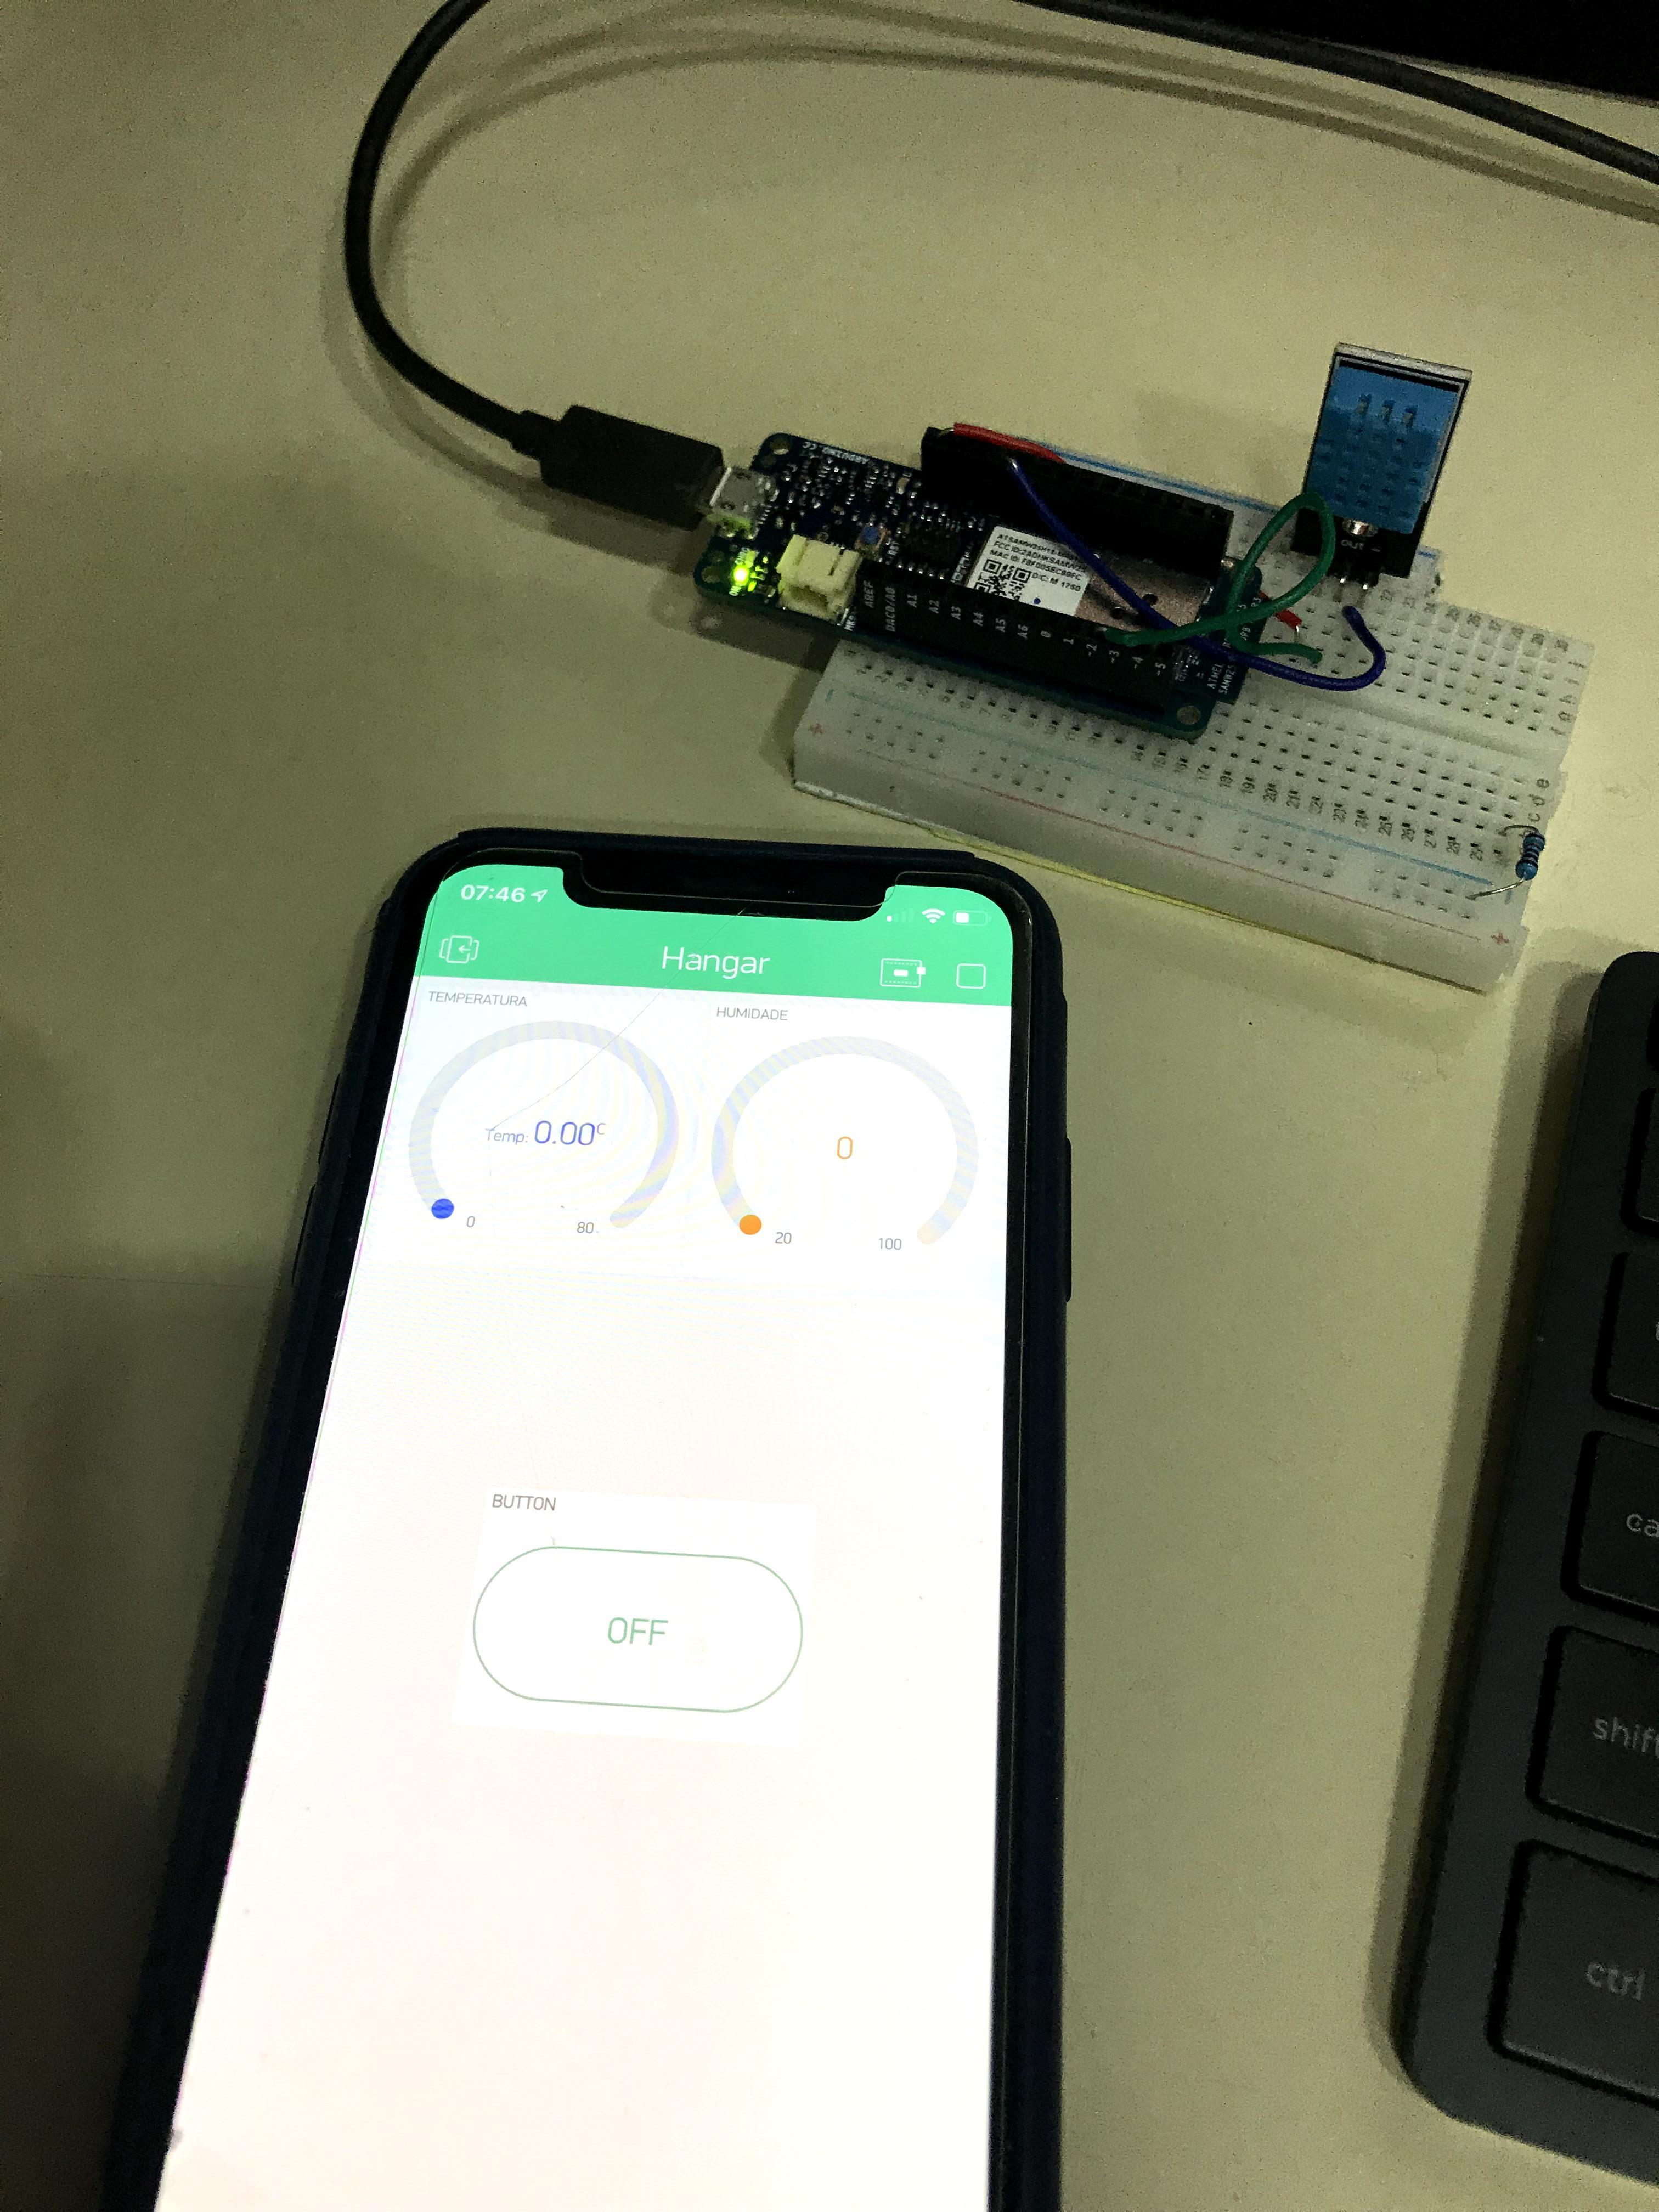
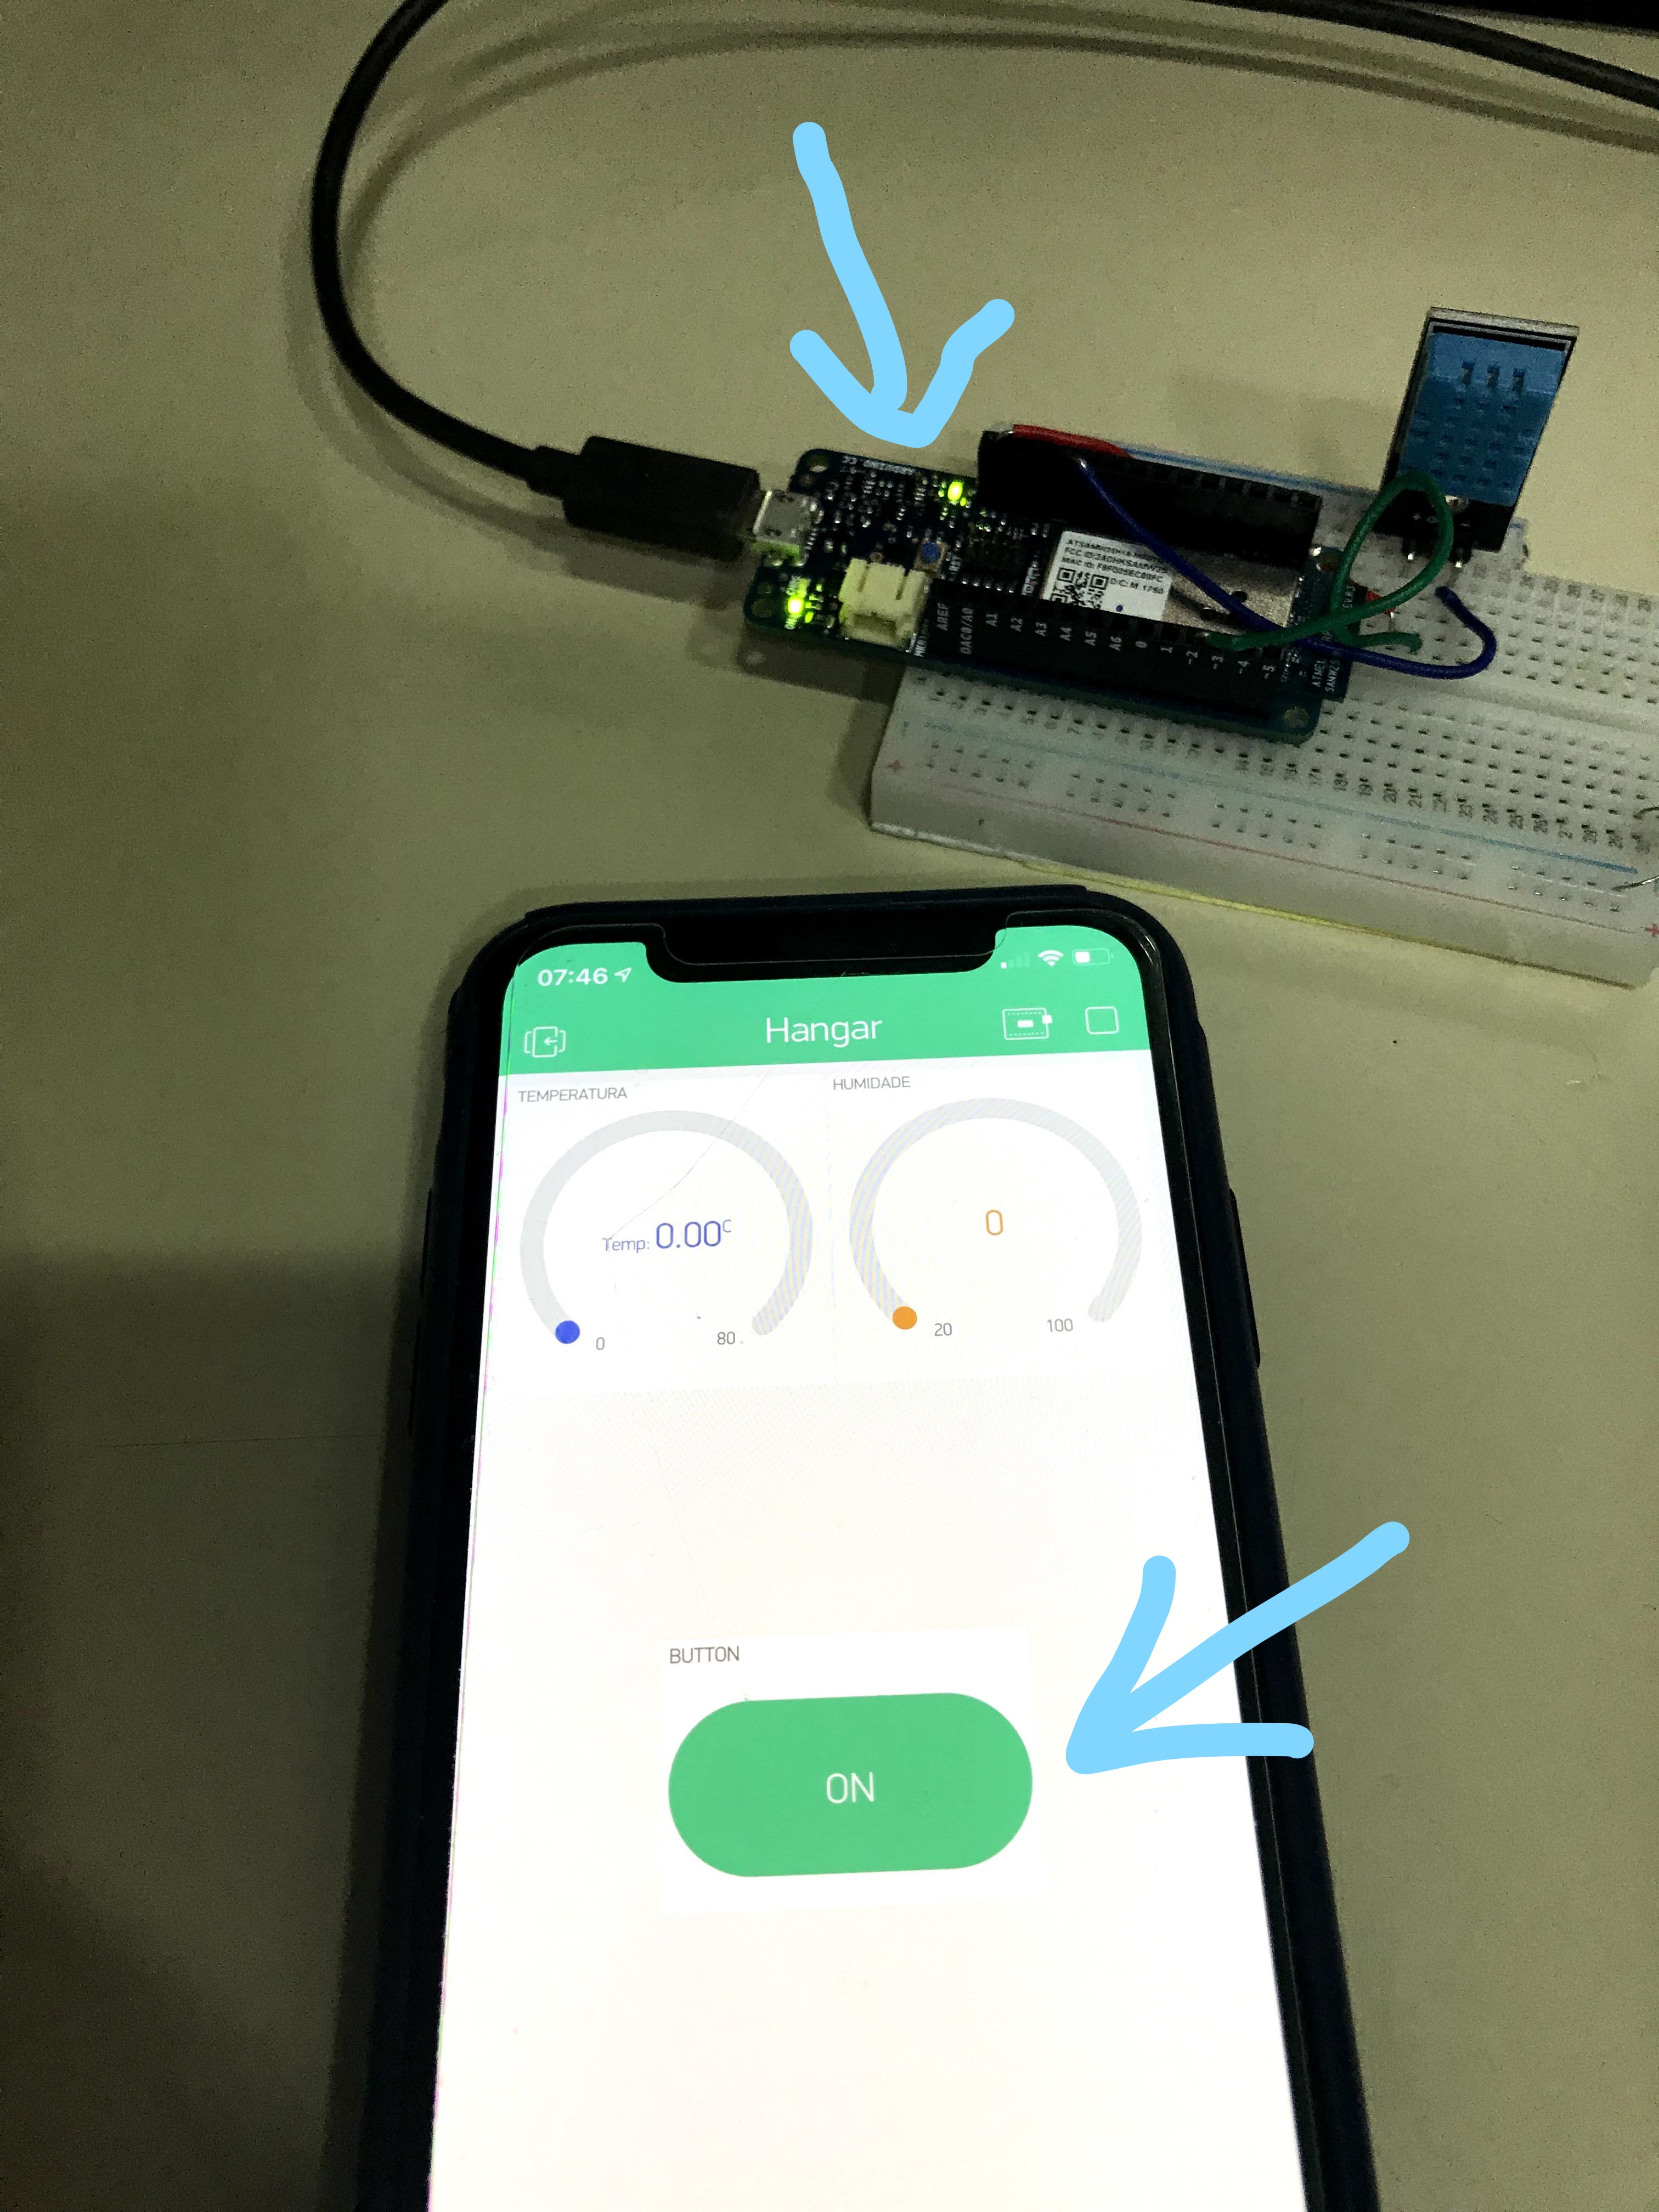
b- Widget configuration:

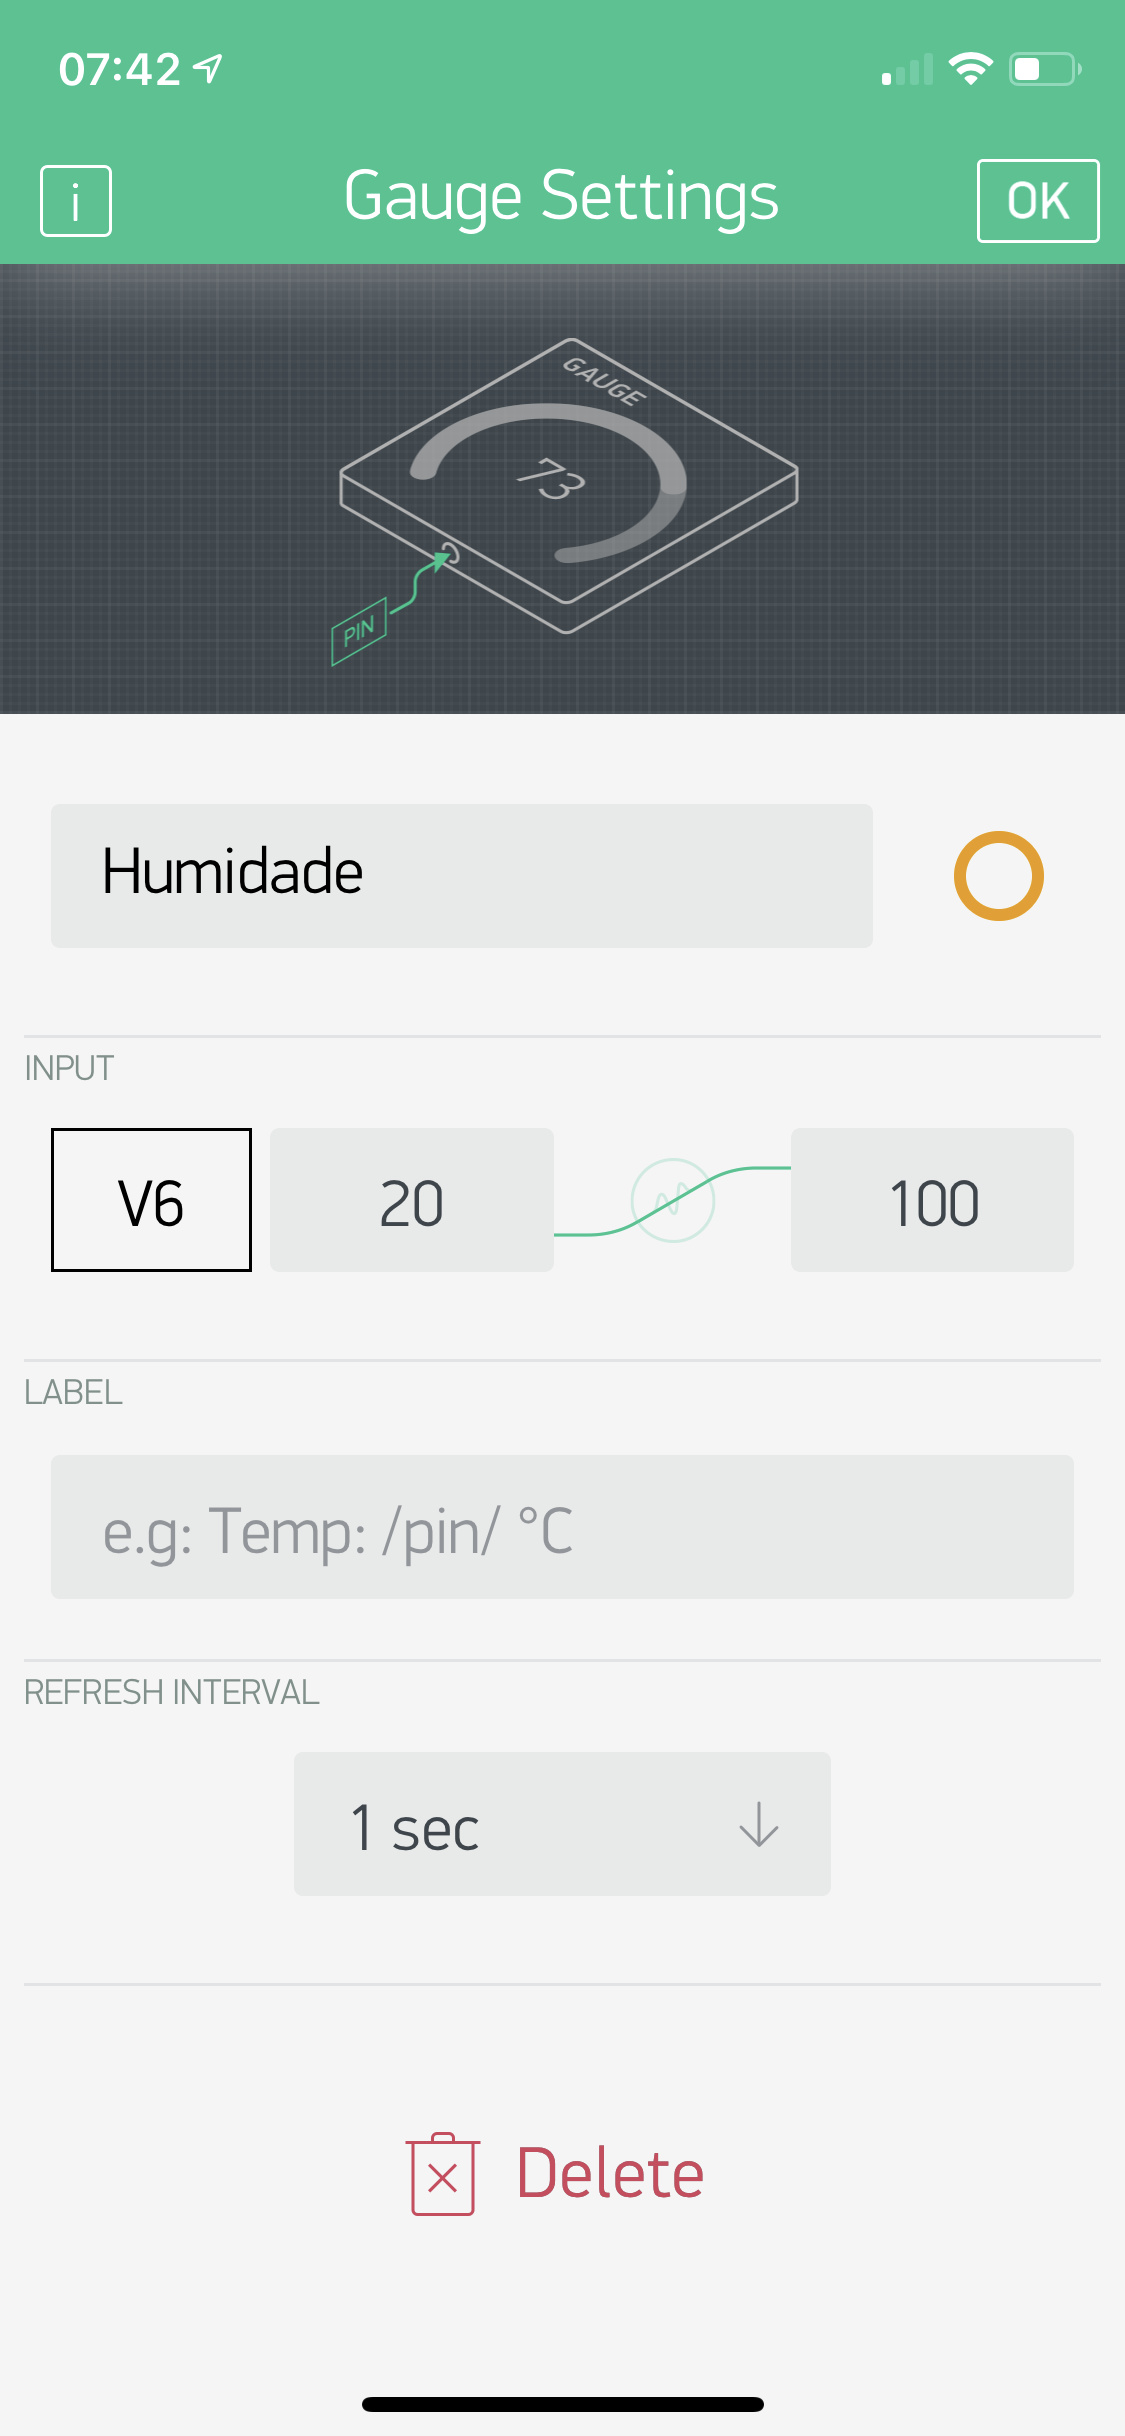
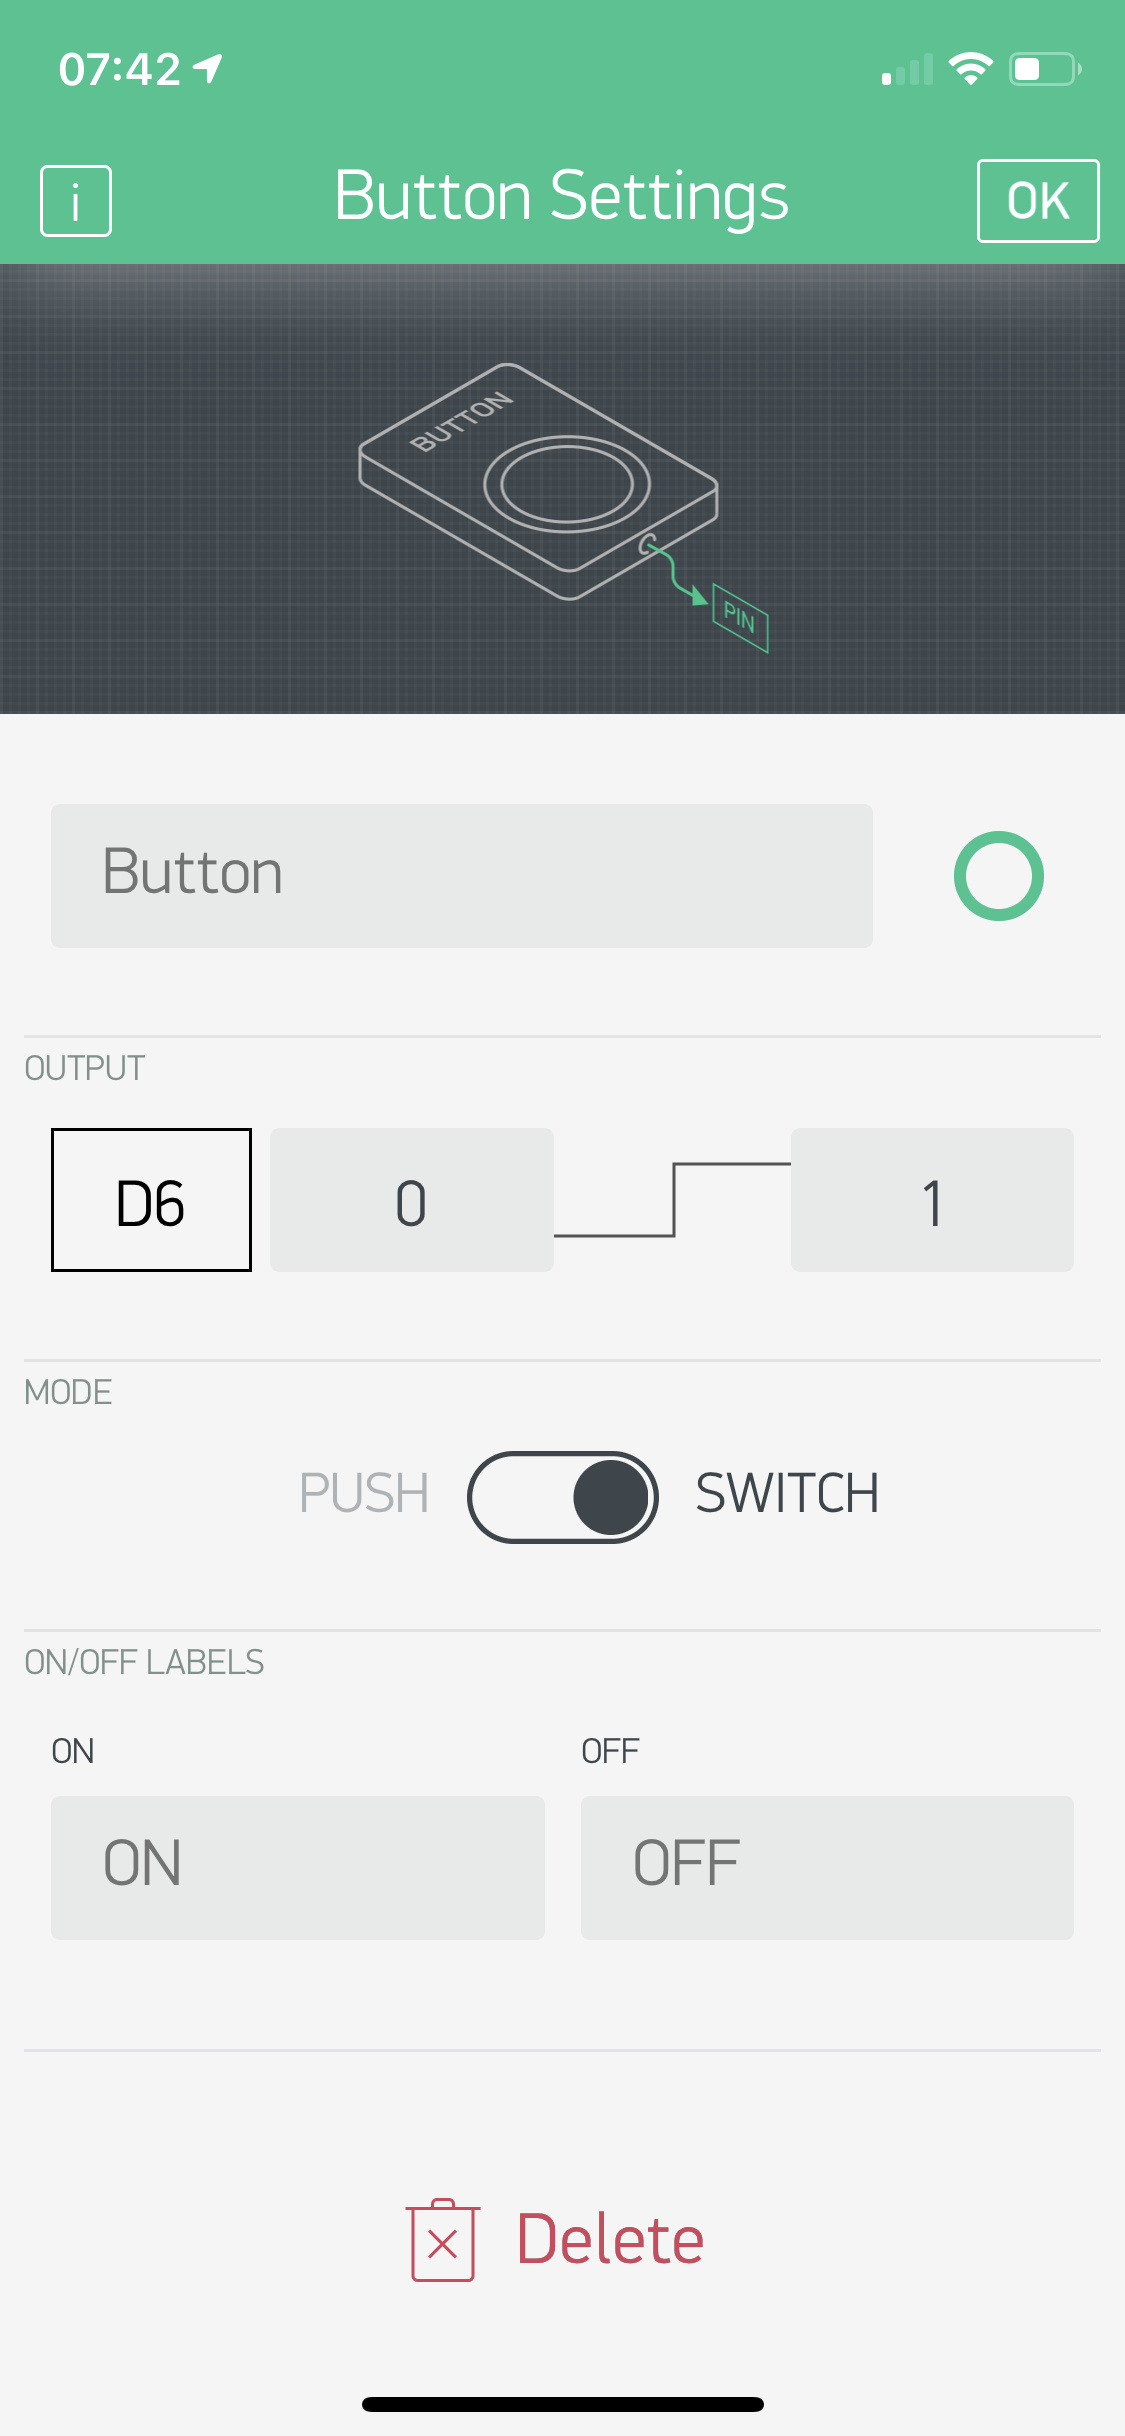
c- See below how it works, I put in pin 6, this pin is that commands the LED of the MKR1000. Works, turns on and off a rele for example. Even without code, only by the configuration of the app.
d- I used this other code to see if the defect was the sensor (DTH11), but it is not because it worked normally in the serial monitor this code:
DHT11

This example reads a DHT11 sensor hooked up on pin D7. Reads both
Temperature and humidity and sends it to the Serial port

Created in Feb 2019 by D. Cuartielles
Based on work by F. Vanzati (2011) and M. Loglio (2013)

This example code is in the public domain.
*/

Include the EduIntro Library
#include <EduIntro.h>

DHT11 DHT11 (D2);  Creating the object sensor on pin ' D7 '

int C;   Temperature C readings are integers
F float; Temperature F readings are returned in float format
int H;   Humidity readings are integers

void Setup ()
{
  Initialize serial communications at 9600 bps
  Serial. Begin (9600);
}

void Loop ()
{
  dht11. Update ();

  C = dht11. readCelsius ();       Reading the temperature in Celsius degrees and store in the C variable
  F = dht11. readFahrenheit ();   Reading the temperature in Fahrenheit degrees and store in the F variable
  H = dht11. readHumidity;     Reading the Humidity Index

  Print The collected data in a row on the Serial Monitor
  Serial. Print ("H:");
  Serial. Print (H);
  Serial. Print ("\tC:");
  Serial. Print (C);
  Serial. Print ("\tF:");
  Serial. println (F);

  Delay (1000);                Wait one second before you get another temperature reading
}Thanks,
I changed to float, did not work in the app, nor in the Serial Monitor
I’m not familiar with the MKR 1000, and it’s a very long time since I used the DHT range of sensors.
However, your issue clearly isn’t with Blynk, it’s with the code and possibly the wiring.
The differences in the code are that one used pin D2 and the other uses pin 2. I don’t know if there’s a difference between these on your MCU, or whether pin 2/D2 has some restrictions/peculiarities when WiFi is used (which it isn’t in the test sketch).
Pete.
Pete
Anyway thank you for trying to help me.
I believe it is neither wiring nor pin 2, because the code example for DTH11 to run on MKR1000, provided by Blynk’s website, indicates pin 2 for the MKR. See in the code below…
It is also not wiring, because I do not change the wiring when I load that code that generates correct on the Serial monitor…
Code example provided by Blynk:
/*************************************************************
Download latest Blynk library here:
https://github.com/blynkkk/blynk-library/releases/latest
Blynk is a platform with iOS and Android apps to control
Arduino, Raspberry Pi and the likes over the Internet.
You can easily build graphic interfaces for all your
projects by simply dragging and dropping widgets.
Blynk library is licensed under MIT license
This example code is in public domain.
*************************************************************
This example shows how value can be pushed from Arduino to
the Blynk App.
WARNING :
For this example you'll need Adafruit DHT sensor libraries:
https://github.com/adafruit/Adafruit_Sensor
https://github.com/adafruit/DHT-sensor-library
App project setup:
Value Display widget attached to V5
Value Display widget attached to V6
*************************************************************/
/* Comment this out to disable prints and save space */
#define BLYNK_PRINT SerialUSB
#include <SPI.h>
#include <WiFi101.h>
#include <BlynkSimpleWiFiShield101.h>
#include <DHT.h>
// You should get Auth Token in the Blynk App.
// Go to the Project Settings (nut icon).
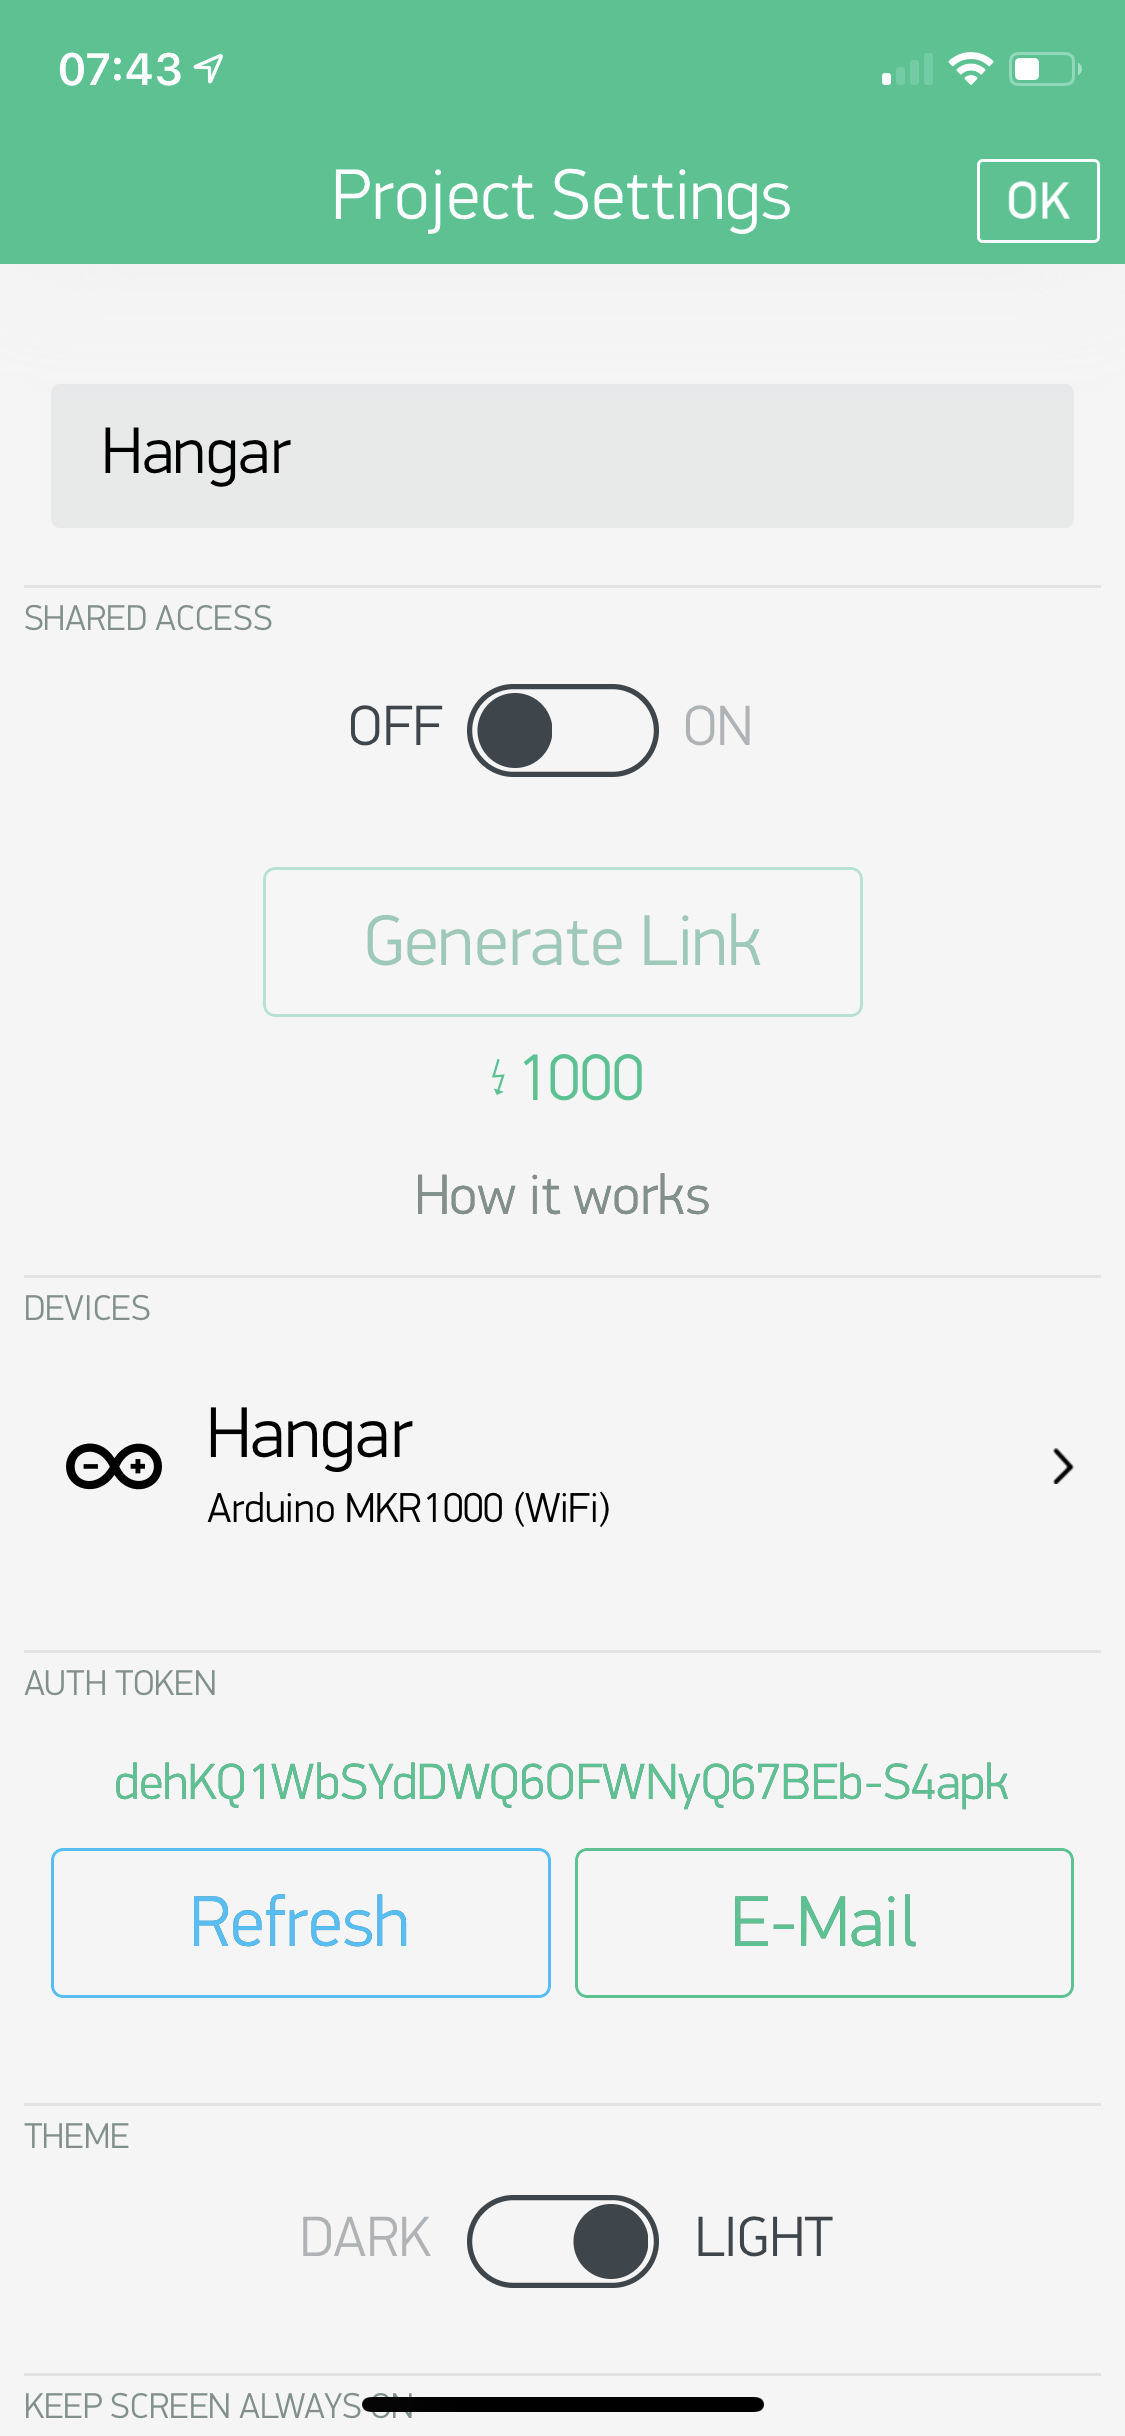
char auth[] = "dehKQ1WbSYdDWQ6OFWNyQ67BEb-S4apk";
// Your WiFi credentials.
// Set password to "" for open networks.
char ssid[] = "Novo-de-cima";
char pass[] = "xxxxxxxxxx";
#define DHTPIN 2 // What digital pin we're connected to
// Uncomment whatever type you're using!
#define DHTTYPE DHT11 // DHT 11
//#define DHTTYPE DHT22 // DHT 22, AM2302, AM2321
//#define DHTTYPE DHT21 // DHT 21, AM2301
DHT dht(DHTPIN, DHTTYPE);
BlynkTimer timer;
// This function sends Arduino's up time every second to Virtual Pin (5).
// In the app, Widget's reading frequency should be set to PUSH. This means
// that you define how often to send data to Blynk App.
void sendSensor()
{
float h = dht.readHumidity();
float t = dht.readTemperature(); // or dht.readTemperature(true) for Fahrenheit
if (isnan(h) || isnan(t)) {
SerialUSB.println("Failed to read from DHT sensor!");
return;
}
// You can send any value at any time.
// Please don't send more that 10 values per second.
Blynk.virtualWrite(V5, h);
Blynk.virtualWrite(V6, t);
}
void setup()
{
// Debug console
SerialUSB.begin(9600);
Blynk.begin(auth, ssid, pass);
// You can also specify server:
//Blynk.begin(auth, ssid, pass, "blynk-cloud.com", 80);
//Blynk.begin(auth, ssid, pass, IPAddress(192,168,1,100), 8080);
dht.begin();
// Setup a function to be called every second
timer.setInterval(1000L, sendSensor);
}
void loop()
{
Blynk.run();
timer.run();
}

Change this:
#define DHTPIN 2
To this:
#define DHTPIN D2
And let us know what happens.
First, thank you very much for the help I have received. I’m very grateful.
I now switched the MKR1000 processor, to the ESP8266 mod., I applied the code below and the same problem continues, does not send the data to the app Blynk.
I switched the naming Pin “2” to “D2” on ESP8266mod gave this error:
 #define DHTPIN D2          // What digital pin we're connected to

                ^

C:\Users\ary\Desktop\ESP8266_pequena_DTH\ESP8266_pequena_DTH.ino:58:9: note: in expansion of macro 'DHTPIN'

 DHT dht(DHTPIN, DHTTYPE);

         ^

Multiple libraries were found for "BlynkSimpleEsp8266_SSL.h"
 Used: D:\OneDrive\Arduino\libraries\Blynk
 Not used: D:\OneDrive\Arduino\libraries\blynk-library-0.6.1
exit status 1
'D2' was not declared in this scope```
Here is the code that I am currently using in ESP and is occurring the same problem that occurred with the MKR100: Very strange!!!
  Download latest Blynk library here:
    https://github.com/blynkkk/blynk-library/releases/latest

  Blynk is a platform with iOS and Android apps to control
  Arduino, Raspberry Pi and the likes over the Internet.
  You can easily build graphic interfaces for all your
  projects by simply dragging and dropping widgets.

    Downloads, docs, tutorials: http://www.blynk.cc
    Sketch generator:           http://examples.blynk.cc
    Blynk community:            http://community.blynk.cc
    Follow us:                  http://www.fb.com/blynkapp
                                http://twitter.com/blynk_app

  Blynk library is licensed under MIT license
  This example code is in public domain.

 *************************************************************

  This example shows how value can be pushed from Arduino to
  the Blynk App.

  WARNING :
  For this example you'll need Adafruit DHT sensor libraries:
    https://github.com/adafruit/Adafruit_Sensor
    https://github.com/adafruit/DHT-sensor-library

  App project setup:
    Value Display widget attached to V5
    Value Display widget attached to V6
 *************************************************************/

/* Comment this out to disable prints and save space */
#define BLYNK_PRINT Serial


#include <ESP8266WiFi.h>
#include <BlynkSimpleEsp8266_SSL.h>
#include <DHT.h>

// You should get Auth Token in the Blynk App.
// Go to the Project Settings (nut icon).
char auth[] = "_c1MjnnGjctr7oCyOMKvJNeGyVrVIVUf";

// Your WiFi credentials.
// Set password to "" for open networks.
char ssid[] = "Novo-de-cima";
char pass[] = "xxxxxxxxxxxx";

#define DHTPIN 2          // What digital pin we're connected to

// Uncomment whatever type you're using!
#define DHTTYPE DHT11     // DHT 11
//#define DHTTYPE DHT22   // DHT 22, AM2302, AM2321
//#define DHTTYPE DHT21   // DHT 21, AM2301

DHT dht(DHTPIN, DHTTYPE);
BlynkTimer timer;

// This function sends Arduino's up time every second to Virtual Pin (5).
// In the app, Widget's reading frequency should be set to PUSH. This means
// that you define how often to send data to Blynk App.
void sendSensor()
{
  float h = dht.readHumidity();
  float t = dht.readTemperature(); // or dht.readTemperature(true) for Fahrenheit

  if (isnan(h) || isnan(t)) {
    Serial.println("Failed to read from DHT sensor!");
    return;
  }
  // You can send any value at any time.
  // Please don't send more that 10 values per second.
  Blynk.virtualWrite(V5, h);
  Blynk.virtualWrite(V6, t);
}

void setup()
{
  // Debug console
  Serial.begin(9600);

  Blynk.begin(auth, ssid, pass);
  // You can also specify server:
  //Blynk.begin(auth, ssid, pass, "blynk-cloud.com", 80);
  //Blynk.begin(auth, ssid, pass, IPAddress(192,168,1,100), 8080);

  dht.begin();

  // Setup a function to be called every second
  timer.setInterval(3000L, sendSensor);
}

void loop()
{
  Blynk.run();
  timer.run();
}```Thanks for the help, but I’m a beginner. You could explain to me better what I meant by that link.
Thanks again
What version of the ESP core have you installed in the Arduino IDE, and what board type did you choose when you compiled the code?
Personally, I’m not a fan of using the ‘D’ numbers that are screen printed on ESP8266/NodeMCU/Wemos D1 Mini boards as it affects the portability of code from one type of device to another.
I think it’s far better to use GPIO numbers and add a comment that translates this to the ‘D’ number on the board so that it makes wiring and debugging the hardware easier.
Pete.
Thank you
1- please can teach me how I see what version the IDE is using, because I have added several libraries, how should I do to fetch the version of “Core”?
2- Below photos of the board configuration.
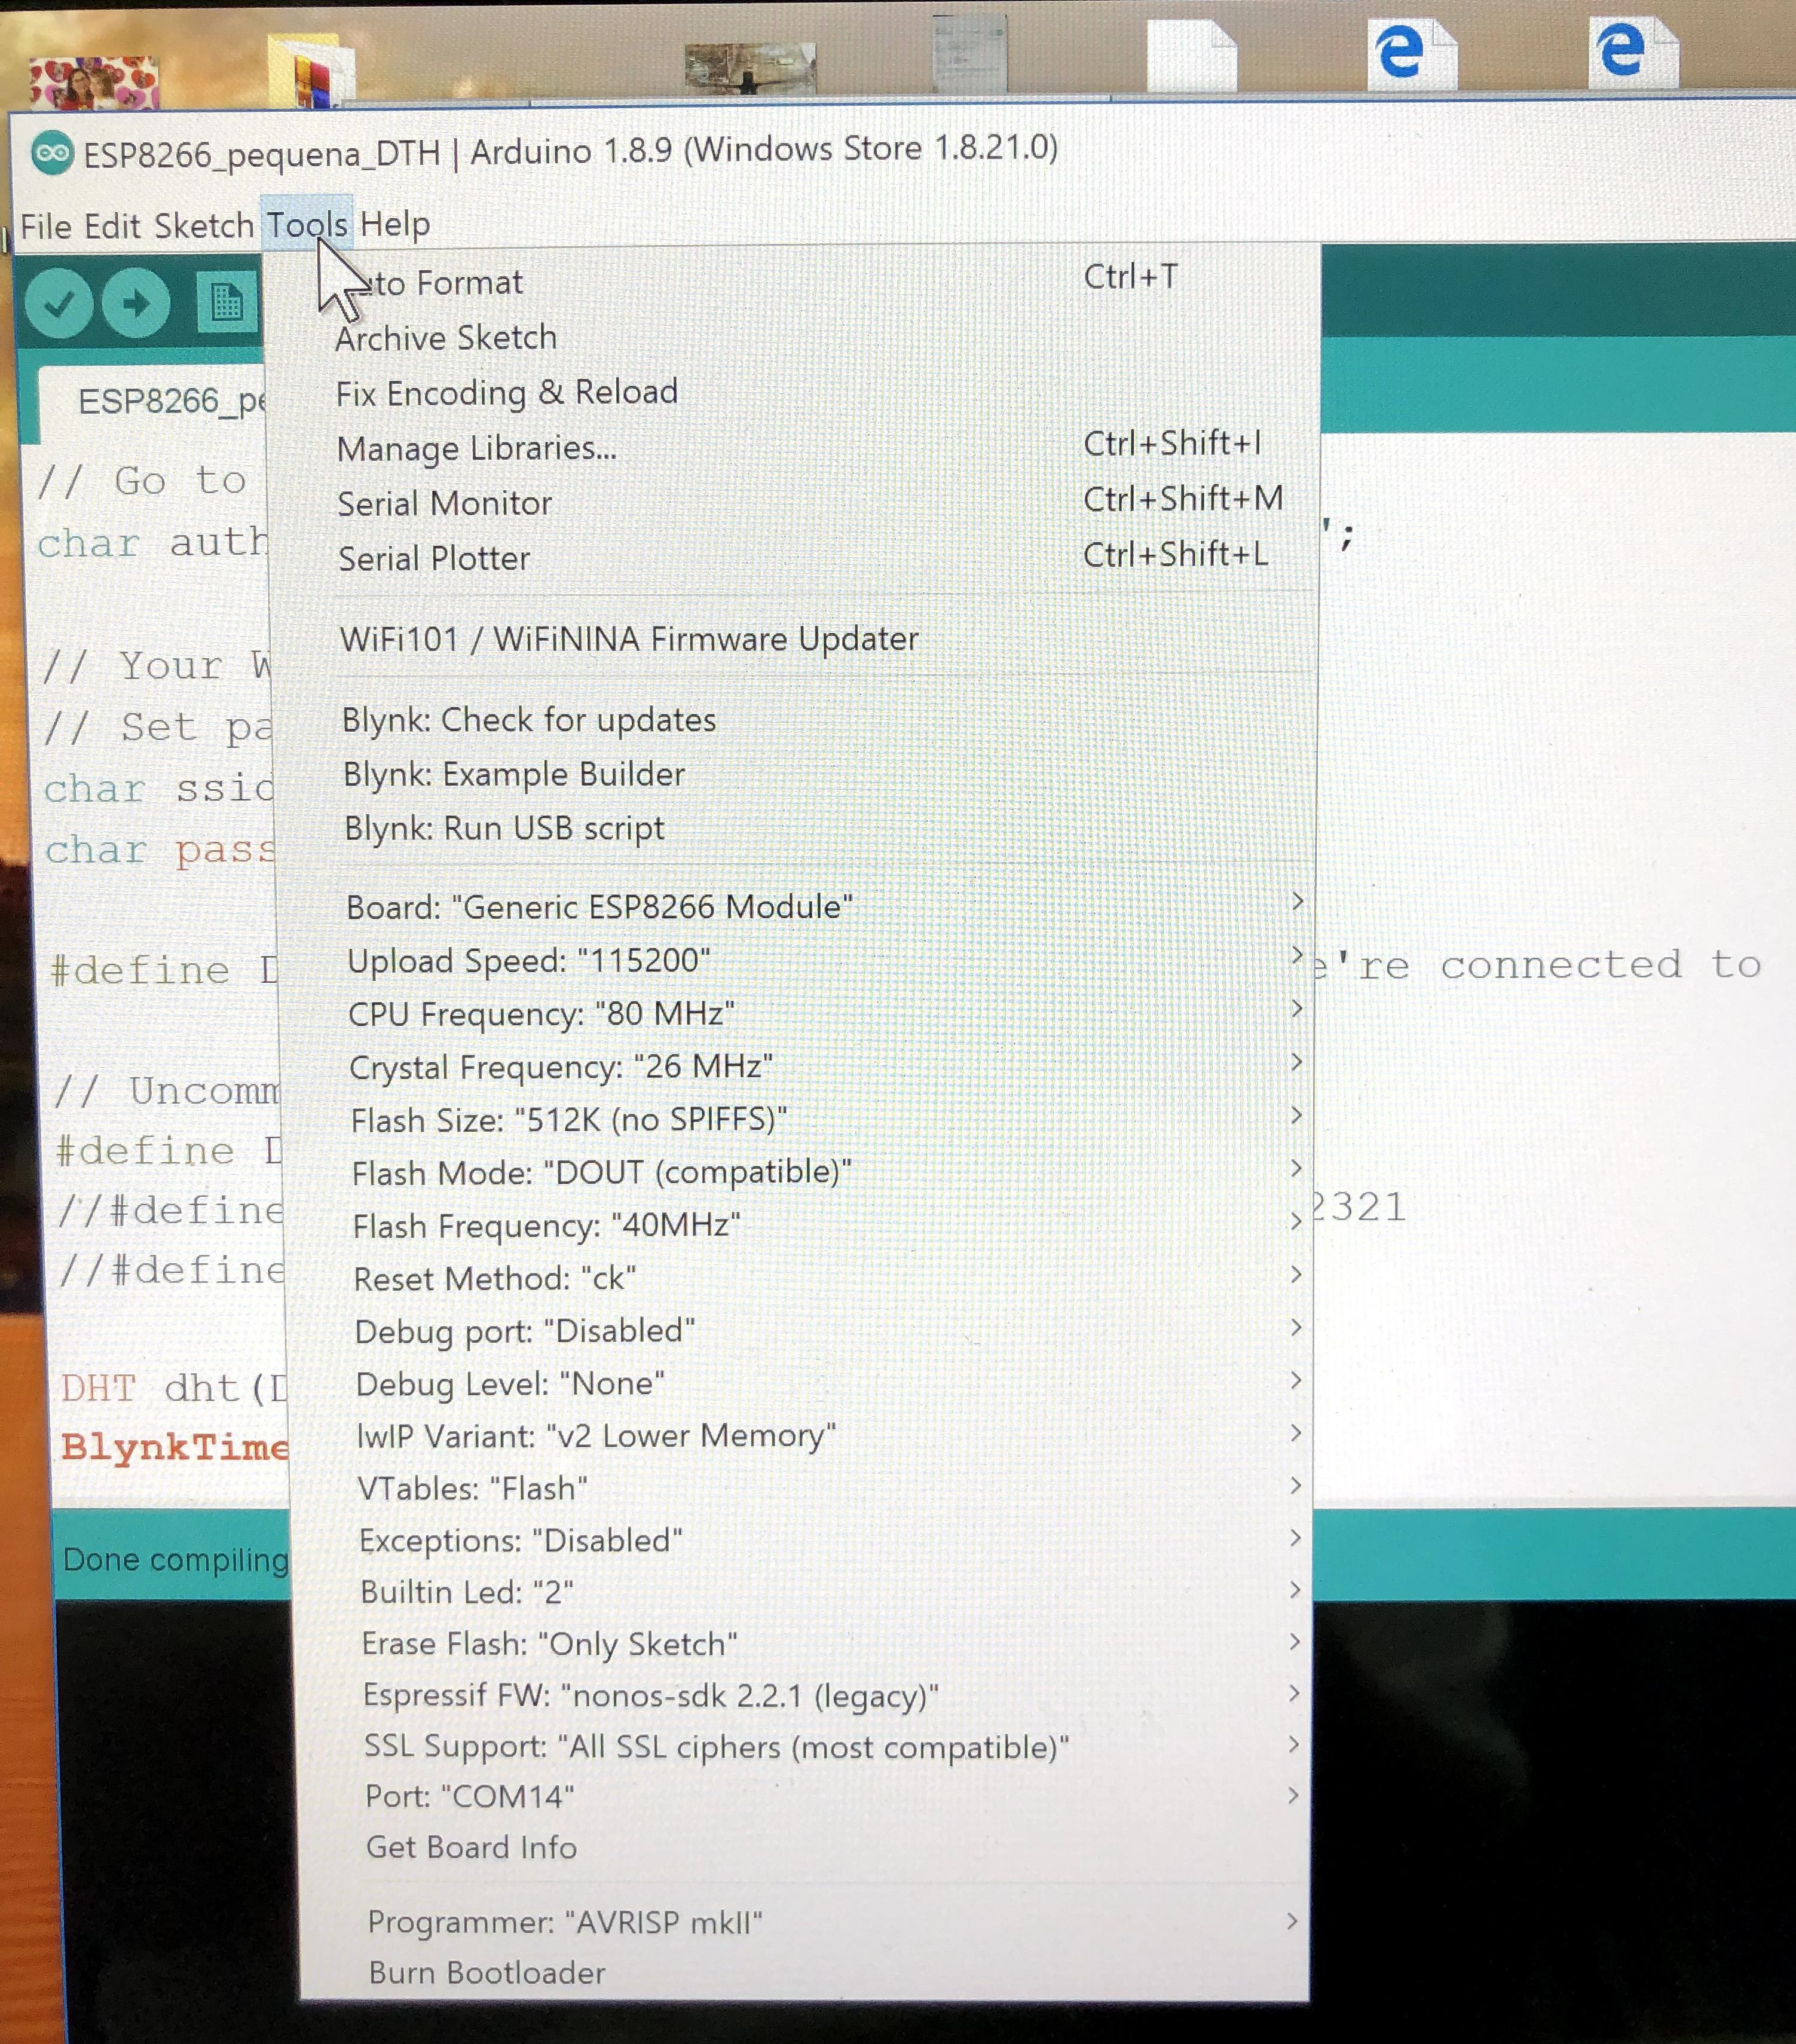
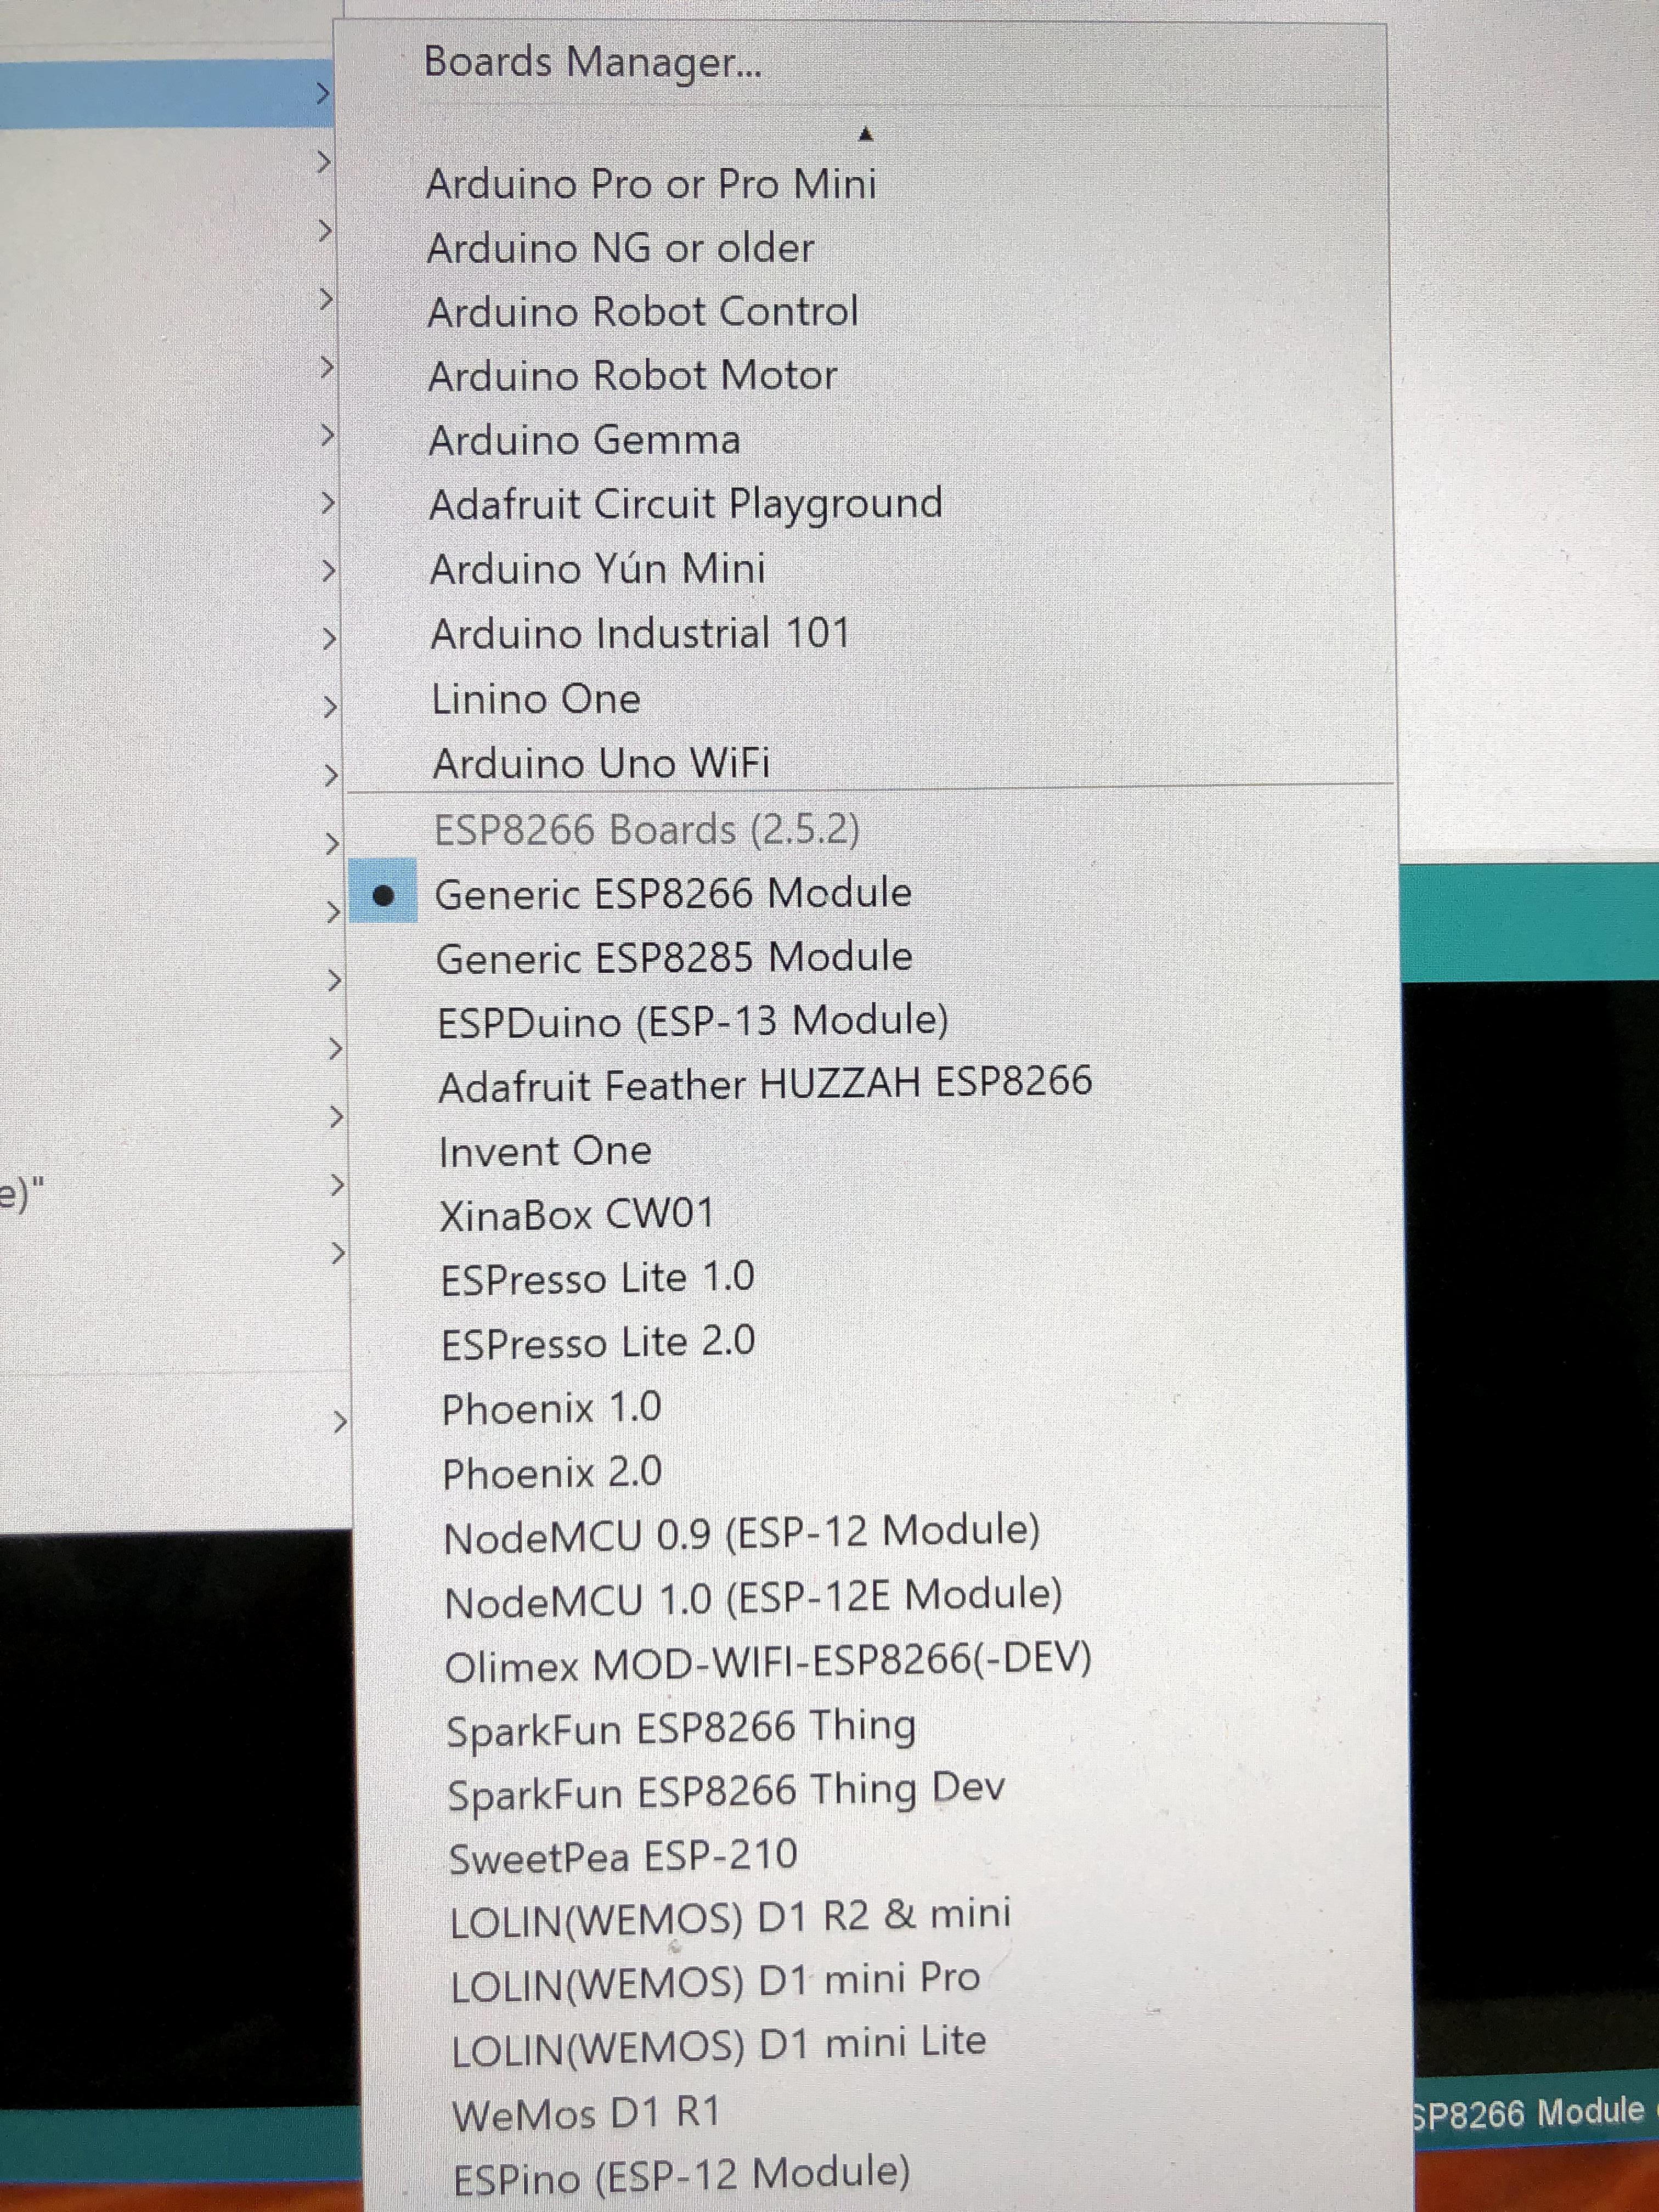

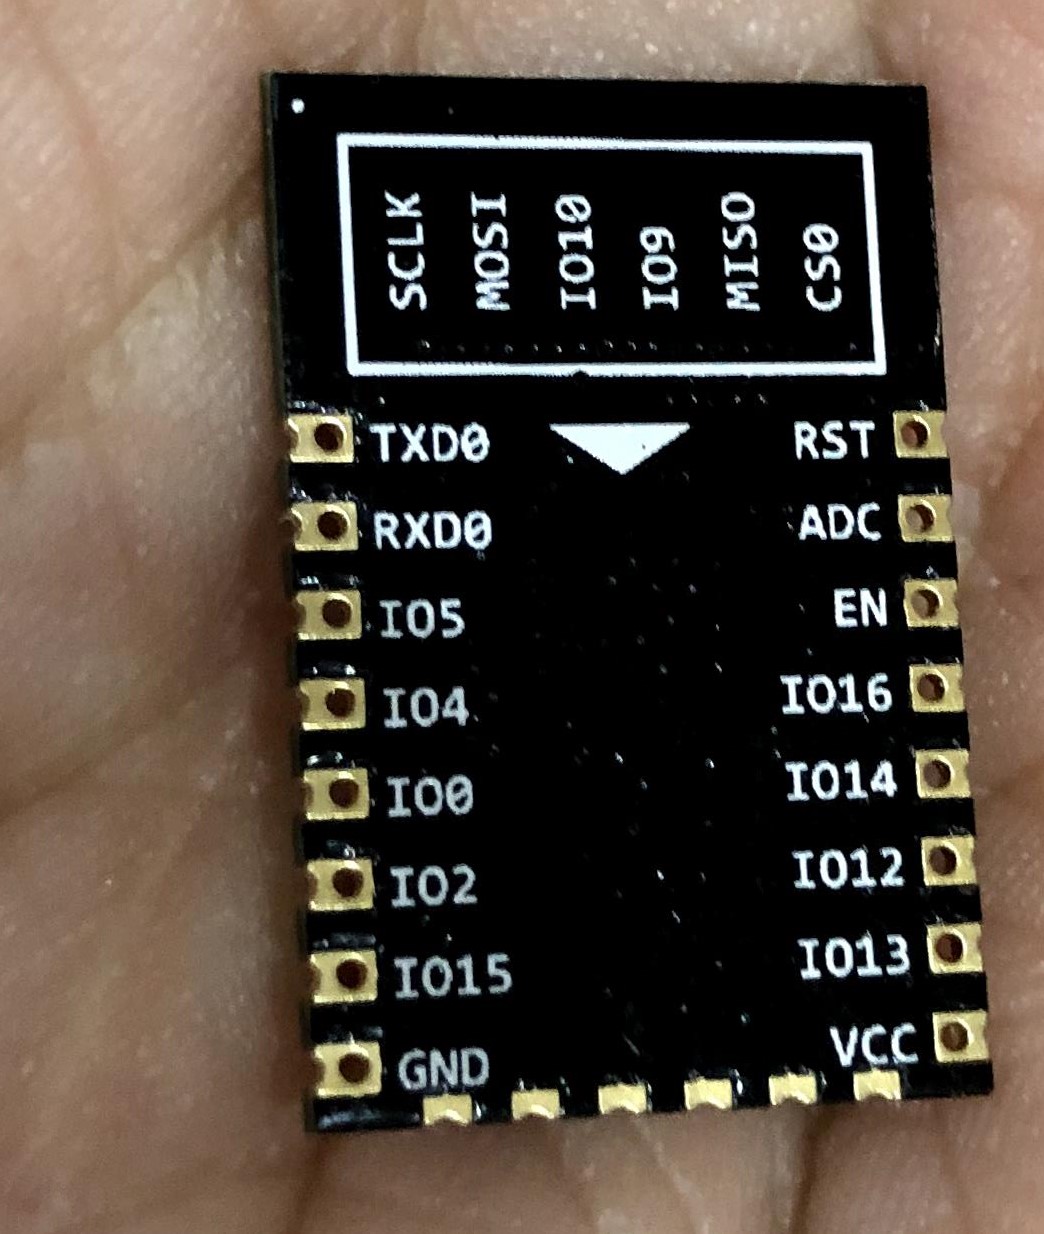
3- Use the pin 2, where it is named in the board “IO2”.
- Tools/Board/Boards Manager. Scroll down to the bottom of the list and find ESP8266 by ESP Community and see what version is installed.
2 & 3) Why are you using a bare ESP module rather than a dev board? You’ll have lots of difficulties powering the module and interfacing with a USB Com port.
I’d recommend a NodeMCU or Wemos D1 Mini dev board…
Which board should I choose for my first Blynk project?
Pete.
Refer to the picture, you need to set your refresh interval to PUSH