For “telemetry” readings when the bike is moving? I’m hoping so because that was my plan all along, and why I chose to use this code.
I’m hoping to be able to use the data via Blynk on track days …
I suspect you would be able to. Although these values would need to be stored somewhere so they could be accessed at a later time, and not just as the bike is being ridden. Do you plan on having a hotspot on the bike so it can be connected to BLYNK while being ridden? If so, I don’t think this would be too difficult. A few Blynk.virtualWrite’s sending the mentioned data in another timed loop should do the trick
If not, then the data may need to be stored on an SD card, and then retrieved once BLYNK is connected. This would probably be out of my current skill-set.
@Toro_Blanco Plan to use a mobile phone hotspot on the bike, same SSID and password as home and work. So yes, I’d like the data to be stored and be sent live to Blynk on my phone.
Only been doing this a few weeks so “difficult” it will be …
Edit.
The MPU-6050 also has a built in compass(magnetometer) but I’m struggling to find much about it except this:
Get raw 9-axis motion sensor readings (accel/gyro/compass).
FUNCTION NOT FULLY IMPLEMENTED YET.
That was where i first had it, but wasn’t sure if that was causing the reported lag
The scan function should loop, but the actual scan notification and announcement was set to only process once every 16 seconds. Worked perfectly with a simple ON/OFF button, as it would with an simple tilt switch etc.
but I don’t have any fansnazzy motion sensors like the OP and thus my code wasn’t really optimised for whatever it can do in the first place.
Thanks for taking over… I have been taking advantage of, and pushing myself through, moments of cognitive clarity, to work on multiple Blynk and Arduino projects at the same time, But that has been running my physical self down
So I need to slow down again and take time to smell the magic smoke released from overworked electronics
Evening @Gunner
Over the past few weeks I’ve wired up a few of these things the wrong way, the “magic smoke” sort of erupted like tiny volcano’s. Big learning curve, but I’m getting there.
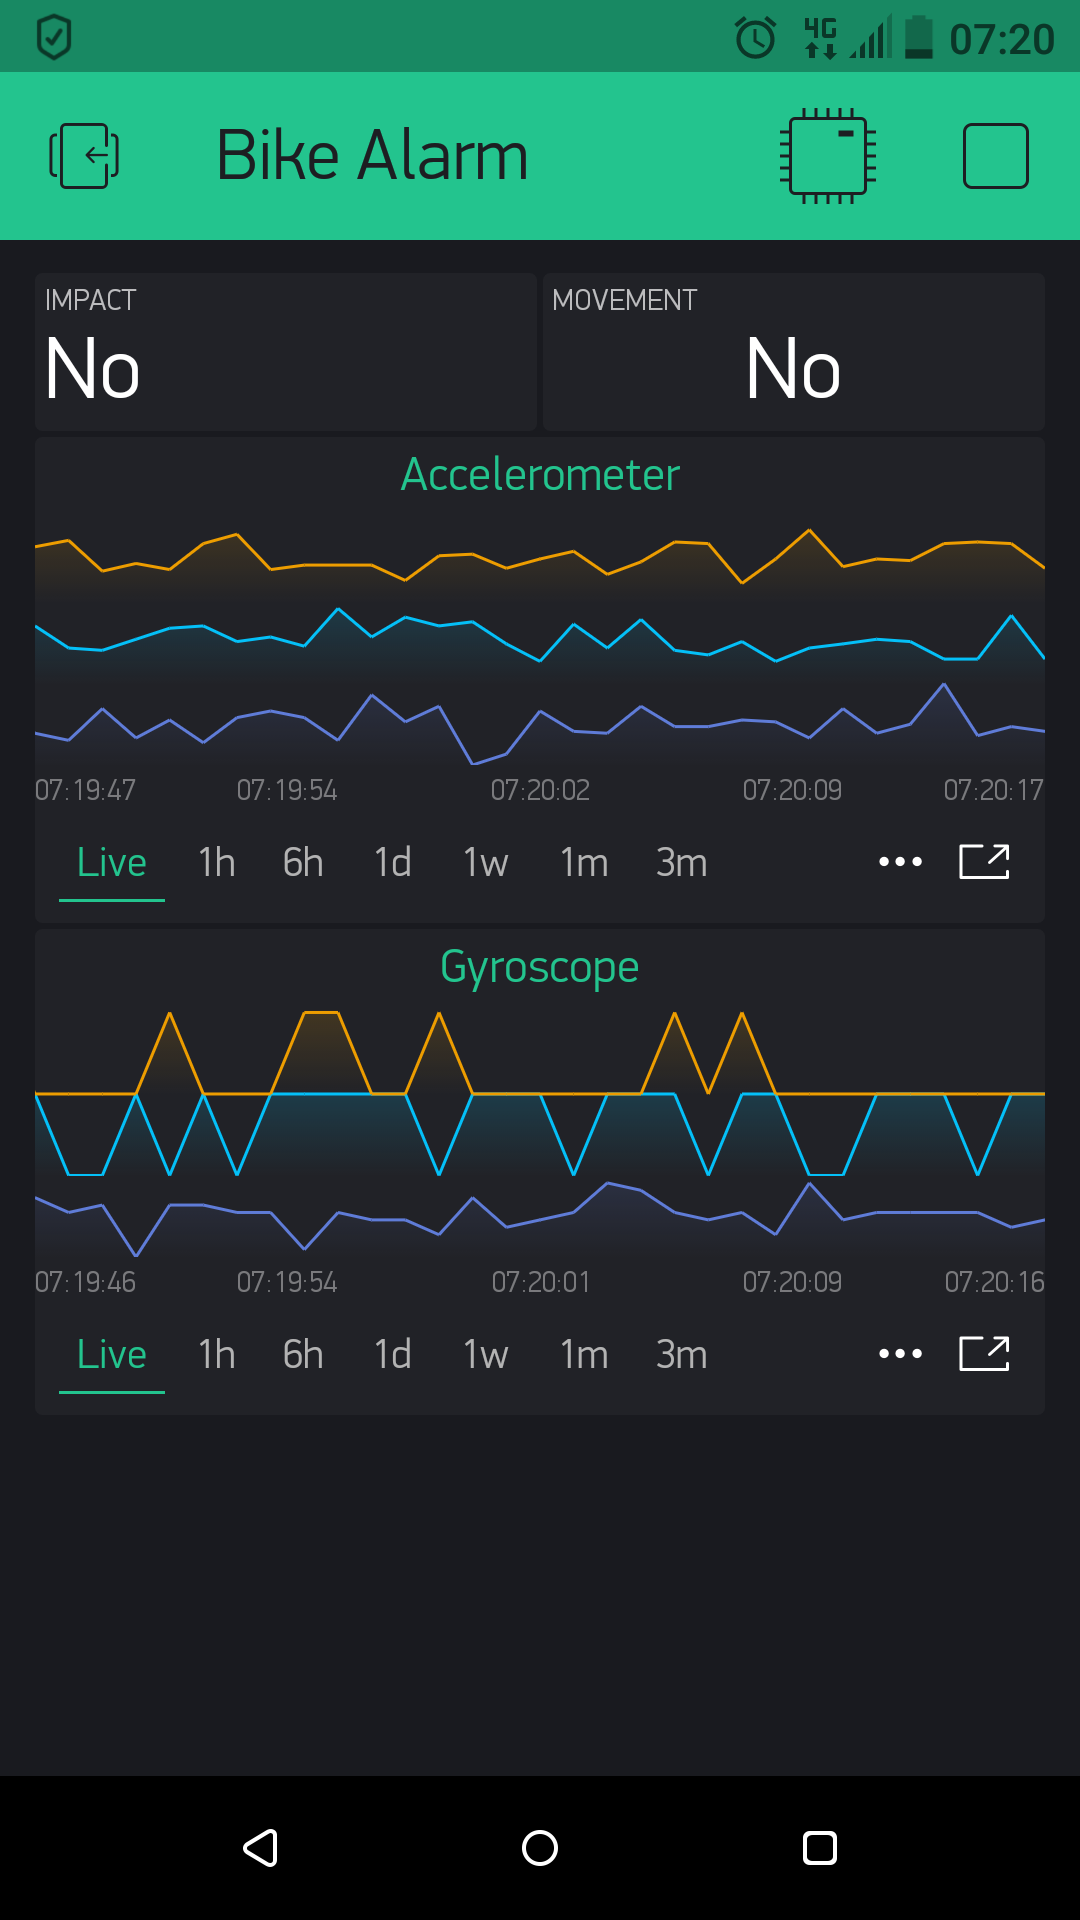
Well I’ve finally got it how I want it, a little too sensitive maybe but that’s a work in progress.
Code works well and looks like I can add the extra telemetry to it. But thats for another day, I’m off to bed.
Thanks for your help guys @Gunner@Toro_Blanco, I’ll be back tomorrow with more coding puzzles for you.
#define BLYNK_PRINT Serial
#include <ESP8266WiFi.h>`
#include <BlynkSimpleEsp8266.h>
#include <Wire.h>
#include <MPU6050.h>

char auth[] = "060348058fd549f083b9b649e6784852";
char ssid[] = "BTHub6-P38S";
char pass[] = "wAwhd7rKg3cT";

BlynkTimer timer;

MPU6050 mpu;

void setup()
{
  Serial.begin(115200);

  Blynk.begin(auth, ssid, pass);

  Serial.println("Initialize MPU6050");

  while(!mpu.begin(MPU6050_SCALE_2000DPS, MPU6050_RANGE_16G))
  {
    Serial.println("Could not find a valid MPU6050 sensor, check wiring!");
    delay(500);
  }

  mpu.setAccelPowerOnDelay(MPU6050_DELAY_3MS);

  mpu.setIntFreeFallEnabled(false);
  mpu.setIntZeroMotionEnabled(false);
  mpu.setIntMotionEnabled(false);

  mpu.setDHPFMode(MPU6050_DHPF_5HZ);

  mpu.setMotionDetectionThreshold(2);
  mpu.setMotionDetectionDuration(5);

  mpu.setZeroMotionDetectionThreshold(8);
  mpu.setZeroMotionDetectionDuration(2);

  checkSettings();
  timer.setInterval(100L, MotionSensorRead); // run the scan for motion function loop 10x/second

}

void checkSettings()
{
  Serial.println();

  Serial.print(" * Sleep Mode:                ");
  Serial.println(mpu.getSleepEnabled() ? "Enabled" : "Disabled");

  Serial.print(" * Motion Interrupt:          ");
  Serial.println(mpu.getIntMotionEnabled() ? "Enabled" : "Disabled");

  Serial.print(" * Zero Motion Interrupt:     ");
  Serial.println(mpu.getIntZeroMotionEnabled() ? "Enabled" : "Disabled");

  Serial.print(" * Free Fall Interrupt:       ");
  Serial.println(mpu.getIntFreeFallEnabled() ? "Enabled" : "Disabled");

  Serial.print(" * Motion Threshold:          ");
  Serial.println(mpu.getMotionDetectionThreshold());

  Serial.print(" * Motion Duration:           ");
  Serial.println(mpu.getMotionDetectionDuration());

  Serial.print(" * Zero Motion Threshold:     ");
  Serial.println(mpu.getZeroMotionDetectionThreshold());

  Serial.print(" * Zero Motion Duration:      ");
  Serial.println(mpu.getZeroMotionDetectionDuration());

  Serial.print(" * Clock Source:              ");
  switch(mpu.getClockSource())
  {
    case MPU6050_CLOCK_KEEP_RESET:     Serial.println("Stops the clock and keeps the timing generator in reset"); break;
    case MPU6050_CLOCK_EXTERNAL_19MHZ: Serial.println("PLL with external 19.2MHz reference"); break;
    case MPU6050_CLOCK_EXTERNAL_32KHZ: Serial.println("PLL with external 32.768kHz reference"); break;
    case MPU6050_CLOCK_PLL_ZGYRO:      Serial.println("PLL with Z axis gyroscope reference"); break;
    case MPU6050_CLOCK_PLL_YGYRO:      Serial.println("PLL with Y axis gyroscope reference"); break;
    case MPU6050_CLOCK_PLL_XGYRO:      Serial.println("PLL with X axis gyroscope reference"); break;
    case MPU6050_CLOCK_INTERNAL_8MHZ:  Serial.println("Internal 8MHz oscillator"); break;
  }

  Serial.print(" * Accelerometer:             ");
  switch(mpu.getRange())
  {
    case MPU6050_RANGE_16G:            Serial.println("+/- 16 g"); break;
    case MPU6050_RANGE_8G:             Serial.println("+/- 8 g"); break;
    case MPU6050_RANGE_4G:             Serial.println("+/- 4 g"); break;
    case MPU6050_RANGE_2G:             Serial.println("+/- 2 g"); break;
  }

  Serial.print(" * Accelerometer offsets:     ");
  Serial.print(mpu.getAccelOffsetX());
  Serial.print(" / ");
  Serial.print(mpu.getAccelOffsetY());
  Serial.print(" / ");
  Serial.println(mpu.getAccelOffsetZ());

  Serial.print(" * Accelerometer power delay: ");
  switch(mpu.getAccelPowerOnDelay())
  {
    case MPU6050_DELAY_3MS:            Serial.println("3ms"); break;
    case MPU6050_DELAY_2MS:            Serial.println("2ms"); break;
    case MPU6050_DELAY_1MS:            Serial.println("1ms"); break;
    case MPU6050_NO_DELAY:             Serial.println("0ms"); break;
  }

  Serial.println();
}

void MotionSensorRead() {  // Motion sensor read
  Vector rawAccel = mpu.readRawAccel();
  Activites act = mpu.readActivites();
  if (act.isActivity)
  {
    Blynk.virtualWrite(V14, "Yes");
  } else
  {
    Blynk.virtualWrite(V14, "No");
  }

  if (act.isInactivity)
  {
    Blynk.virtualWrite(V15, "Yes");
  } else
  {
    Blynk.virtualWrite(V15, "No");
  }
}

void loop()
{
  Blynk.run();
  timer.run();
}
Morning @Toro_Blanco
I tinker at work too, I’m the boss so I can tinker as much as I like. I’ve been tinkering a lot just lately, and due to the rain this morning. I’ll probably be tinkering all day to day to, I’m guessing the site will be flooded again.
I just know this is going to be a silly question but how do I " associate 6 different "Vpins in the superchart, I see only input box?
Edit.
I knew it was a silly question. DOH!
I’ve found it but can only add 4 inputs, so no where for V24 and V25?
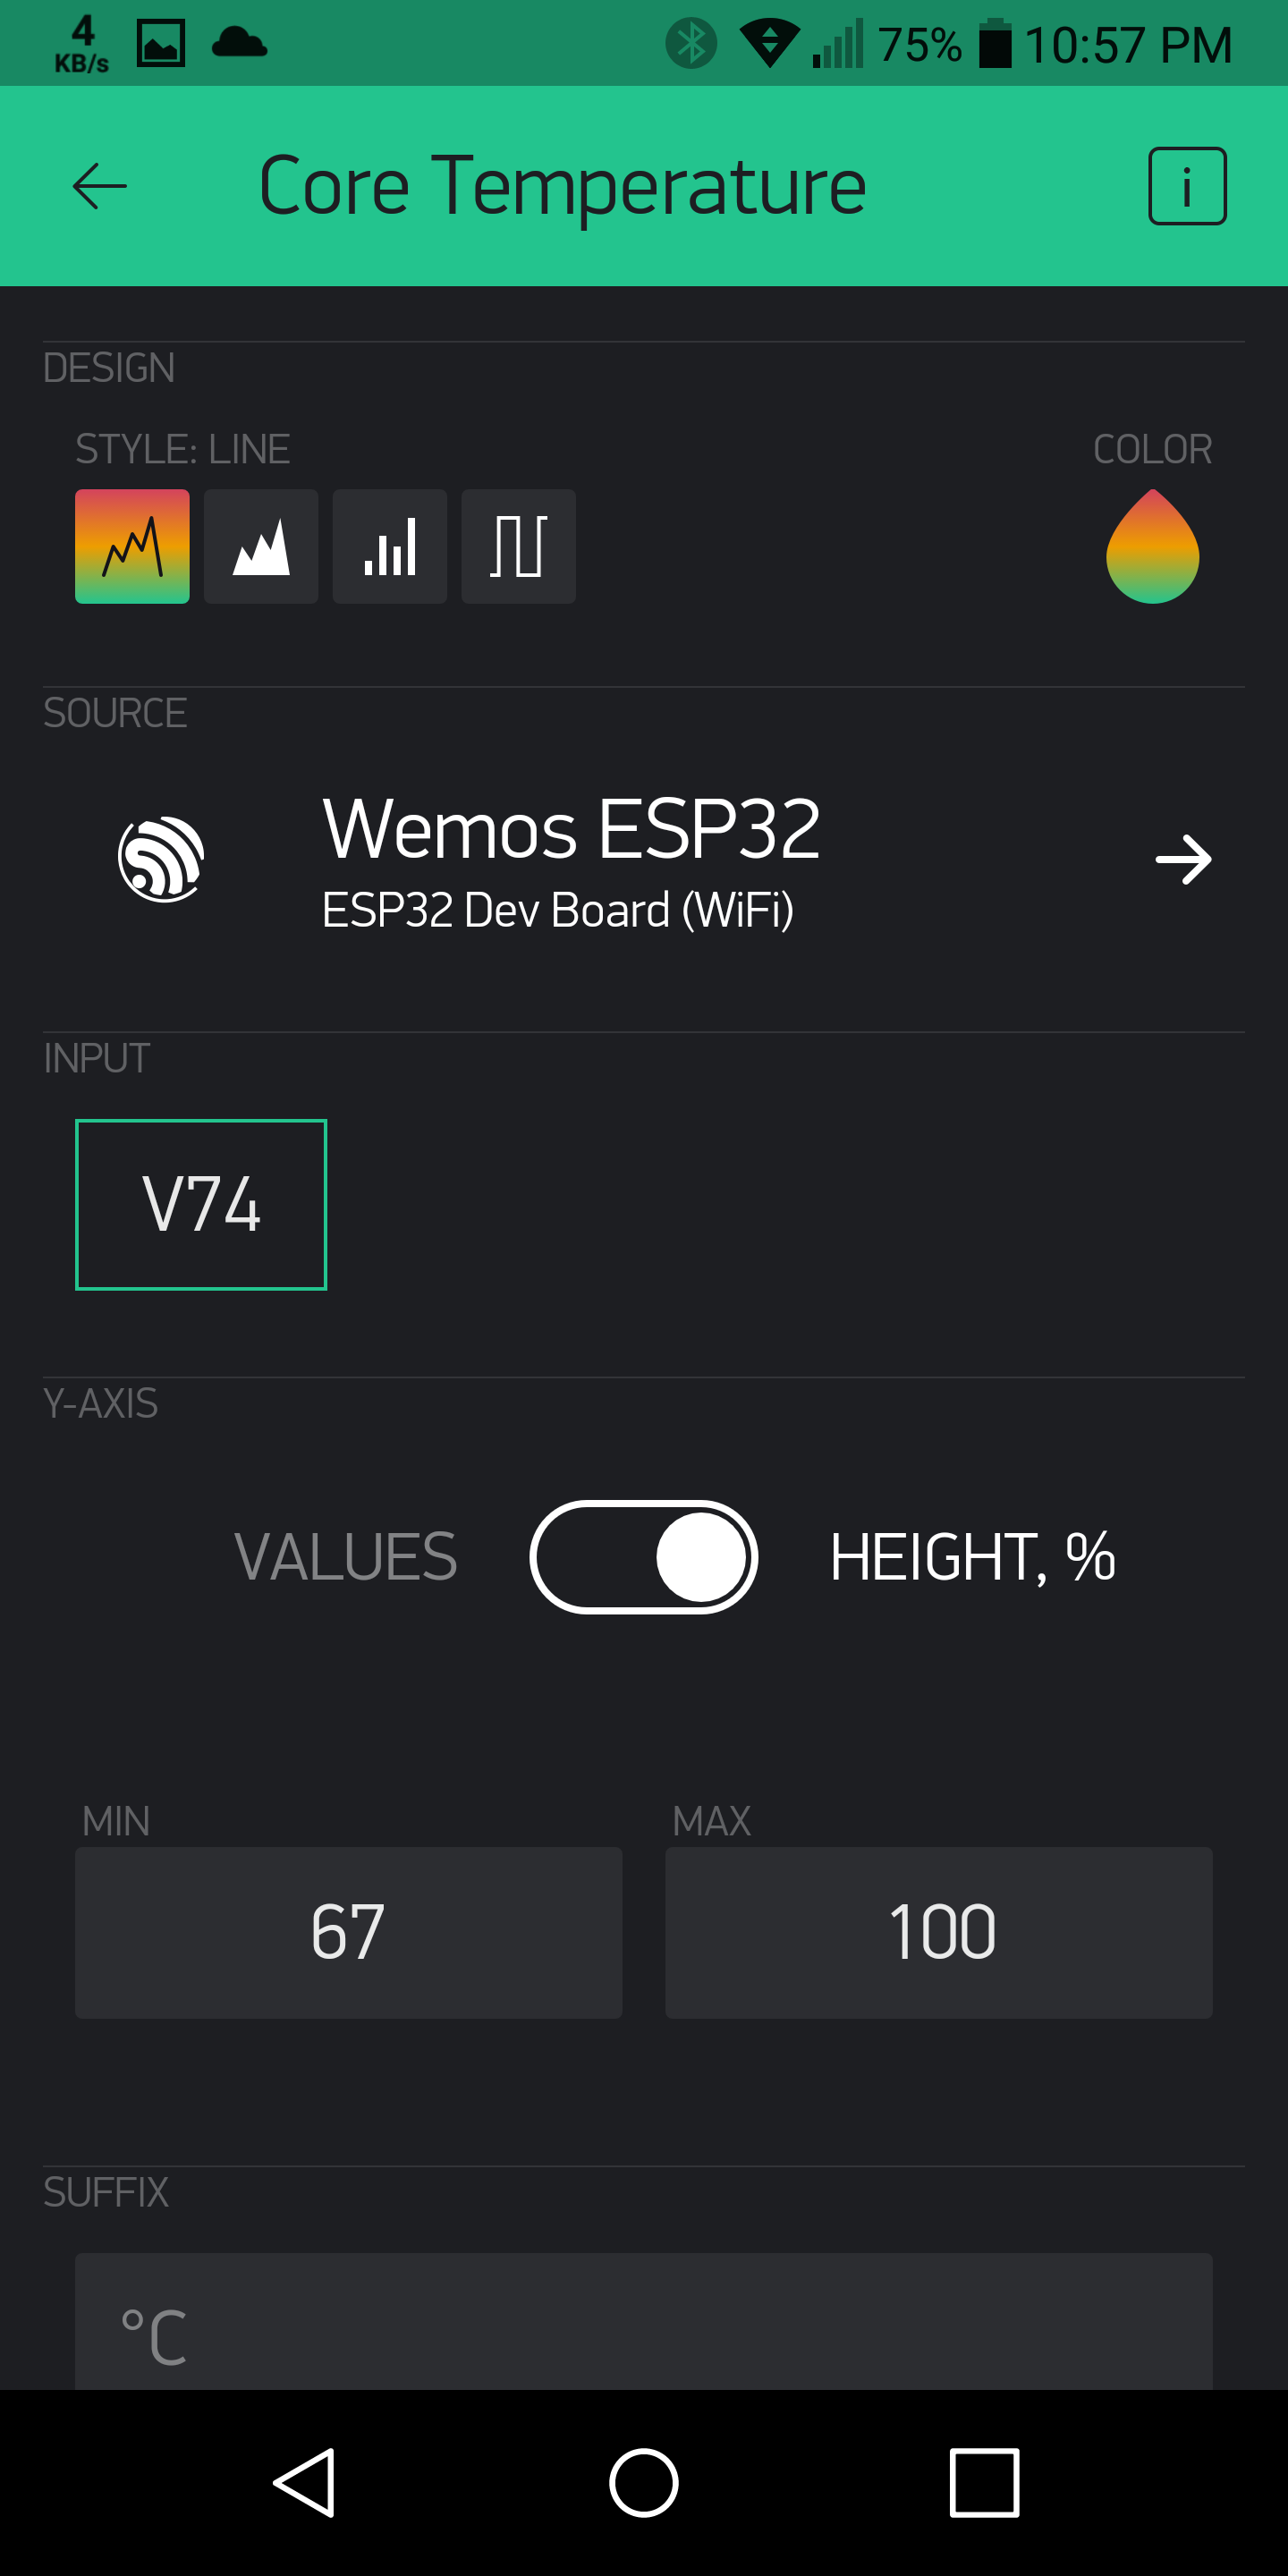
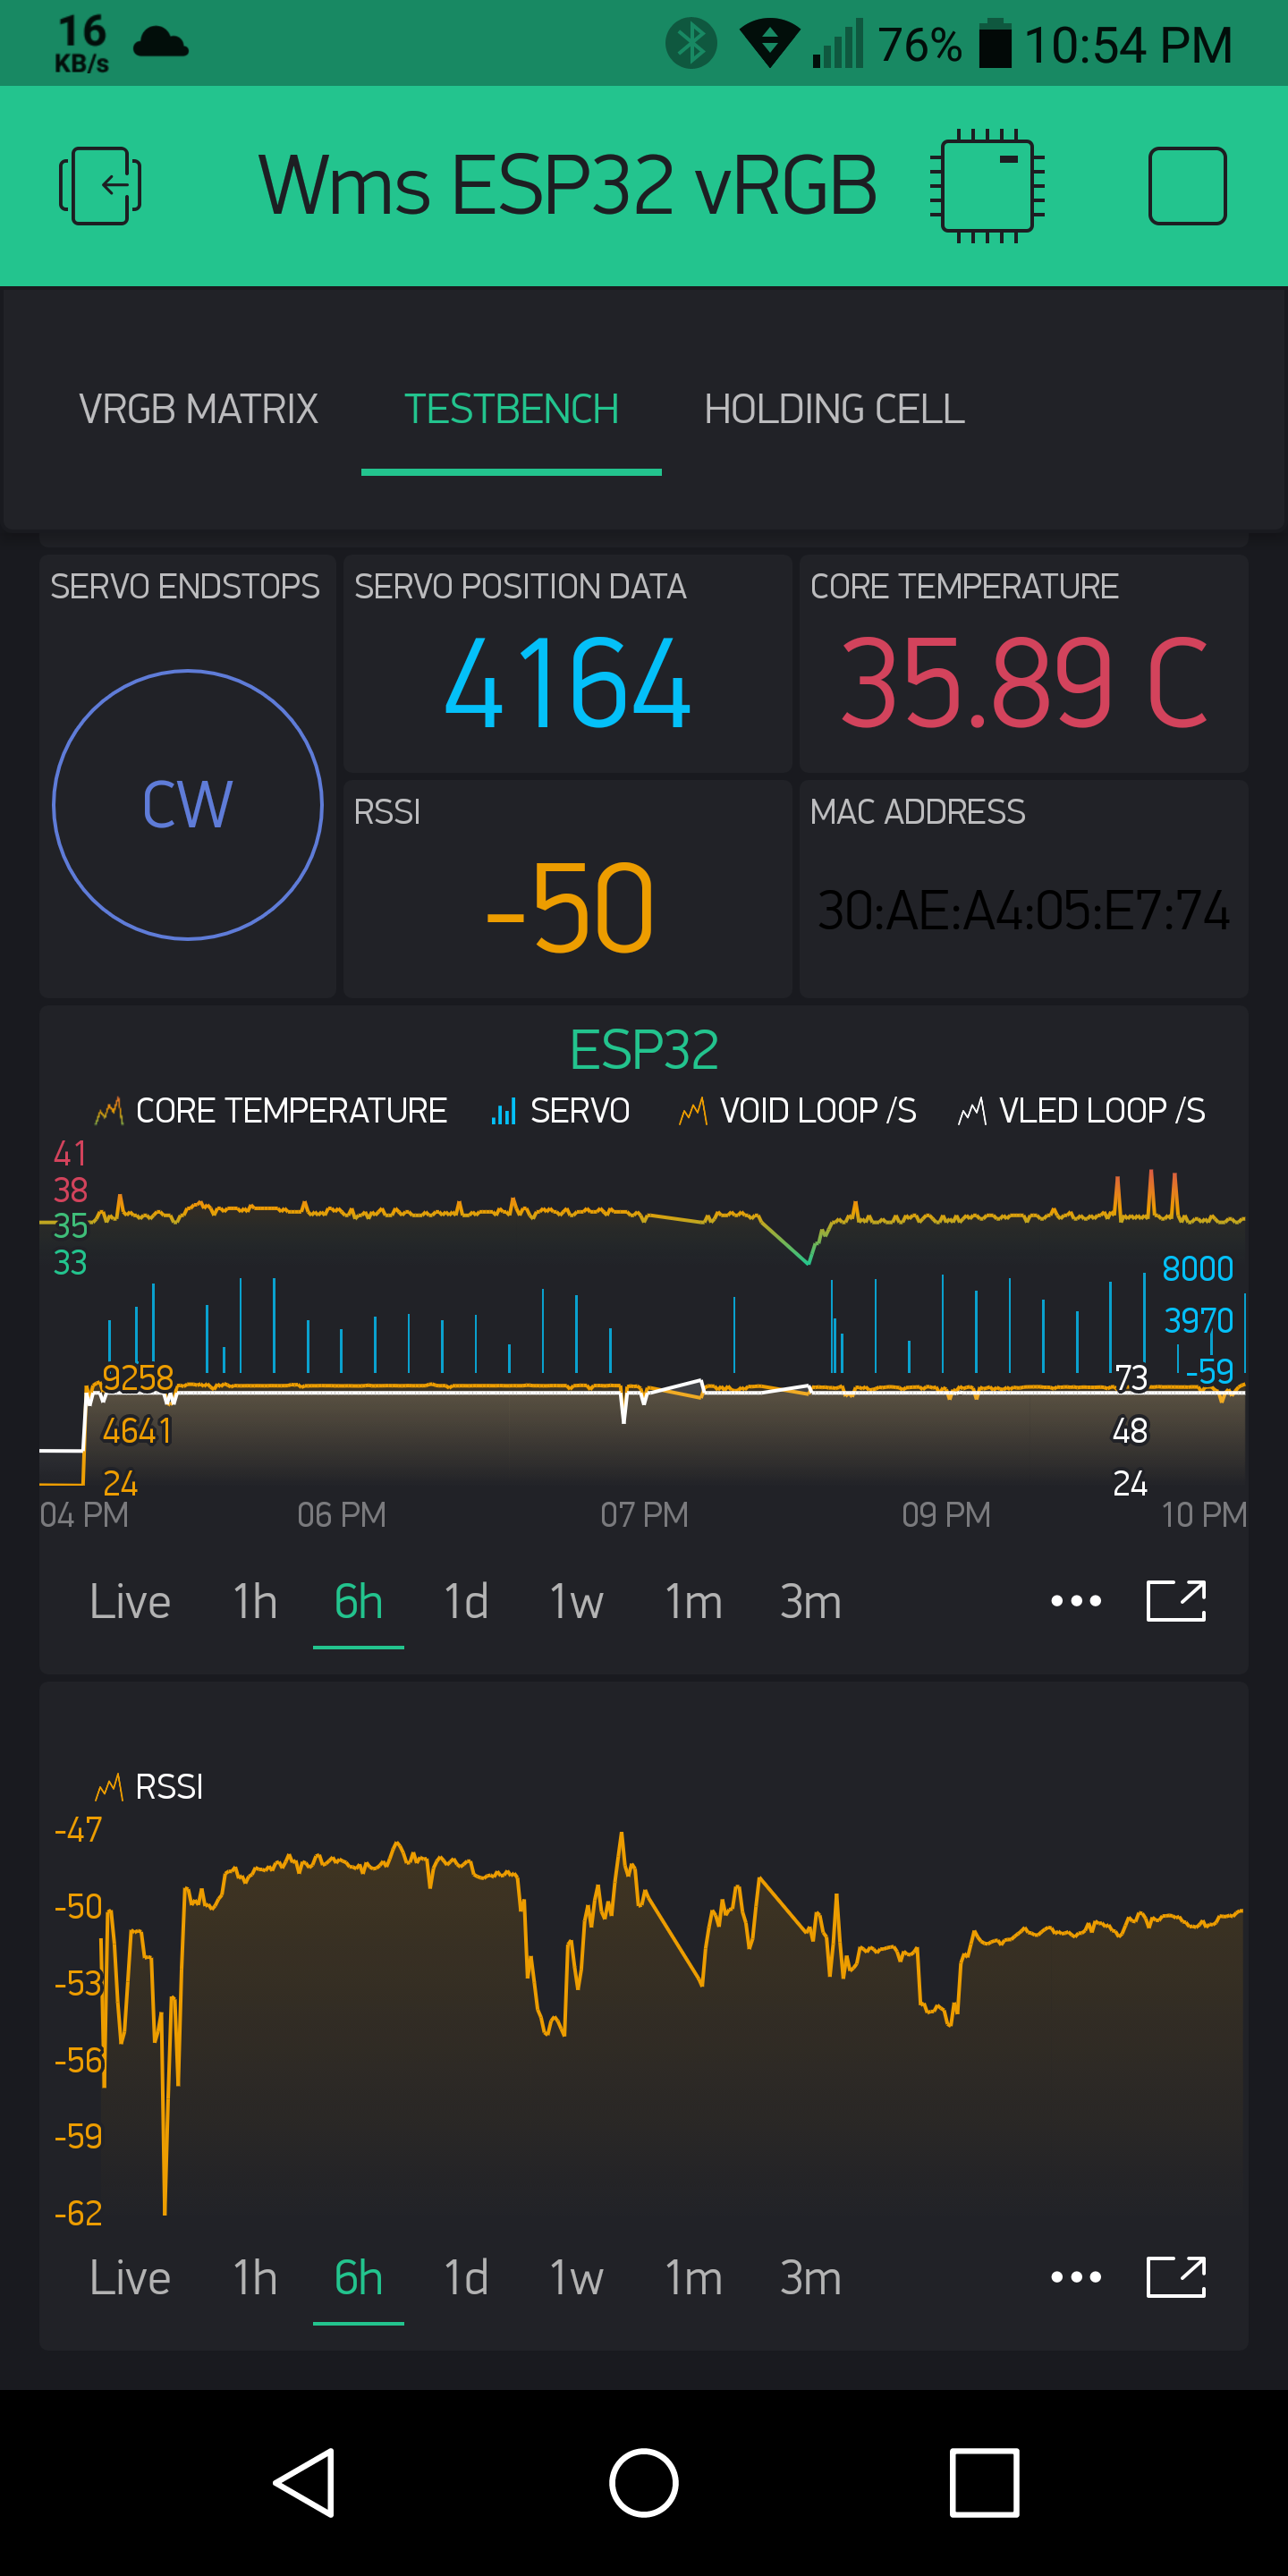
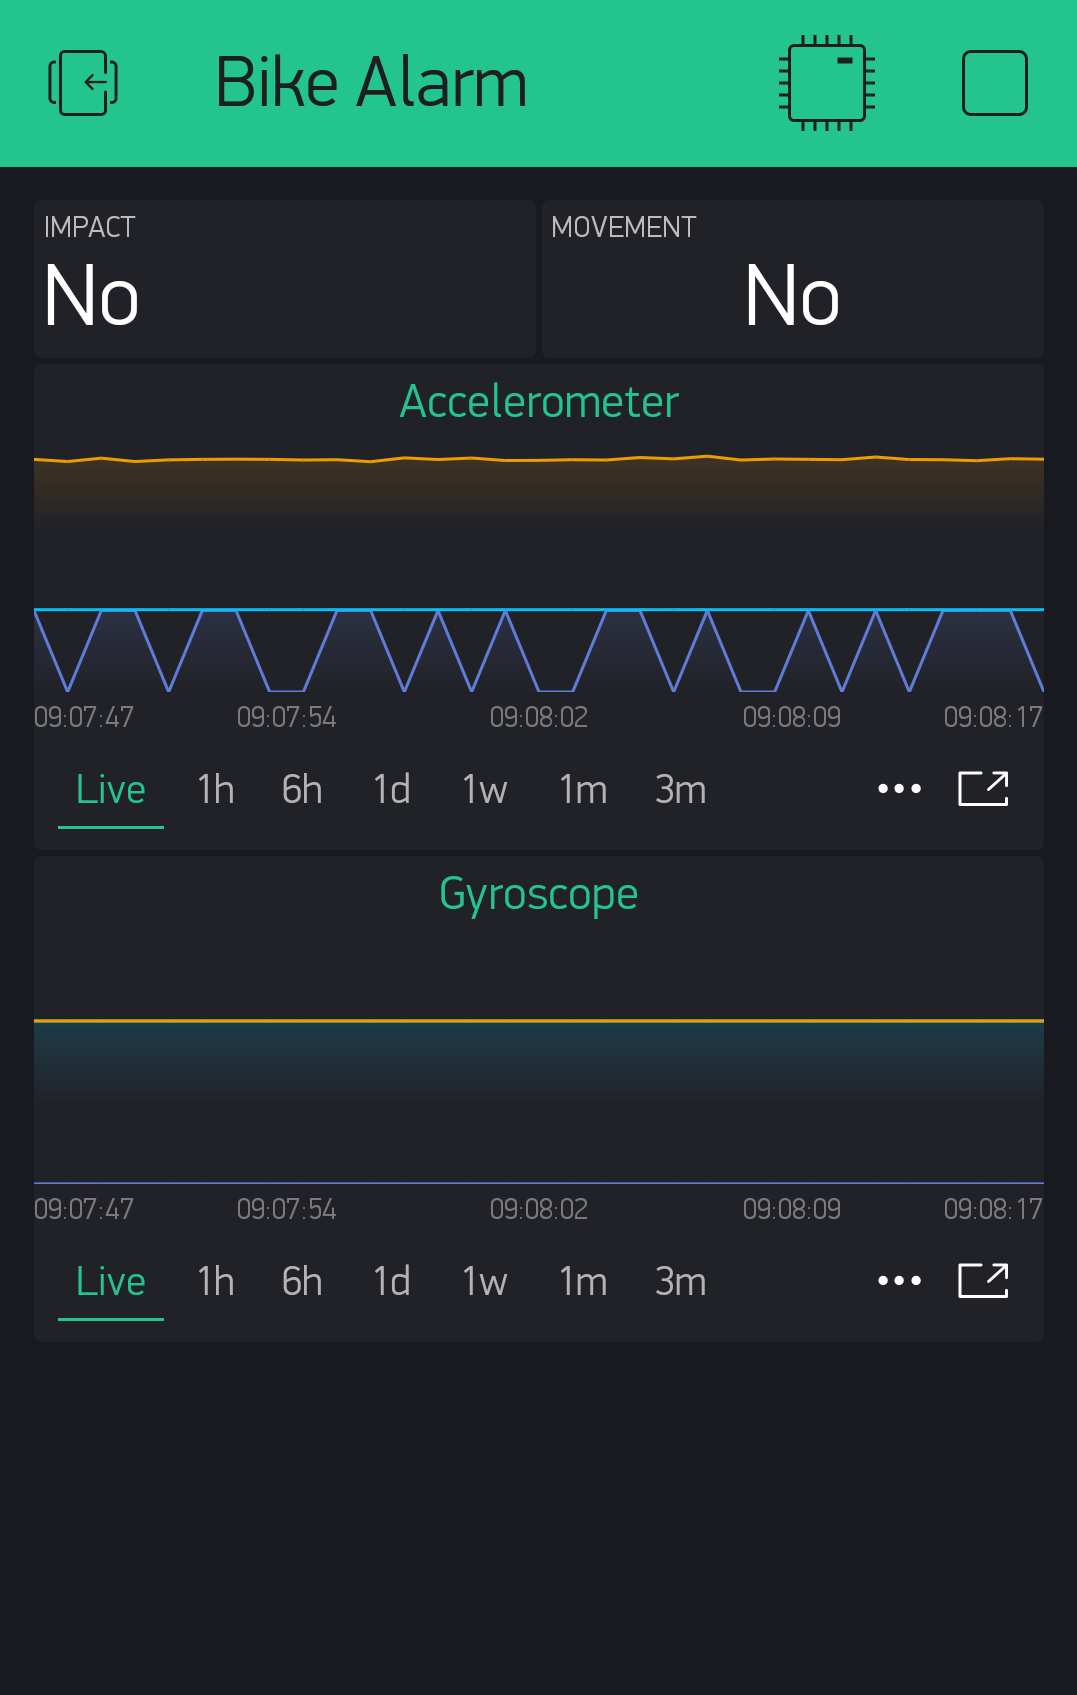
Now try experimenting with separating the individual feeds into sections of the chart with the Height% option and MIN MAX (of the total height). You can then have all four feeds in their own 1/2, 1/3, 1/4, etc. section of the chart.
This is the settings of the uppermost feed on the top chart (next pic)
You have to click on each pic as this forum doesn’t like showing the full scaled down image from new skinny 1:2 aspect phones
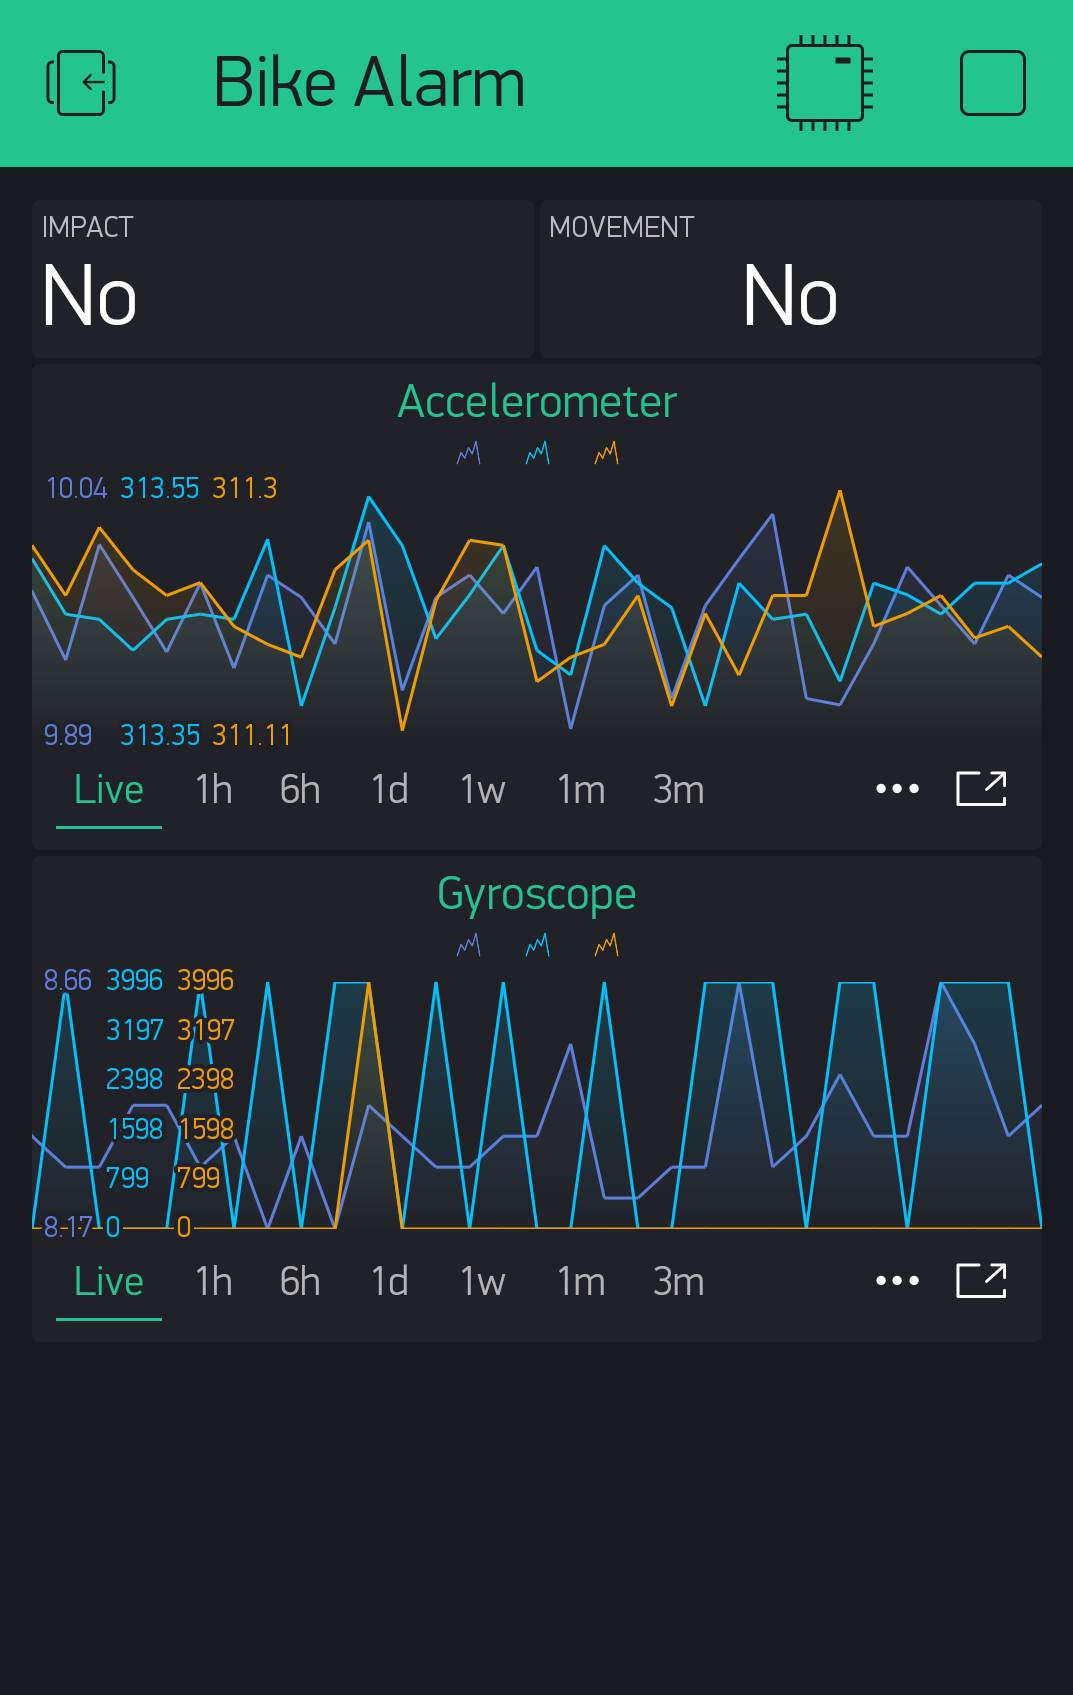
I have NEVER wanted fast access to a phone app so have never placed one on my phones home screen. But BLYNK, it now has pride of place right next to the browser, brilliant app!
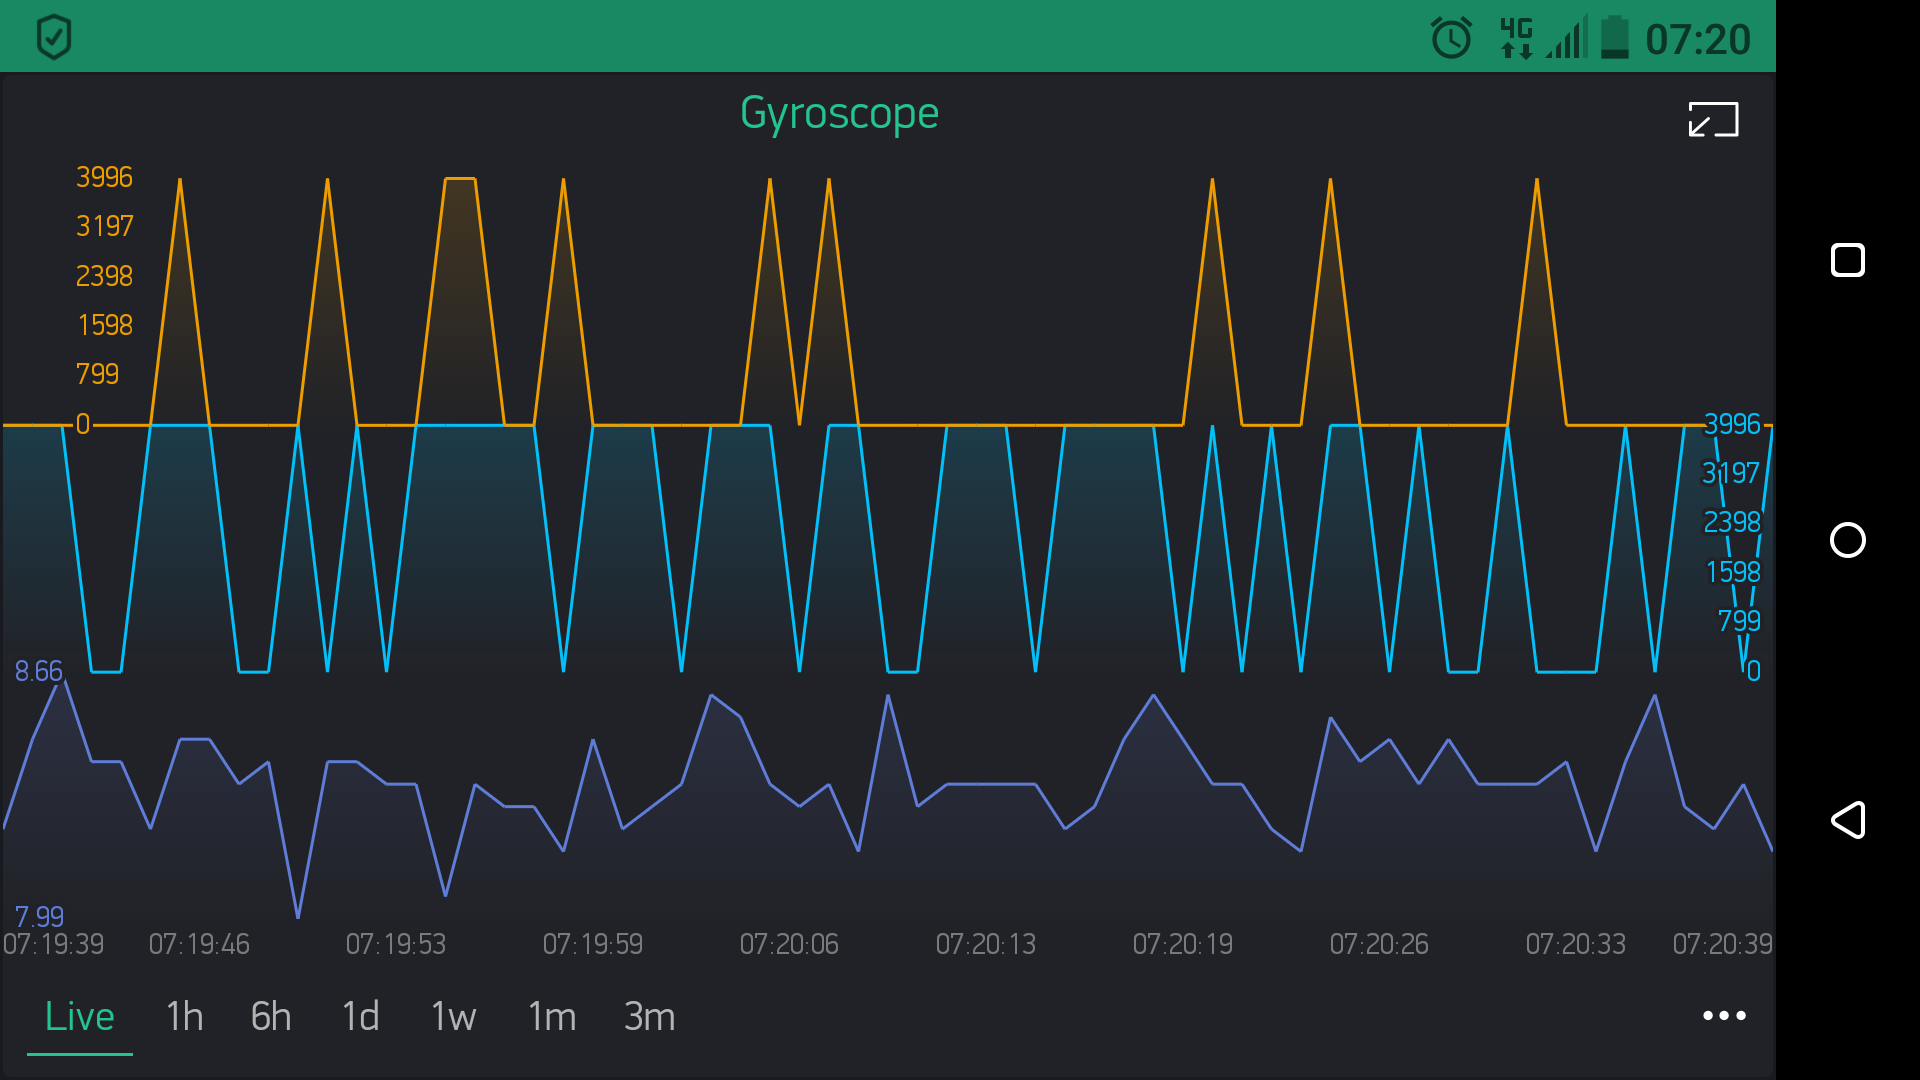
Absolutely no idea what all the data means yet but I’m working on it. …
Using my work phone(HTC A9) for this as I leave my personal phones at home when I’m working. This A9 is crap, but O2 give me a brand new one every time I loose or break it so I’m not complaining …
Yes, you’d need to put an IF statement in your code.
If the result of reading the virtual pin that the switch widget is connected to == 0 then don’t send the notification, else send the notification.