I will try to summarize the process…
In the App a Button Widget has two default states, ON and OFF. Each time you press a button it sets the associated vPin to 1 (ON) when you press and 0 (OFF) when you release. Switch mode just make this a more manually controlled process requiring separate presses to achieve state changes.
These vPin state changes are sent to the Server and then to the Sketch… when the Sketch receives the announcement, it triggers what is called a Blynk Function that is associated with the same vPin… or in this case
BLYNK_WRITE(vPin) {
// do stuff here every state change
}
So normally this simple function would be called twice for each full Button action (e.g press/1 and release/0), but that is not any good for a normal action for ON and another for OFF…
Thus we can add in a parameter check to see the actual contents of the vPin (in this case 0 or 1) and have separate action depending on the state of the vPin
BLYNK_WRITE(vPin) {
  if (param.asInt() == 1) {  // looks at the vPin parameter as an integer and if it is 1...
    // do stuff here if state is 1
  } else {  // but if the parameter is 0 then ...
    // do stuff here if state is 0
  }
}
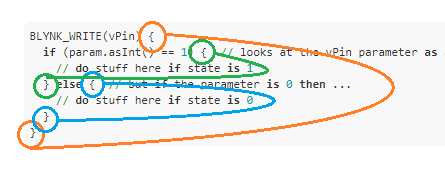
And the braces are used to contain each separate step
Orange for the entire function
Green for action if state is 1/ON
Blue for action if state is 0/OFF
This whole “Power” or “MotionOnFlag” setting process would normally end up looking like this for you…
BLYNK_WRITE(V13) { // Alarm ON/OFF Button set to SWITCH mode
  if (param.asInt() == 1) {  // looks at the vPin parameter as an integer and if it is 1...
    MotionOnFlag = 1
  } else {  // but if the parameter is 0 then ...
    MotionOnFlag = 0
  }
}
But for code writing simplicity’s sake, I had originally written this command in “shorthand”.
It functionally works the same way, but visually interpreting it can be tricky without understanding the longer process.
BLYNK_WRITE(V13) // Alarm ON/OFF Button set to SWITCH mode
{
  MotionOnFlag = param.asInt(); // this setts the variable to the vPin state
}