Last month I received an e-mail from ITEAD Studios on their new 16A Sonoff S31 US standard smart socket with energy monitoring feature. Of course that was just one of those “got-to-have” things, so I order a couple. I had also read that it may be a little difficult to hack; flashing it is the same as any other Sonoff products but breaking into it and hooking it up is a little more difficult.
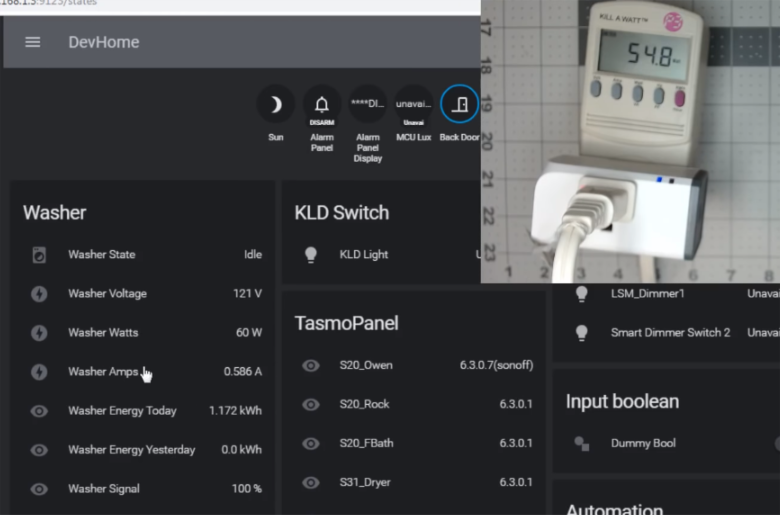
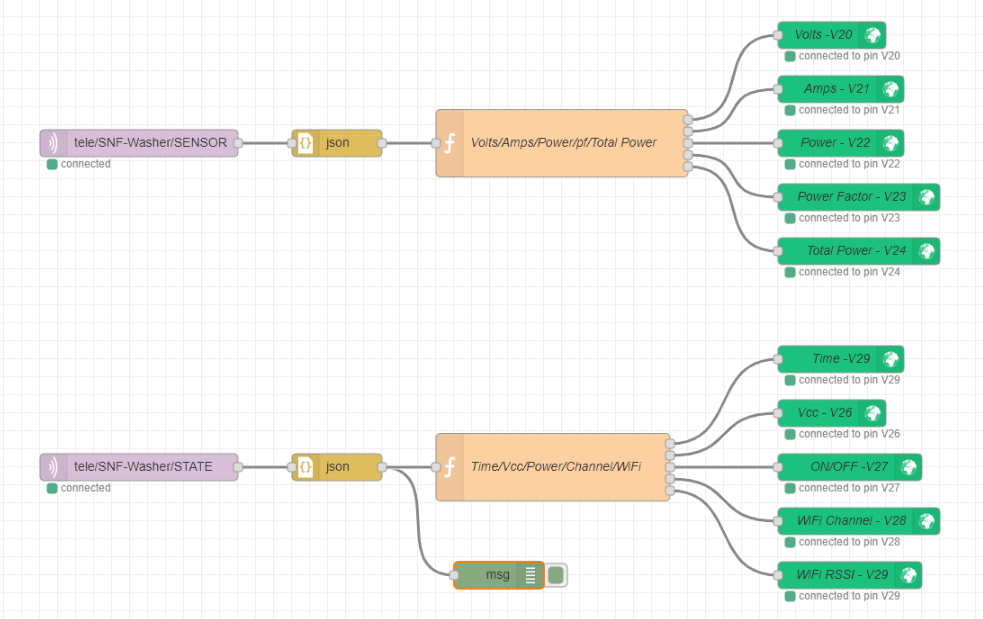
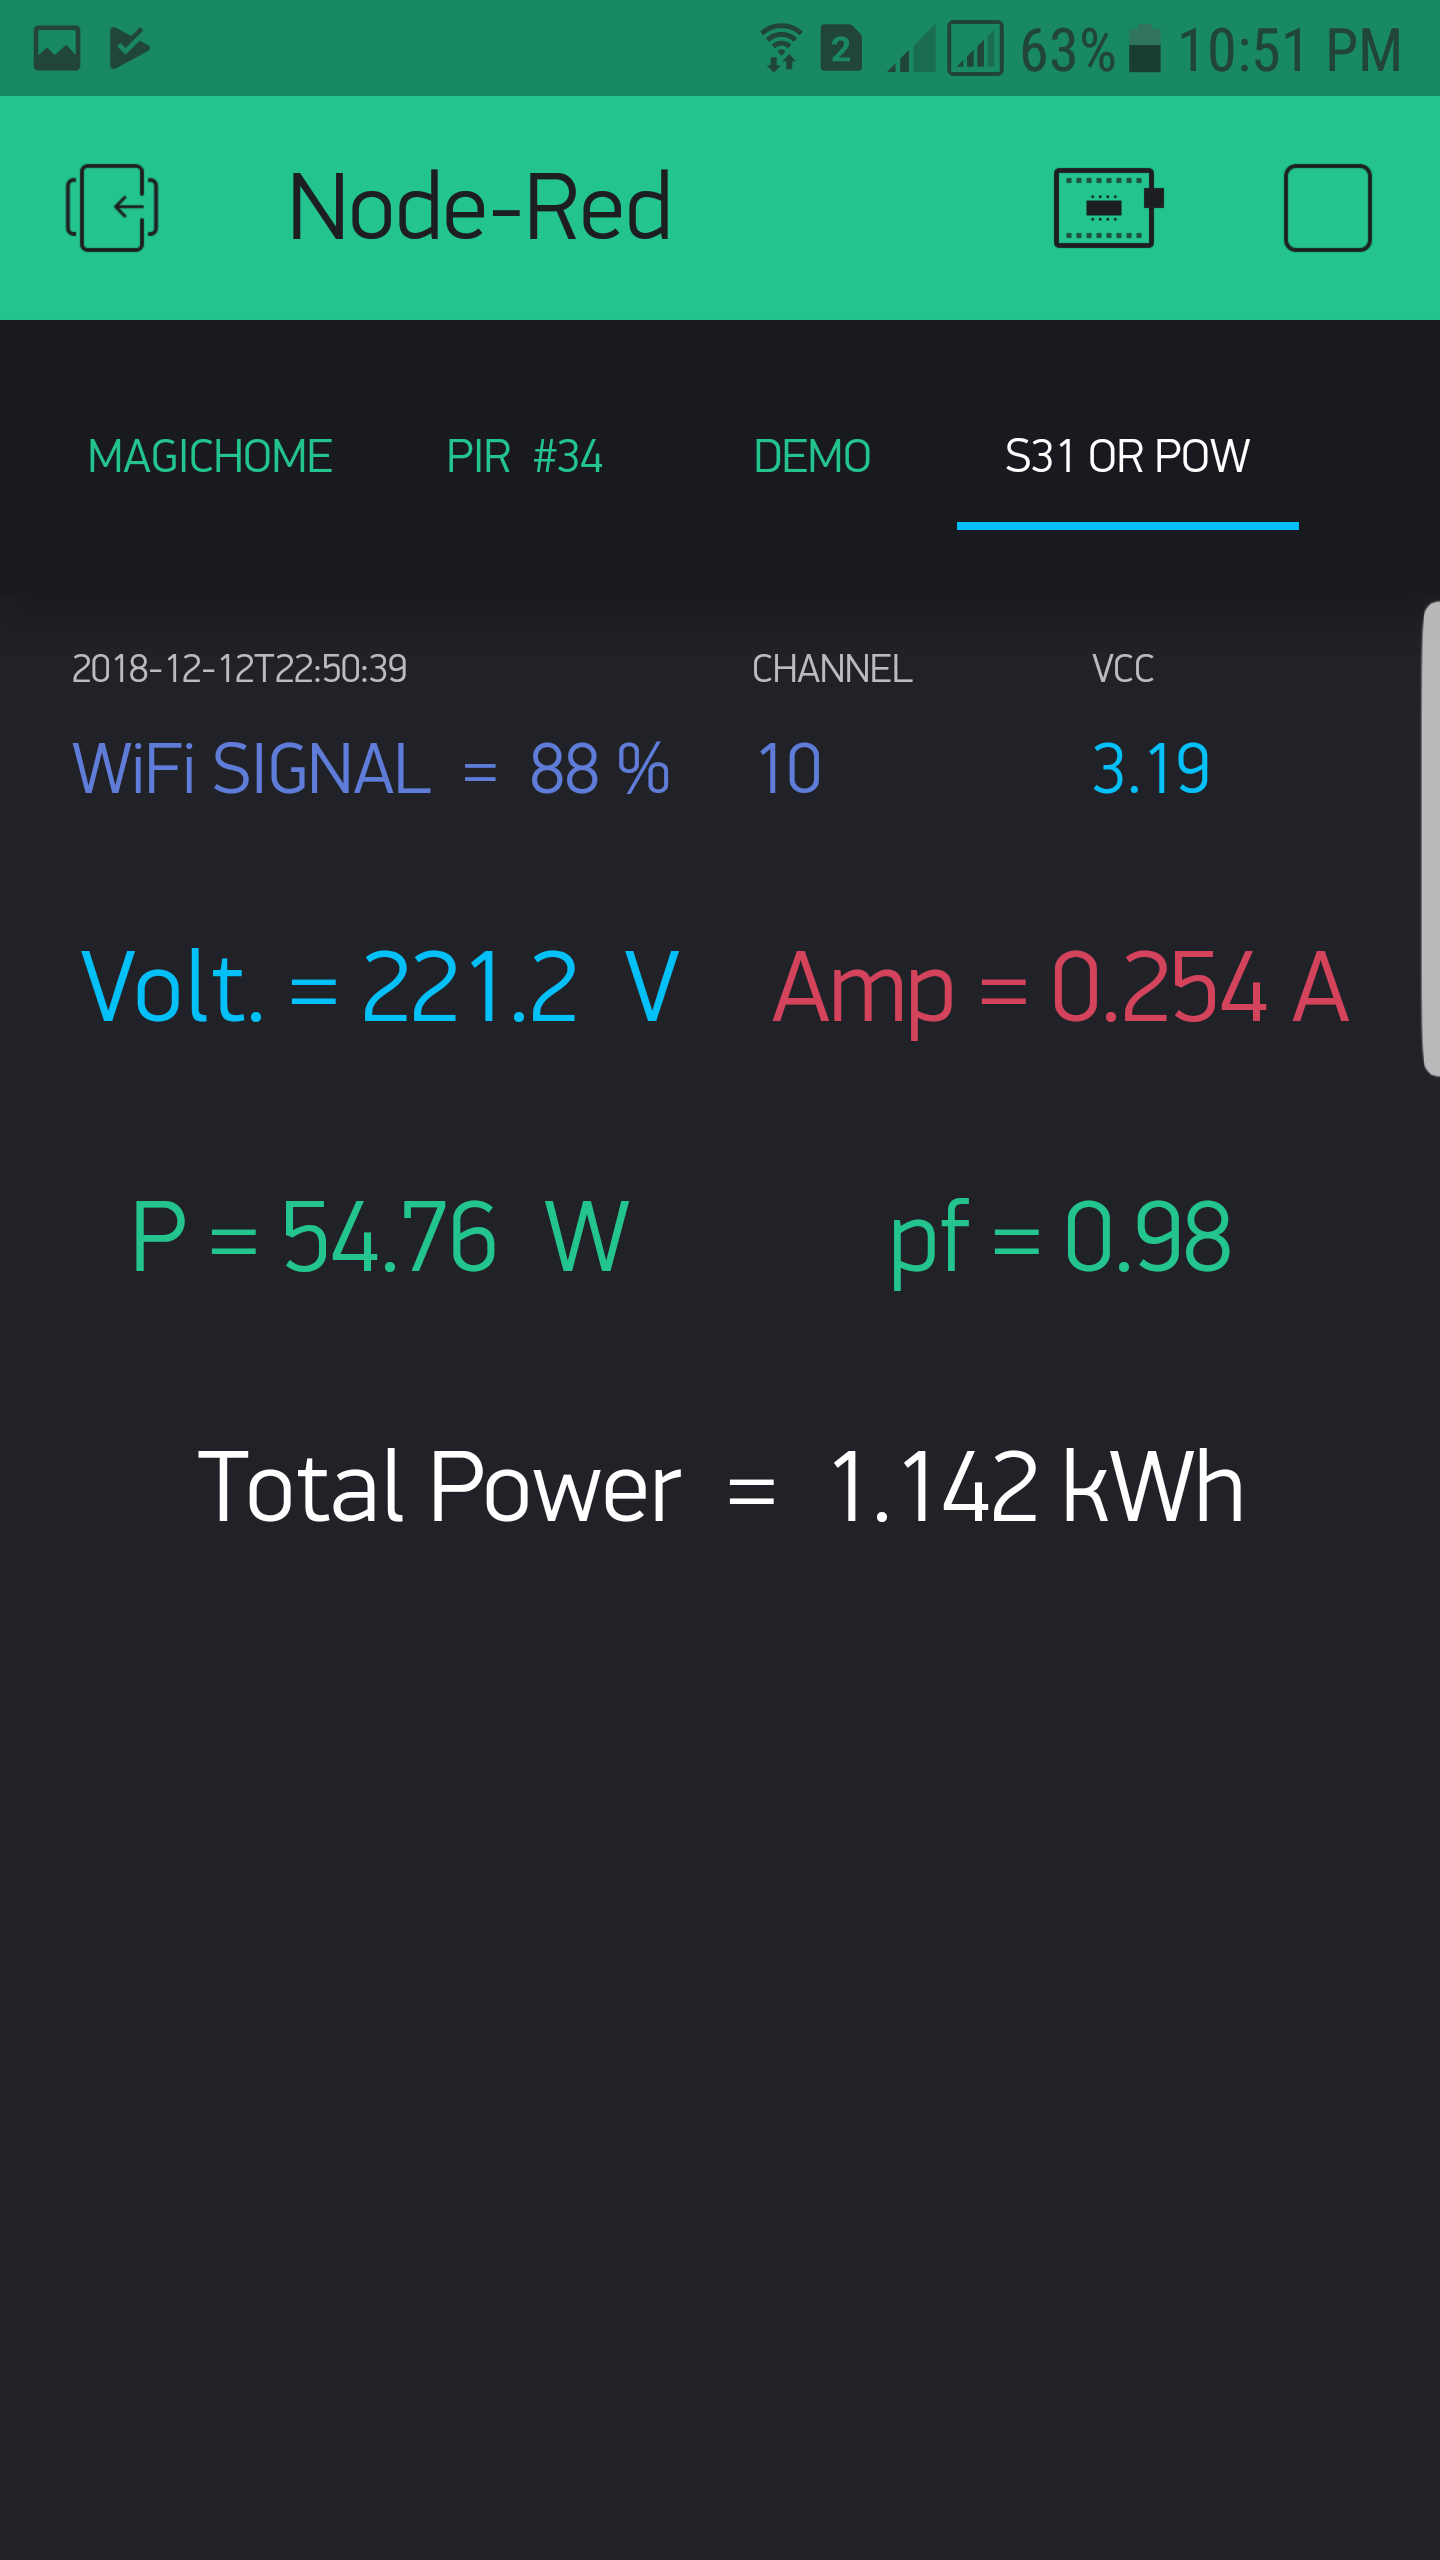
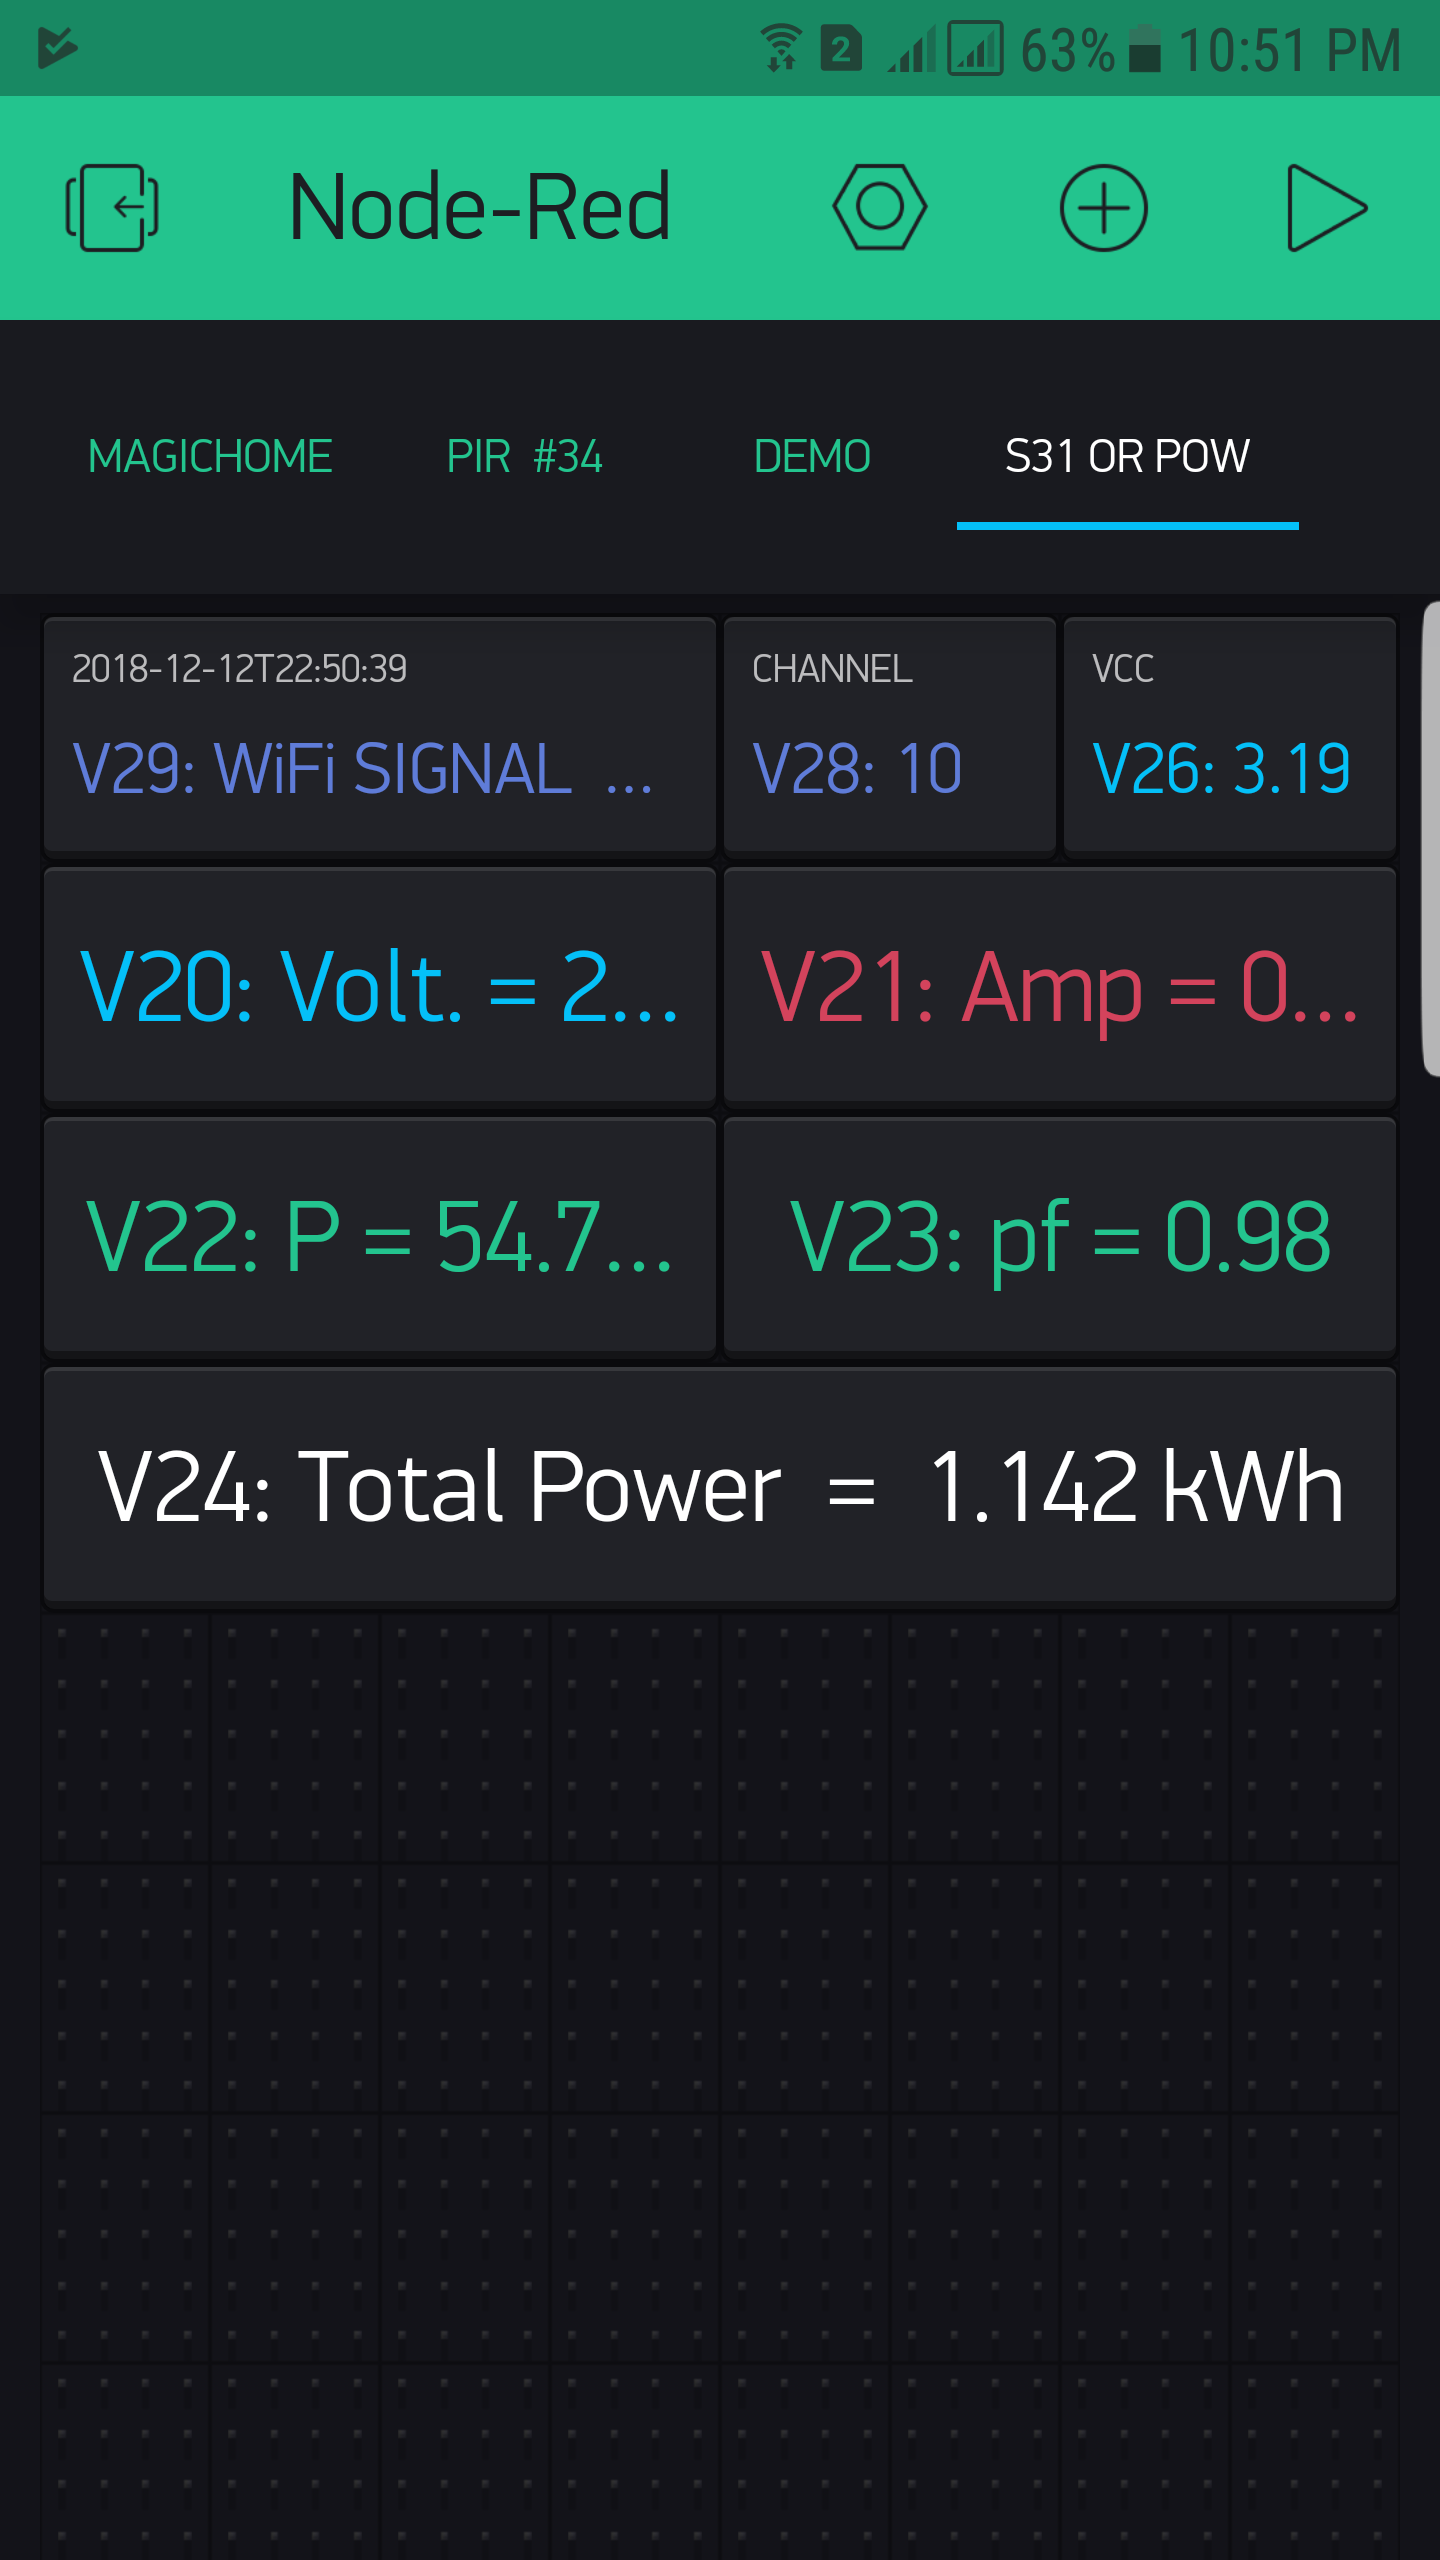
The Sonoff S31 has a compact design so that two can be plug into a single wall receptacle. The 4MB flash allows for OTA programming and the 16 amp relay can carry a heaver load. Although the Chipsea Cse7766 energy monitoring chip is a neat feather on the eWeLink app. After flashing the S31 for the Blynk app the functionality of the Cse7766 becomes useless… unless someone can figure out all the formulas. With the S31s compact design, 4MB flash, 16A relay, and cost of only $17.00… about $2.00 more than the Sonoff S20 made it a much better option.
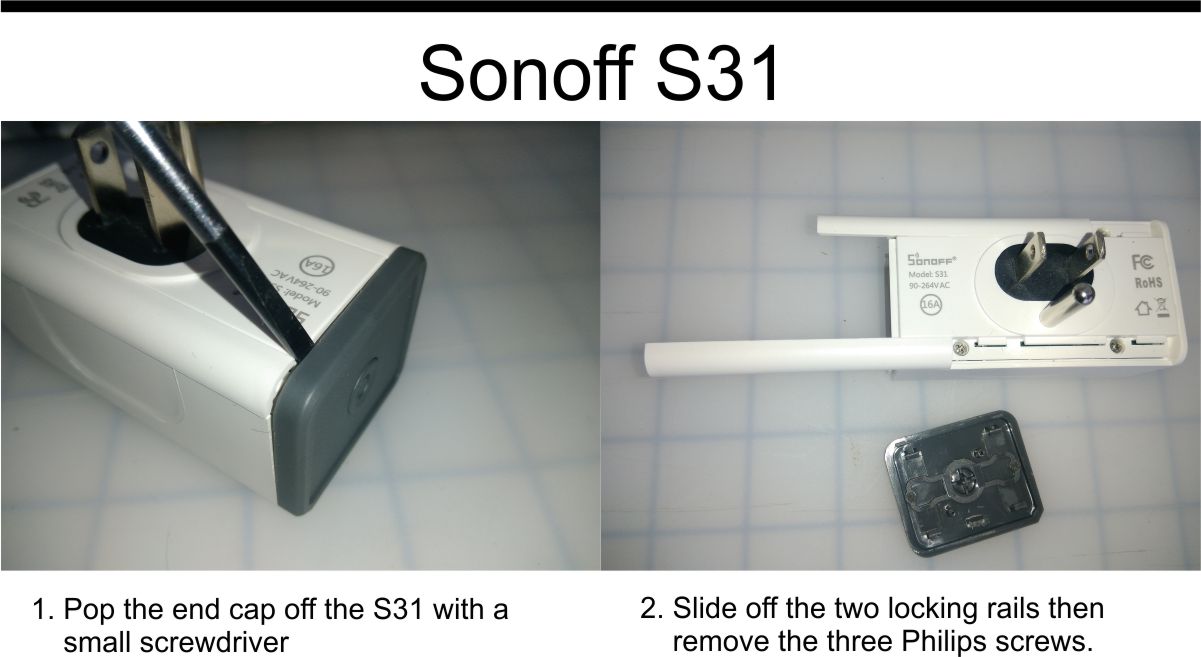
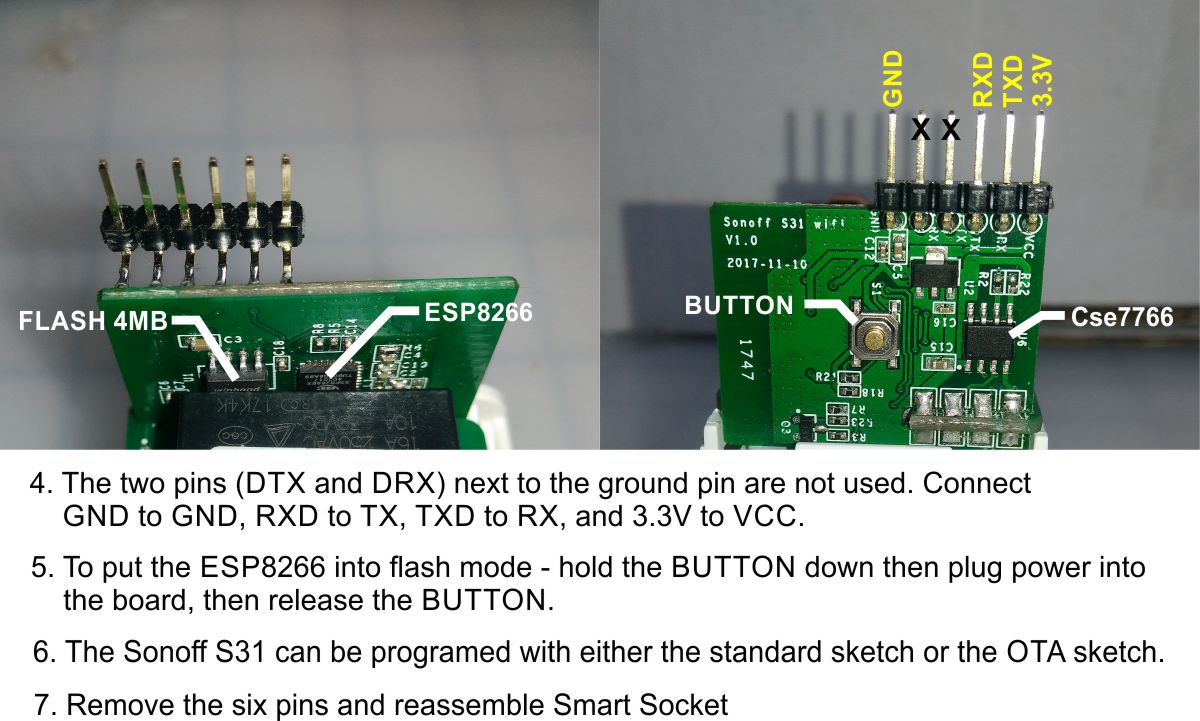
Below are instructions on hacking the Sonoff S31 and two versions firmware. Either version can be flashed on the Sonoff S31. For the Sonoff S20 only the non-OTA version should be used. Because the S31 is a little difficult to open up, solder pins and reassemble for each time you want to flash it, the OTA version seems like a more practical way to go. I didn’t try the OTA version on the S20 so I don’t know if it will work or not.
The Blynk app is set up with a vertical button in switch mode on “V1” and an LED widget on “V10” that I used to make sure the buttons and relay were all synchronized during testing.
Note: The Sonoff S31 only comes in U.S standard at this time.


Sonoff S31 - OTA verson
/*************************************************************

  ITEAD Sonoff S31 - OTA version for the Blynk app.
 *************************************************************/

/* Comment this out to disable prints and save space */
//#define BLYNK_PRINT Serial

#include <ESP8266mDNS.h>
#include <WiFiUdp.h>
#include <ArduinoOTA.h>
#include <ESP8266WiFi.h>
#include <BlynkSimpleEsp8266.h>

int buttonPin = 0;              // Sonoff On/Off button
int relayPin = 12;              // Sonoff relay
int ledPin = 13;                // Sonoff green LED - always on
int relayStatus = 0;
// variables will change
int buttonState = LOW;          // variable for reading the pushbutton status
int lastButtonState = HIGH;     // previous state of the button
int relayState = LOW;
int ledState = LOW;
int volts = 0;

long lastTime = 0;              // the last time the output pin was toggled
long debounce = 200;            // the debounce time, increase if the output flickers

// Your WiFi credentials.
// Set password to "" for open networks.
const char* ssid     = "ssid";
const char* password = "passward";
char auth[] = "blynk authorization"; // Sonoff S31 "4M(3M SPIFFS)"

WidgetLED led1(V10); // Widget Relay LED

BLYNK_WRITE(V1) { // Widget relay button
  relayStatus = param.asInt();
  if (relayStatus == 1) {
    relayState = HIGH;
  }
  else {
    relayState = LOW;
  }
} // end - BLYNK_WRITE(V1)


void setup() {
  Serial.begin(115200);
  Serial.println("Booting");

  Blynk.begin(auth, ssid, password);
  while (Blynk.connect() == false) {
    Serial.println("Connection Failed! Rebooting...");
    delay(5000);
    ESP.restart();
  }

  // ============ OTA =============
  ArduinoOTA.onStart([]() {
    Serial.println("Start");
  });
  ArduinoOTA.onEnd([]() {
    Serial.println("\nEnd");
  });
  ArduinoOTA.onProgress([](unsigned int progress, unsigned int total) {
    Serial.printf("Progress: %u%%\r", (progress / (total / 100)));
  });
  ArduinoOTA.onError([](ota_error_t error) {
    Serial.printf("Error[%u]: ", error);
    if (error == OTA_AUTH_ERROR) Serial.println("Auth Failed");
    else if (error == OTA_BEGIN_ERROR) Serial.println("Begin Failed");
    else if (error == OTA_CONNECT_ERROR) Serial.println("Connect Failed");
    else if (error == OTA_RECEIVE_ERROR) Serial.println("Receive Failed");
    else if (error == OTA_END_ERROR) Serial.println("End Failed");
  });
  ArduinoOTA.begin();
  Serial.println("Ready");
  Serial.print("IP address: ");
  Serial.println(WiFi.localIP());
  // ============ OTA end =============

  pinMode(buttonPin, INPUT);  // on/off button
  pinMode(relayPin, OUTPUT);  // relay
  pinMode(ledPin, OUTPUT);    // led
  digitalWrite(ledPin, LOW);  // always on
}

void loop() {
  ArduinoOTA.handle();
  Blynk.run();
  pushButton();
  ledStatus();

}

void pushButton() {
  buttonState = digitalRead(buttonPin);

  if (buttonState == HIGH && lastButtonState == LOW && millis() - lastTime > debounce) {
    if (relayState == HIGH) {
      relayState = LOW;
      Blynk.virtualWrite(V1, 0);
    }
    else {
      relayState = HIGH;
      Blynk.virtualWrite(V1, 1);
    }

    lastTime = millis();
  }

  digitalWrite(relayPin, relayState); // Relay open/close - digital pin 12
  lastButtonState = buttonState;
} //end - pushButton()


void ledStatus() { // Widget LED - relay status
  ledState = digitalRead(relayPin);
  if (ledState == HIGH)
    led1.on();
  else
    led1.off();
}

Sonoff S31 and S20 - Non-OTA version
/*************************************************************

  ITEAD Sonoff S31 and S20 for the Blynk app.
 *************************************************************/

/* Comment this out to disable prints and save space */
//#define BLYNK_PRINT Serial

#include <ESP8266WiFi.h>
#include <BlynkSimpleEsp8266.h>

int buttonPin = 0;              // Sonoff On/Off button
int relayPin = 12;              // Sonoff relay
int ledPin = 13;                // Sonoff green LED - always on
int relayStatus = 0;
int buttonState = LOW;          // variable for reading the pushbutton status
int lastButtonState = HIGH;     // previous state of the button
int relayState = LOW;
int ledState = LOW;

long lastTime = 0;             // the last time the output pin was toggled
long debounce = 200;           // the debounce time, increase if the output flickers

// Your WiFi credentials.
// Set password to "" for open networks.
const char* ssid     = "ssid";
const char* password = "passward";

//char auth[] = "blynk authorization"; // Sonoff S31 "4M(3M SPIFFS)"
char auth[] = "blynk authorization"; // Sonoff S20 "1M(512k SPIFFS)"

WidgetLED led1(V10); // Widget Relay LED

BLYNK_WRITE(V1) { // Widget relay button
  relayStatus = param.asInt();
  if (relayStatus == 1) {
    relayState = HIGH;
  }
  else {
    relayState = LOW;
  }
} // end - BLYNK_WRITE(V1)


void setup() {
  Serial.begin(115200);
  delay(10);

  Blynk.begin(auth, ssid, password);
  while (Blynk.connect() == false) {
    //Wait until connected
    //Serial.print("x");
  }

  pinMode(buttonPin, INPUT);  // on/off button
  pinMode(relayPin, OUTPUT);  // relay
  pinMode(ledPin, OUTPUT);    // led
  digitalWrite(ledPin, LOW);  // always on
} // end - setup()

void loop() {
  Blynk.run();
  pushButton();
  ledStatus();

}

void pushButton() {
  buttonState = digitalRead(buttonPin);

  if (buttonState == HIGH && lastButtonState == LOW && millis() - lastTime > debounce) {
    if (relayState == HIGH) {
      relayState = LOW;
      Blynk.virtualWrite(V1, 0);
    }
    else {
      relayState = HIGH;
      Blynk.virtualWrite(V1, 1);
    }

    lastTime = millis();
  }

  digitalWrite(relayPin, relayState); // Relay open/close - digital pin 12
  lastButtonState = buttonState;
} //end - pushButton()

void ledStatus() { // Widget LED - relay status
  ledState = digitalRead(relayPin);
  if (ledState == HIGH)
    led1.on();
  else
    led1.off();
} // end - ledStatus()