With Blynk you can build a basic Energy Monitor for under a fiver.
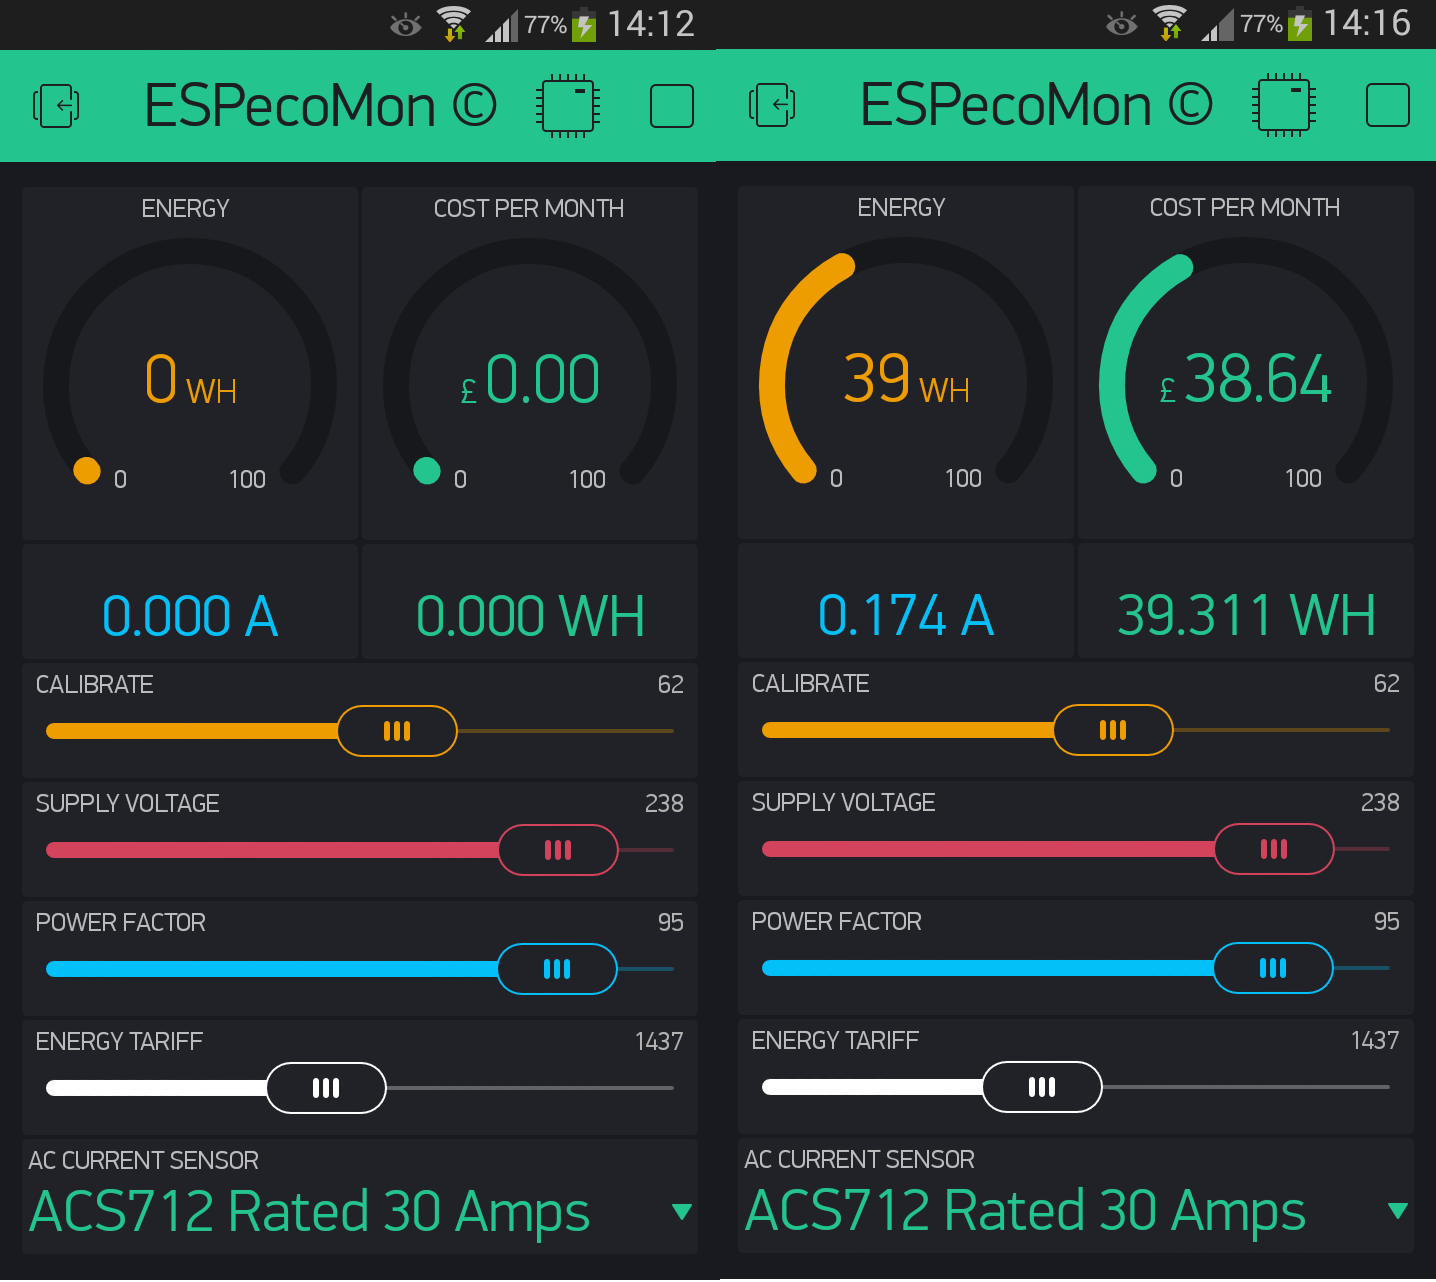
Full details, including QR code and sketch from:
With Blynk you can build a basic Energy Monitor for under a fiver.
Full details, including QR code and sketch from:
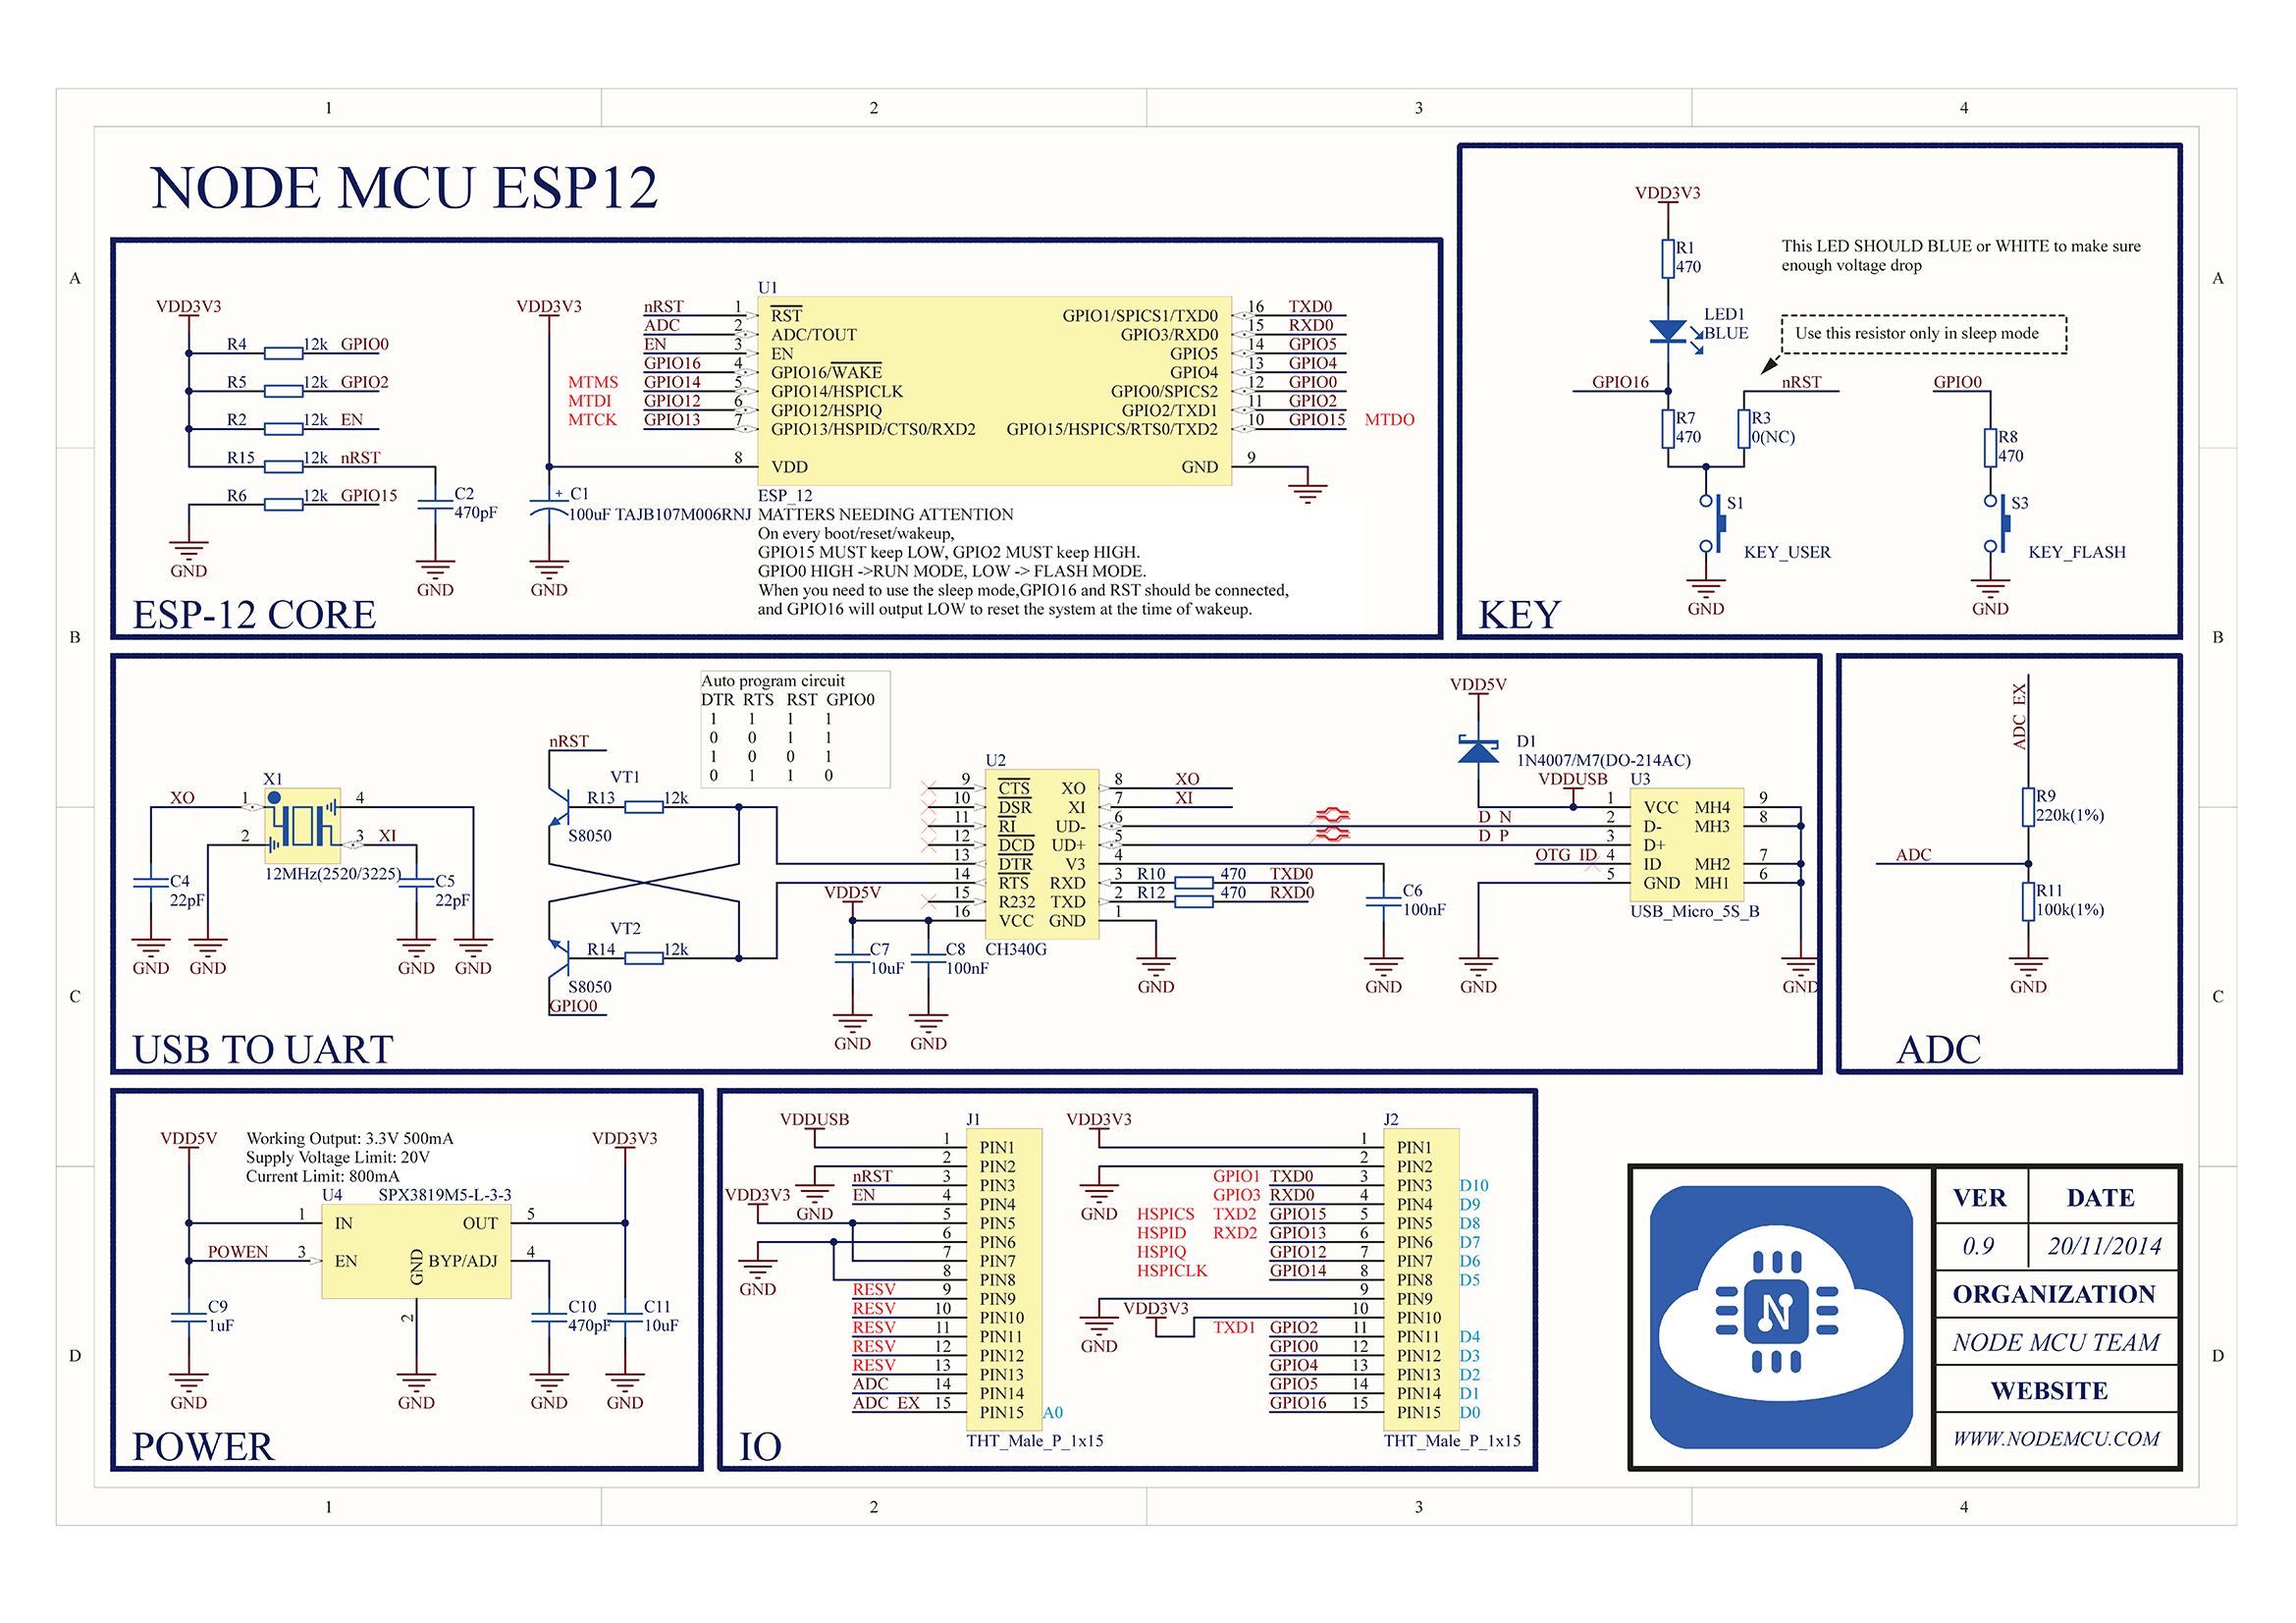
The only thing missing is schematic. As far as I know, you can’t connect ACS712 directly to A0, because it works in 0-1V range, not 3.2 as stated, output on ACS is 0-5V, so voltage divider or at least pot should be used. Maybe I’m missing something. It’s a little bit confusing, complete project without any wiring instructions.
While a schematic would be nice for “one stop shopping”… Google also works ![]()
ESP Dev boards usually have a built in voltage divider that allows the ADC 0-1v to accept 0-3.2v.
For a 5v input, one would need to place an additional 180k resistor inline with the signal wire.
That’s really strange. I’m using NodeMCU V1.0, and I can’t remember that I’ve read anything about built-in voltage divider. Maybe it’s only related to Wemos D1? I will try this tomorrow anyway. And yes, google was not my friend this time. Thanks, Gunner.
@zodiac the reason we don’t provide a schematic is that if a user doesn’t know how to wire the system up then the ACS712 is probably not for them. We are talking peak voltages over 300V so it’s not for beginners.
From our GitHub page:
Pick up a plug and play ESP8266 with 3.2+ ADC:
Sparkfun’s Blynk Board WeMos NodeMCU
That should of course say 3.2V+
Thanks, I’ve already visited github page, I saw that NodeMCU is listed. I just didn’t find info about on board voltage divider in official documentation as it clearly states A0 range is 0-1V. That’s why I shared my worries on this matter with you here, it’s easier if somebody already have on-hands experience, as I know that documentation can be wrong. And yes, I’m completely comfortable working with AC mains, yet it means nothing in this particular case. I’m not asking about AC side, I’m worried about inconsistency of docs available for NodeMCU. I will give it a try tomorrow anyway, worst case scenario is one NodeMCU less 
@zodiac never used a nodeMCU but Sparkfun and WeMos clearly show the maximum voltage for their ADC. After pointing out to “Mr WeMos” that his 3.3V was incorrect and that the resistors he chose means it is only 3.2V he updated most, but not all of the references, on his site.
When I asked why he didn’t select the correct resistors to be able to at least read 3.3V (ESP voltage) his reply was “we just copied the nodeMCU”.
I will try to dig out the nodeMCU confirmed ADC maximum.
@Gunner is right to mention the additional 180K resistor or alternatively restrict current reading to 60% of the rated value of the ACS712. I will update the GitHub in due course to reflect this.
@zodiac nodeMCU schematic covering the ADC https://raw.githubusercontent.com/nodemcu/nodemcu-devkit/master/Documents/NODEMCU_DEVKIT_SCH.png
Dear Costas, is your power monitor suitable for monitoring AC current?
Thanks
@mikegr hi Mike, is your question relating to the ESPecoMon © “€5 ACS712 Power Monitor” that we published on GitHub or the more expensive systems we use?
The GitHub sketch is specifically for measuring AC current and it would be slightly different for DC current. With the 3.2V ADC of the “plug and play” ESP’s you can “safely” monitor up to 60% of the rated current for the particular ACS712 that you buy. So the 30A modules are good for 18A wired directly to the single analogue port.
Allegro who make the chips also do 50A modules and with a minimum of 180K resistor between the data out and analogue port you can monitor the full rated range of the ACS712.
When I say they can be used “safely” I refer to danger to the ESP and not to yourself. We do not want to encourage anyone to work with mains electricity that is not familiar with the potential harm it can do.
We do have “plug and play” monitoring systems that don’t involve any direct connection with mains electricity and they also include accurate Power Factor monitoring. These are what we recommend for the general public, but alas they cost more than the ESPecoMon ©.
If you indicate what your project is we can probably advise further. Meanwhile Sparkfun have a detailed tutorial for their version of the ACS712 break out board at https://learn.sparkfun.com/tutorials/acs712-low-current-sensor-hookup-guide
Dear Costas,
thanks a lot for your in details answer. You cover me 100%.
Thanks and Best Regards,
Mike Kranidis
P.S. can you give me the link for your professional power monitoring system?
Hi @costas, your code does its measurement every 950ms out of every 2 seconds slice of time. Does that mean that to get a truer indication of total WH used, the final calculation would need to be multiplied with a factor of 2.1 (2/0.95)?
@alantch not quite.
The actual gauge of cost per month is a single snapshot based on the present energy being used.
So it’s covered at line 53 of the sketch:
energyCostpermonth = 24.0 * 30.0 * (pF / 100.0) * (WH / 1000.0) * (energyTariff / 1000.0);
So 24 hours per day X 30 days per month X Power Factor X snapshot of energy used in KWH X cost per KWH.
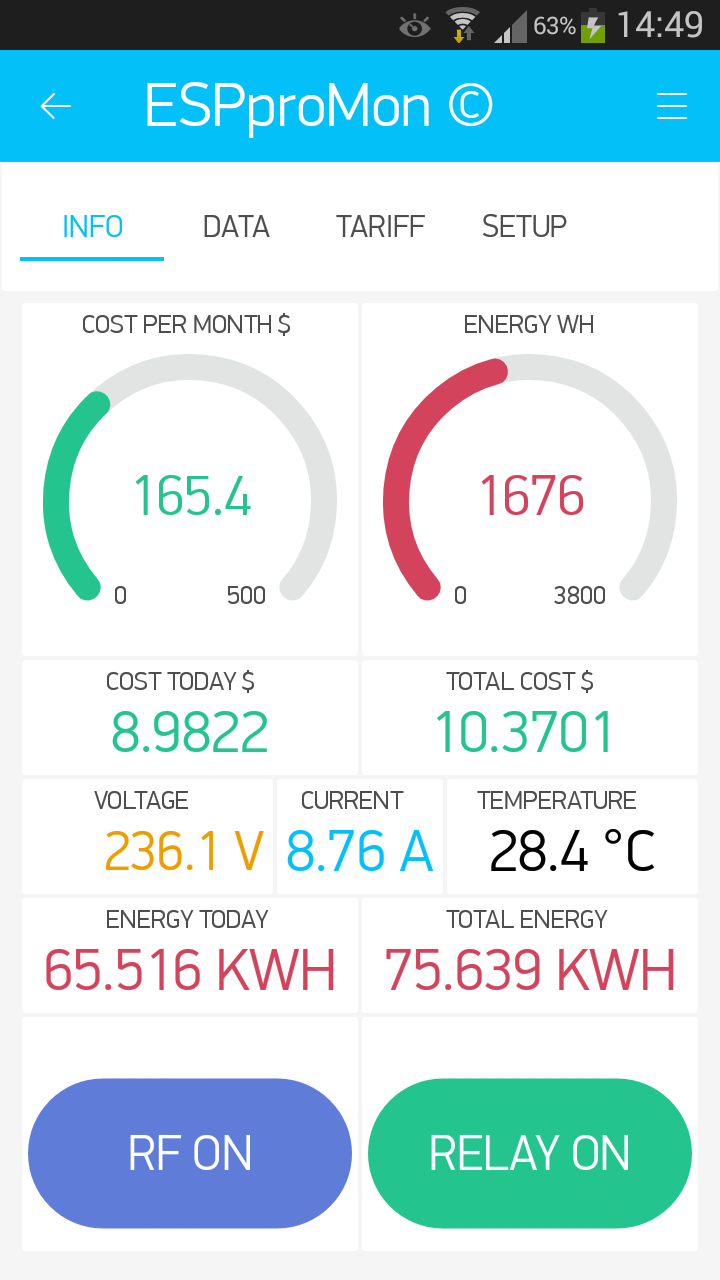
In ESPproMon ©, which hooks up to various different sensors, it’s handled in 2 ways:
Similar to your 2.1 factor for sub $2 sensors like the ACS712 breakout boards. It assumes the energy used was fixed throughout the 2 seconds.
Our mainstream sensors actually do constant sampling and retain the value within the breakout board.
The main app has 4 overflowing tabs with graphs, configuration menu’s including sensor selection, local currency, cost bands etc. Provides API updates to one of the leading Energy Monitoring websites and the project itself can be controlled with Blynk’s API.
The safest monitoring systems I know of are available from https://shop.openenergymonitor.com/ and reasonably priced too. They have a mountain of information at https://learn.openenergymonitor.org/ and a Community site at https://community.openenergymonitor.org/
Send me a PM if you like the look of their systems and i’ll give you a few pointers on the best route.
We also use slightly cheaper hardware from another source but it doesn’t offer the plug and play route provided by the OpenEnergyMonitor team. Again send me a PM for details if you need them.
emonPi is beautiful but expensive… !!!
OK Costas, in case I fall in love with any of theirs product, I will PM to you!
Thanks and Best Regards,
Mike Kranidis
You are looking at the wrong hardware ![]()
Why? Please guide me a little…
Do you mean this: ESP8266 WIFI Heatpump Monitor ?
As you say the EmonPi is a very nice piece of kit but not their cheapest solution.
Look at the EmonTX and then think, same but cheaper.
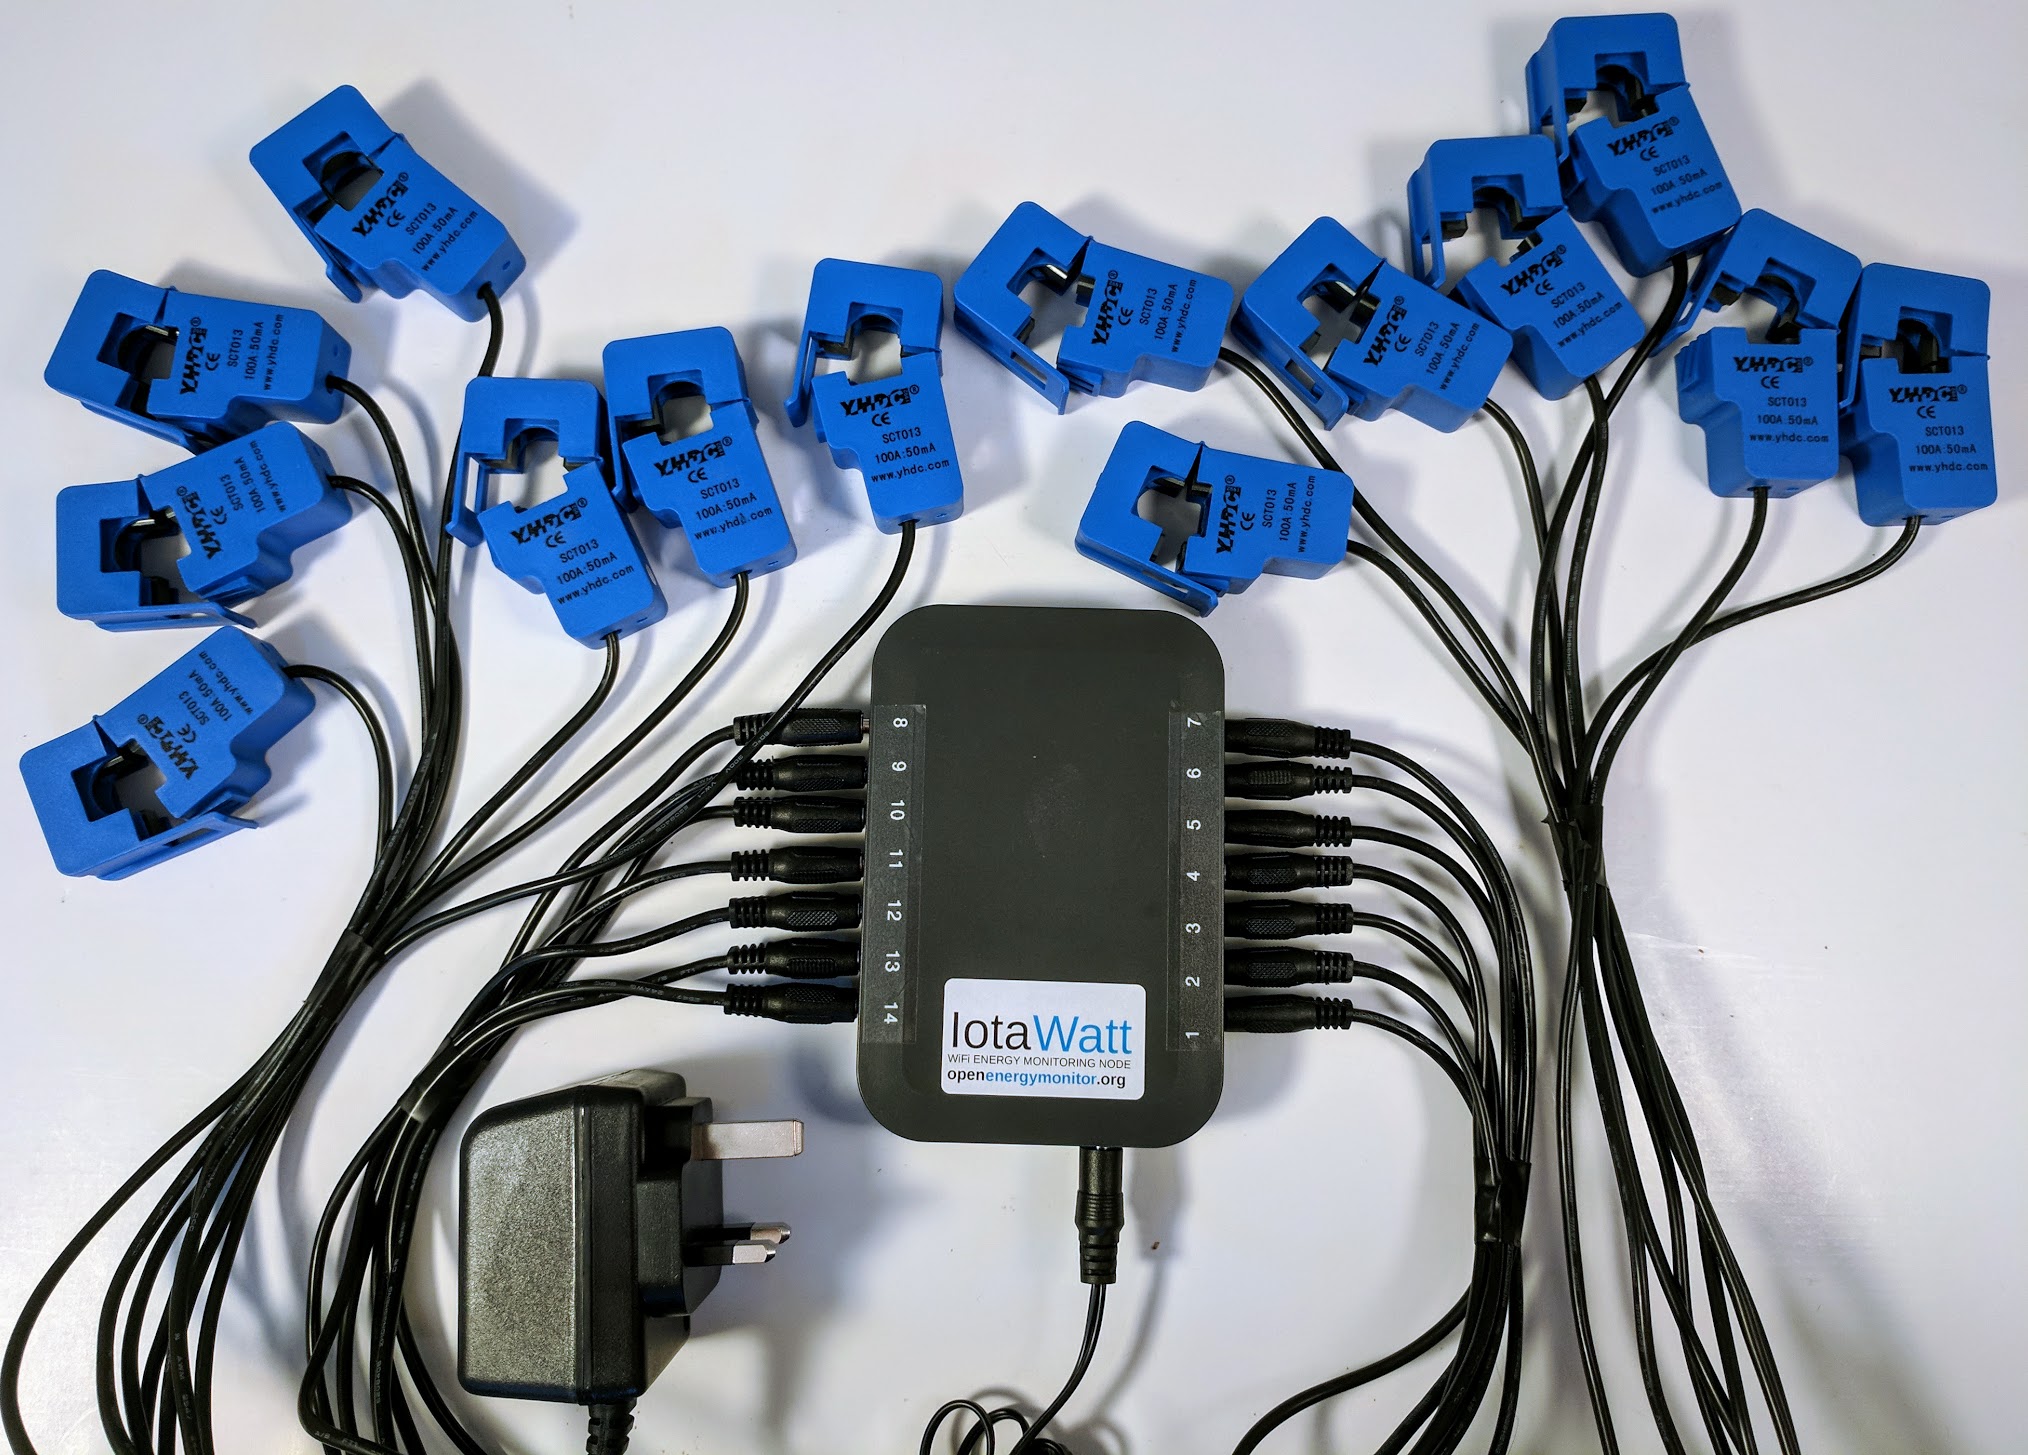
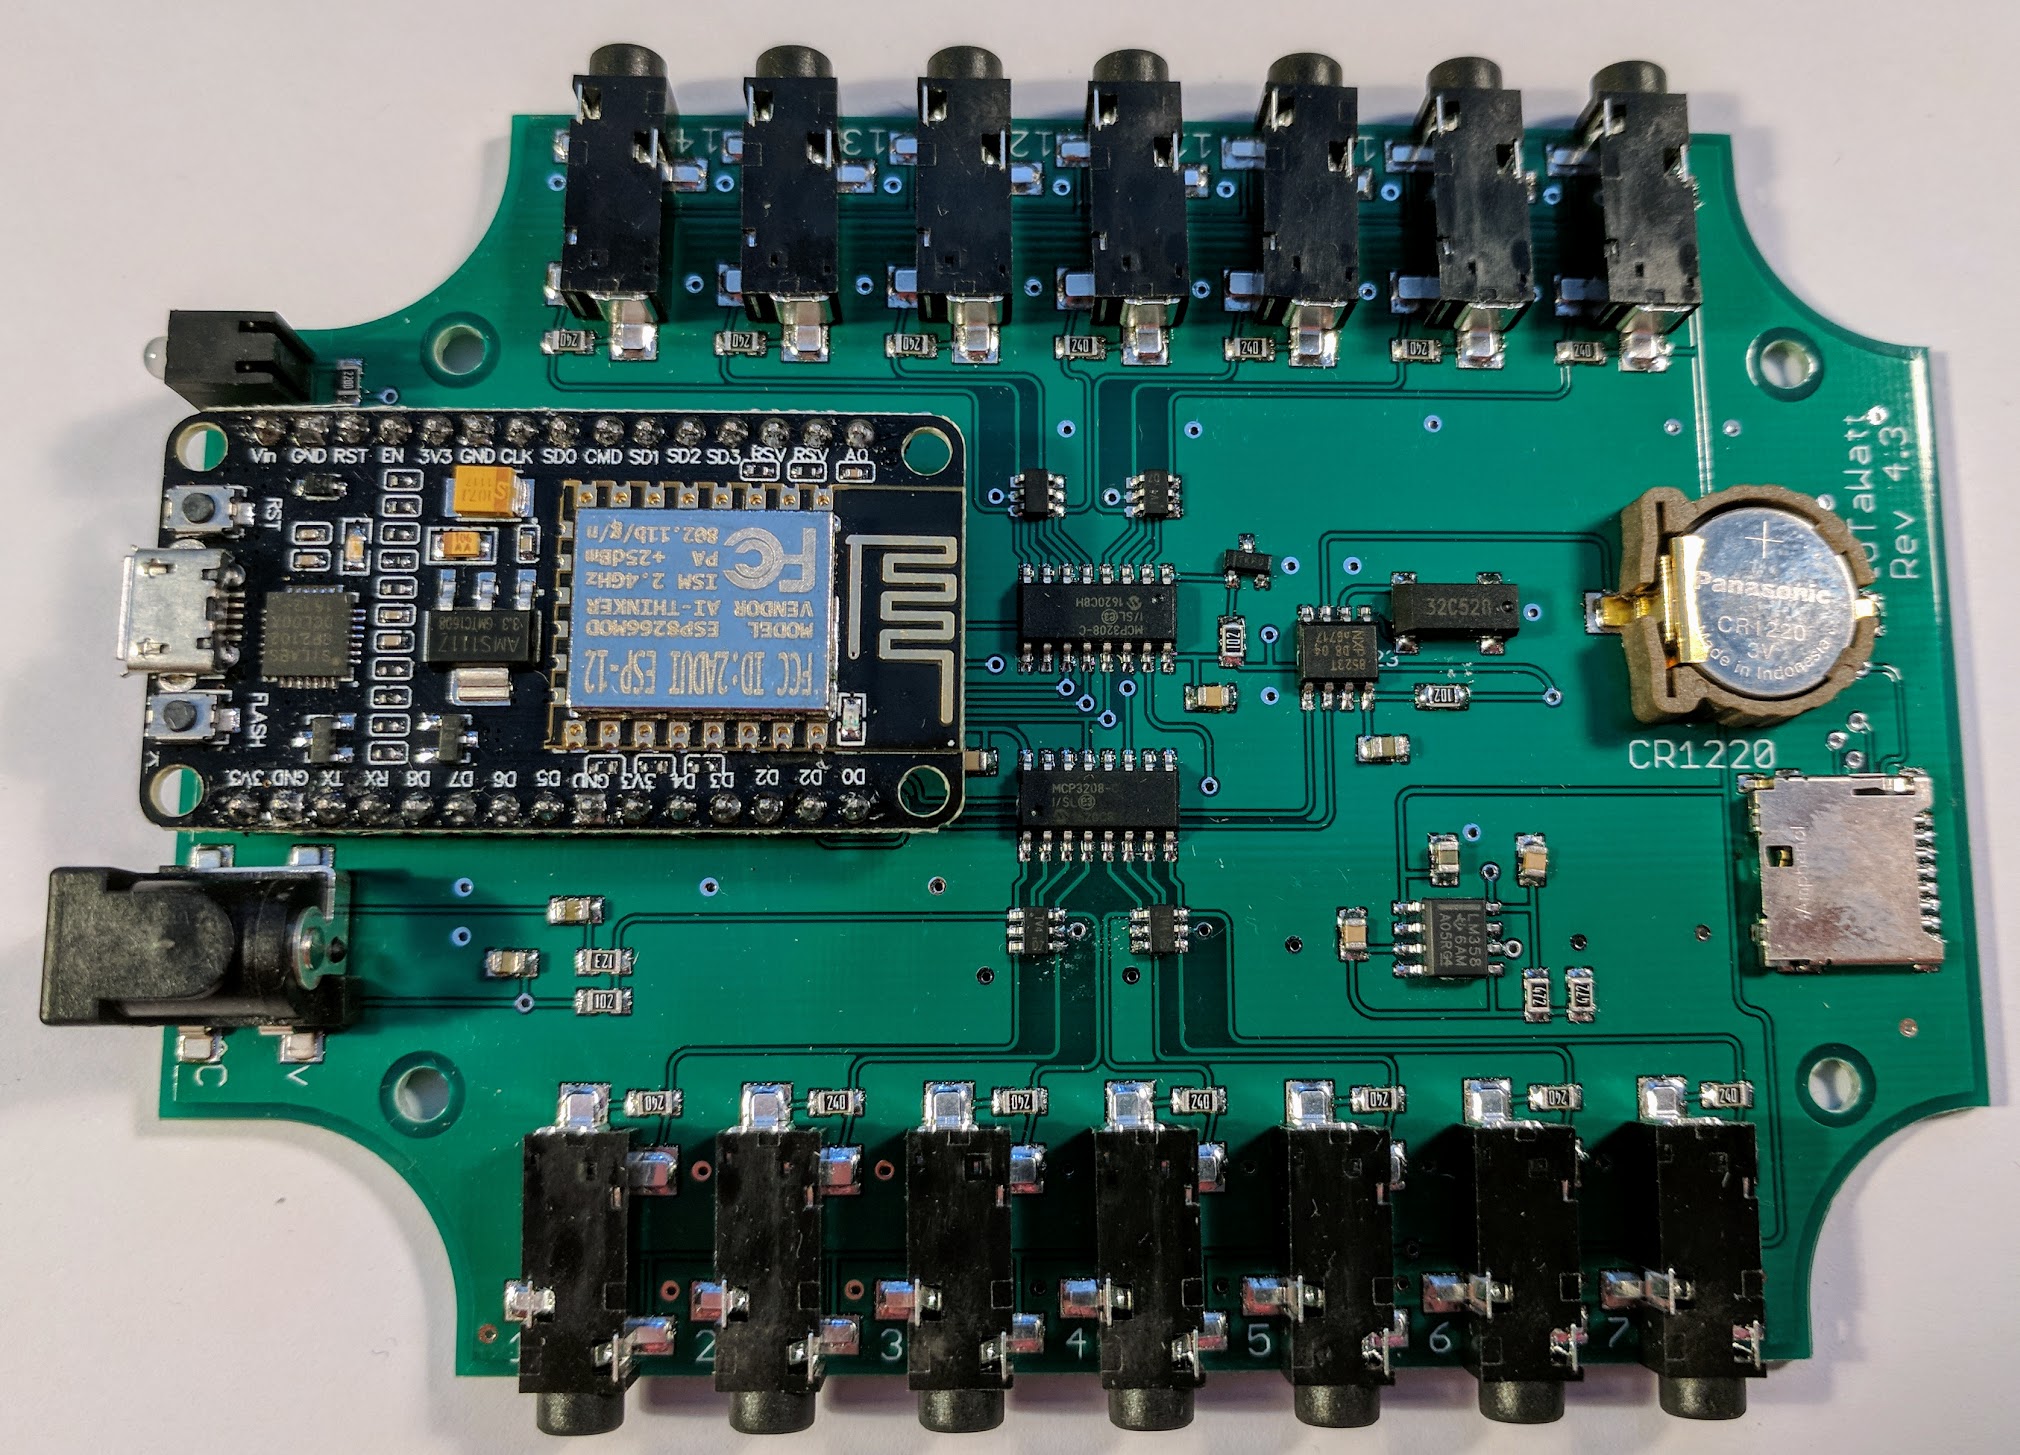
Earlier today OpenEnergyMonitor released a very slick looking 14 channel energy monitoring device called IotaWatt.
In their shop at http://shop.openenergymonitor.com/iotawatt/
It’s nice to see a commercial product that uses a ‘plug and play’ ESP8266 that has been approved to CE standards for EMC.