CH340 is a USB to serial (RS232) convertor chip, so as long as it is in the USB-TTL form like this, then that is what you can use to send serial print data from your Arduino to Termite (or any serial monitor, like Putty, etc).
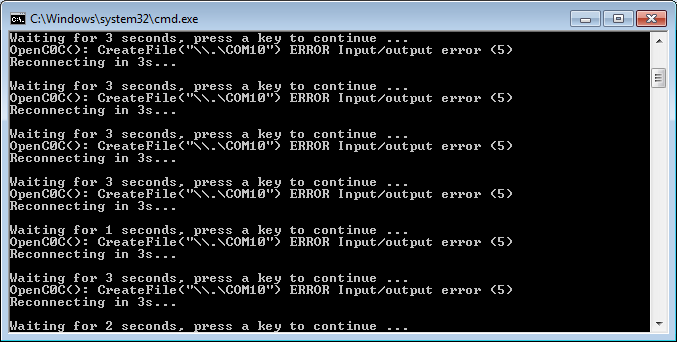
I have tried use termite. When I run file blynk-ser.bat, termite can’t detect the port. Otherwise, when I close file blynk-ser.bat, termite can detect the port. But, if I open termite first, after that I run file blynk-ser.bat, then the command prompt will be error like this:
And I have modified the sketch:
    #define BLYNK_PRINT SwSerial
    #include <SoftwareSerial.h>
    SoftwareSerial SwSerial(10, 11); // RX, TX

    #include <BlynkSimpleStream.h>

    // You should get Auth Token in the Blynk App.
    // Go to the Project Settings (nut icon).
    char auth[] = "*******************************************";

    int buzzer = 13 ;// define buzzer Interface
    int pin = 2; // define the flame sensor interface
    int analoog = A0; // define the flame sensor interface

    int val ;// define numeric variables val
    float sensor; //read analoog value

    BlynkTimer timer;

    void readSensor()   // Costas
    {
       sensor = analogRead(analoog);
       Serial.println(sensor);  // display temperature
       // long uptime = millis() / 60000L;  Costas

      // You can send any value at any time.
      // Please don't send more that 10 values per second.
      Blynk.virtualWrite(V1, millis() / 1000);

      val = digitalRead (pin) ;// digital interface will be assigned a value of 3 to read val
      if (val == HIGH) // When the flame sensor detects a signal, buzzer beep
      {
         digitalWrite (buzzer, HIGH);
      }
         else
     {
        digitalWrite (buzzer, LOW);
     }
       //delay(1000);  // Costas
    }

    void setup()
    {
      pinMode (buzzer, OUTPUT) ;// define buzzer as output interface
      pinMode (pin, INPUT) ;// output interface defines the flame sensor
      pinMode (analoog, INPUT) ;// output interface defines the flame sensor

      // Debug console
      SwSerial.begin(9600);

      // Blynk will work through Serial
      // Do not read or write this serial manually in your sketch
      Serial.begin(9600);
      Blynk.begin(Serial, auth);

      // Notify immediately on startup
      if(val==HIGH){
      //Blynk.notify("Flame!!!");
      Blynk.email("nurlela.dabukke@gmail.com", "Flame!!!", "Sensor activated");
      }

       // Setup a function to be called every 200ms Costas
       timer.setInterval(10L, readSensor);  // Costas
       Blynk.email("nurlela.dabukke@gmail.com", "Flame!!!", "Sensor activated");
       }

      void loop()
      {
        Blynk.run();
        timer.run();
      }
When I click play button on the app, nothing value appear. Any wrong with my sketch?
    #define BLYNK_PRINT Serial
    #include <ESP8266WiFi.h>
    #include <BlynkSimpleEsp8266.h>

    // You should get Auth Token in the Blynk App.
    // Go to the Project Settings (nut icon).
    char auth[] = "*****************************************";

    // Your WiFi credentials.
    // Set password to "" for open networks.
    char ssid[] = "Redmi 3s";
    char pass[] = "***********";

    int buzzer = D1 ;// define buzzer Interface
    int pin = D0; // define the flame sensor interface
    int analoog = A0; // define the flame sensor interface

    int val ;// define numeric variables val
    float sensor; //read analoog value

    BlynkTimer timer;

    void readSensor()
    {
      sensor = analogRead(analoog);
      Serial.println(sensor);  // display temperature
      //long uptime = millis() / 60000L;

     // You can send any value at any time.
     // Please don't send more that 10 values per second.
     Blynk.virtualWrite(V1, millis() / 1000);

     val = digitalRead (pin) ;// digital interface will be assigned a value of 3 to read val
     if (val == HIGH) // When the flame sensor detects a signal, buzzer beep
     {
       digitalWrite (buzzer, HIGH);
     }
       else
    {
      digitalWrite (buzzer, LOW);
    }
      // Actually send the message.
      // Note:
      //   We allow 1 notification per 15 seconds for now.
      //Blynk.notify(String("Running for ") + uptime + " minutes.");
    }

    void setup()
    {
      pinMode (buzzer, OUTPUT) ;// define buzzer as output interface
      pinMode (pin, INPUT) ;// output interface defines the flame sensor
      pinMode (analoog, INPUT) ;// output interface defines the flame sensor
      // Debug console
      Serial.begin(115200);

      Blynk.begin(auth, ssid, pass);
      // You can also specify server:
      //Blynk.begin(auth, ssid, pass, "blynk-cloud.com", 8442);
      //Blynk.begin(auth, ssid, pass, IPAddress(192,168,1,100), 8442);

      // Notify immediately on startup
      Blynk.notify("Device started");

       // Notify immediately on startup
       if(val==HIGH){
       //Blynk.notify("Flame!!!");
       Blynk.email("nurlela.dabukke@gmail.com", "Flame!!!", "Sensor activated");
       // Setup a function to be called every minute
       timer.setInterval(10L, readSensor);
     }
       // Setup a function to be called every 200ms Costas
       timer.setInterval(10L, readSensor);  // Costas
       Blynk.email("nurlela.dabukke@gmail.com", "Flame!!!", "Sensor activated");
    }

    void loop()
    {
       Blynk.run();
       timer.run();
    }
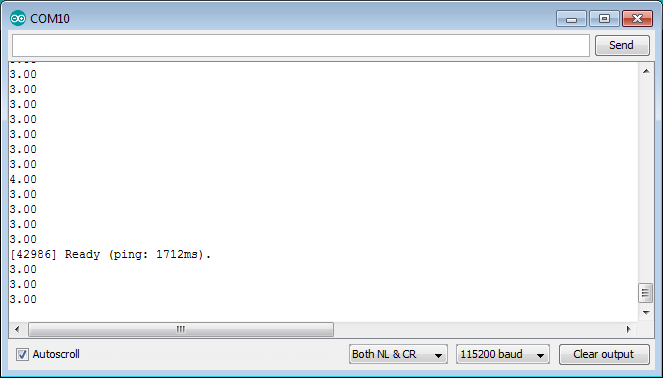
When I upload the sketch and I open serial monitor, the values appear only 5, 4, 3 repeatedly whereas I still haven’t yet started the fire.Anyway, the email come in when I started fire, but the nothing value come to email and buzzer can’t rang. The email just contained “Sensor acitvated”. Are there any wrong in my sketch or my circuit?
Sorry, I forgot to edit the fritzing diagram. I have change the pin to D1 on my circuit, but the buzzer still can’t rang.
Anyway, I have edit the sketch:
    #define BLYNK_PRINT Serial
    #include <ESP8266WiFi.h>
    #include <BlynkSimpleEsp8266.h>

    // You should get Auth Token in the Blynk App.
    // Go to the Project Settings (nut icon).
    char auth[] = "******************************************";

    // Your WiFi credentials.
    // Set password to "" for open networks.
    char ssid[] = "Redmi 3s";
    char pass[] = "***********";

    int buzzer = D1 ;// define buzzer Interface
    int pin = D0; // define the flame sensor interface
    int analoog = A0; // define the flame sensor interface

    int val ;// define numeric variables val
    float sensor; //read analoog value

    BlynkTimer timer;

    void readSensor()
    {
      sensor = analogRead(analoog);
      Serial.println(sensor);  // display temperature
      //long uptime = millis() / 60000L;

     // You can send any value at any time.
     // Please don't send more that 10 values per second.
     //Blynk.virtualWrite(V1, millis() / 1000);

     val = digitalRead (pin) ;// digital interface will be assigned a value of 3 to read val
     if (val == HIGH) // When the flame sensor detects a signal, buzzer beep
     {
        digitalWrite (buzzer, HIGH);
     }
        else
    {
        digitalWrite (buzzer, LOW);
    }
       // Actually send the message.
       // Note:
       //   We allow 1 notification per 15 seconds for now.
       //Blynk.notify(String("Running for ") + uptime + " minutes.");
       //Notify immediately on startup

       if(val==HIGH){
        //Blynk.notify("Flame!!!");
        Blynk.email("nurlela.dabukke@gmail.com", "Flame!!!", "Sensor activated");
        // Setup a function to be called every minute
        timer.setInterval(100L, readSensor);
      }
      // Setup a function to be called every 200ms Costas
      timer.setInterval(100L, readSensor);  // Costas
      Blynk.email("nurlela.dabukke@gmail.com", "Flame!!!", "Sensor activated");
     }

    void setup()
    {
       pinMode (buzzer, OUTPUT) ;// define buzzer as output interface
       pinMode (pin, INPUT) ;// output interface defines the flame sensor
       pinMode (analoog, INPUT) ;// output interface defines the flame sensor
       // Debug console
      Serial.begin(115200);

      Blynk.begin(auth, ssid, pass);
      // You can also specify server:
      //Blynk.begin(auth, ssid, pass, "blynk-cloud.com", 8442);
      //Blynk.begin(auth, ssid, pass, IPAddress(192,168,1,100), 8442);

      // Notify immediately on startup
      Blynk.notify("Device started");
      }

      void loop()
      {
         Blynk.run();
         timer.run();
       }
I have edit function readSensor and setup like this:
    void readSensor()
    {
      sensor = analogRead(analoog);
      Serial.println(sensor);  // display temperature
      //long uptime = millis() / 60000L;

      // You can send any value at any time.
      // Please don't send more that 10 values per second.
      //Blynk.virtualWrite(V1, millis() / 1000);

      val = digitalRead (pin) ;// digital interface will be assigned a value of 3 to read val
      if (val == HIGH) // When the flame sensor detects a signal, buzzer beep
      {
        digitalWrite (buzzer, HIGH);
        Blynk.email("nurlela.dabukke@gmail.com", "Flame!!!", "Sensor activated");
      }
        else
     {
        digitalWrite (buzzer, LOW);
     }
        // Actually send the message.
        // Note:
        //   We allow 1 notification per 15 seconds for now.
        //Blynk.notify(String("Running for ") + uptime + " minutes.");
     }

     void setup()
     {
        pinMode (buzzer, OUTPUT) ;// define buzzer as output interface
        pinMode (pin, INPUT) ;// output interface defines the flame sensor
        pinMode (analoog, INPUT) ;// output interface defines the flame sensor
        // Debug console
        Serial.begin(115200);

        Blynk.begin(auth, ssid, pass);
         // You can also specify server:
         //Blynk.begin(auth, ssid, pass, "blynk-cloud.com", 8442);
         //Blynk.begin(auth, ssid, pass, IPAddress(192,168,1,100), 8442);

         // Notify immediately on startup
         Blynk.notify("Device started");

         // Notify immediately on startup
          if(val==HIGH){
          //Blynk.notify("Flame!!!");
          //Blynk.email("nurlela.dabukke@gmail.com", "Flame!!!", "Sensor activated");
          // Setup a function to be called every minute
          timer.setInterval(10L, readSensor);
       }
       // Setup a function to be called every 200ms Costas
       timer.setInterval(150L, readSensor);  // Costas
       //Blynk.email("nurlela.dabukke@gmail.com", "Flame!!!", "Sensor activated");
     }
I still haven’t started fire. Doesn’t it to strange if I haven’t started fire but the value has been appeared? And nothing changed in the serial monitor when the fire started.
Not sure what you are trying to do with the diode and 3.3 Ohm resistor.
Disconnect A0 and D0. Disconnect the 5V feed. Connect 3.3V directly to the sensor along with the GND.
Your sensor is shown to work from 3.3V to 5V but some are 3.3V on the digital pin and 5V on the analog pin.
Forget the software for a moment. With my revised wiring does a flame turn the LED’s on?
If they don’t try the 5V feed from the WeMos in place of the 3.3V but you MUST disconnect all the other wires, except ground, first. Does 5V and a flame now turn on the LED’s?