Hi,
I am managing my home automation motes (Arduino, Moteino, ESP8266 and ESP32 ) via MQTT.
The motes are MQTT clients and the MQTT server (broker) is a Raspberry pi.
On the broker I currently run OpenHab2 and NodeRed to interface the motes, however the Web interface used to connect to the server from a smartphone is not very fancy.
Is it a way to interface the MQTT server from a Blynk client, and if yes, it this documented somewhere?
Thanks in advance
Rob
Aaaah, a man after my own heart!
This should get you pointed in the right direction…
and this may also help…
Give me a shout if you want some specific help, although openHab isn’t something I can help with I’m afraid.
Pete.
Pete,
Thanks for your info, I am very aware of NODERED, OPENHAB and MQTT configurations and my own Home Automation devices are well managed via MQTT. This development took me already 5 years! and I am pretty happy with it. So my intention is to not start everything from scratch. I am just looking for an easy way to interface my Broker with something better than just a WEB interface to NODERED or OPENHAB which doesn’t fit well with various screen sizes of smartphones or tablets (I am am not a JAVA, HTML,… expert), the reason I am looking for Blynk. As far as I understand it could be possible to use Blynk virtual ports, however I don’t want to spend ages to learn Blynk to finally admit that this is not what I am looking for.
A basic example showing how to transform / bridge a MQTT message (publish / subscribe) to a the Blynk interface should be OK, so that I can evaluate the efforts and benefits.
If not I will have to be satisfied with my actual tuning of the OPENHAB / NODERED minimum web configuration that fits with my smartphones (IOS and Android).
Robert
Okay, to test it out do the following…
Install the Blynk app on your phone/tablet, create an account and create a new project with a device (it doesn’t really matter what type of device, but I’d recommend an ESP8266 with WiFi connection). Give the device a name like “Blynk Test”. You will get an email from Blynk with your Auth Token. You’ll need this later.
Then add the following widgets:
Gauge widget attached to pin V1
Button widget attached to V2 - set this to ‘Switch’ mode
LED widget attached to V3
In Node-Red install node-red-contrib-blynk-ws (this can be done via palette manager). The current version is 1.0.3
Add the nodes shown in the screenshot below.
Double-click one of the Blynk nodes and set-up a connection. Give the connection the name of “Blynk Test” that you used for the device in the app.
Use ws://blynk-cloud.com/websockets as your URL and copy/paste the Auth Token that arrived via email into the Auth Token field
Ensure that your other two Blynk nodes use this same connection, and that you’ve chosen virtual pins 1, 2 and 3 as shown in the screenshot.
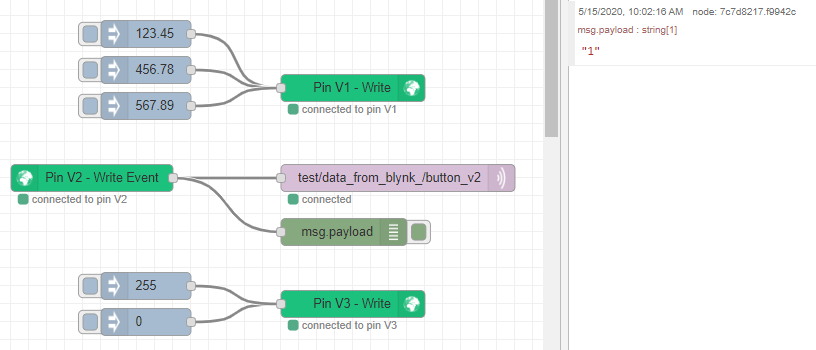
Deploy the flow, and you should see the “connected to pin v1” etc status messages appear below the Blynk nodes.
Put your app in “Run” mode with the arrow at the top right of the app screen and you are ready to start playing.
A few explanatory notes…
The Gauge widget’s upper and lower ranges can be defined easily within the widget and the text that appears in the middle can also be adjusted using the label field so /pin.# will round the data to one decimal place, /pin.#/°C will round to one decimal place and append the °C suffix.
You could use Value Display or Labelled Value widgets instead to show the same data, or a Level H or Level V widget if you wanted to simulate an LED VU meter type of display.
Button widgets in “Push” mode will send 1 when pressed and 0 when released, which can be a little confusing if you haven’t realised that you aren’t in Switch mode.
LED widgets are PWM, so 0 = off and 255 = maximum brightness. sending a 1 to an LED will turn it on at such low brightness that it appears off - unless you look very carefully - and can cause a few hours of head-scratching and cursing if you’re not careful 
You can do a lot of nice things with the Set Property node and can allow buttons to act as LEDs as well as switches, and display different text, including numerical values, if you wish. This can allow you to develop quite a powerful UI with a limited number of controls.
Have a play around, and come back with any questions.
Pete.
Pete,
Many thanks to take time to answer me and for your detailed response. I will try your proposal and come back to you if I have any issue.
Thanks again and have a good day
Robert
1 Like
Pete,
OK basic connection is OK, I had to reload npm, and change a little bit the configuration because I am using my own Blynk server.
I was able to switch a LED ON/OFF and display a gauge.
I will see more in details if it fits to what I expect with my MQTT implementation, actually a sophisticated thermostat .
Thanks again for your detailed explanations
Robert
1 Like