So, you want to add audio or play an MP3 music file in your project with some cheap module? Here’s the plan
Step 1 – Add a buzzer
Been there, done that, but my house is full of irritating sine-sound already. Go to step 2.
Step 2- Use the ISD1820 module
In case you don’t know this cool cheap module: it has a microphone, a speaker and amplifier on a small board. Press the button to record your own audio sample, and play it by pulling a pin HIGH. Easy and good in many cases. But if you need more than one audio sample, play real music, want better audio quality or upload a pure digital MP3-file, go to step 3
Step 3 – DFRobot DFPlayer Mini MP3 SD-card module FN-M16P SKU:DFR0299
It’s amazing, this little cheap module has a microSD-card reader, MP3/WAV decoder and builtin amplifier. You just need to put the MP3’s on a microSD-card and connect the module to a speaker. There are several ways to control it, but the serial interface has the most capabilities and occupies the least pins. But if you want to use the module in combination with Blynk on your ESP8266 (NodeMCU, Wemos D1, …) or ESP32 based board you can read on this forum that it’s hard to do. That seems logical, as the standard library, DFRobotDFPlayerMini, is blocking (uses delays), and Blynk doesn’t like that.
But then I found a new library, DFPlay, which doesn’t have any delay. Unfortunately, it was only running on Particle, but the author was willing to do the necessary changes to run it on the ESP-modules in the Arduino IDE. So here it is, an example using an ESP8266 chip (NodeMCU, …)
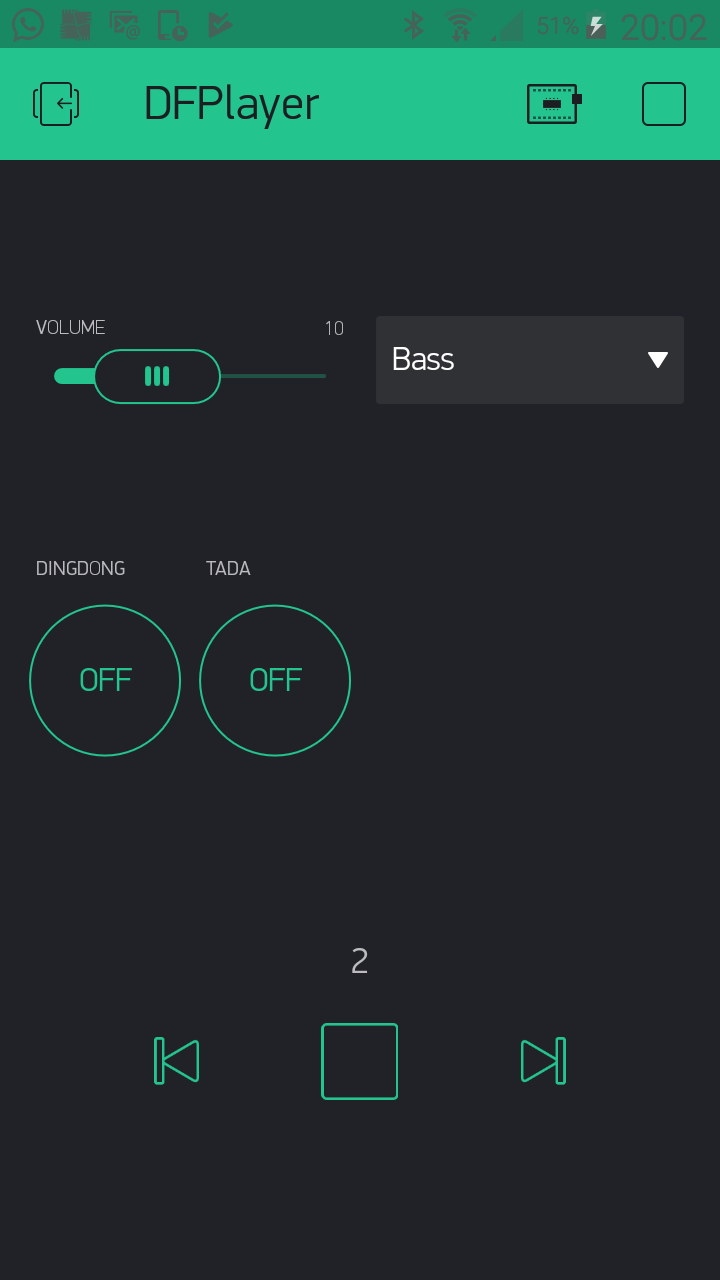
Use case 1 (mode PLAY_MODE_TRACK): Use a Button widget (V4) to play a specific audio file. Perfect to let you project play “DingDong” or “TaDa” or something. The on-value is the track number, the off-value should be zero.
Use case 2 (mode PLAY_MODE_ALL): Use the Music Player widget (V5) to control the music player that plays all files in the root directory of the SD-card. It has Back / Next / Play / Stop functionality and shows the current track number.
In both cases you have a volume slider (V6, range 0-30) and a Menu widget for setting the equaliser (V7, values: 1 Normal / 2 Pop / 3 Rock / 4 Jazz / 5 Classic / 6 Bass).
When the volume is above 15 it can crash the module, so start with a low volume.
Have fun!
/*************************************************************
This example shows how you can control a DFPlayer MP3 module
on ESP8266 using Blynk (music player widget) and a Wifi connection
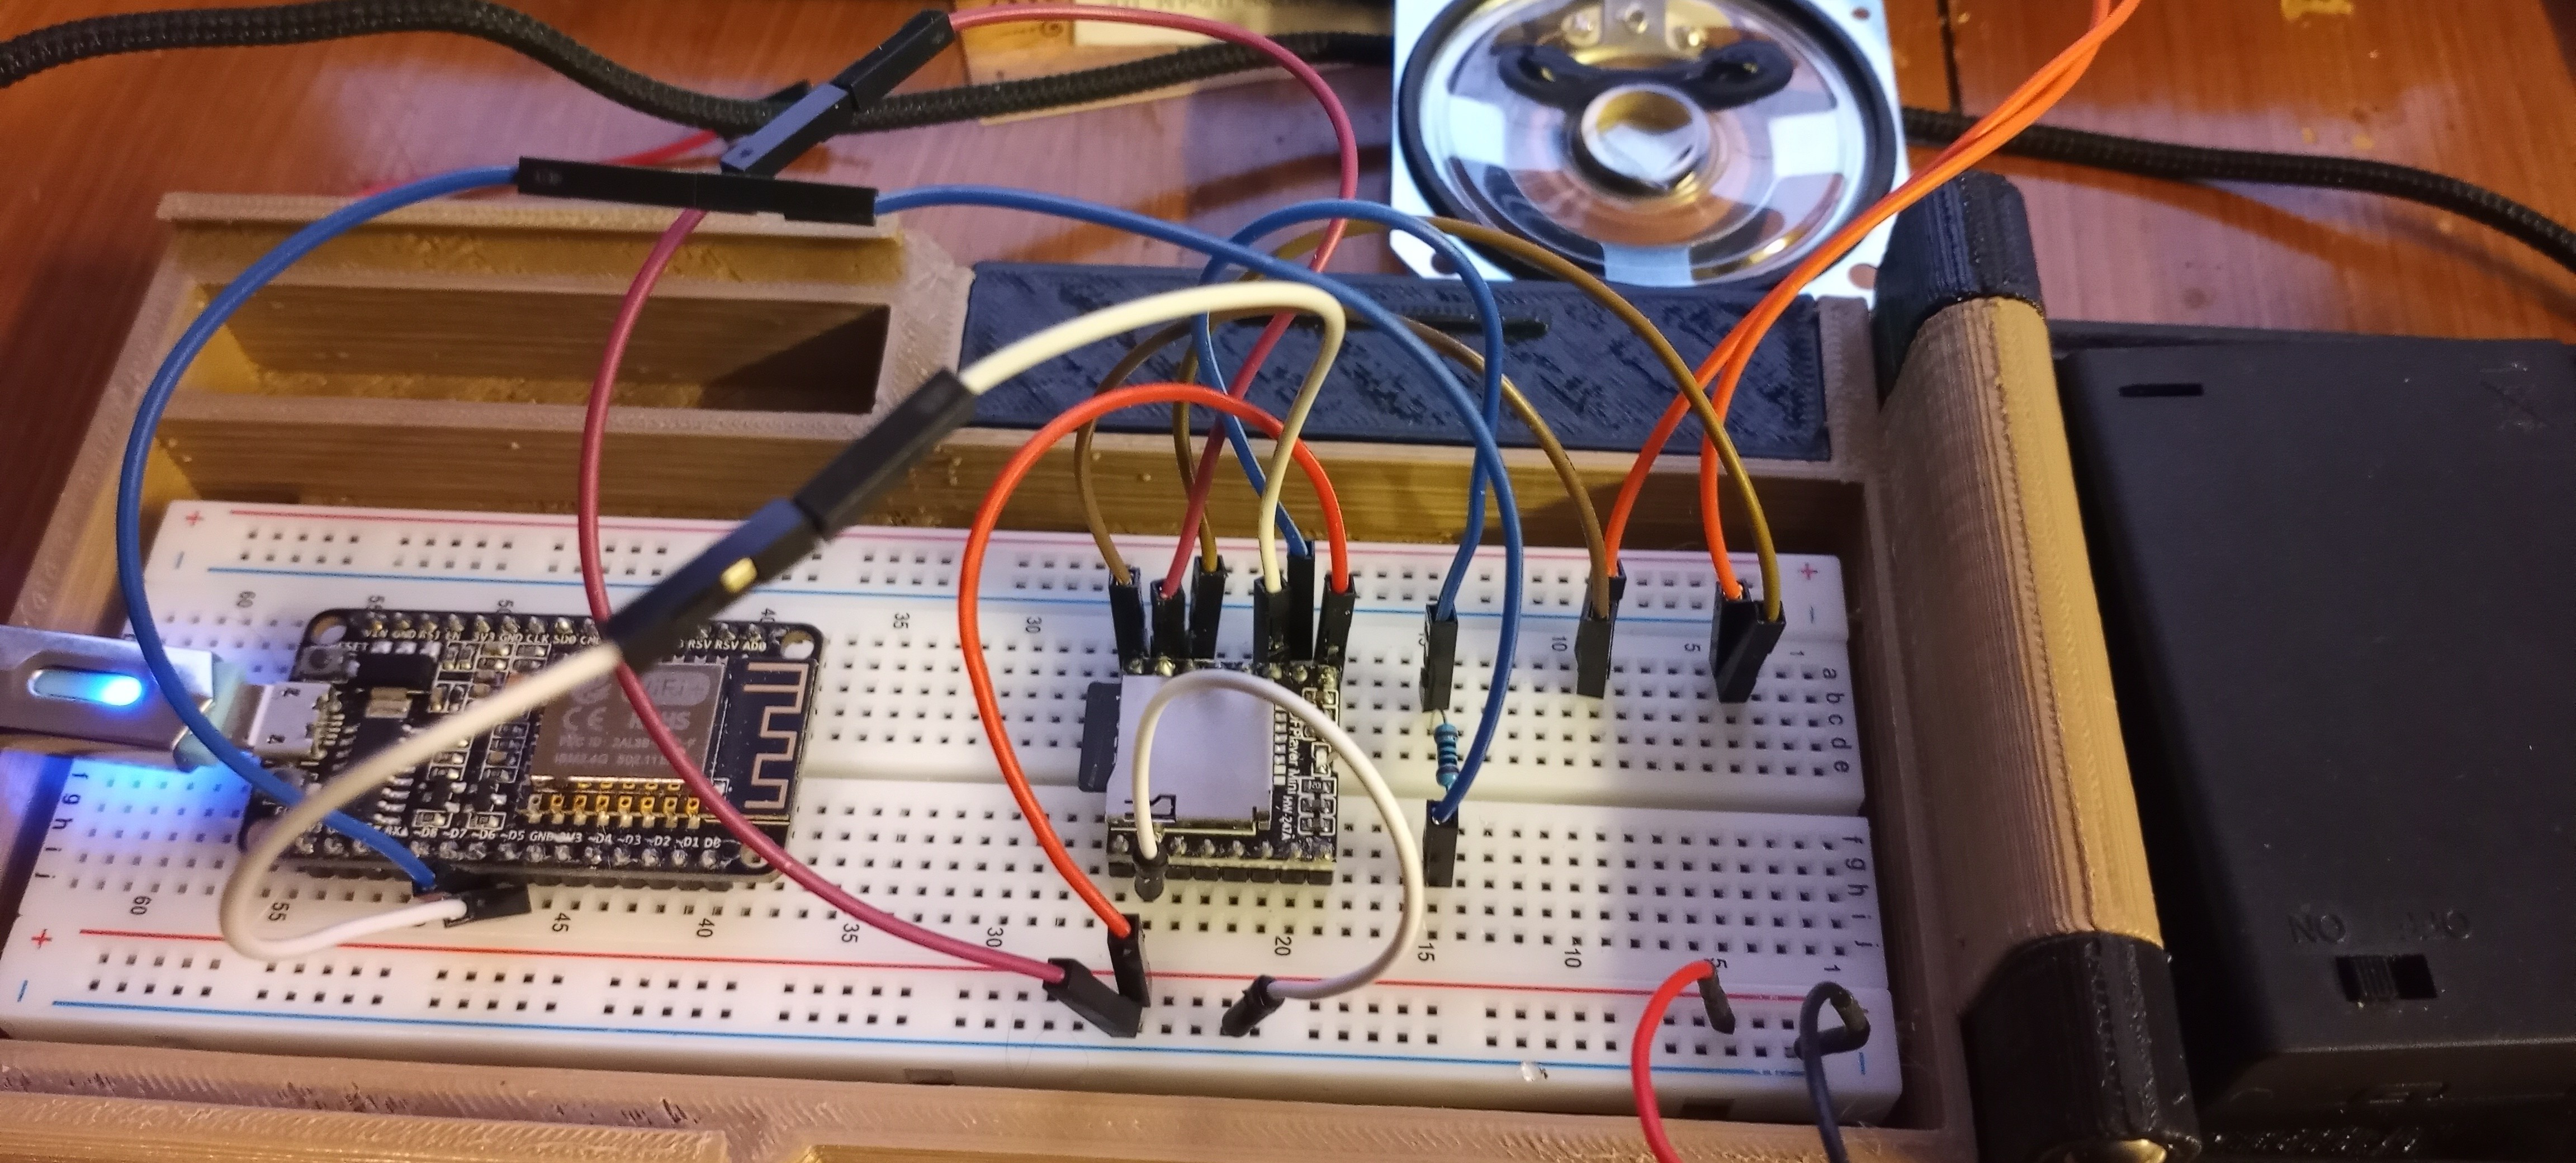
Hardware:
- ESP8266 based module e.g. NodeMCU
- DFPlayer Mini MP3 player
App project setup:
- Button widget attached to V4 :Play track button: OFF value=0, ON value=tracknr
- Music Player widget attached to V5: shows current tracknr
- Slider widget attached to V6 : Volume slider: range 0-30
- Menu settings widget attached to V7: Equaliser selector: values
1 Normal
2 Pop
3 Rock
4 Jazz
5 Classic
6 Bass
Necessary libraries
- Blynk: https://github.com/blynkkk/blynk-library/releases/latest
- DFPlay: https://github.com/rwpalmer/DFPlay
*************************************************************/
/* Comment this out to disable prints and save space */
#define BLYNK_PRINT Serial
#include <ESP8266WiFi.h>
#include <BlynkSimpleEsp8266.h>
#include <SoftwareSerial.h>
// D5 is RX of ESP8266, connect to TX of DFPlayer
// D6 is TX of ESP8266, connect to RX of DFPlayer module
SoftwareSerial dfPlaySerial(D5, D6);
#include "DFPlay.h"
DFPlay dfPlay;
// You should get Auth Token in the Blynk App.
// Go to the Project Settings (nut icon).
char auth[] = "YourAuthToken";
// Your WiFi credentials.
// Set password to "" for open networks.
char ssid[] = "YourNetworkName";
char pass[] = "YourPassword";
#define PLAY_MODE_OFF 0
#define PLAY_MODE_TRACK 1
#define PLAY_MODE_ALL 2
int playmode = PLAY_MODE_OFF;
#define DFPLAY_MEDIA_USB 1
#define DFPLAY_MEDIA_SD 2
#define VPIN_PLAYTRACK V4
#define VPIN_MUSICPLAYER V5
#define VPIN_VOLUME V6
#define VPIN_EQUALIZER V7
int currentTrackCount = -1;
BLYNK_CONNECTED() {
// Synchronize volume & equalizer of DFPlayer with Blynk widgets
Blynk.syncVirtual(VPIN_VOLUME);
Blynk.syncVirtual(VPIN_EQUALIZER);
// Update music player widget (play/stop button and label) based on state DFPlayer
if (currentTrackCount >= 0)
{
String trackcountString(currentTrackCount + 1); // Start with 1 instead of 0 in user interface
Blynk.virtualWrite(VPIN_MUSICPLAYER, "play");
Blynk.setProperty(VPIN_MUSICPLAYER, "label", trackcountString);
}
else
{
Blynk.virtualWrite(VPIN_MUSICPLAYER, "stop");
Blynk.setProperty(VPIN_MUSICPLAYER, "label", " ");
}
}
BLYNK_WRITE(VPIN_PLAYTRACK)
{
int tracknr = param.asInt();
#ifdef BLYNK_PRINT
BLYNK_PRINT.print("BLYNK_WRITE(VPIN_PLAYTRACK): ");
BLYNK_PRINT.println(tracknr);
#endif
if (tracknr > 0)
{
String trackcountString(tracknr);
dfPlay.play(DFPLAY_MEDIA_SD, 0, tracknr); // Plays tracknr in root folder on SD-card
playmode = PLAY_MODE_TRACK;
currentTrackCount = -1;
Blynk.setProperty(VPIN_MUSICPLAYER, "label", trackcountString);
Blynk.virtualWrite(VPIN_MUSICPLAYER, "play");
}
}
BLYNK_WRITE(VPIN_MUSICPLAYER)
{
String action = param.asStr();
#ifdef BLYNK_PRINT
BLYNK_PRINT.print("BLYNK_WRITE(VPIN_MUSICPLAYER): ");
BLYNK_PRINT.println(action);
#endif
if (action == "play") {
dfPlay.play(DFPLAY_MEDIA_SD); // Plays all tracks in root folder of SD-card
playmode = PLAY_MODE_ALL;
}
if (action == "stop") {
dfPlay.stop();
}
if (action == "next") {
dfPlay.skip();
}
if (action == "prev") {
dfPlay.back();
}
}
BLYNK_WRITE(VPIN_VOLUME)
{
int paramVol = param.asInt();
uint8_t volume = constrain(paramVol, 0, 30);
#ifdef BLYNK_PRINT
BLYNK_PRINT.print("BLYNK_WRITE(VPIN_VOLUME): ");
BLYNK_PRINT.println(paramVol);
#endif
dfPlay.setVolume(volume);
}
BLYNK_WRITE(VPIN_EQUALIZER)
{
int paramEq = param.asInt();
uint8_t eq = constrain(paramEq, 1, 6) - 1; // Blynk starts with 1, setEqualizer starts with 0
#ifdef BLYNK_PRINT
BLYNK_PRINT.print("BLYNK_WRITE(VPIN_EQUALIZER): ");
BLYNK_PRINT.println(paramEq);
#endif
dfPlay.setEqualizer(eq);
}
void updatePlayerState()
{
int trackcount;
if (dfPlay.isPlaying())
{
trackcount = (int)dfPlay.getTrackCount();
}
else
{
trackcount = -1;
playmode = PLAY_MODE_OFF;
}
if (trackcount != currentTrackCount)
{
switch (playmode)
{
case PLAY_MODE_OFF:
Blynk.setProperty(VPIN_MUSICPLAYER, "label", " ");
Blynk.virtualWrite(VPIN_MUSICPLAYER, "stop");
break;
case PLAY_MODE_ALL:
String trackcountString(trackcount + 1); // Start with 1 instead of 0 in user interface
Blynk.setProperty(VPIN_MUSICPLAYER, "label", trackcountString);
Blynk.virtualWrite(VPIN_MUSICPLAYER, "play");
break;
}
currentTrackCount = trackcount;
}
}
void setup()
{
// Debug console
#ifdef BLYNK_PRINT
BLYNK_PRINT.begin(115200);
BLYNK_PRINT.println("Waiting for connections...");
#endif
dfPlaySerial.begin(9600);
dfPlay.begin(dfPlaySerial); // Prepares DFPlay for execution
Blynk.begin(auth, ssid, pass);
// You can also specify server:
//Blynk.begin(auth, ssid, pass, "blynk-cloud.com", 80);
//Blynk.begin(auth, ssid, pass, IPAddress(192,168,1,100), 8080);
}
void loop()
{
Blynk.run();
dfPlay.manageDevice(); // Sends requests to DFPlayer & processes responses.
updatePlayerState();
}
The library can be found here: