Connect your existing RF devices to the internet with Blynk

We will probably create an Instructable for this when time permits but we thought we would give Blynkers a head start.

The project currently requires just 1800 Energy units so FREE for everyone.

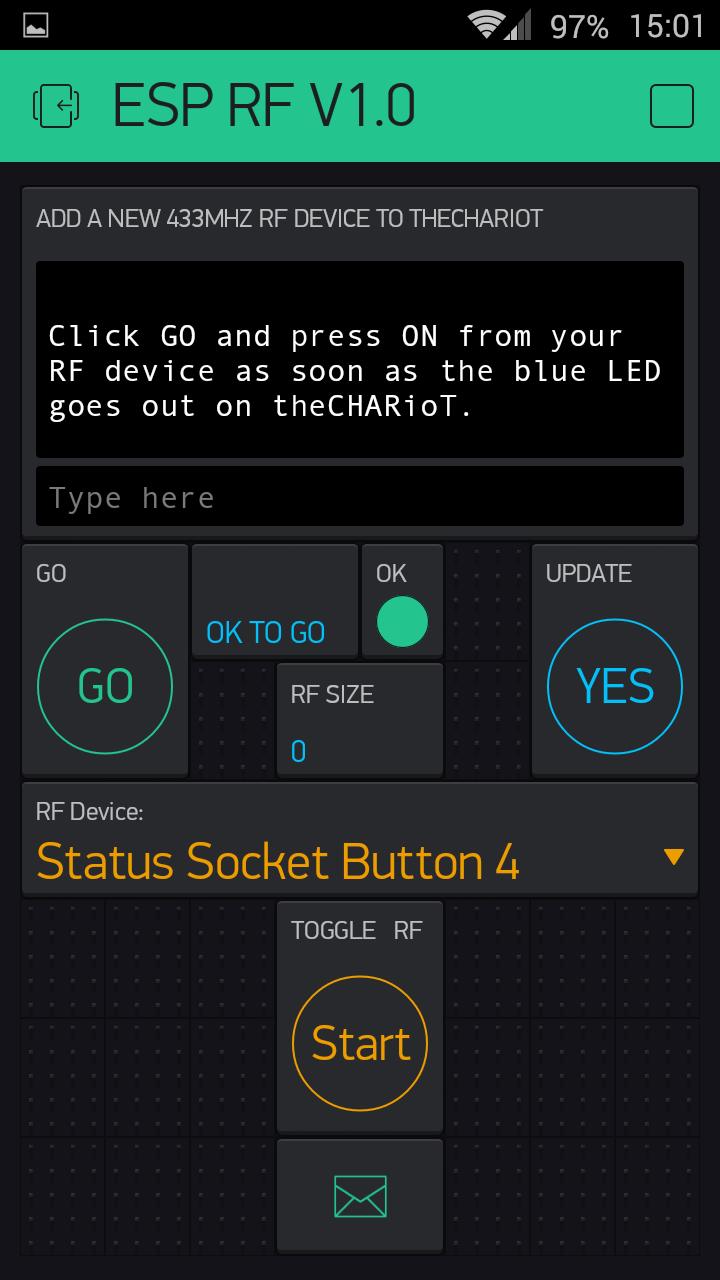
Terminal prompts guide you through the process once you have the system set up and a couple of the prompts are shown below.

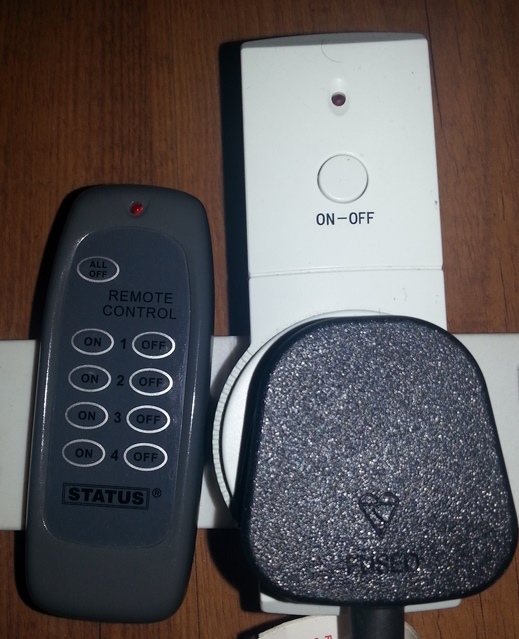
Rather than go out and buy new IOT connected devices you can quite often connect what you already have to the internet for a fraction of the price. For less than $1 you can buy an RF transmitter and receiver set on Ebay like these http://www.ebay.com/itm/140719918135

We are big fans of the WeMos D1 Mini but the details below should work for all ‘16 pin’ ESP’s. You will need to wire up a voltage divider (220K and 68K) for the analogue port if you are using regular ESP’s as they will only accept 1V without the voltage divider.

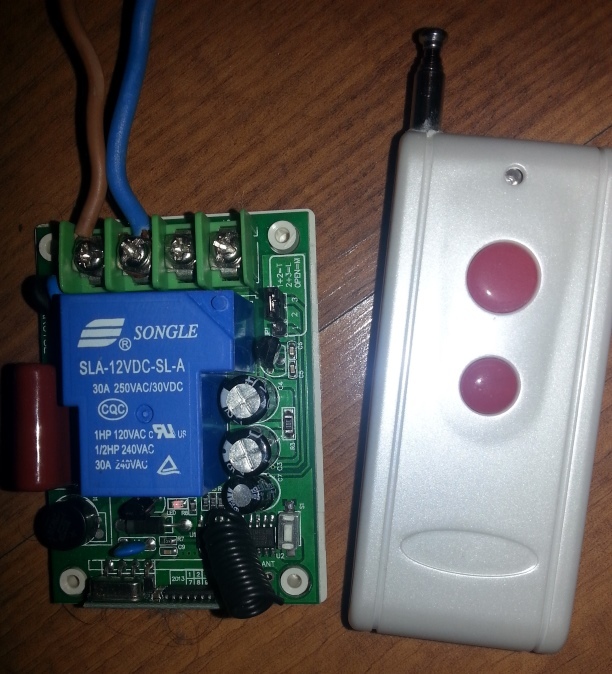
The circuit for the RF transmitter and receiver couldn’t be simpler:

Receiver GND, 3V3 and AO.
Transmitter GND 3V3 (or 5V) and D0

The sketch actually uses standard GPIO references so D0 is GPIO 16 on a regular ‘16 pin’ ESP.
Currently the project uses the inbuilt LED on the WeMos which is D4 (GPIO 2) which should be ok for the ‘16 pin’ ESP’s.

We will try to make an ESP-01 version available (ESP-01 memory permitting) by changing the pin assignment for the RF transmitter from GPIO16 to GPIO 2 and the LED from GPIO 2 to GPIO 1 (TX Pin on the ESP-01).

Once you have the circuit wired up use a simple sketch like the one below to upload bin files to the ESP via a web bowser and OTA:

/*
  To upload through terminal you can use: curl -F "image=@firmware.bin" theCHARioT.local/update
*/

#include <ESP8266WiFi.h>
#include <WiFiClient.h>
#include <ESP8266WebServer.h>
#include <ESP8266mDNS.h>
#include <ESP8266HTTPUpdateServer.h>

const char* host = "theCHARioT";
const char* ssid = "routerSSID";
const char* password = "routerPWD";

ESP8266WebServer httpServer(80);
ESP8266HTTPUpdateServer httpUpdater;

void setup(void){

  Serial.begin(115200);
  Serial.println();
  Serial.println("Booting Sketch...");
  WiFi.mode(WIFI_AP_STA);
  WiFi.begin(ssid, password);

  while(WiFi.waitForConnectResult() != WL_CONNECTED){
    WiFi.begin(ssid, password);
    Serial.println("WiFi failed, retrying.");
  }

  MDNS.begin(host);

  httpUpdater.setup(&httpServer);
  httpServer.begin();

  MDNS.addService("http", "tcp", 80);
  Serial.printf("HTTPUpdateServer ready! Open http://%s.local/update in your browser\n", host);
}

void loop(void){
  httpServer.handleClient();
  delay(1);
}

Be sure to enter you own SSID and PWD in the sketch for routerSSID and routerPWD.

As shown in the screenshot above the bin file for the project is available for download in the directory at https://thechariot.co.uk/esprf/

Once you have downloaded the bin file and uploaded the sketch above Serial Monitor should give you the following prompt:

Booting Sketch...
HTTPUpdateServer ready! Open http://theCHARioT.local/update in your browser

It can be done without Serial Monitor as the sketch is actually for OTA updates and you just need to cut and paste http://theCHARioT.local/update into your browser a few seconds after you power up the ESP.

The web browser should now show this:

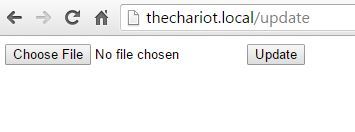
Despite what it shows in the graphics above you should include the http:// when you paste in the url. From here you click the Choose File button and browse to the bin file you downloaded. Select the bin file and you will then be able to press the Update button. You will see the progress of the OTA update in the bottom left hand corner of your web browser.

If you are doing a true OTA update i.e. without connecting up to Serial Monitor your ESP should then reboot. If you have Serial Monitor connected you may need to manually reset the ESP at this point.

You now need the QR code for the Blynk project which is shown below.

You might also be able to access the Blynk project at http://tinyurl.com/gwehlur but is wasn’t working for us when we tried it. Edit - the link seems to work for Android devices but MUST be accessed from your Smartphone not a PC and might not work with an iPhone.

We suggest you then email the Blynk token for the project to yourself by pressing the Nut icon and clicking the Email link.

The project makes use of @tzapulica excellent WiFiManager and ideally you should start with SPIFFS newly formatted (i.e. as the ESP’s come from the supplier).

If you restart the ESP now (perhaps connected to Serial Monitor but not essential) WiFiManager will set up an Access Point called THECHARIOT

*WM: Connection result: 
*WM: 1
*WM: SET AP STA
*WM: 
*WM: Configuring access point... 
*WM: THECHARIOT
*WM: 
*WM: AP IP address: 
*WM: 192.168.4.1
*WM: HTTP server started

Look for the Access Point in your WiFi settings, select it and enter the password ACCESSCHS and then enter the following url 192.168.4.1 into your web browser.

It should then bring up the WiFiManager Access Point front page as shown below.

Click Configure WiFI to reveal this screen.

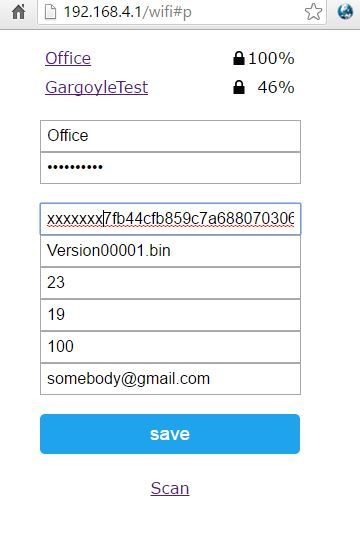
Click on the link for the SSID of your router (Office in our case), enter the WiFi password, paste in the Blynk token that you emailed to yourself and enter your email address. The other fields don’t require any details and can be left as they appear on the screen. When you click the save button your ESP should connect to Blynk and you are ready to connect to your RF devices from anywhere with internet access.

Were sure that the details above look more involved than they really are but it can all be done in a few minutes, but we have had quite a bit of practise :smile:

We would be interested to know how long it takes you from start to finish.

We will follow up by providing details of how the App works but it is fairly obvious from the screenshots.

Meanwhile please note that the App will email details of the RF signals to us for ‘decoding’ purposes. If you don’t want the details to be emailed to us, don’t use the App.

2 Likes

@Pavel this is the email that was created when we cloned the project:

I’ve made ESP RF V1.0 app. You are welcome to try it out!

To start using it:

  1. Download Blynk App: http://j.mp/blynk_Android or http://j.mp/blynk_iOS
  2. Touch the QR icon and point the camera to the code below or open the link below - http://tinyurl.com/gwehlur
  3. Enjoy my app!

Any ideas why http://tinyurl.com/gwehlur seems to go nowhere and are you able to locate the true url so we can run it through another url shortener?

The QR code works fine.

@Dmitriy - do you why the url is broken and where should we fix it?

It is supposed to be opened from mobile app. It shouldn’t be open from PC.

It doesn’t work from mobile either. Just checked.

@Pavel so maybe ticket (Android)?

@Dmitriy and @Pavel the link was created from an Android device (Samsung S3) and when I click the link from my Android mail box the url works fine and Clones the project.

So maybe not a bug simply operator error on my side?

Are the cloning links available for general use or are they specific to the sender / recipient?

When i click on iphone it doesn’t work.

Ok so what does the App do?

Well perhaps it might be worth saying what it doesn’t do first. It will not open the car doors on your neighbours BMW or Mercedes even though they normally use the same 433 Mhz frequency. High security devices use rolling RF codes so the signals are slightly different each time a signal is sent.

That doesn’t mean the App will not work with any security devices. We have a ‘security’ barrier at our property and the App is able to control it.

The App comes pre-configured to operate with a selection of common RF devices.

The most common device is probably the Status Mains Power Sockets which is similar in operation to the Nexa sockets. Years ago they were for sale in Morrisons in the UK at just 5 quid for 3 including the remote control. So these days they are probably available in Poundland for next to nothing. They are rated at 2900W so will take care of most household appliances.

As you can probably see from the photo you can have 4 sockets for each remote control and all devices can be switched off from a single button. Maybe to prevent power surges the regular remote doesn’t allow you to power up 4 sockets from a single button. With the Blynk project this limitation is now a thing of the passed but do take care not to overload your sockets i.e. distribute them around the house.

Although the Status Sockets are reasonably well made the regular remote control is not exactly built to last. Some of the buttons on our remote control barely function and we have only ever used it for testing purposes, albeit a lot of testing. With the Status and Nexa type mains Sockets you have to pair each Socket to a button on the remote control. Now you have an ever lasting remote control that will not wear out over time and can be used to pair the devices.

The App is also preconfigured to work with the learner RF activated relays as shown in the picture below (30A 85V to 250V). Simply put the device into learning mode and send an ON signal from the App.

The App has an entry for a Siemens RF Controlled Thermostat which will be coded up in due course but one RF Controlled Switch that it does already work with it the Home Easy HE105. So if you have one of these you can now switch it on and off via the internet (no need to splash out on Google’s Nest or British Gas’ Hive Thermostats).

Other RF devices:

Well that is up to you. Follow the Terminal prompts in the App to send ON and OFF signals to us for your 433 Mhz devices and we will decode them, if possible, and add them to the App for the benefit of all.

Very nice Costas. I am very interested in what you are doing here. I have 10 RF devices setup at home which I can control reasonably well with my iPhone. I have been able to setup with Homebridge running on a Raspberry Pi2, so I can can use IOS HomeKit apps (I use Insteon). They were originally outlets similar to what you show in the pictures (4 still work that way), but I modified 6 of them to work as wall switches, which works better for me.

Setting them to be controlled through Blynk rather than having a local sever would be great!

Thanks for sharing!

1 Like

@lfbaron we would be pleased to try and add some or all of your RF devices to theCHARioT.

Do you have a set of the cheap RF transmitters and receivers?
Do you have a WeMos D1 Mini or a similar ESP?

We can probably send you the hardware free of charge providing you don’t live on the moon.

The collection of RF data by the ESP is very sensitive and we have tried various different approaches to collect the data. At one stage we were ensuring the ON or OFF button on the remote control was pressed before the data collection started in the app. Furthermore we continued to hold down the button for several seconds to try and collect a full signal.

What we found works best is a quick, sharp press of the ON or OFF button as soon as the LED goes out on the ‘hardware’. It is almost like a game of fastest finger first and when I say as soon as the LED goes out I mean within a fraction of a second. Too early or too late and the signal will not be captured and often leads to a reset of the ESP.

The App will indicate if it failed to capture the RF signal and it is simply a case of trying again. The Value Display Widget labelled RF SIZE indicates the length of the signal captured and ideally it should be in the range 600 to 1000 but the App will accept > 200 as a successful capture.

The larger the captured signal the more chance we have of decoding the signal. As you are probably aware the RF signals are generally repeated several times, even as many as 20 times, to ensure the signal is received correctly. So a lot of the captured signal is simply the same data repeated over and over again but some equipment is quite specific about the number of times the signal is repeated. In the full App we have a slider to set signal repeats from 1 to 20 with 10 being fine for most devices.

Once an RF signal has being successfully decoded and added to theCHARioT the RF signals that are sent are very reliable. Better than the original remote control in many cases and with the extra benefits of being able to control the hardware via the internet and much better scheduling than most of the original manufacturers provided with their equipment.

1 Like

@Costas I do have a spare set of RF transmitter/receiver and have a cheap version of the D1 board - although it only works intermittently, so I am not really using it. Thanks for the offer to send hardware. I am in Miami, FL. and can always buy some hardware if needed.

I have the RF data (on/off codes) for all my devices. Is it possible to add them manually rather than have the app go through the “learning” process? It would greatly simplify things.

@lfbaron message me with the make and model of the RF devices together with the ON and OFF codes and I will see what I can do. The ON and OFF codes alone are not normally enough as there is a timing issue to cater for as well as the high and low signals themselves. We can probably knock up a version of the app for you to modify the timing with a slider until the signals are accepted by your hardware.

@Pavel does the QR code work with your iPhone i.e. is it just the url from an iPhone that fails?

QR works fine, url doesn’t

@Costas is this procedure still working because it has very old blynk library as reported during the booting at the serial…? I tried very carefully this procedure but seams that I can not control the WeMos app from my Android blynk app (it says that it is not connected, WeMos at the serial channel reports connection to blynk server (are you use the new one?) but no communication between WeMos & Android blynk app as I stated). Please offer me your explanation or your suggestions.
Thanks and Best Regards,
Mike Kranidis

@mikekgr I have worked through the original post again this morning and it looks like some of part of the OTA procedure might have changed. Where it states:

Once you have downloaded the bin file and uploaded the sketch above Serial Monitor should give you the following prompt:…

Booting Sketch...
HTTPUpdateServer ready! Open http://theCHARioT.local/update in your browser

I couldn’t connect to the ESP with http://theCHARioT.local/update.
First I had to make a WiFi connection to an AP created by the ESP (ESP_XXXXX) without any password.

I then used the standard IP for ESP AP’s and the following url allowed me to select the bin file:

http://192.168.4.1/update

The library version used in the bin file is 0.3.4 but it does connect to blynk-cloud.com:8442 rather than the old .cc server.

If you are able to get this far and still have problems let me know and I can probably upload a bin file with the latest Blynk library. Please indicate what problem you have though.

@Costas Dear Costas, yes I am at the point that I have installed your bin file, rebooted, I saw the blue led constantly on, the ESP is connected to my router (it takes IP), I have many times checked the Blynk AUTH … BUT I can not see it connected to my Android Blynk app. (I also change the Blynk AUTH for test --and I reinitialize your applications given the new Blynk AUTH).

Never worked, never!

I confirm this. I already did tho

@mikekgr after you have made the initial connection with WiFi Manager and entered the required details if you reset the WeMos whilst it is connected to Serial Monitor does it show something like this:

Mounted file system
Reading config file
Config file is open
{"blynk_token":"xxxxxxxxxxxxxxxxxxx","firmwarebin":"Version00001.bin","Max_Temp":"23","Min_Temp":"19","Calibration%":"100","YourEmailAddress":"somebody@gmail.com"}
parsed json
*WM: Adding parameter
*WM: blynk
*WM: Adding parameter
*WM: Firmware
*WM: Adding parameter
*WM: Max
*WM: Adding parameter
*WM: Min
*WM: Adding parameter
*WM: Calibration
*WM: Adding parameter
*WM: Email
*WM: 
*WM: AutoConnect
*WM: Connecting as wifi client...
*WM: Using last saved values, should be faster
*WM: Connection result: 
*WM: 3
*WM: IP Address:
*WM: 192.168.10.171
Connected to Central Heating System
[4184] Blynk v0.3.4
[5001] Connecting to blynk-cloud.com:8442
[5143] Ready (ping: 1ms).

Where xxxxxxxxxx is the specific token being used by the Blynk app on your Android.

I have tested a new version with Blynk library 0.3.7 that I could let you have but if the original one doesn’t work for you I don’t think the new one will.