Water Valve Project: Adding Blynk control to previously written code

Thanks Pete, tried the display widget (within the app only)… nothing displays. Thankfully this is not the in use project but a second test set up, so no issues testing :slight_smile: . I went back and installed the blynk 1.0 version of the code and virtual LEDs work properly, so its does not appear to be a hardware or wiring issue. The only difference from the original programming is the removal of the

as well as timer.run in the void loop

these caused errors during verification, so I removed them… plus I thought I read these were no longer needed in 2.0

Any ideas ?

Here’s the datastream info for open LED if it helps …


So how do you think that the control_LEDs() function - which is the only part of the code that writes to the LED widget - is going to be triggered?

Of course it’s still necessary to trigger a function that contains code which needs to be executed, and a timer is the required way to do that in this case.

Not without details of what those errors were.

Pete.

ahh … so its me :wink:

ok here is the error

Arduino: 1.8.19 (Windows 10), Board: "ESP32 Dev Module, Disabled, Default 4MB with spiffs (1.2MB APP/1.5MB SPIFFS), 240MHz (WiFi/BT), QIO, 80MHz, 4MB (32Mb), 921600, None"

C:\Users\Donna\Documents\Arduino\Valve_Project__01.18.22__No_Timer-Edgent_ESP32\Valve_Project__01.18.22__No_Timer-Edgent_ESP32.ino: In function 'void setup()':

Valve_Project__01.18.22__No_Timer-Edgent_ESP32:68:3: error: 'timer' was not declared in this scope

   timer.setInterval(100,control_LEDs);

   ^

C:\Users\Donna\Documents\Arduino\Valve_Project__01.18.22__No_Timer-Edgent_ESP32\Valve_Project__01.18.22__No_Timer-Edgent_ESP32.ino: In function 'void loop()':

Valve_Project__01.18.22__No_Timer-Edgent_ESP32:98:5: error: 'timer' was not declared in this scope

     timer.run();

     ^

Multiple libraries were found for "BlynkSimpleEsp32_SSL.h"

 Used: C:\Users\Donna\Documents\Arduino\libraries\blynk-library-master

 Not used: C:\Users\Donna\Documents\Arduino\libraries\Blynk

Multiple libraries were found for "WiFi.h"

 Used: C:\Users\Donna\AppData\Local\Arduino15\packages\esp32\hardware\esp32\1.0.5\libraries\WiFi

 Not used: C:\Program Files (x86)\Arduino\libraries\WiFi

exit status 1

'timer' was not declared in this scope


This report would have more information with
"Show verbose output during compilation"
option enabled in File -> Preferences.

and the code


// Fill-in information from your Blynk Template here
#define BLYNK_TEMPLATE_ID "TMPLBQenu4Rw"
#define BLYNK_DEVICE_NAME "Water Switches"

#define BLYNK_FIRMWARE_VERSION        "0.1.0"

#define BLYNK_PRINT Serial
//#define BLYNK_DEBUG

#define APP_DEBUG

// Uncomment your board, or configure a custom board in Settings.h
//#define USE_WROVER_BOARD

#include "BlynkEdgent.h"
#define valveRelay 16
#define whRelay 26
#define openPositionGPIO 17
#define closedPositionGPIO 18
#define openLED 21
#define closedLED 22
#define whLED 23
#define vRelayBtn V1
#define v_openLED V2
#define v_closedLED V3
#define vWHBtn V4

void control_LEDs()
{
  if (digitalRead(openPositionGPIO) == HIGH)
  {
    Blynk.virtualWrite(v_openLED,255);
    digitalWrite (openLED,HIGH);
  }
  else
  {
    Blynk.virtualWrite(v_openLED,0);
    digitalWrite (openLED,LOW);    
  }


  if (digitalRead(closedPositionGPIO) == HIGH)
  {
    Blynk.virtualWrite(v_closedLED,255);
    digitalWrite (closedLED,HIGH);
  }
  else
  {
    Blynk.virtualWrite(v_closedLED,0);
    digitalWrite (closedLED,LOW);
  }
}

void setup()
{
  // Debug console
  Serial.begin(115200);
  
  pinMode(valveRelay,OUTPUT);
  pinMode(openPositionGPIO,INPUT_PULLUP);
  pinMode(closedPositionGPIO,INPUT_PULLUP);
  pinMode(openLED,OUTPUT);
  pinMode(closedLED,OUTPUT);
  pinMode(whRelay,OUTPUT);
  pinMode(whLED,OUTPUT);

  timer.setInterval(100,control_LEDs);
  BlynkEdgent.begin();
}

BLYNK_WRITE(vWHBtn)
{
  if (param.asInt())
  {       
    digitalWrite(whRelay, HIGH);
    digitalWrite(whLED,HIGH);
  }
  else
  {
    digitalWrite(whRelay, LOW);
    digitalWrite(whLED,LOW);
  }
}
BLYNK_WRITE(vRelayBtn)
{
  if (param.asInt())
  {       
    digitalWrite(valveRelay, HIGH);
  }
  else
  {
    digitalWrite(valveRelay, LOW);
  }
}
void loop() 
{
    timer.run();
    BlynkEdgent.run();
}

You’re missing this line of code…

Pete.

1 Like

It works !! Pete … you da man!!!

Now that it works, I wanted to try and get this to work via Alexa commands. I read this comment by you

Which led me to these instructions … does that put me on the right path or do you have a better approach

I’ve never used node red
Thanks again, Jack

Check this out

Moving to Node-Red is quite a big step, as the best approach is to use MQTT to communicate between Node-Red and your devices, and run no Blynk code on your devices at all.

You could go for an intermediate solution, which simply uses Node-Red as the tool to provide Alexa integration by using commands from Alexa to change the state of Blynk virtual pins.
You could do this on a Windows machine as a trial, but longer term you’d be better running a Raspberry Pi to host Node-Red.

Adding Sinric or FauxmoESP to your sketch is an alternative approach, but isn’t something I’ve ever tried.

Pete.

OK, I ended up trying Voiceflow instead and have it working in the online creator for Alexa, under my blink 1.0 project. Now I’m trying to make this work with Blynk Iot … but I get an “Invalid token.” message whether I ping directly or via the voiceflow interface . The token I’m using is from the ‘device info’ tab of blynk console under FIRMWARE CONFIGURATION … I assume this is the correct token … so maybe voiceflow wont work with blynk 2.0
Any suggestions ?

http://blynk-cloud.com/my token/update/V1?value=1
http://blynk-cloud.com/my token/get/v1

You are trying to make an API call to the Legacy server, using a Blynk IoT token, which is why you are getting the Invalid Auth Token message.

You need to use the Blynk IoT token with the Blynk IoT API syntax, and specify the correct Blynk IoT server.

Here is the documentation for the correct syntax:
https://docs.blynk.io/en/blynk.cloud/https-api-overview

and in particular you should read the “Troubleshooting” section to get the correct server name…

Pete.

As usual … Thanks Pete !! Looks like I had the whole string wrong !

For anyone else looking for the correct strings for GET and Update value API if your using Voiceflow dot com (you get 2 free projects) to provide voice commands to your project via Amazon’s Alexa.

You may see these in your research, but, these are all the wrong strings for Blynk IoT (aka Blynk 2.0)

GETs
http://188.166.206.43/{your token}/get/{requested pin} (only works for legacy Blynk)
http://blynk-cloud.com/{your token}/get/{requested pin} (only works for legacy Blynk)
https://blynk.cloud/external/api/get?token=**{token}**&**{pin}**
Update Value
http://188.166.206.43/**{token}**/update/**{Pin}**?value=**{value}** (only works for legacy Blynk)
http://blynk-cloud.com/{token}/update/**{Pin}**?value=**{value}** (only works for legacy Blynk)
https://blynk.cloud/external/api/update?token=**{token}**&**{pin}**=**{value}**

Correct ‘GET’ string

https://{region}.blynk.cloud/external/api/get?token={token}&{pin}

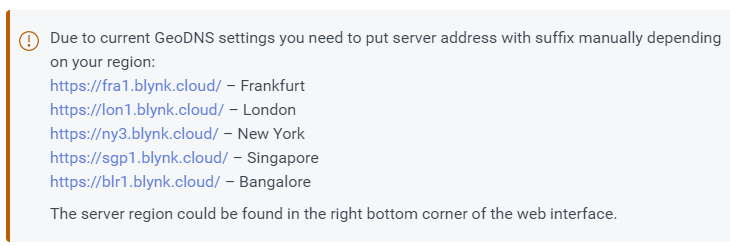
Where the region(in my case ny3) depends on the region that displays in the bottom right corner of your browser, when you’re on the ‘Blynk console’ web page for your projects.

Get Value Documentation

https://docs.blynk.io/en/blynk.cloud/get-datastream-value

Same goes for region in the string for updating a pin

https://{region}.blynk.cloud/external/api/update?token={token}&{pin}={value}

Update data stream value Documentation

https://docs.blynk.io/en/blynk.cloud/update-datastream-value