Sir I need help Can anyone send me or give me a link or guide me that how to get the led on through virtual pins on my blynk app on my android whenever I turn any thing on or off through the digital pins say 13 from my blynk app. I have tried very much but failed because it always give me the error that your device is offline
Versions I am using are
Arduino IDE 1.6.4
Blynk 2.14.6
Using Android
Arduino UNO
USB connection
And if I also enter the blynk code such as virtual pin write code virtualPinWrite without any modification but the problem remain same.
Earlier when i modified the Virtualpinwrite code as given below worked fine but now the basic blynk code isn’t working.
#define BLYNK_PRINT Serial
#include <SPI.h>
#include <Ethernet.h>
#include <BlynkSimpleEthernet.h>
// You should get Auth Token in the Blynk App.
// Go to the Project Settings (nut icon).
char auth[] = "d448581bb65a4997a92203c1f84ebdcf";
BlynkTimer timer;
// This function sends Arduino's up time every second to Virtual Pin (5).
// In the app, Widget's reading frequency should be set to PUSH. This means
// that you define how often to send data to Blynk App.
void myTimerEvent()
{
  // You can send any value at any time.
  // Please don't send more that 10 values per second.
  if (analogRead(A1 > 0))
    Blynk.virtualWrite(V1, 255);
  else
    Blynk.virtualWrite(V1, 0);
}
void setup()
{
  // Debug console
  Serial.begin(9600);
  Blynk.begin(auth);
  // Setup a function to be called every second
  timer.setInterval(1000L, myTimerEvent);
}
void loop()
{
  Blynk.run();
  timer.run(); // Initiates BlynkTimer
}
Sorry my bad i posted the wrong one
Now recently i have uploaded this code in my arduino and in blynk app led widget assigned V5 virtual pin and connect to blynk server(not local one) and as i run the blynk app it still gives the same message “device is offline”. Code is given below
#define BLYNK_PRINT SwSerial


#include <SoftwareSerial.h>
SoftwareSerial SwSerial(10, 11); // RX, TX

#include <BlynkSimpleStream.h>

// You should get Auth Token in the Blynk App.
// Go to the Project Settings (nut icon).
char auth[] = "95b6eeef38fe481dba590c28febef4bb";

BlynkTimer timer;

// This function sends Arduino's up time every second to Virtual Pin (5).
// In the app, Widget's reading frequency should be set to PUSH. This means
// that you define how often to send data to Blynk App.
void myTimerEvent()
{
  // You can send any value at any time.
  // Please don't send more that 10 values per second.
  Blynk.virtualWrite(V5, millis() / 1000);
}

void setup()
{
  // Debug console
  SwSerial.begin(9600);

  // Blynk will work through Serial
  // Do not read or write this serial manually in your sketch
  Serial.begin(9600);
  Blynk.begin(Serial, auth);

  // Setup a function to be called every second
  timer.setInterval(1000L, myTimerEvent);
}

void loop()
{
  Blynk.run();
  timer.run(); // Initiates BlynkTimer
}
and this one too uploaded but same error
/*************************************************************
  Download latest Blynk library here:
    https://github.com/blynkkk/blynk-library/releases/latest

  Blynk is a platform with iOS and Android apps to control
  Arduino, Raspberry Pi and the likes over the Internet.
  You can easily build graphic interfaces for all your
  projects by simply dragging and dropping widgets.

    Downloads, docs, tutorials: http://www.blynk.cc
    Sketch generator:           http://examples.blynk.cc
    Blynk community:            http://community.blynk.cc
    Follow us:                  http://www.fb.com/blynkapp
                                http://twitter.com/blynk_app

  Blynk library is licensed under MIT license
  This example code is in public domain.

 *************************************************************

  Blynk using a LED widget on your phone!

  App project setup:
    LED widget on V1
 *************************************************************/

/* Comment this out to disable prints and save space */
#define BLYNK_PRINT Serial


#include <SPI.h>
#include <Ethernet.h>
#include <BlynkSimpleEthernet.h>

// You should get Auth Token in the Blynk App.
// Go to the Project Settings (nut icon).
char auth[] = "95b6eeef38fe481dba590c28febef4bb";

WidgetLED led1(V1);

BlynkTimer timer;

// V1 LED Widget is blinking
void blinkLedWidget()
{
  if (led1.getValue()) {
    led1.off();
    Serial.println("LED on V1: off");
  } else {
    led1.on();
    Serial.println("LED on V1: on");
  }
}

void setup()
{
  // Debug console
  Serial.begin(9600);

  Blynk.begin(auth);

  timer.setInterval(1000L, blinkLedWidget);
}

void loop()
{
  Blynk.run();
  timer.run();
}
OK… which method are you physically using to connect your UNO to the network with… USB or Ethernet??? You have shown two sketches, neither that will work with the other sketches method.
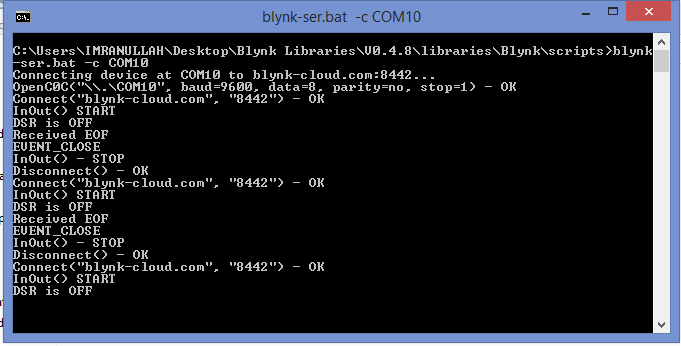
This is the .bat file window
But one thing i don’t understand it now when i uploaded the sketch 1 where virtual pin 5 is used its working and is online but the below sketch where virtual pin 1 is used isn’t working as i uploaded it and run blynk app mean it still is giving me the same msg
Something is clearly interrupting the serial connection… please stop using the sketch for the ethernet and let’s focus on the proper one for the USB.
When using the USB link… absolutely NOTHING else can use that same port; No serial prints in the sketch and no serial monitor in the IDE… otherwise disconnections will happen.
i am using dsl to connect my arduino with the network through router.
and my arduino is connected with my laptop through usb port
Okay
Now bro ya saying that i should comment out all the serial print commands
Unless you have a physical shield with an RJ11 network port on it… you are NOT directly using ethernet on the Arduino.
What the USB-link does is turn your laptop into an oversized serial to ethernet adapter, but as far as the UNO and sketch is concerned, you are using the serial port.
Since the USB link is on the primary (and on the UNO only) UART port… aka Serial you can only print to the SwSerial port, and only if you have a TTL-USB adapter connected to pins 10 & 11.
@vshymanskyy I think the supplementary docs for USB refer to the need for a USB2TTL adaptor but I think the sketch should too and the implications for Serial Monitor and Serial.print().