Dear Costas, ( Dear All ),
considering your expertise in this field, I will wait your comment for the above enlisted http OTA case.
I have implemented, and I am very satisfied. To give you some more details what I have did :
I have a private server that I use to “store” the compiled images ( the *.bin files where * is the MAC address of each ESP8266 )
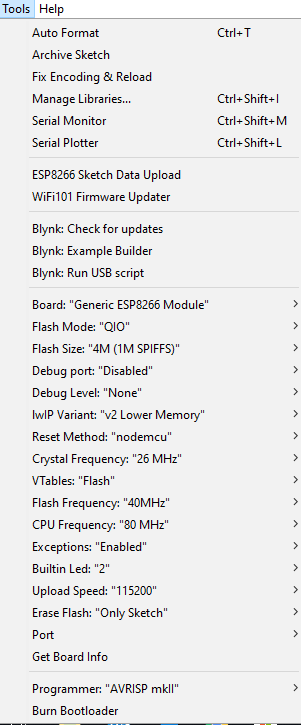
I Compile the under update/upgrade sketch using ARDUINO IDE as usual but from Arduino Sketch menu I select “Export compiled Binary” there is also keyboard shortcut that is: Ctrl+Alt+S.
You can open file explorer at the relevant directory using Sketch menu Show Sketch Folder or using the keybord shortcut Ctrl+K
Please don’t forget to have the sketch version compiled inside this sketch ex : const int FW_VERSION = 2017102501 ; /// year_month_day_same day release number
Prepare one more file using MACADDRESS.version ex in my case the file name is: 5CCF7FC602E2.version and inside this file write your firmware version, ex 2017102501
Upload these two files to your Server ex using ftp or ssh underlay. I use ssh and WinSCPP
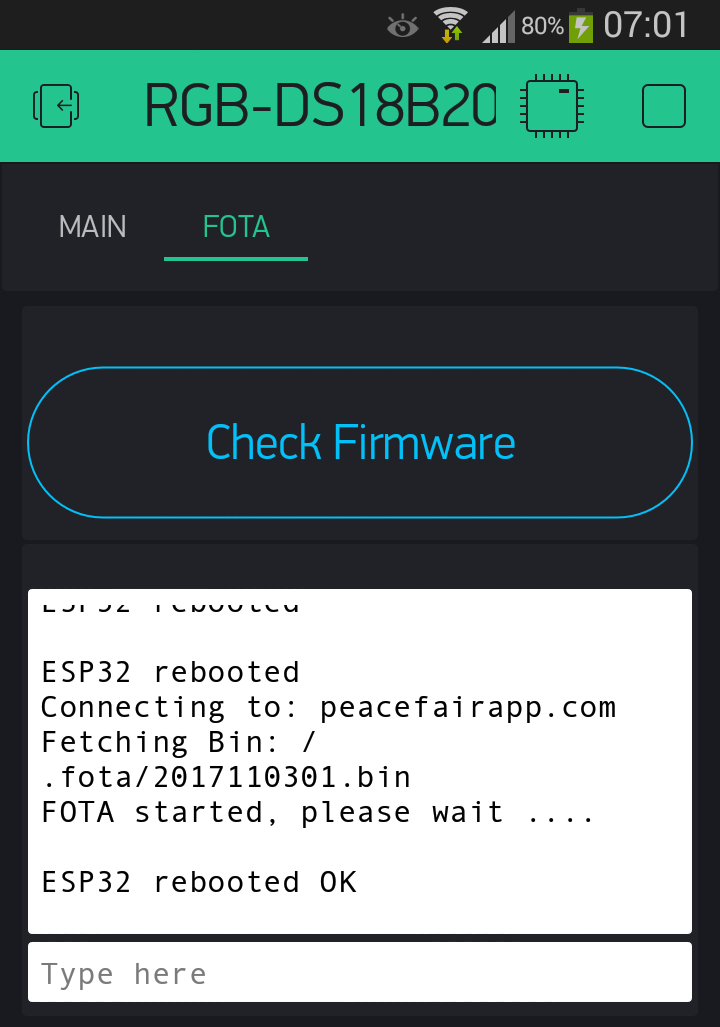
If you have these files already uploaded to your server, trigger the HTTP OTA update/upgrade using timer or Blynk’s virtual button ( I use this ) and code like ( in my case I use also terminal widget to get printings but this is not necessary for the HTTP OTA functionality… ):
const int FW_VERSION = 2017102501 ; /// year_month_day_same day release number
const char* fwUrlBase = "http://yourserver/.fota/";
bool HTTP_OTA = false;
/// V26 switch to activate HTTP file OTA on demand via boolean HTTP_OTA variable that activate in the loop V26 ///

/// START routine for manual (on demand) requesting HTTP file OTA. Virtual Button SW V26 is used ///
  BLYNK_WRITE(V26)
  {
    if (param.asInt()) {
        HTTP_OTA = true;
    }
    else {
    HTTP_OTA = false;
    }
  }
/// END routine for manual (on demend) requesting HTTP file OTA. Virtual Button SW V15 is used ///

/// Start of main function that performs HTTP OTA ///
void checkForUpdates() {
  uint8_t mac[6];
  char macAddr[14];
  WiFi.macAddress( mac );
  ///sprintf(macAddr,"%02x%02x%02x%02x%02x%02x", mac[0], mac[1], mac[2], mac[3], mac[4], mac[5]); /// small letters at MAC address
  sprintf(macAddr, "%02X%02X%02X%02X%02X%02X", mac[0], mac[1], mac[2], mac[3], mac[4], mac[5]); /// capital letters at MAC address
  terminal.println(macAddr);
  String fwURL = String( fwUrlBase );
  fwURL.concat( macAddr );
  String fwVersionURL = fwURL;
  fwVersionURL.concat( ".version" );
  Serial.println( "Checking for firmware updates." );
  Serial.print( "MAC address: " );
  Serial.println( macAddr );
  ///terminal.printf("\nChecking for firmware updates.\nMAC address: %s ",mac);
  terminal.printf("\nChecking for firmware updates.\nMAC address: ");
  terminal.print( macAddr );
  Serial.print( "Firmware version URL: " );
  Serial.println( fwVersionURL );
  ///terminal.printf("\nFirmware version URL: %s ",fwVersionURL);
  terminal.printf("\nFirmware version URL: ");
  terminal.print(fwVersionURL);
  terminal.flush();

  HTTPClient httpClient;
  httpClient.begin( fwVersionURL );
  int httpCode = httpClient.GET();
  if( httpCode == 200 ) {
    String newFWVersion = httpClient.getString();

    Serial.print( "Current firmware version: " );
    Serial.println( FW_VERSION );
    Serial.print( "Available firmware version: " );
    Serial.println( newFWVersion );
    ///terminal.printf("\nCurrent firmware version: %s  Available firmware version: %s ",FW_VERSION,newFWVersion);
    terminal.print("\nCurrent firmware version: ");
    terminal.print(FW_VERSION);
    terminal.print("\nAvailable firmware version: ");
    terminal.println(newFWVersion);
    terminal.flush();
    int newVersion = newFWVersion.toInt();

    if( newVersion > FW_VERSION ) {
      Serial.println( "Preparing to update" );
    terminal.println( "\nPreparing to update" );
    terminal.flush();
      String fwImageURL = fwURL;
      fwImageURL.concat( ".bin" );
      t_httpUpdate_return ret = ESPhttpUpdate.update( fwImageURL );

      switch(ret) {
        case HTTP_UPDATE_FAILED:
          Serial.printf("HTTP_UPDATE_FAILD Error (%d): %s", ESPhttpUpdate.getLastError(), ESPhttpUpdate.getLastErrorString().c_str());
          terminal.printf("\nHTTP_UPDATE_FAILD Error (%d): %s\n", ESPhttpUpdate.getLastError(), ESPhttpUpdate.getLastErrorString().c_str());
          terminal.flush();
          break;

        case HTTP_UPDATE_NO_UPDATES:
          Serial.println("HTTP_UPDATE_NO_UPDATES");
          terminal.println("\nHTTP_UPDATE_NO_UPDATES\n");
          terminal.flush();
          break;
      }
    }
    else {
      Serial.println( "Already on latest version" );
      terminal.println( "\nAlready on latest version\n" );
      terminal.flush();
    }
  }
  else {
    Serial.print( "Firmware version check failed, got HTTP response code " );
    Serial.println( httpCode );
    terminal.printf( "\nFirmware version check failed, got HTTP response code : %d\n",httpCode );
    terminal.flush();
  }
  httpClient.end();
}
/// End of main function that performs HTTP OTA ///

/// YOU NEED SOMEWHERE THIS, I PUT IT on LOOP
if(HTTP_OTA) {
    /// shall I stop timers and Blynk related in order to ensure succesful WEB OTA ??? ///
    checkForUpdates();
Dear Friends,
I will love to have your comments in the idea and implementation enlisted above,so please, if you test it let me know your opinion and the possible improvements that we can do.
We don’t use the MAC system as we have 825,632 devices to update, I wish
I tweaked your code for the ESP32 and we get down as far as Preparing to update and then it fails to do an update. That’s because the process for the ESP32 is quite different to that of the ESP8266.
I have however just successfully completed my first internet firmware update (fota) for an ESP32. Not bad to say we haven’t had the Espressif device for 24 hours yet.
Remove OTA code from loop() , ensure V26 button is in PUSH mode (not SWITCH) for when ESP8266 restarts if you are using syncAll and make V26 function simply:
  BLYNK_WRITE(V26)
  {
    if (param.asInt()) {
        checkForUpdates();
    }
  }
Good morning @Costas Paul. You working really hard almost all hours…!
It is very promising that you did internet updates for ESP32. Please share your sketch I am eager to try it. Congratulations Paul.
Thanks and Best Regards,
Mike Kranidis
P. S. Yes switch 26 is in push button mode in my implementation
It’s just the regular AWS S3 OTA Update, without AWS S3 but including Blynk.
I can’t think of any reason why your MAC system shouldn’t work with the AWS S3 OTA update
Screenshot above is just the “AWS” system but using your filename numbering and path details. I haven’t combined the 2 systems and a bit busy with other things at the moment.
Hello, very nice done, jobb. But last 48 houres i try to figured out how to make update with out reset manualy bord,. I geting this “Invalid bootstrapping state, reset ESP8266 before updating”, are you have the same?
@mikekgr Thank you for your simple yet powerful code, but there is a problem when i want to update my ESP12F using cloud hosting !
Checking for firmware updates.
MAC address: 840D8E896790
Firmware version URL: http://*************/fota/840D8E896790.version
Current firmware version: 2018041200
Available firmware version: 2018041201
Preparing to update
HTTP_UPDATE_FAILD Error (-106): Verify Bin Header Failed[811550]
Please be sure that in your cloud server your bin file has the name: 840D8E896790.bin and has been produced with the indicated steps from the Arduino IDE.
Check it and let me know
It is strange then. I use this way of OTA extensively without problems. When you see the files at your cloud server, everything is OK? Did you try to erase the .bin file from the cloud server and to upload again, to exclude uploading error? Try to download the .bin file to a directory of your computer and calculate the MD5sum both of the original Arduino IDE .bin file and the re-downloaded from your cloud server.
Other than this… I don’t know…
Test them and let me know
I re-upload the file and the problem is still there, calculate the original and downloaded bin file MD5 and both of them are “135bd4f64d7be9bfe326989d92a14f5b” !!
i had arduino core 2.4.0 and update it to 2.4.2 after updating i have new problem
HTTP_UPDATE_FAILD Error (6): Update error: ERROR[6]: Stream Read Timeout
I’m testing device on local server does it matter ?