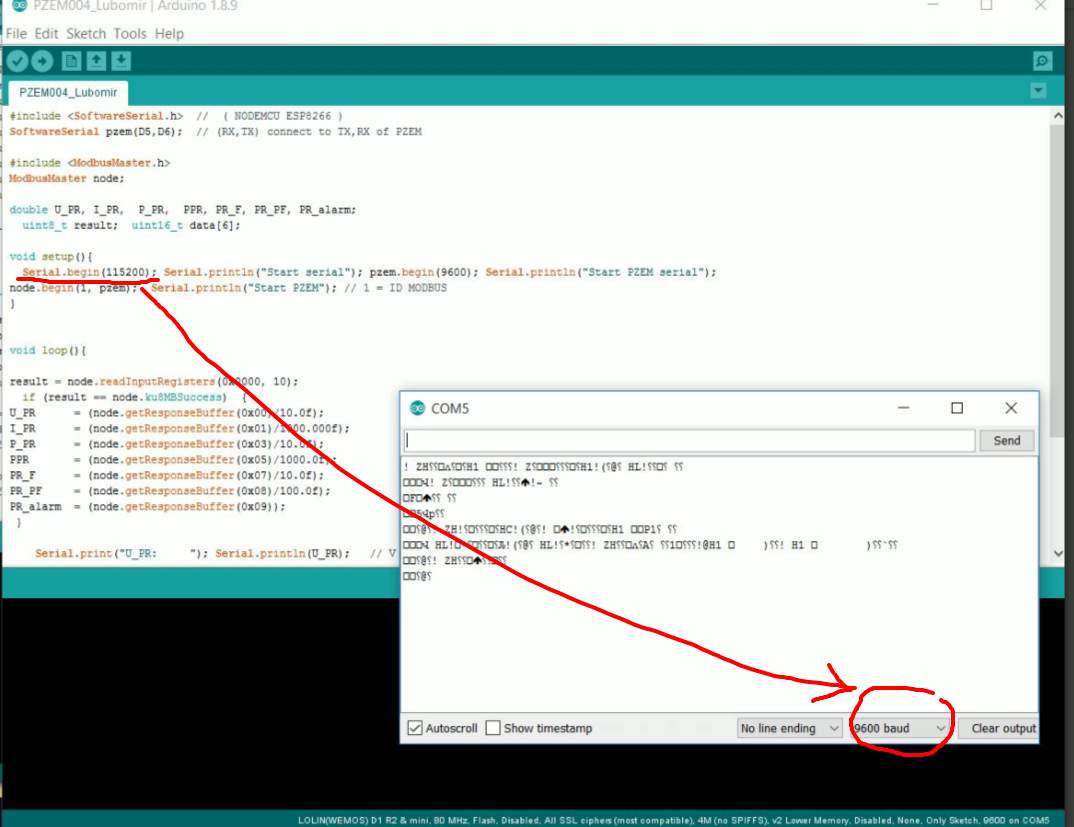
set your serial monitor speed to 115200 bauds 
1 Like
Thank you Lubomir, Blynk and Marvin7,
I was able to have data show up on Serial Monitor. 
My next step is to get WiFi connection to NodeMCU, when I input my WiFi data from the begining of the code, upload it to the NodeMCU, the device still can’t connect to my WiFi. (I don’t see it on my router either)
char ssid[] = "WiFiNameHerer";             //WiFi Name**
char pass[] = "WiFiPassword";              //WiFi Password**
char server[] = "192.168.1.20";            //Blynk local server IP address**
int port = 8080;                           //Blynk local port**
#define USE_LOCAL_SERVER                   //Use local Blynk Server - comment-out if use Blynk hosted cloud service**


#include <SoftwareSerial.h>  //  ( NODEMCU ESP8266 )
SoftwareSerial pzem(D5,D6);  // (RX,TX) connect to TX,RX of PZEM

#include <ModbusMaster.h>
ModbusMaster node;

double U_PR, I_PR,  P_PR,  PPR, PR_F, PR_PF, PR_alarm;
  uint8_t result;  uint16_t data[6];
1 Like
show us your serial monitor.
don’t forget that the serial monitor show everything you need to solve the problem.
1 Like
Dare to show us those, so we can help? ![]()
![]()
Hi Blynk, Marvin7,
What I’m trying now is to get the device connect to the WiFi so I can implement it with the Blynk server, but the device won’t connect to WiFi.
Here is the Serial Monitor Output, which is great

I don’t see any blynk.begin or something like that in your sketch.
and your serial monitor didn’t show any IP address , no more any blynk trying to connect.
That is probably, because you never asked the device to connect to WIFI. Please follow the basic examples at https://examples.blynk.cc/
1 Like
Sorry blynker, but I opened port 80 of the router, now how can I view data from FW Tasmota 6.5 from the outside? Thank you so much
- On your router forward port 80 to your ESP (PZEM) ip address 192.168.xxx.xxx
Hi Marvin7, Blynk, Lubomir,
I was able to get the device display the data on Serial Monitor and connected it to the WiFi. I also have the Blynk load it on the sketch but my phone still can’t access to this device via Blynk.
As of now, the Blynk still can’t see the PZEM/NodeMCU
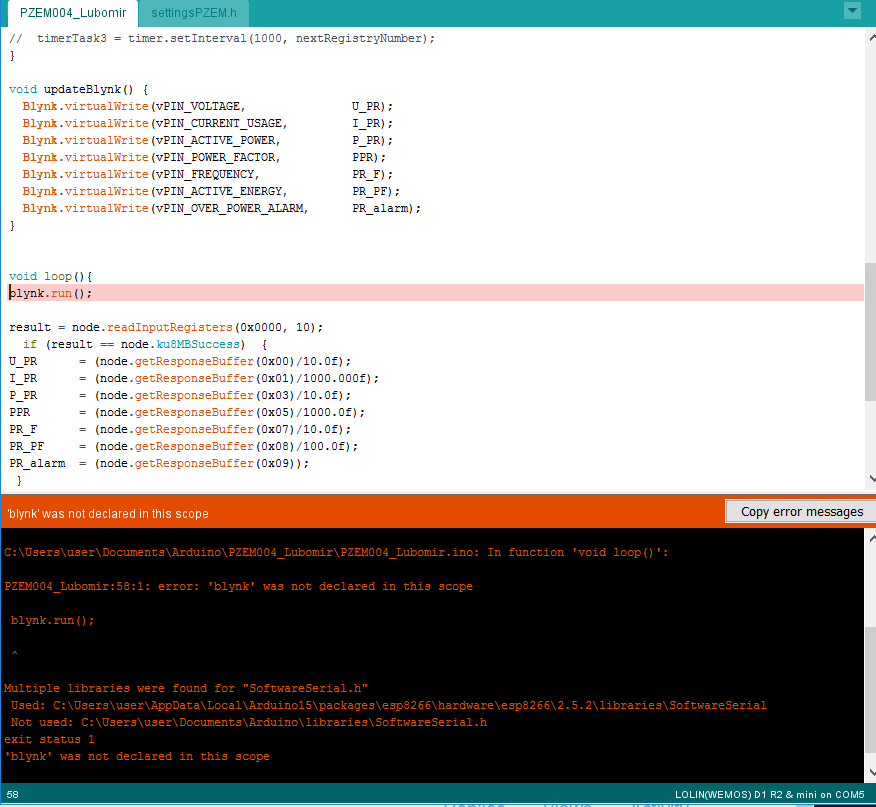
Here is the full sketch:
#include <ArduinoOTA.h>
#include <BlynkSimpleEsp8266.h>
#include <SimpleTimer.h>
#include <ModbusMaster.h>
#include <ESP8266WiFi.h>
#include "settingsPZEM.h"

#include <SoftwareSerial.h>  //  ( NODEMCU ESP8266 )
SoftwareSerial pzem(D5,D6);  // (RX,TX) connect to TX,RX of PZEM
#include <ModbusMaster.h>
ModbusMaster node;

double U_PR, I_PR,  P_PR,  PPR, PR_F, PR_PF, PR_alarm;
uint8_t result;  uint16_t data[6];
//int timerTask1

void setup(){
  Serial.begin(115200); Serial.println("Start serial"); pzem.begin(9600); Serial.println("Start PZEM serial");
node.begin(1, pzem);  Serial.println("Start PZEM"); // 1 = ID MODBUS

WiFi.mode(WIFI_STA);
#if defined(USE_LOCAL_SERVER)
  WiFi.begin(ssid, pass);
  Blynk.config(AUTH, server, port);
#else
  Blynk.begin(AUTH, ssid, pass);
#endif
  while (Blynk.connect() == false) {}
  ArduinoOTA.setHostname(OTA_HOSTNAME);
  ArduinoOTA.begin();

}

void updateBlynk() {
  Blynk.virtualWrite(vPIN_VOLTAGE,               U_PR);
  Blynk.virtualWrite(vPIN_CURRENT_USAGE,         I_PR);
  Blynk.virtualWrite(vPIN_ACTIVE_POWER,          P_PR);
  Blynk.virtualWrite(vPIN_POWER_FACTOR,          PPR);
  Blynk.virtualWrite(vPIN_FREQUENCY,             PR_F);
  Blynk.virtualWrite(vPIN_ACTIVE_ENERGY,         PR_PF);
  Blynk.virtualWrite(vPIN_OVER_POWER_ALARM,      PR_alarm);
}


void loop(){

result = node.readInputRegisters(0x0000, 10);
  if (result == node.ku8MBSuccess)  {
U_PR      = (node.getResponseBuffer(0x00)/10.0f);
I_PR      = (node.getResponseBuffer(0x01)/1000.000f);
P_PR      = (node.getResponseBuffer(0x03)/10.0f);
PPR       = (node.getResponseBuffer(0x05)/1000.0f);
PR_F      = (node.getResponseBuffer(0x07)/10.0f);
PR_PF     = (node.getResponseBuffer(0x08)/100.0f);
PR_alarm  = (node.getResponseBuffer(0x09));
 }

    Serial.print("U_PR:     "); Serial.println(U_PR);   // V
    Serial.print("I_PR:     "); Serial.println(I_PR,3);   //  A
    Serial.print("P_PR:     "); Serial.println(P_PR);   //  W
    Serial.print("PPR:      "); Serial.println(PPR,3);   // kWh
    Serial.print("PR_F:     "); Serial.println(PR_F);    // Hz
    Serial.print("PR_PF:    "); Serial.println(PR_PF);
    Serial.print("PR_alarm: "); Serial.println(PR_alarm,0);
Serial.println("====================================================");

  delay(1000);
}
And here is the settings.h
#define OTA_HOSTNAME "PZEM-004v3"
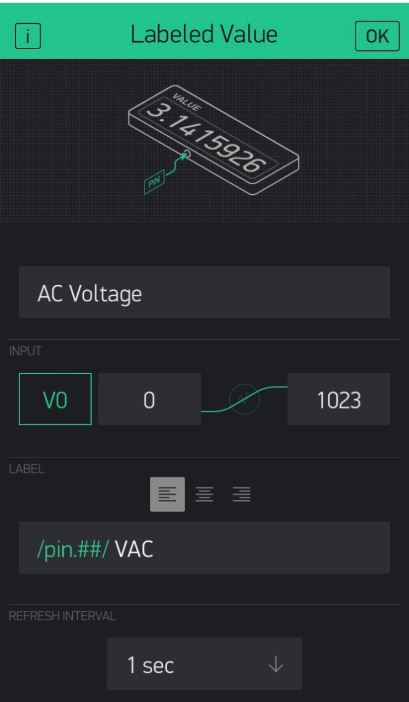
#define vPIN_VOLTAGE V0
#define vPIN_CURRENT_USAGE V1
#define vPIN_ACTIVE_POWER V2
#define vPIN_POWER_FACTOR V3
#define vPIN_FREQUENCY V4
#define vPIN_ACTIVE_ENERGY V5
#define vPIN_OVER_POWER_ALARM V6
const int debug = 1;
you need blynk.run() in your void loop.
Alexis
1 Like
Hi Blynk,
Could you please let me know where to put it in the sketch?
void loop(){
blynk.run();
.
.
Arduino/C++ is case SENSITIVE!
1 Like
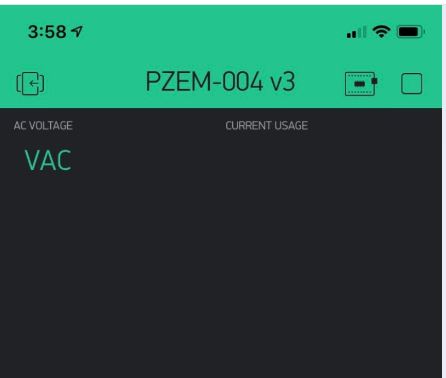
Thanks Marvin7, the device show up in the Blynk app now but the data does NOT display in the Blynk. Could you please check and let me know if the “mapping” on the Sketch/Setting is correct or not?
What else did I missed?
Below is the setting on the Blynk App
Blynk display NO data
Is never called (neither by timer not directly), or I can’t find where it is. I strongly suggest you to check some basic examples, how to build a working code, because till now it is a kind of hit-and-miss. You placed delay(1000) in loop, which supposedly will work here, but shouldn’t be there. A timer is an almost MUST HAVE with most Blynk firmwares.
Hi Marvin,
I’m just a normal user with ZERO knowledge in programming therefore it take me weeks or month just to do one project. After spend another 2 hours and I still can’t figure out. I also tried to put timer.run in the code and it failed to compile.
Please help to fix this so the data can display on the Blynk.
Put the updateBlynk(); just before this delay(1000); in void loop (). It may work, at least to show you some readings. For proper code You NEED TO call updateBlynk() periodically using a Timer. (Blynk.timer) AND remove this delay… How to set it up please find in docs.blynk.cc or examples.blynk.cc, for example look here https://examples.blynk.cc/?board=ESP8266&shield=ESP8266%20WiFi&example=GettingStarted%2FVirtualPinWrite