Im using nodemcu v1 and i want to keep the D2 high for certain amount of time ? how could be that possible using blynk ?
any advice will be appreciated thank you
There is no statement im using blynk app my code is somethink look like this
#define BLYNK_PRINT Serial    // Comment this out to disable prints and save space
#include <ESP8266WiFi.h>
#include <BlynkSimpleEsp8266.h>

// You should get Auth Token in the Blynk App.
// Go to the Project Settings (nut icon).
char auth[] = "YourAuthToken";

void setup()
{
  Serial.begin(9600);
  Blynk.begin(auth, "ssid", "pass");
}

void loop()
{
  Blynk.run();
}
i assign a led to pin d2 and i want it to stay on for 6 sec
delay()'s go against Blynk guidelines as it will cause disruptions to the heartbeat timer and cause disconnects.
NEVER USE DELAY
@Abdullah_Anwar, you need to learn how to use SimpleTimer and Virtual Pins.
You cannot do what you want without using these methods.
yes exactly simple timer and virtual pins is the best way. but @Abdullah_Anwar his asking for only single pin i think as per his statement, so i give delay…
1 Like
@Jamin @Castle Thank you guys I will read the guideline and try to solve the problem if I counter any problem I let you know
Thanks again
1 Like
ANY ONE COULD TELL ME HOW TO ELIMINATE THE DELAY IN MY CODE BY USING OTHER FUNCTION OR ANY WAY COULD DO THE WORK ?
@Jamin @Castle
#define BLYNK_PRINT Serial    // Comment this out to disable prints and save space
#include <ESP8266WiFi.h>
#include <BlynkSimpleEsp8266.h>

// You should get Auth Token in the Blynk App.
// Go to the Project Settings (nut icon).
char auth[] = "";

void setup()
{
  digitalWrite(D7, HIGH); //GPIO13
  pinMode(D7, OUTPUT);       // Pin connected to the Relay
  Serial.begin(9600);
  Blynk.begin(auth, "", "");
}

BLYNK_WRITE(V7)
{
  if (param.asInt() == 1 )
  {
   digitalWrite(D7, HIGH); //GPIO13
   delay(3000);
  }
  else
  {digitalWrite(D7, LOW);

     }

 }


void loop()
{
  Blynk.run();
  yield();
}
-
- List item
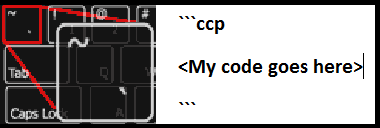
format your code correctly.
```cpp
CODE
```
Do not use delay()… between the ESP connection process and Blynks own heartbeat loop, any delay over a few fractions of a second will cause disconnects and timeouts.
@Abdullah_Anwar Please format your code and read up on Simple Timer or we may be unwilling to continue further assistance…
http://playground.arduino.cc/Code/SimpleTimer
Sorry but I’m new here I’m not sure how to format my code
Well you clearly know how to paste your code in your posts… just add the three backtick characters and the letters ccp in front of it, then three more backticks at the end… just like the picture above.
Watch the GIF here for more info…
COPY THIS EXAMPLE AND PASTE IT IN YOUR POST, THEN REPLACE CODE WITH YOUR SKETCH.
```cpp
CODE
```
…CPP
#define BLYNK_PRINT Serial    // Comment this out to disable prints and save space
#include <ESP8266WiFi.h>
#include <BlynkSimpleEsp8266.h>

// You should get Auth Token in the Blynk App.
// Go to the Project Settings (nut icon).
char auth[] = "";

void setup()
{
  digitalWrite(D7, HIGH); //GPIO13
  pinMode(D7, OUTPUT);       // Pin connected to the Relay
  Serial.begin(9600);
  Blynk.begin(auth, "", "");
}

BLYNK_WRITE(V7)
{
  if (param.asInt() == 1 )
  {
   digitalWrite(D7, HIGH); //GPIO13
   delay(3000);
  }
  else
  {digitalWrite(D7, LOW);

     }

 }


void loop()
{
  Blynk.run();
  yield();
}
Correct principle, wrong key for the backtick (it looks like you used periods, a backtick is like a reversed comma)… look at the picture and find the same looking key somewhere on your keyboard. Depending on the language layout of your keyboard, the backtick may be located elsewhere then the upper left.
Or just try copy and pasting these three backticks here like @Jamin suggested —> ```
@Abdullah_Anwar Looks better… and thanks for going back and editing all the previous ones as well  Not many do that.
Now as for your timing issue… @Jamin posted a good example of triggering relays for a set time in this post here [SOLVED] Triggered cycle counter Check it out for ideas on how to work Simple Timer into your code.
1 Like
Here is my code i did like the example but it does not work am i missing something? @Gunner @Jamin
#define BLYNK_PRINT Serial    // Comment this out to disable prints and save space
#include <ESP8266WiFi.h>
#include <BlynkSimpleEsp8266.h>
#include <SimpleTimer.h>
SimpleTimer timer;


// You should get Auth Token in the Blynk App.
// Go to the Project Settings (nut icon).
char auth[] = "";


void setup()
{
  Serial.begin(115200);
  Blynk.begin(auth, "", "");
  pinMode(2, OUTPUT);
  pinMode(13, OUTPUT);
}
void actionRelays(){
  relay1_ON(); // turn on relay1
  timer.setTimeout(2000, relay2_ON); // delay 2sec then turn on relay2
  timer.setTimeout(15000, relays_OFF); // delay 15sec from first action and turn off both relays
}

void relay1_ON(){
  digitalWrite(2,HIGH); // turn on relay1
  Blynk.virtualWrite(V10, 255); // turn on an LED widget (optional)
}

void relay2_ON(){
  digitalWrite(13,HIGH); // turn on relay2
  Blynk.virtualWrite(V20, 255); // turn on an LED widget (optional)
}

void relays_OFF(){
  digitalWrite(2,LOW); // turn off relay1
  digitalWrite(13,LOW); // turn off relay2
  Blynk.virtualWrite(V10, 0); // turn off an LED widget (optional)
  Blynk.virtualWrite(V20, 0); // turn off an LED widget (optional)
}

BLYNK_WRITE(V7)
{
  if (param.asInt() == 1 )
  {
   actionRelays();
  }
  else
  {digitalWrite(13, LOW);

     }
}
void loop()
{
  Blynk.run();
  }
No such GPIO as “D7” …
You need to convert the D pin to a GPIO pin number.
D4 = 2
D7 = 13

Also… this part is too complex… lets slim it down. …
BLYNK_WRITE(V7)
{
  if (param.asInt() == 1 )
  {
   actionRelays();
  }
  else
  {digitalWrite(D7, LOW);

     }
}
to this. …
BLYNK_WRITE(V7) {
  actionRelays();
  Serial.println("V7 triggered"); // to confirm it was pressed in Serial montior
}
because all you can do it start the sequence… if you want to stop it… you need to add some more code!
@Jamin Thanks for the quick response i changed the pin numbers but still the same nothing changed
is my blink_write function correct ?