I have finally found a solution to the controlling a robot using the ESP8266 Solution without the need of an Arduino development board. I am using the NodeMCU board and a cheap two wheel drive platform and a motor driver adapter board that connects in a manor similar to an Arduino shield. I had help some good advice from various members of the Blynk Community and the Blynk staff that is often active in chat. Special thanks to members Psoro, katzworld and Lichtsignaal. Their assistance greatly reduced the time it would have taken to get to this point of having a working prototype.
Later I will add pictures and video.
I used the Blynk ESP8266 Stand Alone Library, the 2-joystick module in merge mode as well as the code snippet from its example within the Blynk library. The driving method was developed with a combination of a previous code I developed for my RomeoBLE Project and the code of a fellow user name Psoro who posted a code to control the same type of robot with an ESP8266 Chip and an Arduino Nano.
Many tweaks and changes had to be made including several adjustments to the mapping values. Some data had to be retrieved by connecting directly to the ESP8266 with Blynk Stand Alone and testing the motor speed at various levels from 0 1000. For this setup, the effect motor control range is from 450 to 1000. The speed adjustment slider is another idea from Psoro that I will be using a lot with kids programs to keep them from breaking the cars lol.
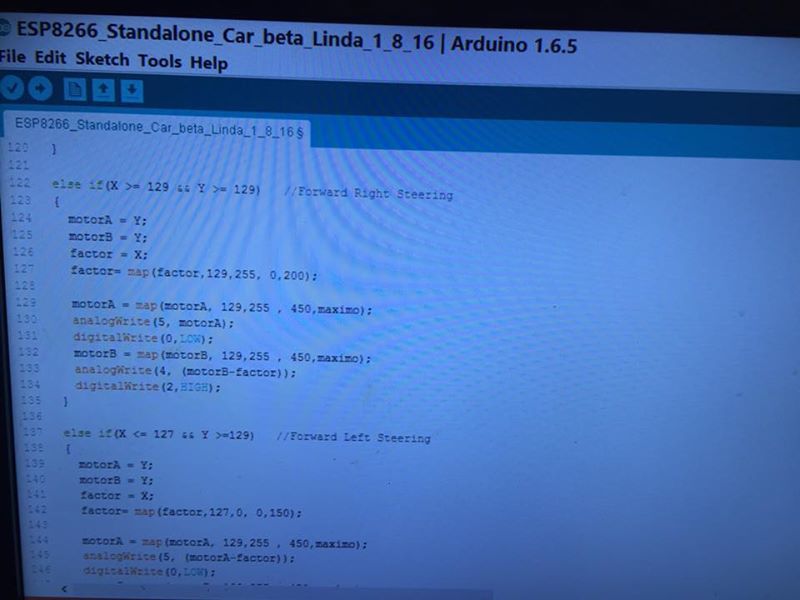
Here is my code:
#define BLYNK_PRINT Serial    // Prints to serial
#include <ESP8266WiFi.h>      //Calls Blynk ESP8266 Wifi Libary
#include <BlynkSimpleEsp8266.h>//Calls Blynk ESP8266 Library

//Variables are declared at this point before void setup to make variables public and thus accessible throughout the entire code if needed.
int motorA ; //Variables for motor speed.
int motorB ; //Variables for motor speed.
int X=0; //Variable to recieve horizontal analog stick movement data.
int Y=0; //Variable to recieve vertical analog stick movement data.
int factor=0; //Decreases the speed of one motor to increase the differential between the two and thus provide differential steering or a steering wheel like control.
int maximo=0; //Limits the speed based on a slider widget within the Blynk App.

// You should get Auth Token in the Blynk App.
// Go to the Project Settings (nut icon).
char auth[] = "authentication code for blynk";

void setup()
{
  // Set console baud rate
  Serial.begin(9600);


 Blynk.begin(auth,"WifiName","WifiPassword"); // Signs into home wifi.

 pinMode(motorA, OUTPUT); //sets any pin used for motorA as output since pins may be inputs by default.
 pinMode(motorB, OUTPUT); //sets any pin used for motorB as output since pins may be inputs by default.
 pinMode(0,OUTPUT); //sets pin 0 to output since pins may be inputs by default.
 pinMode(2,OUTPUT); //sets pin 2 to output since pins may be inputs by default.

}

 BLYNK_WRITE(V1) //Vertual pin used with 2-axis joystick in merge mode to control robot movement.
{
  int X1 = param[0].asInt();// Variable to recieve input from parameter 0 position array within V1 that tracks horizontal movement.
  X=X1;
  int Y1 = param[1].asInt();// Variable to recieve input from parameter 1 position array within V1 that tracks vertical movement.
 Y=Y1;

}

 BLYNK_WRITE(V0)//Virtual pin used with maximo variable to limit upper boundary or top end of speed.
{
 int vel = param.asInt();
 maximo=vel;
}

void loop()
{

  if(X == 128  &&  Y == 128)  //  Writes 0 to all motor pins to Stop vehicle when joystick is in centered x and y position or neutral.
  {
   motorA = 0;
   motorB = 0;
   analogWrite(5, motorA);
   analogWrite(4, motorA);
   analogWrite(0, motorB);
   analogWrite(2, motorB);
   }

   if(X > 123 && X < 132 && Y >= 129)   //Forward
  {
    motorA = Y;
    motorB = Y;

    motorA = map(motorA, 129,255 , 450,maximo);
    analogWrite(5, motorA);
    digitalWrite(0,LOW);
    motorB = map(motorB, 129,255 , 450,maximo);
    analogWrite(4, motorB);
    digitalWrite(2,HIGH);
  }

 else if(X > 123 && X < 132 && Y <= 127)   //Reverse
  {
    motorA = Y;
    motorB = Y;

    motorA = map(motorA, 127,0 , 450,maximo);
    analogWrite(5, motorA);
    digitalWrite(0,HIGH);
    motorB = map(motorB, 127,0 , 450,maximo);//something is wrong with HIGH signal
    analogWrite(4, motorB);
    digitalWrite(2,LOW);
  }

  else if(Y > 123 && Y < 132 && X <= 127)   //Left
  {
    motorA = X;
    motorB = X;

    motorA = map(motorA, 127,0 , 450,maximo);
    analogWrite(5, motorA);
    digitalWrite(0,HIGH);
    motorB = map(motorB, 127,0 , 450,maximo);//something is wrong with HIGH signal
    analogWrite(4, motorB);
    digitalWrite(2,HIGH);
  }

   else if(Y > 123 && Y < 132 && X >= 127)   //Right
  {
    motorA = X;
    motorB = X;

    motorA = map(motorA, 129,255 , 450,maximo);
    analogWrite(5, motorA);
    digitalWrite(0,LOW);
    motorB = map(motorB, 129,255 , 450,maximo);//something is wrong with HIGH signal
    analogWrite(4, motorB);
    digitalWrite(2,LOW);
  }

  else if(X >= 129 && Y >= 129)   //Forward Right Steering
  {
    motorA = Y;
    motorB = Y;
    factor = X;
    factor= map(factor,129,255, 0,200);

    motorA = map(motorA, 129,255 , 450,maximo);
    analogWrite(5, motorA);
    digitalWrite(0,LOW);
    motorB = map(motorB, 129,255 , 450,maximo);
    analogWrite(4, (motorB-factor));
    digitalWrite(2,HIGH);
  }

  else if(X <= 127 && Y >=129)   //Forward Left Steering
  {
    motorA = Y;
    motorB = Y;
    factor = X;
    factor= map(factor,127,0, 0,150);

    motorA = map(motorA, 129,255 , 450,maximo);
    analogWrite(5, (motorA-factor));
    digitalWrite(0,LOW);
    motorB = map(motorB, 129,255 , 450,maximo);
    analogWrite(4, motorB);
    digitalWrite(2,HIGH);
  }

  Blynk.run();
}
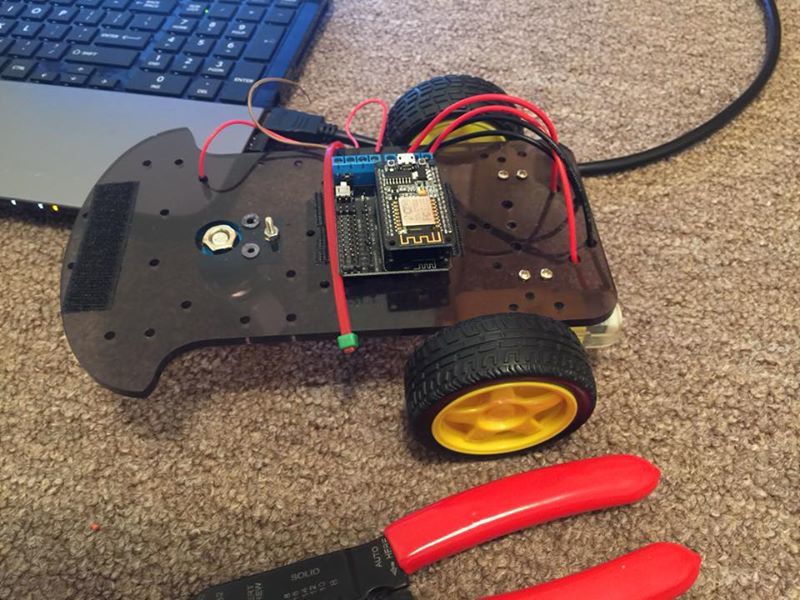
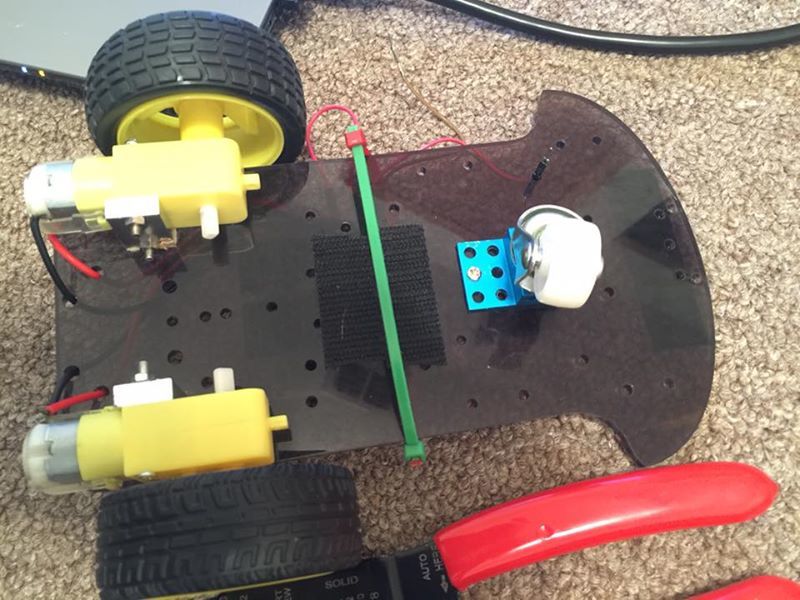
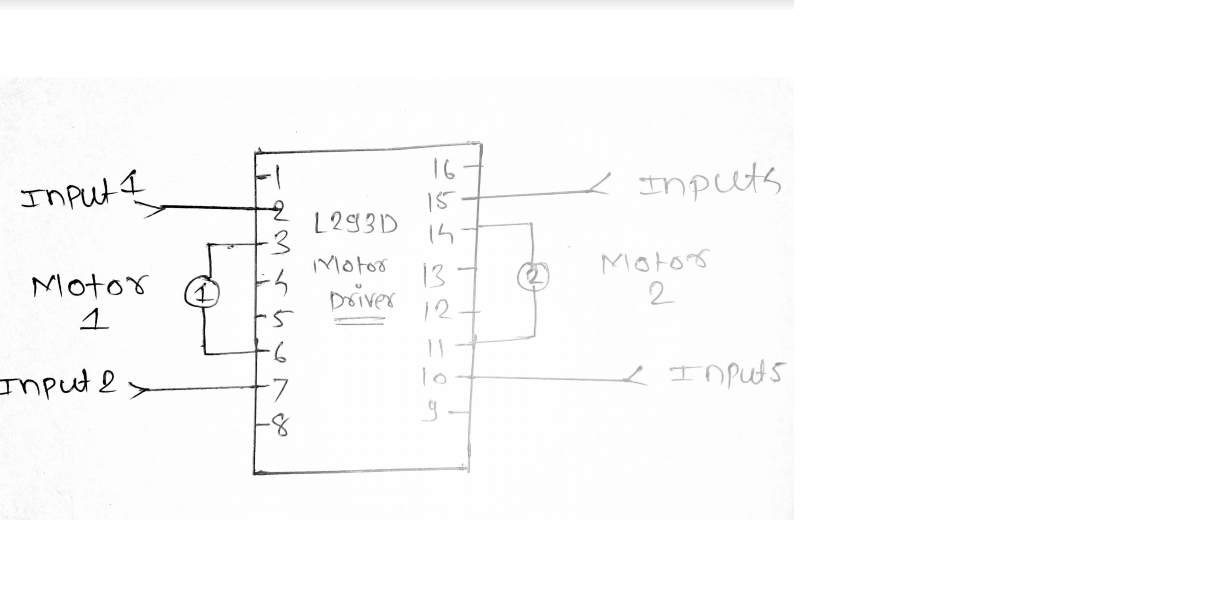
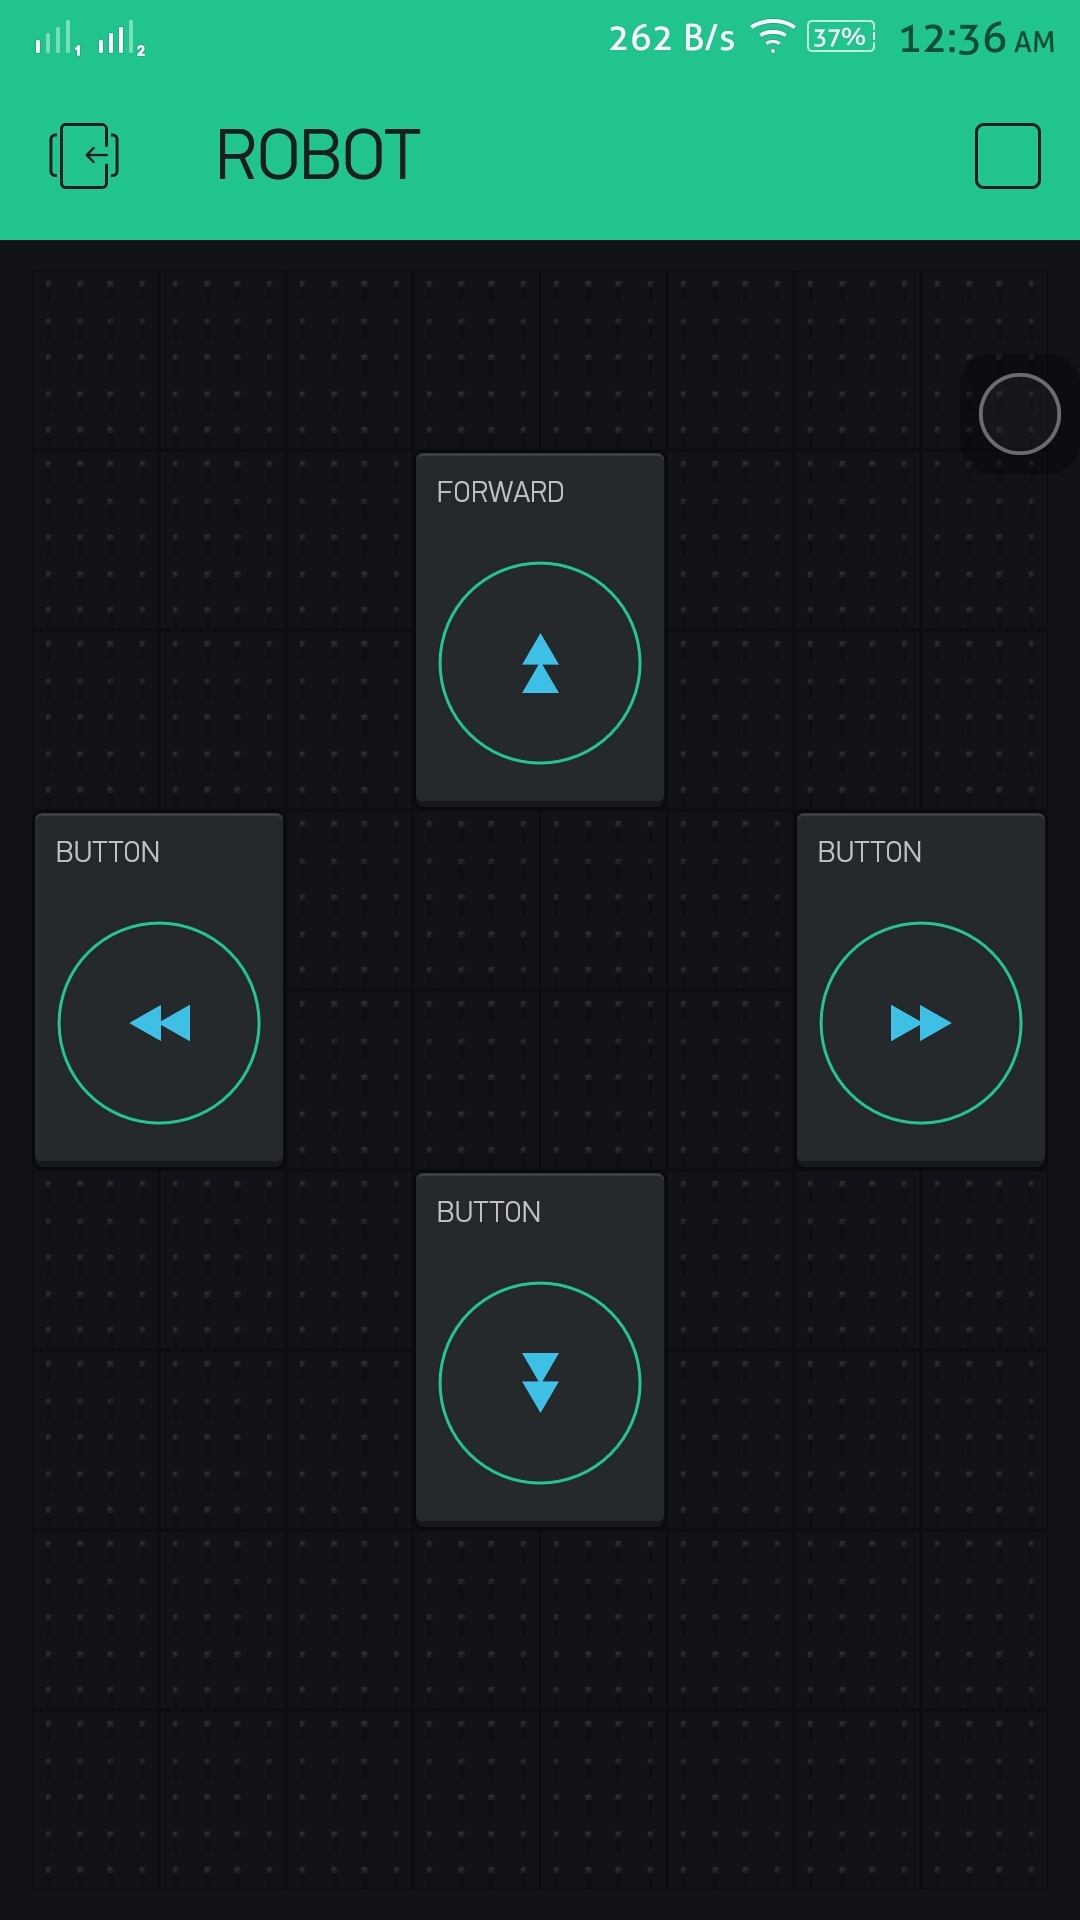
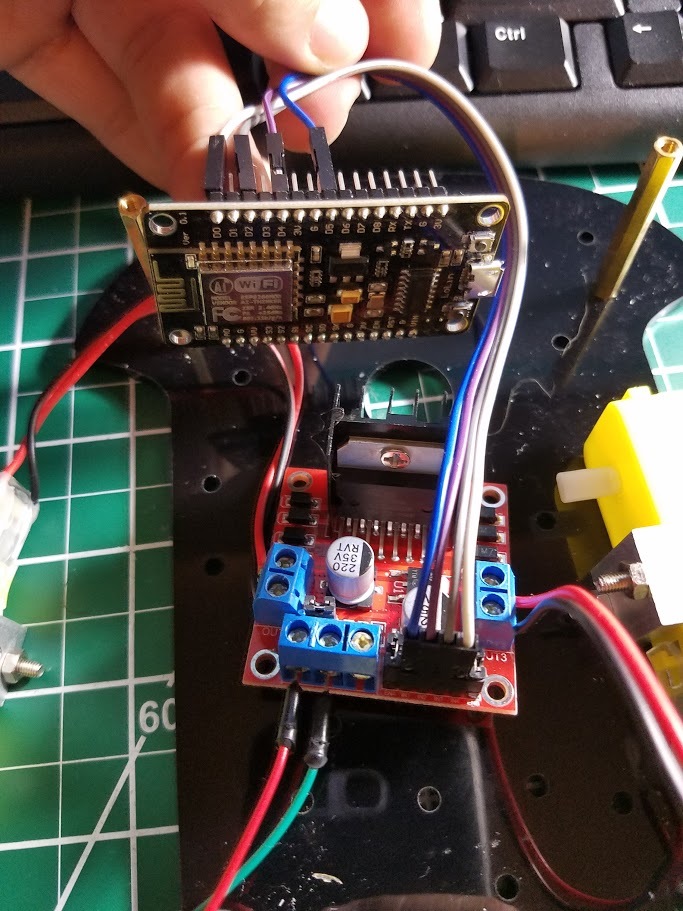
Here some pictures: