Hi,
I’m a novice, but I am about to start a project where I need to monitor negative value temperature and as well as the Humidity, so I will be using DHT11 and DS18B20 Sensors. Also, I plan to add a Gas sensor MQ-137 or MQ-135 for Ammonia in PPM. Can you guys help me relate the code with Blynk so that I may use from any compatible smartphone?
Thanks in advance.
If you’re willing to get the data you want, and can print it out to a serial port, in other words, show you can do the initial work on your own, you bet! Im newer to the Blynk communitiy myself and can testify they have always been super helpful. Post what you have so far @Bashar, and the crew here will always do the best to point you in the right direction. Basically, they assume you are willing to do the initial developement on your own but are more than happy to help you out adding blynk to what you have. Everyone here is cheering for you!
Sorry, my bad. I should have been elaborate but hesitated.
Moving on. So far I have created a code using which I am able to measure Temperature and Humidity. I have used a DHT11 Sensor but I need to use DS18B20 as I would place it under sub-zero Temperatures. However, the DS18B20 Sensor only shows Temperature so for getting the Humidity reading, I will also add DHT11 side by side.
Moreover, I want to add Gas sensors for CO2 and Ammonia reading.
Hope I was able to explain myself clearly. Thanks.
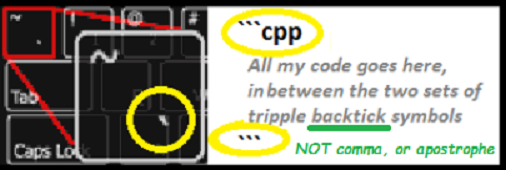
I don;t know how to share the code here.
You copy the code and paste it into your message. So that it displays correctly you have to add some special charterers at the top and bottom, like this:
Pete.
FYI, DHT11 doesn’t do negative values. But the DHT12 will, and higher resolution as well.
I also use a BME280 - I2C based Temperature, Humidity and Barometric sensor that is even better then the DHT12
Some of my code with that one is in this Topic - Weather Station with ESP32 (with OLED), Nextion & BME280 (and now Virtuino)
The code is given below:
  Download latest Blynk library here:
    https://github.com/blynkkk/blynk-library/releases/latest

  Blynk is a platform with iOS and Android apps to control
  Arduino, Raspberry Pi and the likes over the Internet.
  You can easily build graphic interfaces for all your
  projects by simply dragging and dropping widgets.

    Downloads, docs, tutorials: http://www.blynk.cc
    Sketch generator:           http://examples.blynk.cc
    Blynk community:            http://community.blynk.cc
    Follow us:                  http://www.fb.com/blynkapp
                                http://twitter.com/blynk_app

  Blynk library is licensed under MIT license
  This example code is in public domain.

 *************************************************************

  This example shows how value can be pushed from Arduino to
  the Blynk App.

  NOTE:
  BlynkTimer provides SimpleTimer functionality:
    http://playground.arduino.cc/Code/SimpleTimer

  App project setup:
    Value Display widget attached to Virtual Pin V5
 *************************************************************/

/* Comment this out to disable prints and save space */
#define BLYNK_PRINT Serial


#include <ESP8266WiFi.h>
#include <BlynkSimpleEsp8266.h>

// You should get Auth Token in the Blynk App.
// Go to the Project Settings (nut icon).
char auth[] = "XXXXX";

// Your WiFi credentials.
// Set password to "" for open networks.
char ssid[] = "XXX";
char pass[] = "XXX";

BlynkTimer timer;

// This function sends Arduino's up time every second to Virtual Pin (5).
// In the app, Widget's reading frequency should be set to PUSH. This means
// that you define how often to send data to Blynk App.
// Uncomment one of the lines below for whatever DHT sensor type you're using!

#define DHTTYPE, DHT11    // DHT 11
//#define DHTTYPE DHT21   // DHT 21 (AM2301)
//#define DHTTYPE DHT22   // DHT 22  (AM2302), AM2321


// Web Server on port 80
WiFiServer server(80);

// DHT Sensor
const int DHTPin = D1;

// Initialize DHT sensor.
DHT dht(DHTPIN, DHTTYPE);

// Temporary variables
static char celsiusTemp[7];
static char fahrenheitTemp[7];
static char humidityTemp[7];

// only runs once on boot
void setup() {
  // Initializing serial port for debugging purposes
  Serial.begin(115200);
  delay(10);

  dht.begin();

  // Connecting to WiFi network
  Serial.println();
  Serial.print("Connecting to ");
  Serial.println(ssid);


  while (WiFi.status() != WL_CONNECTED) {
    delay(500);
    Serial.print(".");
  }
  Serial.println("");
  Serial.println("WiFi connected");

  // Starting the web server
  server.begin();
  Serial.println("");
  delay(10000);

  // Printing the ESP IP address
  Serial.println(WiFi.localIP());
}

// runs over and over again
void loop() {
  // Listenning for new clients
  WiFiClient client = server.available();

  if (client) {
    Serial.println("New client");
    // bolean to locate when the http request ends
    boolean blank_line = true;
    while (client.connected()) {
      if (client.available()) {
        char c = client.read();

        if (c == '\n' && blank_line) {
            // Sensor readings may also be up to 2 seconds 'old' (its a very slow sensor)
            float h = dht.readHumidity();
            // Read temperature as Celsius (the default)
            float t = dht.readTemperature();
            // Read temperature as Fahrenheit (isFahrenheit = true)
            float f = dht.readTemperature(true);
            // Check if any reads failed and exit early (to try again).
            if (isnan(h) || isnan(t) || isnan(f)) {
              Serial.println("Failed to read from DHT sensor!");
              strcpy(celsiusTemp,"Failed");
              strcpy(fahrenheitTemp, "Failed");
              strcpy(humidityTemp, "Failed");
            }
            else{
              // Computes temperature values in Celsius + Fahrenheit and Humidity
              float hic = dht.computeHeatIndex(t, h, false);
              dtostrf(hic, 6, 2, celsiusTemp);
              float hif = dht.computeHeatIndex(f, h);
              dtostrf(hif, 6, 2, fahrenheitTemp);
              dtostrf(h, 6, 2, humidityTemp);
              // You can delete the following Serial.print's, it's just for debugging purposes
              Serial.print("Humidity: ");
              Serial.print(h);
              Serial.print(" %\t Temperature: ");
              Serial.print(t);
              Serial.print(" *C ");
              Serial.print(f);
              Serial.print(" *F\t Heat index: ");
              Serial.print(hic);
              Serial.print(" *C ");
              Serial.print(hif);
              Serial.print(" *F");
              Serial.print("Humidity: ");
              Serial.print(h);
              Serial.print(" %\t Temperature: ");
              Serial.print(t);
              Serial.print(" *C ");
              Serial.print(f);
              Serial.print(" *F\t Heat index: ");
              Serial.print(hic);
              Serial.print(" *C ");
              Serial.print(hif);
              Serial.println(" *F");
            }
            client.println("HTTP/1.1 200 OK");
            client.println("Content-Type: text/html");
            client.println("Connection: close");
            client.println();
            // your actual web page that displays temperature and humidity
            client.println("<!DOCTYPE HTML>");
            client.println("<html>");
            client.println("<head></head><body><h1>ESP8266 - Temperature and Humidity</h1><h3>Temperature in Celsius: ");
            client.println(celsiusTemp);
            client.println("*C</h3><h3>Temperature in Fahrenheit: ");
            client.println(fahrenheitTemp);
            client.println("*F</h3><h3>Humidity: ");
            client.println(humidityTemp);
            client.println("%</h3><h3>");
            client.println("</body></html>");
            break;
        }
        if (c == '\n') {
          // when starts reading a new line
          blank_line = true;
        }
        else if (c != '\r') {
          // when finds a character on the current line
          blank_line = false;
        }
      }
    }
    // closing the client connection
    delay(1);
    client.stop();
    Serial.println("Client disconnected.");
void myTimerEvent()
{
  // You can send any value at any time.
  // Please don't send more that 10 values per second.
  Blynk.virtualWrite(V5, millis() / 1000);
}

void setup()
{
  // Debug console
  Serial.begin(9600);

  Blynk.begin(auth, ssid, pass);
  // You can also specify server:
  //Blynk.begin(auth, ssid, pass, "blynk-cloud.com", 80);
  //Blynk.begin(auth, ssid, pass, IPAddress(192,168,1,100), 8080);

  // Setup a function to be called every second
  timer.setInterval(1000L, myTimerEvent);
}

void loop()
{
  Blynk.run();
  timer.run(); // Initiates BlynkTimer
}
DS18B20 is supposed to do Negative values.
Why do you have two void loops() ?? How does that even compile?
Yes, but just temp. You want Temp and Humidity, so a DHT12 or the BME280 (and probably a few others) offer both, and more, with proper scale and resolution.
The DHT11 is sooo out of date.
To print the Values repetitively on Blynk app.
I think you need to do some further reading about how Blynk works. Starting here…
And here is some code I use with both DHT11/12 and DS18B20 sensors
Hey Thanks a ton for your help. I will study the loop error that you are pointing at and will try to understand it. Can you please tell me a bit more about what wrong I did to this code? The code did ran on the Blynk app. I am just trying to learn, it would really help me. Thanks again.
Hi @Bashar
You’re suggesting the code you’ve included above compiles and runs? Could you include a copy of the output as written to your Serial port.
Joe
Sorry I am not sure what you mean. Do you mean that you want me to paste the end result? Done Compiling or upload complete??
I am having error pls help 
"C:\Users\Syedul Bashar\AppData\Local\Arduino15\packages\esp8266\tools\xtensa-lx106-elf-gcc\1.20.0-26-gb404fb9-2/bin/xtensa-lx106-elf-g++" -D__ets__ -DICACHE_FLASH -U__STRICT_ANSI__ "-IC:\Users\Syedul Bashar\AppData\Local\Arduino15\packages\esp8266\hardware\esp8266\2.4.2/tools/sdk/include" "-IC:\Users\Syedul Bashar\AppData\Local\Arduino15\packages\esp8266\hardware\esp8266\2.4.2/tools/sdk/lwip2/include" "-IC:\Users\Syedul Bashar\AppData\Local\Arduino15\packages\esp8266\hardware\esp8266\2.4.2/tools/sdk/libc/xtensa-lx106-elf/include" "-IC:\Users\SYEDUL~1\AppData\Local\Temp\arduino_build_140636/core" -c -w  -Os -g -mlongcalls -mtext-section-literals -fno-exceptions -fno-rtti -falign-functions=4 -std=c++11  -ffunction-sections -fdata-sections -w -x c++ -E -CC -DF_CPU=80000000L -DLWIP_OPEN_SRC -DTCP_MSS=536   -DARDUINO=10805 -DARDUINO_ESP8266_NODEMCU -DARDUINO_ARCH_ESP8266 -DARDUINO_BOARD="ESP8266_NODEMCU"   -DESP8266 "-IC:\Users\Syedul Bashar\AppData\Local\Arduino15\packages\esp8266\hardware\esp8266\2.4.2\cores\esp8266" "-IC:\Users\Syedul Bashar\AppData\Local\Arduino15\packages\esp8266\hardware\esp8266\2.4.2\variants\nodemcu" "-IC:\Users\Syedul Bashar\AppData\Local\Arduino15\packages\esp8266\hardware\esp8266\2.4.2\libraries\ESP8266WiFi\src" "-IM:\Arduino\libraries\Blynk\src" "-IM:\Arduino\libraries\DHT-sensor-library-master" "C:\Users\SYEDUL~1\AppData\Local\Temp\arduino_build_140636\sketch\DHT11___DS18B20.ino.cpp" -o "C:\Users\SYEDUL~1\AppData\Local\Temp\arduino_build_140636\preproc\ctags_target_for_gcc_minus_e.cpp"
M:\Arduino\Cold Storage\DHT11___DS18B20\DHT11___DS18B20.ino:27:21: fatal error: OneWire.h: No such file or directory

 #include <OneWire.h>

                     ^

compilation terminated.

Using library ESP8266WiFi at version 1.0 in folder: C:\Users\Syedul Bashar\AppData\Local\Arduino15\packages\esp8266\hardware\esp8266\2.4.2\libraries\ESP8266WiFi
Using library Blynk at version 0.6.1 in folder: M:\Arduino\libraries\Blynk
Using library DHT-sensor-library-master at version 1.3.4 in folder: M:\Arduino\libraries\DHT-sensor-library-master
exit status 1
Error compiling for board NodeMCU 1.0 (ESP-12E Module).
I now have no idea which code it is that you’re trying to compile, and whether you’ve fixed the issues with two void loops.
The compile error you’re getting above is because the compiler can’t find the OneWire library. As this is a core library 8n the basic Arduino IDE setup, I’m guessing that either you’ve messed-up your IDE installation, or the preferences setting that tell the IDE where to look are incorrect. I suspect the latter, as your sketch is on your M:\ drive and your IDE is on your C:\ drive.
You’re also giving conflicting information. You said that:
but clearly that’s not the case as you can’t get it to compile.
I’d suggest that you sort-out your Arduino IDE setup and get to the point here you can compile one of the Blynk sketch builder examples, then try again with your code.
If you want assistance with Blynk related problems then you should explain where you are in the process clearly, and include code and anything else that’s relevant - including output from your serial monitor when the sketch is running.
Pete.
Nevemind  I fixed it my bad some libraries were missing…
It’s done compiling 
DS18B20 is givng -127 as a value…HELP 