Part 4 – Climate Control
In this installment, I’ll talk about my heating and cooling controller. It will be MUCH higher level that the last installment, as the system is quite complex and extremely specific to our situation. Hopefully it might inspire others to look at similar projects of their own.
This is still work in progress to a certain extent. The basic climate control functionality works well and I’ve developed and tested some additional features, but in some cases I’ve yet to implement them fully.
As we only spend around 4 months of the year in Spain, it’s actually quite difficult to make much progress with the project. I tend to develop bits and pieces when I’m at home in the UK, but finding time to implement them when we’re in Spain can be a bit tricky. Also, you cant really test the heating functionality in the middle of summer and vice versa.
Overview
The system controls the heating and cooling devices in our living room of our holiday home in Spain.
The climate in our part of Spain is hot in summer and surprisingly cold in winter. Spanish homes are designed to stay cool, so keeping them warm can be a major issue in winter.
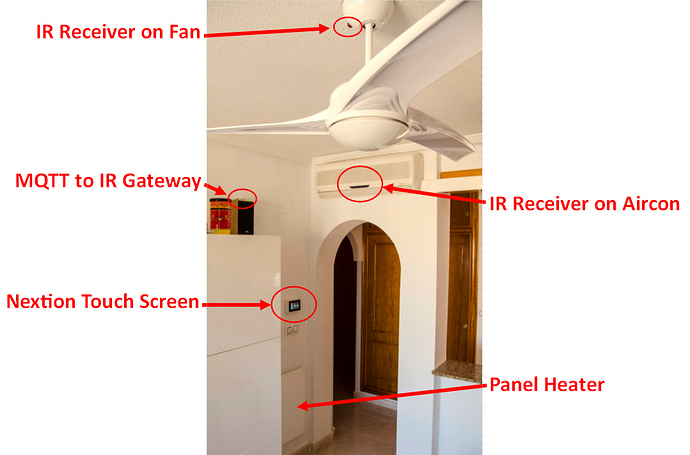
Heating - this is provided by an inverter air-conditioning unit and three wall-mounted 400w heating panels. There is also a built-in gas fire, but this can only be used manually. I’ve toyed with the idea of trying to add electronic controls to it, but it would be quite difficult and isn’t really something I want to do at this stage.
Cooling - this is also provided by the same inverter air-conditioning unit (in cooling mode of course) and a three-speed ceiling fan. I actually added a second ceiling fan last summer, but I don’t want to be able to control them independently, so for the purpose of the control system they are treated as one device.
Controlling the inverter aircon unit
The A/C is made by LG and it’s a few years old, so the only way to control it is via infrared commands. There is no feedback system to ensure that the command has been received and actioned, so at this stage it’s a ‘fire and forget’ system. I plan to add some current sensing circuitry into the mains supply to the aircon unit, which will tell me when it’s on or off, but that’s in the list of future enhancements. At the moment it works quite well, but I would like to be able to verify that an off command has been received and actioned.
I also want to be able to know that all the external doors and windows are closed when using the aircon unit, so that whatever hot or cold air is generated doesn’t go to waste. I’ve done a bit of development work with some 433MHz door/window switches and have a working system, but I’ve not implemented it yet. My plan is for this to be part of an intruder system as well, so sensing that the doors and windows are closed for the aircon system is really just a spin-off from that. The door/window switches will use my existing 433MHz to MQTT gateway that I’ve discussed in previous installments.
Controlling the ceiling fan(s)
These three speed fans also have infrared remote controls and that allows me to control them quite easily. The infrared control library that I use has built-in codes for the LG aircon, but for the ceiling fans it’s necessary to capture the raw signals from the remote control and use these raw codes to send the various commands (Off, Speed 1, Speed 2 and Speed 3) to the fans.
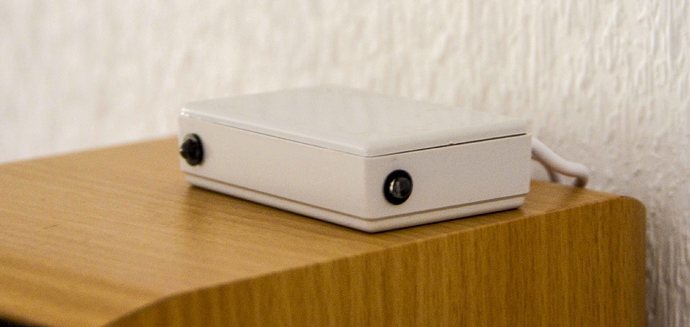
I created a small MQTT to Infrared gateway using a Wemos D1 Mini and a few infrared LEDs and this works quite nicely for controlling the aircon and fans.
Controlling the wall mounted heaters
The heaters are controlled using Sonoff S20 plug-in devices, or equivalent devices that I’ve hacked myself. See this topic for more info on the alterative devices:
I have two heaters on one wall and these both plug into the same Sonoff S20. The other heater has its own S20 , so there are two ‘zones’ of wall mounted heaters.
The heaters take a while to warm up, but they also stay warm for a while after they’ve been switched off, so they add a kind of artificial ‘thermal mass’ to the heating system. This helps to smooth-out the peaks and troughs that come from the inverter aircon.
Temperature sensing
My original plan was to use several temperature sensors in different locations within the room and to average-out the readings. At the moment I’m only using one sensor and this seems to work quite well, so I’ll probably stick with this setup.
The sensor is a BME280, attached to a Wemos D1 Mini. The Wemos is actually the same one that acts as the MQTT to Infrared gateway. The sensor is housed in a perforated case that’s around 2m away from the Wemos and connected by a length of 4-core wire, so that I can position it where I want it and it’s not affected by the heat from the Wemos or other electrical items in the vicinity.
The aircon unit has its own internal thermometer/thermostat function and I could rely on this to control the temperature by sending the correct IR command to set the desired temperature. In reality, using that approach didn’t really give consistent results and it was difficult to get the control of the wall heaters and the aircon unit synchronised. In the end I changed my approach and now send an IR command to set the aircon target temperature to maximum, then when the room is at the correct temperature send a command to set the target temperature to minimum (and vice versa in summer of course). This works much better, as differences in temperature sensing between the BME280 and the aircon thermostat are now irrelevant. It also simplifies the range of commands that need to be sent to the aircon unit. Using this approach has the disadvantage that if the IR command to stop the aircon unit isn’t received then it will continue to run at maximum – hence why I’d like be able to sense the current consumption and know that it’s not running at full blast when the system thinks it’s idle.
With any heating/cooling system it’s important to write the control code in a way that builds some hysteresis into the system. This stops the heating/cooling devices constantly switching on and off when the room temperature fluctuates by a tiny amount around the target temperature. Think of this as building-in some tolerance that de-sensitises the thermostat function. By trial and error I’ve found that in heating mode a 0.3 degree Celsius tolerance (+/- 0.15 degrees) works well.
This means that if the target temperature is 24 degrees, the heating won’t kick-in until the room temperature drops to 23.85 degrees and when it does kick-in, it will continue to run until the room temperature is 24.15 degrees. This seems like a very narrow tolerance, and I started with a much wider range, but trial and error has shown that this works well with my particular combination of heaters and temperature sensors (and my personal internal thermostat of course).
In cooling mode, it seems that the tolerance can be wider whilst still maintaining personal comfort, but at the moment I’m using the same tolerance values for both modes.
User Interfaces
I use three different methods of interfacing with the system to turn it on/off, set the target temperature, get the current temperature and control which mode (heating or cooling) is used.
These are a Nextion touch screen, several Amazon Alexa devices, and of course the Blynk app. These are used in different ways, to make the most of their individual strengths…
Nextion touch screen
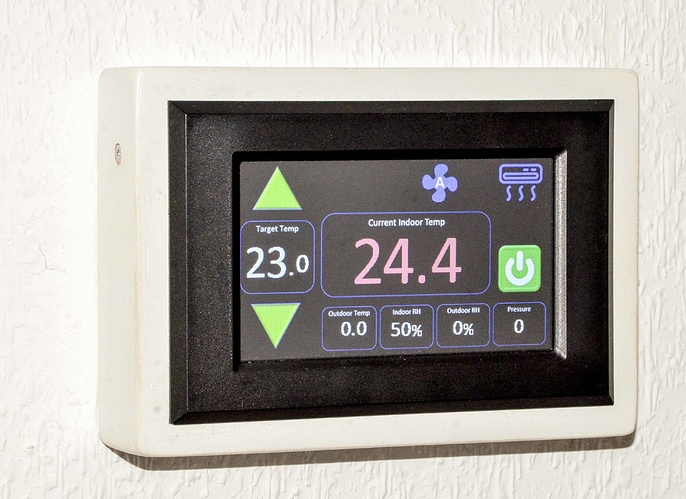
This is a 4.3” device and it’s mounted on the wall in a convenient spot in the living room. It’s used as the primary controller for the climate control system and also as a way of displaying other information such as internal humidity (from the same BME280 that is used to sense the temperature in the living room), external temperature and humidity, and other data about the weather outside. I’ve built a weather station that can provide this data, but it’s not yet mounted outside in a permanent way, so this still falls into the ‘work in progress’ category. Hopefully there will be more on this in a future installment.
Amazon Alexa
The Alexa plugin for Node-Red that I’m using has the ability to set values for devices, as demonstrated in the previous installment. It also gives the ability to query values from devices.
Using this functionality, it’s possible to lie in bed and say “Alexa, what’s the living room temperature” and get a reply something like “The living room temperature is 17 degrees”. You can then say “Alexa, turn the living room heating on” and “Alexa, set the living room temperature to 22 degrees”, followed by “Alexa, set an alarm for 20 minutes” so that I can snooze for a while and be woken up when it’s safe to venture out of bed.
Blynk App
It’s obviously possible to use the app to check the internal and external temperatures, turn the heating on and off, set the target temperature etc. In practice, I don’t really use the app for this, unless I’m out of the house. For me, this is where Blynk really comes into its own. It allows the heating or cooling to be turned-on before you get home, so that you arrive home to a comfortable temperature.
It’s also handy in summer, when we’re eating outside in the evening. In this situation the humidity often creeps-up in the evening and it starts to feel quite sticky; and it tends to feel hotter inside than outside. It’s nice to put the aircon on for 20 minutes or so before going back indoors, and the Blynk app is great for that.
I initially took the approach of replicating the Nextion touch screen in the app. This didn’t really work that well, and I’ve since decided that I don’t really need the same level of detail in the app, and that it would make more sense to design the app to do the job it’s intended for and making the best use of the available widgets, rather than trying to mimic the Nextion display.
I’ve currently disabled remote access to my Node-Red server in Spain, as there is a security issue which allows unauthorised access in certain circumstances. This means that I can’t currently update my Node-Red flows in Spain, which is needed before I can change my Blynk app functionality, so that’s something else that will need to wait until I’m in Spain again.
System Architecture
The majority of the processing work is done by a Wemos D1 mini that is connected to the Nextion touch screen. This handles the user input from the touch screen, and also handles the writing of updated info to the touch screen.
The temperature/humidity sensor publishes an MQTT message every 5 seconds with the current readings. These are picked-up by the Wemos attached to the touch screen and used to calculate what actions to take - depending on what mode we’re in (heating/cooling/off), the target temperature that’s set, and the temperature reading from the sensor.
If the heating/cooling devices need to be switched on/off then an MQTT message is sent to the appropriate device (Infra-Red bridge or Sonoff S20s).
If the Nextion controller was the only user input device then no other processing would be needed, but as I want both Blynk and Amazon Alexa to also be able to turn the heating/cooling on and off, and to set the target temperature, Node-Red is used to interface with these devices. The general principal is similar to what I described in earlier installments, ensuring that Blynk and (in this case) the Nextion controller are synchronised via MQTT messages when a value is changed.
Node-Red will also be used to handle info about whether doors and/or windows are open. This will come from the 433MHz to MQTT bridge and I’ll use some sort of flag to only allow the heating/cooling to be activated if the doors/windows are closed – with some sort of override if I think that it’s something that I want to ignore. I’ll also want to ensure that the heating/cooling doesn’t go off every time someone walks through a door, so I’ll have a time delay on the doors.
The Nextion display will probably be the main controller for the intruder alarm when I get around to implementing that, with Node-Red doing the majority of the processing work. There will be some 433MHz PIR detectors and 433MHz panic alarms as well (probably ![]() ;).
;).
That’s all I have to share on the subject of Climate Control at the moment, I’ll try to update this post with screenshots of my updated Blynk app layout and Node-Red flow when I have something that’s worth sharing.
I’m keeping this thread locked so that it’s easier to read.
If you have any comments, questions etc then please use the following thread:
Pete.


