How To Install Using Arduino Library Manager
This library is a Light Weight Credentials / WiFi Manager for ESP8266 AT shields, specially designed to support AVR Mega, Teensy, SAM DUE, SAMD, STM32, etc. boards running ESP8266 AT-command shields, with smaller memory (64+K bytes)
You can also specify static AP and STA IP. Use much less memory compared to full-fledge WiFiManager. Credentials are saved in EEPROM, FlashStorage or DueFlashStorage.
You can use this library when your boards have more than 32K bytes of memory, for example Mega 1280/2560, SAM DUE, BluePill/BlackPill F103C8 (64+K Bytes).
The web configuration portal, served from the ESP8266 AT-command shields is operating as an access point (AP) with configurable static IP address or use default IP Address of 192.168.4.1
Sample Code
/* Comment this out to disable prints and save space */
#define ESP_AT_DEBUG_OUTPUT Serial

#define ESP_AT_DEBUG    true

#if !( defined(ARDUINO_AVR_MEGA) || defined(ARDUINO_AVR_MEGA2560) )
#error This code is intended to run only on the Arduino Mega 1280/2560 boards ! Please check your Tools->Board setting.
#endif

// For Mega, use Serial1 or Serial3
#define EspSerial Serial3

#if defined(ARDUINO_AVR_MEGA2560)
#define BOARD_TYPE      "AVR Mega2560"
#else
#define BOARD_TYPE      "AVR Mega"
#endif

// Start location in EEPROM to store config data. Default 0
// Config data Size currently is 128 bytes)
#define EEPROM_START      (64)

#include <Esp8266_AT_WM_Lite.h>

// Your Mega <-> ESP8266 baud rate:
#define ESP8266_BAUD 115200

void heartBeatPrint(void)
{
  static int num = 1;

  if (WiFi.status() == WL_CONNECTED)
    Serial.print("H");        // H means connected to WiFi
  else
    Serial.print("F");        // F means not connected to WiFi

  if (num == 80)
  {
    Serial.println();
    num = 1;
  }
  else if (num++ % 10 == 0)
  {
    Serial.print(" ");
  }
}

void check_status()
{
  static unsigned long checkstatus_timeout = 0;

  //KH
  #define HEARTBEAT_INTERVAL    10000L
  // Print hearbeat every HEARTBEAT_INTERVAL (10) seconds.
  if ((millis() > checkstatus_timeout) || (checkstatus_timeout == 0))
  {
    heartBeatPrint();
    checkstatus_timeout = millis() + HEARTBEAT_INTERVAL;
  }
}

ESP_AT_WiFiManager_Lite* ESP_AT_WiFiManager;

void setup()
{
  // Debug console
  Serial.begin(115200);
  delay(1000);

  Serial.println("\nStart Mega_ESP8266Shield on " + String(BOARD_TYPE));

  // initialize serial for ESP module
  EspSerial.begin(115200);

  ESP_AT_WiFiManager = new ESP_AT_WiFiManager_Lite(&EspSerial, ESP8266_BAUD);

  // Optional to change default AP IP(192.168.4.1) and channel(10)
  //ESP_AT_WiFiManager->setConfigPortalIP(IPAddress(192, 168, 120, 1));
  //ESP_AT_WiFiManager->setConfigPortalChannel(1);

  ESP_AT_WiFiManager->begin();
}

void loop()
{
  ESP_AT_WiFiManager->run();
  check_status();
}
This is the terminal output when running Teensy_ESP8266Shield example on Teensy 4.0
- Open Config Portal
Start Teensy_ESP8266Shield on TEENSY 4.0
*AT: CCsum=5543,RCsum=1127042391
*AT: Init EEPROM sz=1080
*AT: Open Portal
*AT: SSID=ESP_AT_CCE61, PW=MyESP_AT_CCE61
*AT: IP=192.168.4.1, CH=10
FFF- Got valid Credential from Config Portal, then connected to WiFi
Start Teensy_ESP8266Shield on TEENSY 4.0
*AT: CCsum=2271,RCsum=2271
*AT: Hdr=SHD_ESP8266, SSID=HueNet1, PW=****
*AT: con2WF:start
*AT: con2WF:spent millis=0
*AT: Con2 HueNet1
*AT: IP=192.168.2.82
*AT: WiFi OK
*AT: con2WF:OK
*AT: IP=192.168.2.82
*AT: WiFi OK
HHHHHHHHHH HHHHHHHHHH HHHHHHHHHH HHHHHHHHHH HHHHHHHHHH HHHHHHHHHH HHHHHHHHHH HHHHHHHHHH
HHHHHHHHHH HHHHHHHHHH HHHHHHHHHH HHHHHHHHHH HHHHHHHHHH HHHHHHHHHH HHHHHHHHHH HHHHHHHHHH
And the Config Portal screens:
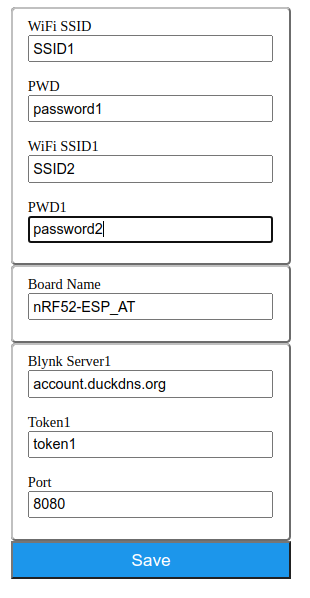
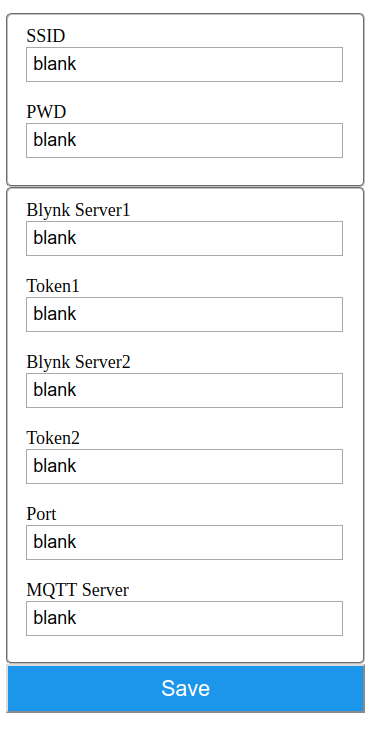
1.Main Screen
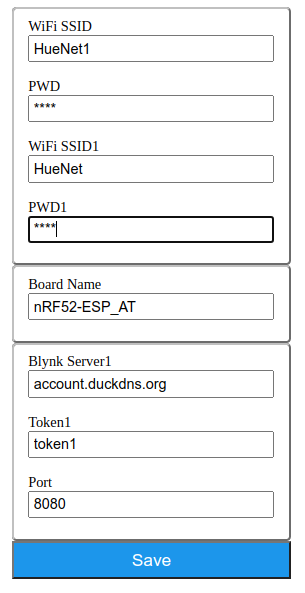
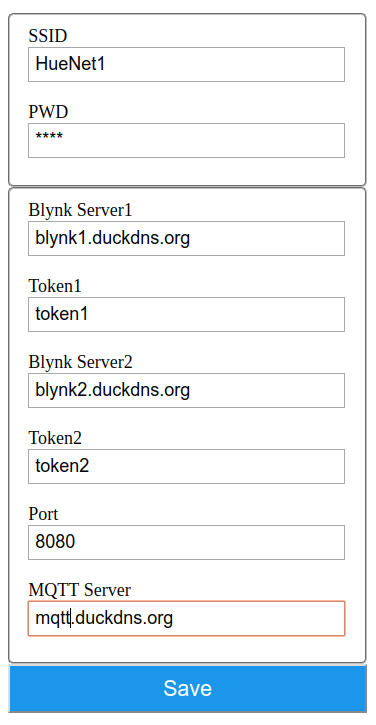
- Input Credentials:
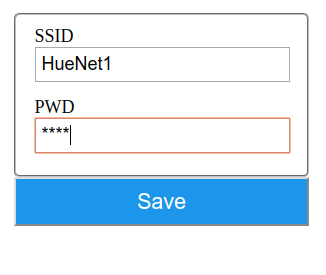
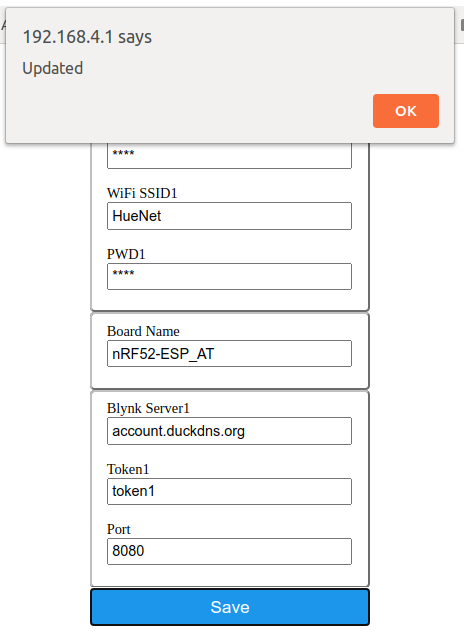
- After pressing Save button

Updated: Mar 20th 2020
ESP_AT_WM_Lite library v1.0.0 just got included into Arduino Library Manager.
Now you can install this library directly from Arduino Library Manager ![]()

Updated: Mar 22nd 2020
New in v1.0.1
- New powerful-yet-simple-to-use feature to enable adding dynamic custom parameters from sketch and input using the same Config Portal. Config Portal will be auto-adjusted to match the number of dynamic parameters.
- Dynamic custom parameters to be saved automatically in EEPROM, SAMD EEPROM-emulated FlashStorage or SAM DUE DueFlashStorage.
If you have used the full-fledge WiFiManager such as :
and have to write complicated callback functions to save custom parameters in SPIFFS, you’d appreciate the simplicity of this Light-Weight Credentials / WiFiManager
How It Works
- The Teensy40_ESP8266Shield example shows how it works and should be used as the basis for a sketch that uses this library.
- The concept of Teensy40_ESP8266Shield is that a new
ESP8266 AT shieldwill start a WiFi configuration portal when powered up, but has no valid stored Credentials. - There are 6 more custom parameters added in the sketch which you can use in your program later. In the example, they are: 2 sets of Blynk Servers and Tokens, Blynk Port and MQTT Server.
- Using any WiFi enabled device with a browser (computer, phone, tablet) connect to the newly created AP and type in the configurable AP IP address (default 192.168.4.1). The Config Portal AP channel (default 10) is also configurable to avoid conflict with other APs.
- The Config Portal is auto-adjusted to fix the 2 static parameters (WiFi SSID/PWD) as well as 6 more dynamic custom parameters.
- After the custom data entered, and
Savebutton pressed, the configuration data will be saved in host’s non-volatile memory, then the board reboots. - If there is valid stored Credentials, it’ll go directly to connect to WiFi without starting / using the Config Portal.
-
ESP8266 AT shieldwill try to connect. If successful, the dynamic DHCP or configured static IP address will be displayed in the configuration portal. - The
ESP8266 AT shieldWiFi Config Portal network and Web Server will shutdown to return control to the sketch code.
So, how it works?
In Configuration Portal Mode, it starts an AP called ESP_AT_XXXXXX. Connect to it using the configurable password you can define in the code. For example, MyESP_AT_XXXXXX (see examples):
// SSID and PW for Config Portal
String ssid = "ESP_AT_" + String(0x1ABCDEF, HEX);
const char* password = "ESP_AT_PW";
After you connected, please, go to http://192.168.4.1 or newly configured AP IP, you’ll see this Main page:
Enter your credentials,
then click Save.

The WiFi and Custom Credentials will be saved and the board connect to the selected WiFi AP.
If you’re already connected to a listed WiFi AP and don’t want to change anything, just select Exit from the Main page to reboot the board and connect to the previously-stored AP. The WiFi Credentials are still intact.