Hello everyone, I have a problem that bothers me now. I am blocked and I don’t even know why. It’s the most basic thing and it’s bothering me because it’s so basic that it should work but it doesn’t.
I looked at all the other topics to see if I could find an answer. I didn’t find anything.
My problem is simple. I can’t connect my esp8266 to blynk. Simply put. So I use either a NodeMCU or a Wemos D1 Mini (I bought both to test both) and I can’t connect with either one.
I have looked at all the existing tutorials. I have installed all the existing libraries. I don’t know what to do anymore. I want to connect in wifi to the blynk app.
I share with you my code, which is simply the example of the blynk library
/* Comment this out to disable prints and save space */
#define BLYNK_PRINT Serial

/* Fill-in your Template ID (only if using Blynk.Cloud) */
//#define BLYNK_TEMPLATE_ID "YourTemplateID"


#include <ESP8266WiFi.h>
#include <BlynkSimpleEsp8266.h>

// You should get Auth Token in the Blynk App.
// Go to the Project Settings (nut icon).
char auth[] = "YourAuthToken";

// Your WiFi credentials.
// Set password to "" for open networks.
char ssid[] = "YourNetworkName";
char pass[] = "YourPassword";

void setup()
{
  // Debug console
  Serial.begin(9600);

  Blynk.begin(auth, ssid, pass);
  // You can also specify server:
  //Blynk.begin(auth, ssid, pass, "blynk-cloud.com", 80);
  //Blynk.begin(auth, ssid, pass, IPAddress(192,168,1,100), 8080);
}

void loop()
{
  Blynk.run();
}
I have no output in the serial monitor. The module does not connect to my local network. However the password and ssid are correct.
Are you using Blynk Legacy, or Blynk IoT ?
(If you don’t know the difference, then tell us what Blynk app version number you are using - this is why we ask you to provide this information when you create the topic).
What baud rate do you have your serial monitor set to?
Does your sketch upload correctly via the serial cable you’re using to view the serial output?
Pete.
First of all thank you for your answer. Then I tried it with the 2 apps. The one I am using is Blynk IoT.
For the baud, the serial monitor is set to 9600 too.
And yes, the code seleverse comes on the esp. (And the ESP works with a normal arduino program with leds)
I wonder if my internet box is the cause of the problem but how do I know?
The code you posted won’t work with Blynk IoT, as it doesn’t have a BLYNK_TEMPLATE_ID and BLYNK_DEVICE_NAME at the top of the code.
What does this mean?
Pete.
I mean “upload”
Yes but when I add them it doesn’t change anything… it still doesn’t work
/* Comment this out to disable prints and save space */
#define BLYNK_PRINT Serial

/* Fill-in your Template ID (only if using Blynk.Cloud) */
#define BLYNK_TEMPLATE_ID "TMPLZ9KeTtQI"
#define BLYNK_DEVICE_NAME "Volets"
#define BLYNK_AUTH_TOKEN "gX7OVdP8cNcG_IIcpDoD1yu-lwPsqlBK"

#include <ESP8266WiFi.h>
#include <BlynkSimpleEsp8266.h>

// You should get Auth Token in the Blynk App.
// Go to the Project Settings (nut icon).
char auth[] = "gX7OVdP8cNcG_IIcpDoD1yu-lwPsqlBK";

// Your WiFi credentials.
// Set password to "" for open networks.
char ssid[] = "xxxxxxxxxxx";
char pass[] = "xxxxxxxxxxx";

void setup()
{
  // Debug console
  Serial.begin(9600);

  Blynk.begin(auth, ssid, pass);
  // You can also specify server:
  //Blynk.begin(auth, ssid, pass, "blynk-cloud.com", 80);
  //Blynk.begin(auth, ssid, pass, IPAddress(192,168,1,100), 8080);
}

void loop()
{
  Blynk.run();
}
You need to sort-out your serial monitor issue, so that you can see the debug messages from Blynk. This will tell you why the connection is failing.
I’d start by rebooting your computer, making sure that you only have one device plugged-in that’s creating a serial port, checking your device manager (if you’re using windows) to ensure which port is being used and that it’s recognising your device correctly, and maybe swapping USB cables.
Ensure that there’s nothing connected to your board, except the USB cable.
Also, if you change your sketch to use 74880 as your baud rate, and choose the same baud rate in your serial monitor, then you should see boot messages from the board when you press the RST button.
When you upload your sketch, does the process end with a “hard resetting…” message?
Pete.
my serial monitor is working. I can talk to it, with another program. I have it in my device manager too. On this side, no problem. I just have the impression that it can’t connect to my local network.
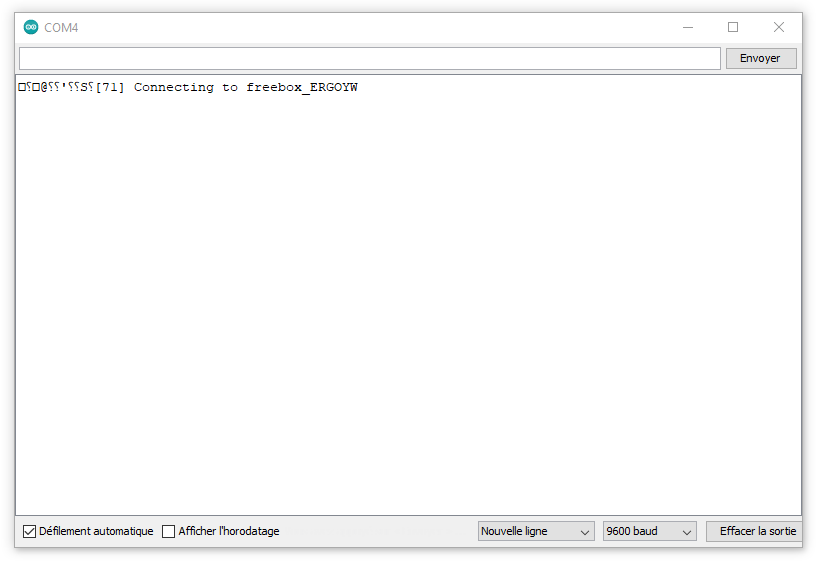
This is what I get in the monitor when I press RST.
Yes the process ends with “hard resetting via RTS pin…”
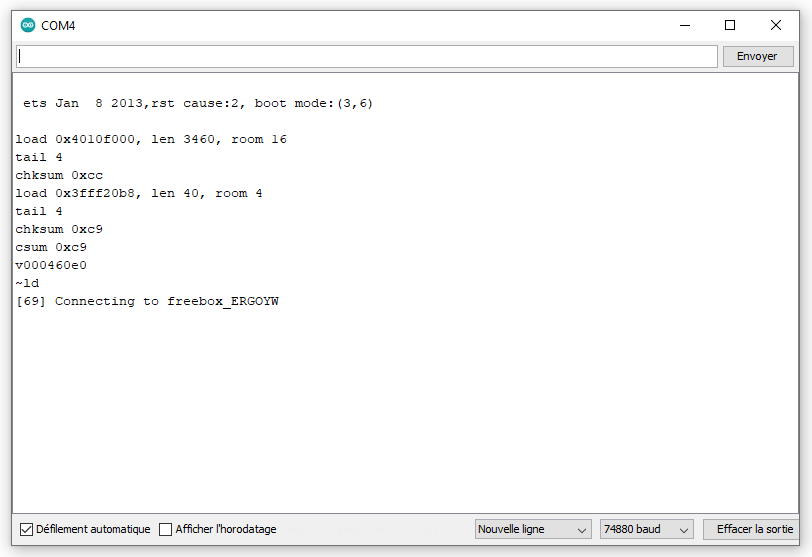
Here is what I get with 74880 bauds
Okay, that “Connecting to freebox…” message tells us that your board is failing to connect to your WiFi.
You could start by rebooting your WiFi and any access points/repeaters that you have connected to it.
Is this a 2.4GHz or 5GHz WiFi network that you’re trying to connect to?
Are you 100% sure that the SSID and password are correct (both are case sensitive)?
Pete.
I have a Freebox too.
Be sure you are not trying to connect to 5 GHz.
ok I’ll reboot my wifi and see… for wifi I don’t know if it’s 2.4GHz or 5GHz. What is the difference?
Then yes, the SSID and password are correct, I have checked them several times
ok so the frequency is the problem?
Maybe you have the same SSID for 2.4 and 5 GHz?
You can easily desactivate the 5 GHz band in Freebox parameters or change SSID name.
Esp8266 works only at 2.4
oh ok very good. I don’t know yet, I’ll look in the settings to know
You can download Freebox app on playstore.
You will access all informations and parameters.
Yes but I have the freebox v5…besides it works only in 2.4 GHz
So my freebox is still not working. I just tried with my smartphone in connection sharing and it just worked. But now I have an error message that the token is invalid even though I did a copy and paste
1 Like
What exactly do you see in the serial monitor?
Please copy the text from the serial monitor and paste here with triple backticks at the beginning and end - in the same way as when you post code.
Please don’t post screenshots.
Pete.
1 Like