How to combine my sketch with wifi manager?

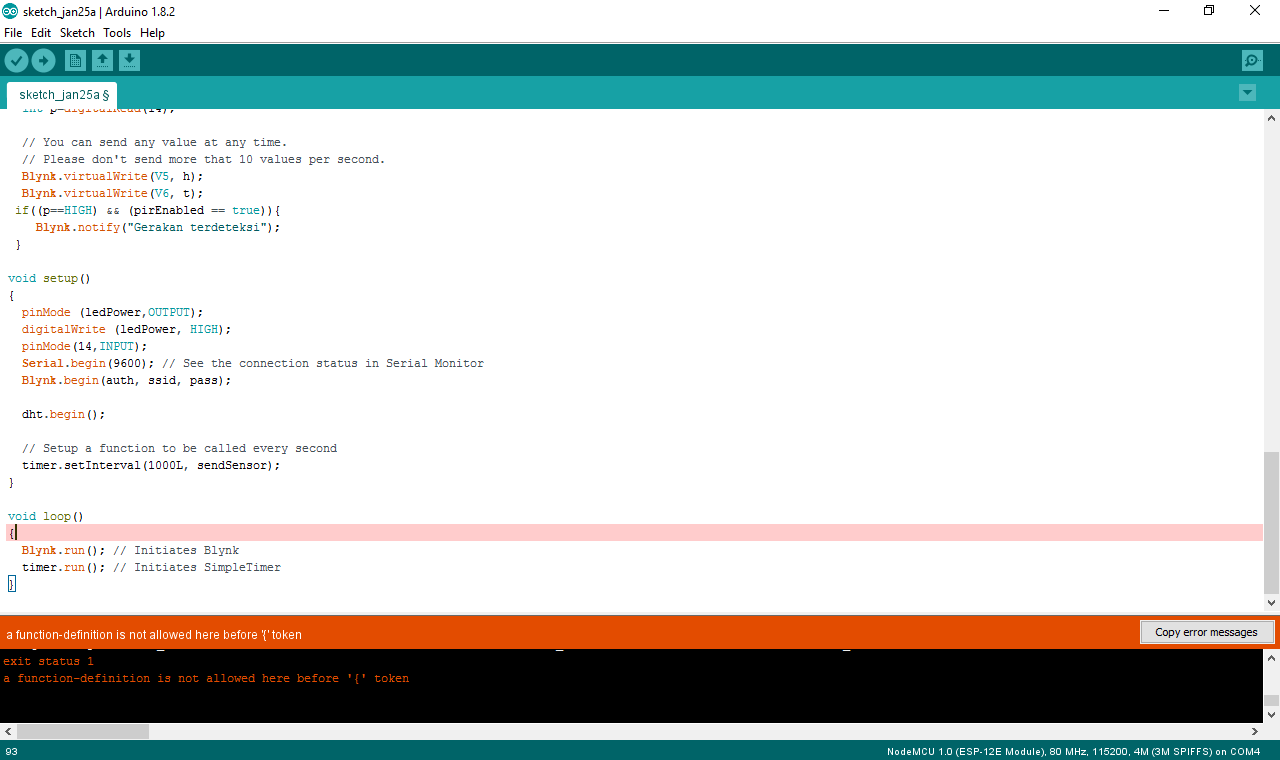
How to combine sketches with wifi manager? I have seen this forum but it does not represent my question … the result I made failed so the dht and pir sensors are not running…only relay control is running…thanks for advice

my sketch


#define BLYNK_PRINT Serial    // Comment this out to disable prints and save space
#include <SPI.h>
#include <ESP8266WiFi.h>
#include <BlynkSimpleEsp8266.h>
#include <SimpleTimer.h>
#include <DHT.h>

// You should get Auth Token in the Blynk App.
// Go to the Project Settings (nut icon).
char auth[] = "xxx";

// Your WiFi credentials.
// Set password to "" for open networks.
char ssid[] = "PULPSTONE";
char pass[] = "internet";
BLYNK_WRITE(V1){
  int control4DigitalPins = param.asInt();
  if(control4DigitalPins == 1){
    digitalWrite(D2, HIGH);
    digitalWrite(D3, HIGH);
    digitalWrite(D7, HIGH);
    digitalWrite(D8, HIGH);
  }
  else{
    digitalWrite(D2, LOW);
    digitalWrite(D3, LOW);
    digitalWrite(D7, LOW);
    digitalWrite(D8, LOW);
  }
}

#define DHTPIN 2          // What digital pin we're connected to
#define ledPower 16

// Uncomment whatever type you're using!
#define DHTTYPE DHT11     // DHT 11
//#define DHTTYPE DHT22   // DHT 22, AM2302, AM2321
//#define DHTTYPE DHT21   // DHT 21, AM2301

DHT dht(DHTPIN, DHTTYPE);
SimpleTimer timer;

// This function sends Arduino's up time every second to Virtual Pin (5).
// In the app, Widget's reading frequency should be set to PUSH. This means
// that you define how often to send data to Blynk App.
void sendSensor()
{
  float h = dht.readHumidity();
  float t = dht.readTemperature(); // or dht.readTemperature(true) for Fahrenheit

  if (isnan(h) || isnan(t)) {
    Serial.println("Failed to read from DHT sensor!");
    return;
  }
  int p=digitalRead(14);
   
  // You can send any value at any time.
  // Please don't send more that 10 values per second.
  Blynk.virtualWrite(V5, h);
  Blynk.virtualWrite(V6, t);
 if(p==HIGH)
 Blynk.notify("Gerakan terdeteksi");
}

void setup()
{
  pinMode (ledPower,OUTPUT);
  digitalWrite (ledPower, HIGH);
  pinMode(14,INPUT);
  Serial.begin(9600); // See the connection status in Serial Monitor
  Blynk.begin(auth, ssid, pass);

  dht.begin();

  // Setup a function to be called every second
  timer.setInterval(1000L, sendSensor);
}

void loop()
{
  Blynk.run(); // Initiates Blynk
  timer.run(); // Initiates SimpleTimer
}

sketch 2 (Wifi Manager)


#include <FS.h>                   //this needs to be first, or it all crashes and burns...
//#define BLYNK_DEBUG           // Comment this out to disable debug and save space
#define BLYNK_PRINT Serial    // Comment this out to disable prints and save space
#include <ESP8266WiFi.h>
#include <DNSServer.h>
#include <ESP8266WebServer.h>
#include <WiFiManager.h>          //https://github.com/tzapu/WiFiManager

//for LED status
#include <Ticker.h>
Ticker ticker;

#include <ArduinoJson.h>          //https://github.com/bblanchon/ArduinoJson

char blynk_token[34] = "BLYNK_TOKEN";

bool shouldSaveConfig = false; //flag for saving data

#include <BlynkSimpleEsp8266.h>
#include <SimpleTimer.h>
SimpleTimer timer;

void tick()
{
  //toggle state
  int state = digitalRead(BUILTIN_LED);  // get the current state of GPIO1 pin
  digitalWrite(BUILTIN_LED, !state);     // set pin to the opposite state
}

void saveConfigCallback () {  //callback notifying us of the need to save config
  Serial.println("Should save config");
  shouldSaveConfig = true;
  ticker.attach(0.2, tick);  // led toggle faster
}

void setup()
{

  Serial.begin(115200);
  Serial.println();

  //set led pin as output
  pinMode(BUILTIN_LED, OUTPUT);
  // start ticker with 0.5 because we start in AP mode and try to connect
  ticker.attach(0.6, tick);

  //SPIFFS.format();    //clean FS, for testing
  Serial.println("Mounting FS...");    //read configuration from FS json

  if (SPIFFS.begin()) {
    Serial.println("Mounted file system");
    if (SPIFFS.exists("/config.json")) {
      //file exists, reading and loading
      Serial.println("Reading config file");
      File configFile = SPIFFS.open("/config.json", "r");
      if (configFile) {
        Serial.println("Opened config file");
        size_t size = configFile.size();
        // Allocate a buffer to store contents of the file.
        std::unique_ptr<char[]> buf(new char[size]);

        configFile.readBytes(buf.get(), size);
        DynamicJsonBuffer jsonBuffer;
        JsonObject& json = jsonBuffer.parseObject(buf.get());
        json.printTo(Serial);
        if (json.success()) {
          Serial.println("\nparsed json");

          strcpy(blynk_token, json["blynk_token"]);

        } else {
          Serial.println("Failed to load json config");
        }
      }
    }
  } else {
    Serial.println("Failed to mount FS");
  }
  //end read

  // The extra parameters to be configured (can be either global or just in the setup)
  // After connecting, parameter.getValue() will get you the configured value
  // id/name placeholder/prompt default length
  WiFiManagerParameter custom_blynk_token("blynk", "blynk token", blynk_token, 33);   // was 32 length
  
  Serial.println(blynk_token);

  //WiFiManager
  //Local intialization. Once its business is done, there is no need to keep it around
  WiFiManager wifiManager;

  wifiManager.setSaveConfigCallback(saveConfigCallback);   //set config save notify callback

  //set static ip
  // this is for connecting to Office router not GargoyleTest but it can be changed in AP mode at 192.168.4.1
  //wifiManager.setSTAStaticIPConfig(IPAddress(192,168,10,111), IPAddress(192,168,10,90), IPAddress(255,255,255,0));
  
  wifiManager.addParameter(&custom_blynk_token);   //add all your parameters here

  //wifiManager.resetSettings();  //reset settings - for testing

  //set minimu quality of signal so it ignores AP's under that quality
  //defaults to 8%
  //wifiManager.setMinimumSignalQuality();
  
  //sets timeout until configuration portal gets turned off
  //useful to make it all retry or go to sleep, in seconds
  wifiManager.setTimeout(600);   // 10 minutes to enter data and then Wemos resets to try again.

  //fetches ssid and pass and tries to connect, if it does not connect it starts an access point with the specified name
  //and goes into a blocking loop awaiting configuration
  if (!wifiManager.autoConnect("CentralHeatingAP", "MY123PWD")) {
    Serial.println("Failed to connect and hit timeout");
    delay(3000);
    //reset and try again, or maybe put it to deep sleep
    ESP.reset();
    delay(5000);
  }
  Serial.println("Connected Central Heating System :)");   //if you get here you have connected to the WiFi
  ticker.detach();
  //turn LED off
  digitalWrite(BUILTIN_LED, HIGH);

  strcpy(blynk_token, custom_blynk_token.getValue());    //read updated parameters

  if (shouldSaveConfig) {      //save the custom parameters to FS
    Serial.println("saving config");
    DynamicJsonBuffer jsonBuffer;
    JsonObject& json = jsonBuffer.createObject();
    json["blynk_token"] = blynk_token;

    File configFile = SPIFFS.open("/config.json", "w");
    if (!configFile) {
      Serial.println("Failed to open config file for writing");
    }

    json.printTo(Serial);
    json.printTo(configFile);
    configFile.close();
    //end save
  }

  Serial.println("local ip");
  Serial.println(WiFi.localIP());
  
  Blynk.config(blynk_token);
  Blynk.connect();

}

  void loop()
{
  Blynk.run(); // Initiates Blynk
  timer.run(); // Initiates SimpleTimer  
}

There is no easy answer, or one way to merge any two, or more, sketches… it all comes down to how well you can analyse what you have, picture what you want and juggle the pieces until they fit… programming 101 :stuck_out_tongue_winking_eye:

For anyone here to actually answer your question, they would probably have to do all the work themselves to be sure it worked… and that may not happen unless someone is really bored :slight_smile: And the end result wouldn’t help you learn anything :wink:

So my suggestion is to break each sketch down into parts that are the same in both, and put that into a 3rd sketch (possibly with it’s own App project), then break down any seperate functions/timers, etc. from the initial sketches and copy them over one at a time to your final sketch… testing as you go!

This is your code

#define BLYNK_PRINT Serial    // Comment this out to disable prints and save space
#include <SPI.h>
#include <ESP8266WiFi.h>
#include <BlynkSimpleEsp8266.h>
#include <SimpleTimer.h>
#include <DHT.h>

#include <ESP8266WebServer.h>
#include <DNSServer.h>
#include <WiFiManager.h>

#include <Ticker.h>
Ticker ticker;


char auth[] = "xxx";       // You should get Auth Token in the Blynk App.


#define DHTPIN 4          // DHT                          ( Pin D2 )
#define DHTTYPE DHT11     // DHT 11
#define ledPower 16       // LED Power                    ( Pin D0 )

#define TRIGGER_PIN 0     // Button     Reset Network     ( Pin D3 )
#define LED_PIN 2         // LED        connection status ( Pin D4 )

DHT dht(DHTPIN, DHTTYPE);
SimpleTimer timer;


void tick()
{
  int state = digitalRead(LED_PIN);
  digitalWrite(LED_PIN, !state);
}
void configModeCallback (WiFiManager *myWiFiManager) {
  ticker.attach(0.2, tick);
}


void setup()
{
  Serial.begin(9600); 

  pinMode (ledPower,OUTPUT);
  digitalWrite (ledPower, HIGH);
  pinMode(14,INPUT);
  
  pinMode(TRIGGER_PIN, INPUT);
  pinMode(LED_PIN, OUTPUT);
  
  WiFiManager wifiManager;
  ticker.attach(0.6, tick);
  wifiManager.setAPCallback(configModeCallback);
  if (!wifiManager.autoConnect("Ap Name")) {                          //    your ap name
    ESP.reset();
    delay(1000);
  }
ticker.detach();
digitalWrite(LED_PIN, HIGH);


Blynk.config(auth);


  dht.begin();
  timer.setInterval(1000L, sendSensor);


}

void loop()
{

  Blynk.run(); 
  timer.run();
  
  int count = 0;
  Blynk.run();


// Reset the network
  while(digitalRead(TRIGGER_PIN) == LOW) {
    delay(100);
    count++;
    if(count > 30) {
      //ESP.eraseConfig();
      WiFi.disconnect();
      digitalWrite(LED_PIN, LOW);
      delay(1000);
      count = 0;
      digitalWrite(LED_PIN, HIGH);
      delay(100);
      ESP.reset();
      delay(1000);
    }
  }
}


BLYNK_WRITE(V1){
  int control4DigitalPins = param.asInt();
  if(control4DigitalPins == 1){

    
//    digitalWrite(D2, HIGH);                     change this
//    digitalWrite(D3, HIGH);                     change this
    digitalWrite(D7, HIGH);
    digitalWrite(D8, HIGH);
  }
  else{
//    digitalWrite(D2, LOW);                      change this
//    digitalWrite(D3, LOW);                      change this
    digitalWrite(D7, LOW);
    digitalWrite(D8, LOW);
  }
}


void sendSensor()
{
  float h = dht.readHumidity();
  float t = dht.readTemperature(); // or dht.readTemperature(true) for Fahrenheit

  if (isnan(h) || isnan(t)) {
    Serial.println("Failed to read from DHT sensor!");
    return;
  }
  int p=digitalRead(14);

  Blynk.virtualWrite(V5, h);
  Blynk.virtualWrite(V6, t);
 if(p==HIGH)
 Blynk.notify("Gerakan terdeteksi");
}

Thanks very much master…

852530311_146137
can is char token also be included in wifi manager like that?

what hardware triggers are meant or left blank just for buttons in blynk apps only?

Auth Token does not think it can be added in the wifi manager

Sorry I do not speak English very well
You need to add a hardware button in order to reset the network
You can experiment with a button in the blynk application

in my sketch, what kind of code to add a virtual pin button to disable and enable the pir sensor ? due to certain conditions I want to disable the pir sensor function.some code I have tried but it does not work

Paste your bad code and maybe someone will fix it for you.

Actually, there’s no need to add a hardware button to reset the network. You can simply feed new credentials to the flash memory, so that it replaces the currently stored SSID and password with bogus ones. I used this method with my HVAC control by triggering the following code from the Blynk dashboard:

 WiFi.begin("FakeSSID","FakePW");     // Replace current WiFi credentials with fake ones
 delay(1000);
 ESP.restart();

code on above …subject : my sketch

I want to see a sketch where you have tried to add some code to disable the PIR.

this is one of all that I tried but not work…plz help how to add virtual pin to on off pir sensor?

#define BLYNK_PRINT Serial    // Comment this out to disable prints and save space
#include <SPI.h>
#include <ESP8266WiFi.h>
#include <BlynkSimpleEsp8266.h>
#include <SimpleTimer.h>
#include <DHT.h>

// You should get Auth Token in the Blynk App.
// Go to the Project Settings (nut icon).
char auth[] = "xxx";

// Your WiFi credentials.
// Set password to "" for open networks.
char ssid[] = "PULPSTONE";
char pass[] = "internet";
BLYNK_WRITE(V1){
  int control4DigitalPins = param.asInt();
  if(control4DigitalPins == 1){
    digitalWrite(D2, HIGH);
    digitalWrite(D3, HIGH);
    digitalWrite(D7, HIGH);
    digitalWrite(D8, HIGH);
  }
  else{
    digitalWrite(D2, LOW);
    digitalWrite(D3, LOW);
    digitalWrite(D7, LOW);
    digitalWrite(D8, LOW);
  }
}

#define DHTPIN 2          // What digital pin we're connected to
#define ledPower 16

// Uncomment whatever type you're using!
#define DHTTYPE DHT11     // DHT 11
//#define DHTTYPE DHT22   // DHT 22, AM2302, AM2321
//#define DHTTYPE DHT21   // DHT 21, AM2301
#define pirPin 14                // Input for HC-S501
int pValue;                   // Place to store read PIR Value
int pinValue;                   //Variable to read virtual pin

DHT dht(DHTPIN, DHTTYPE);
SimpleTimer timer;

// This function sends Arduino's up time every second to Virtual Pin (5).
// In the app, Widget's reading frequency should be set to PUSH. This means
// that you define how often to send data to Blynk App.
void sendSensor()
{
  float h = dht.readHumidity();
  float t = dht.readTemperature(); // or dht.readTemperature(true) for Fahrenheit

  if (isnan(h) || isnan(t)) {
    Serial.println("Failed to read from DHT sensor!");
    return;
  }
  int p=digitalRead(14);
   
  // You can send any value at any time.
  // Please don't send more that 10 values per second.
  Blynk.virtualWrite(V5, h);
  Blynk.virtualWrite(V6, t);
 if(p==HIGH)
 Blynk.notify("Gerakan terdeteksi");
}
BLYNK_WRITE(V0)
{
 pinValue = param.asInt();    
} 

void setup()
{
  pinMode (ledPower,OUTPUT);
  digitalWrite (ledPower, HIGH);
  pinMode(14,INPUT);
  Serial.begin(9600); // See the connection status in Serial Monitor
  Blynk.begin(auth, ssid, pass);

  dht.begin();

  // Setup a function to be called every second
  timer.setInterval(1000L, sendSensor);
}

void loop()
{
  Blynk.run(); // Initiates Blynk
  timer.run(); // Initiates SimpleTimer
}

Take a look at this:

bool pirEnabled = false;

BLYNK_WRITE(V1){
  if(pirEnabled == true){
    int control4DigitalPins = param.asInt();
    if(control4DigitalPins == 1){
      digitalWrite(D2, HIGH);
      digitalWrite(D3, HIGH);
      digitalWrite(D7, HIGH);
      digitalWrite(D8, HIGH);
    }
    else{
      digitalWrite(D2, LOW);
      digitalWrite(D3, LOW);
      digitalWrite(D7, LOW);
      digitalWrite(D8, LOW);
    }
  }
}

BLYNK_WRITE(V2){  // button in switch mode
  if(param.asInt()){
    pirEnabled = true;  
  }
  else{
    pirEnabled = false;     
  }
}
1 Like

Actually I was thinking you had PIR tied to V1, maybe remove the outer if statement I added in V1 and use this in sendSensor() function.

 if((p==HIGH) && (pirEnabled == true)){
    Blynk.notify("Gerakan terdeteksi");
 }
#define BLYNK_PRINT Serial    // Comment this out to disable prints and save space
#include <SPI.h>
#include <ESP8266WiFi.h>
#include <BlynkSimpleEsp8266.h>
#include <SimpleTimer.h>
#include <DHT.h>

// You should get Auth Token in the Blynk App.
// Go to the Project Settings (nut icon).
char auth[] = "xxx";

// Your WiFi credentials.
// Set password to "" for open networks.
char ssid[] = "PULPSTONE";
char pass[] = "internet";
bool pirEnabled = false;

BLYNK_WRITE(V1){
  if(pirEnabled == true){
    int control4DigitalPins = param.asInt();
    if(control4DigitalPins == 1){
      digitalWrite(D2, HIGH);
      digitalWrite(D3, HIGH);
      digitalWrite(D7, HIGH);
      digitalWrite(D8, HIGH);
    }
    else{
      digitalWrite(D2, LOW);
      digitalWrite(D3, LOW);
      digitalWrite(D7, LOW);
      digitalWrite(D8, LOW);
    }
  }
}

BLYNK_WRITE(V2){  // button in switch mode
  if(param.asInt()){
    pirEnabled = true;  
  }
  else{
    pirEnabled = false;     
  }
}

#define DHTPIN 2          // What digital pin we're connected to
#define ledPower 16

// Uncomment whatever type you're using!
#define DHTTYPE DHT11     // DHT 11
//#define DHTTYPE DHT22   // DHT 22, AM2302, AM2321
//#define DHTTYPE DHT21   // DHT 21, AM2301

DHT dht(DHTPIN, DHTTYPE);
SimpleTimer timer;

// This function sends Arduino's up time every second to Virtual Pin (5).
// In the app, Widget's reading frequency should be set to PUSH. This means
// that you define how often to send data to Blynk App.
void sendSensor()
{
  float h = dht.readHumidity();
  float t = dht.readTemperature(); // or dht.readTemperature(true) for Fahrenheit

  if (isnan(h) || isnan(t)) {
    Serial.println("Failed to read from DHT sensor!");
    return;
  }
  int p=digitalRead(14);
   
  // You can send any value at any time.
  // Please don't send more that 10 values per second.
  Blynk.virtualWrite(V5, h);
  Blynk.virtualWrite(V6, t);
 if((p==HIGH) && (pirEnabled == true)){
    Blynk.notify("Gerakan terdeteksi");
 }

void setup()
{
  pinMode (ledPower,OUTPUT);
  digitalWrite (ledPower, HIGH);
  pinMode(14,INPUT);
  Serial.begin(9600); // See the connection status in Serial Monitor
  Blynk.begin(auth, ssid, pass);

  dht.begin();

  // Setup a function to be called every second
  timer.setInterval(1000L, sendSensor);
}

void loop()
{
  Blynk.run(); // Initiates Blynk
  timer.run(); // Initiates SimpleTimer
}


error compilling…any suggestion
exit status 1
a function-definition is not allowed here before ‘{’ token

You are missing a closing bracket at the end of sendSensor but also see my note above about V1.

so which part should I edit

Ad the V2 button and the revised if statement round Blynk.notifty(). Remove outer if that I added to V1 unless you also want V2 to control V1.

im edited this code but V2 is not working to stop n start pir sensor…
note : uploading done (success but V2 not working)

#define BLYNK_PRINT Serial    // Comment this out to disable prints and save space
#include <SPI.h>
#include <ESP8266WiFi.h>
#include <BlynkSimpleEsp8266.h>
#include <SimpleTimer.h>
#include <DHT.h>

// You should get Auth Token in the Blynk App.
// Go to the Project Settings (nut icon).
char auth[] = "xxx";

// Your WiFi credentials.
// Set password to "" for open networks.
char ssid[] = "PULPSTONE";
char pass[] = "internet";
bool pirEnabled = false;

BLYNK_WRITE(V1){
  if(pirEnabled == true){
    int control4DigitalPins = param.asInt();
    if(control4DigitalPins == 1){
      digitalWrite(D2, HIGH);
      digitalWrite(D3, HIGH);
      digitalWrite(D7, HIGH);
      digitalWrite(D8, HIGH);
    }
    else{
      digitalWrite(D2, LOW);
      digitalWrite(D3, LOW);
      digitalWrite(D7, LOW);
      digitalWrite(D8, LOW);
    }
  }
}

BLYNK_WRITE(V2){  // button in switch mode
  if(param.asInt()){
    pirEnabled = true;  
  }
  else{
    pirEnabled = false;     
  }
}

#define DHTPIN 2          // What digital pin we're connected to
#define ledPower 16

// Uncomment whatever type you're using!
#define DHTTYPE DHT11     // DHT 11
//#define DHTTYPE DHT22   // DHT 22, AM2302, AM2321
//#define DHTTYPE DHT21   // DHT 21, AM2301

DHT dht(DHTPIN, DHTTYPE);
SimpleTimer timer;

// This function sends Arduino's up time every second to Virtual Pin (5).
// In the app, Widget's reading frequency should be set to PUSH. This means
// that you define how often to send data to Blynk App.
void sendSensor()
{
  float h = dht.readHumidity();
  float t = dht.readTemperature(); // or dht.readTemperature(true) for Fahrenheit

  if (isnan(h) || isnan(t)) {
    Serial.println("Failed to read from DHT sensor!");
    return;
  }
  int p=digitalRead(14);
   
  // You can send any value at any time.
  // Please don't send more that 10 values per second.
  Blynk.virtualWrite(V5, h);
  Blynk.virtualWrite(V6, t);
 if(p==HIGH)
 Blynk.notify("Gerakan terdeteksi");
}

void setup()
{
  pinMode (ledPower,OUTPUT);
  digitalWrite (ledPower, HIGH);
  pinMode(14,INPUT);
  Serial.begin(9600); // See the connection status in Serial Monitor
  Blynk.begin(auth, ssid, pass);

  dht.begin();

  // Setup a function to be called every second
  timer.setInterval(1000L, sendSensor);
}

void loop()
{
  Blynk.run(); // Initiates Blynk
  timer.run(); // Initiates SimpleTimer
}

Try this if V1 is your button widget.

BLYNK_WRITE(V1){
digitalWrite(control4DigitalPins, param.asInt());
if(control4DigitalPins == 1){
    digitalWrite(D2, HIGH);
    digitalWrite(D3, HIGH);
    digitalWrite(D7, HIGH);
    digitalWrite(D8, HIGH);
  }
  else{
    digitalWrite(D2, LOW);
    digitalWrite(D3, LOW);
    digitalWrite(D7, LOW);
    digitalWrite(D8, LOW);
  }
}

I have used a button to reset the Wifi, because IF you choose a correct WiFi SSID and Password, but by mistake you put a wrong or invalid Blynk Token, you will never get in fake SSID then ESP restart per your code. am I wrong? Thanks for this tip, I will try to implement in a way for avoiding using a extra button.