Have added some functionality to an ESP8266 standalone configuration to avoid that ESP8266 users have to program the WIFI SSID, passwords and Blynk Authorisation key.
It works like this:
software checks (hw pin) whether is can run business as usual or start-up in the configuration mode
If Business as usual nothing special; use Blynk example code
If configuration mode:
Start ESP8266 access-point and launch web-page showing the existing SSID, password and authorisation code.
Modify these values and
Store the values in EEPROM
//#define BLYNK_PRINT Serial    // Comment this out to disable prints and save space
#include <ESP8266WiFi.h>
#include <BlynkSimpleEsp8266.h>
#include <DNSServer.h>
#include <ESP8266WebServer.h>
#include <WiFiManager.h>         //https://github.com/tzapu/WiFiManager
#include <EEPROM.h>

// You should get Auth Token in the Blynk App.
// Go to the Project Settings (nut icon).
char auth[] = "AUTHTOKEN";

void setup()
{
  EEPROM.begin(512);
  Serial.begin(115200);
  WiFiManager wifiManager;
  //wifiManager.resetSettings();    //Uncomment this to wipe WiFi settings from EEPROM on boot.  Comment out and recompile/upload after 1 boot cycle.
  wifiManager.autoConnect("NodeMCU");
  //if you get here you have connected to the WiFi
  Serial.println("connected...yeey :)");
  pinMode(BUILTIN_LED, OUTPUT);     // Initialize the BUILTIN_LED pin as an output, I like blinkies.
  Blynk.begin(auth, WiFi.SSID().c_str(), WiFi.psk().c_str());
}

void loop()
{
  Blynk.run();  // Commented out for a short time.
}
@pnewb you have a very concise sketch incorporating WiFiManager and I tried Blynk.begin(auth, WiFi.SSID().c_str(), WiFi.psk().c_str()); with some success. Does your sketch incorporate all the WiFiManager features as it looks too short to have all the web portal configuration and the additional Blynk token parameter?
My sketch with full WiFiManager details works ok the first time I connect to a new router but the token is rejected by Blynk on subsequent connections.
Ah, you’re correct in that the Blynk auth is not configurable via the portal. I misread the original question when first posting my code. The “AUTHTOKEN” just after the includes would be a hard coded Blynk token. I don’t know offhand how much room is available in the EEPROM to store arbitrary data like this. If I have some time I’ll look into it.
@pnewb I have it working well now with @tzapulica’s WiFiManager requesting the token in the AP.
Until a couple of hours ago I was reformatting the SPIFFS on every reset so I was losing the token, all good now though.
Your welcome to the sketch but the work was done by @tzapulica not me.
#include <FS.h>                   //this needs to be first, or it all crashes and burns...
//#define BLYNK_DEBUG           // Comment this out to disable debug and save space
#define BLYNK_PRINT Serial    // Comment this out to disable prints and save space
#include <ESP8266WiFi.h>
#include <DNSServer.h>
#include <ESP8266WebServer.h>
#include <WiFiManager.h>          //https://github.com/tzapu/WiFiManager

//for LED status
#include <Ticker.h>
Ticker ticker;

#include <ArduinoJson.h>          //https://github.com/bblanchon/ArduinoJson

char blynk_token[34] = "BLYNK_TOKEN";

bool shouldSaveConfig = false; //flag for saving data

#include <BlynkSimpleEsp8266.h>
#include <SimpleTimer.h>
SimpleTimer timer;

void tick()
{
  //toggle state
  int state = digitalRead(BUILTIN_LED);  // get the current state of GPIO1 pin
  digitalWrite(BUILTIN_LED, !state);     // set pin to the opposite state
}

void saveConfigCallback () {  //callback notifying us of the need to save config
  Serial.println("Should save config");
  shouldSaveConfig = true;
  ticker.attach(0.2, tick);  // led toggle faster
}

void setup()
{

  Serial.begin(115200);
  Serial.println();

  //set led pin as output
  pinMode(BUILTIN_LED, OUTPUT);
  // start ticker with 0.5 because we start in AP mode and try to connect
  ticker.attach(0.6, tick);

  //SPIFFS.format();    //clean FS, for testing
  Serial.println("Mounting FS...");    //read configuration from FS json

  if (SPIFFS.begin()) {
    Serial.println("Mounted file system");
    if (SPIFFS.exists("/config.json")) {
      //file exists, reading and loading
      Serial.println("Reading config file");
      File configFile = SPIFFS.open("/config.json", "r");
      if (configFile) {
        Serial.println("Opened config file");
        size_t size = configFile.size();
        // Allocate a buffer to store contents of the file.
        std::unique_ptr<char[]> buf(new char[size]);

        configFile.readBytes(buf.get(), size);
        DynamicJsonBuffer jsonBuffer;
        JsonObject& json = jsonBuffer.parseObject(buf.get());
        json.printTo(Serial);
        if (json.success()) {
          Serial.println("\nparsed json");

          strcpy(blynk_token, json["blynk_token"]);

        } else {
          Serial.println("Failed to load json config");
        }
      }
    }
  } else {
    Serial.println("Failed to mount FS");
  }
  //end read

  // The extra parameters to be configured (can be either global or just in the setup)
  // After connecting, parameter.getValue() will get you the configured value
  // id/name placeholder/prompt default length
  WiFiManagerParameter custom_blynk_token("blynk", "blynk token", blynk_token, 33);   // was 32 length

  Serial.println(blynk_token);

  //WiFiManager
  //Local intialization. Once its business is done, there is no need to keep it around
  WiFiManager wifiManager;

  wifiManager.setSaveConfigCallback(saveConfigCallback);   //set config save notify callback

  //set static ip
  // this is for connecting to Office router not GargoyleTest but it can be changed in AP mode at 192.168.4.1
  //wifiManager.setSTAStaticIPConfig(IPAddress(192,168,10,111), IPAddress(192,168,10,90), IPAddress(255,255,255,0));

  wifiManager.addParameter(&custom_blynk_token);   //add all your parameters here

  //wifiManager.resetSettings();  //reset settings - for testing

  //set minimu quality of signal so it ignores AP's under that quality
  //defaults to 8%
  //wifiManager.setMinimumSignalQuality();

  //sets timeout until configuration portal gets turned off
  //useful to make it all retry or go to sleep, in seconds
  wifiManager.setTimeout(600);   // 10 minutes to enter data and then Wemos resets to try again.

  //fetches ssid and pass and tries to connect, if it does not connect it starts an access point with the specified name
  //and goes into a blocking loop awaiting configuration
  if (!wifiManager.autoConnect("CentralHeatingAP", "MY123PWD")) {
    Serial.println("Failed to connect and hit timeout");
    delay(3000);
    //reset and try again, or maybe put it to deep sleep
    ESP.reset();
    delay(5000);
  }
  Serial.println("Connected Central Heating System :)");   //if you get here you have connected to the WiFi
  ticker.detach();
  //turn LED off
  digitalWrite(BUILTIN_LED, HIGH);

  strcpy(blynk_token, custom_blynk_token.getValue());    //read updated parameters

  if (shouldSaveConfig) {      //save the custom parameters to FS
    Serial.println("saving config");
    DynamicJsonBuffer jsonBuffer;
    JsonObject& json = jsonBuffer.createObject();
    json["blynk_token"] = blynk_token;

    File configFile = SPIFFS.open("/config.json", "w");
    if (!configFile) {
      Serial.println("Failed to open config file for writing");
    }

    json.printTo(Serial);
    json.printTo(configFile);
    configFile.close();
    //end save
  }

  Serial.println("local ip");
  Serial.println(WiFi.localIP());

  Blynk.config(blynk_token);
  Blynk.connect();

}

  void loop()
{
  Blynk.run(); // Initiates Blynk
  timer.run(); // Initiates SimpleTimer
}
I have the WiFiManager working great, and i am able to set wifi no problem and pass along the blynk code too. The issue I’m having is that the university uses WiFi that requires you enter a username and password. I’ve scanned through the files for WiFi manager and i wasn’t able to see where i could add something that would allow this to be passed in a correct manner. any help would be appreciated.
Your home network uses what’s called a Pre Shared Key and the university uses WPA2 Enterprise (probably with Radius behind it) to dynamically authenticate users and the ESP just doesn’t support it.
When I said switch the router off I didn’t mean off and back on.
ESP’s store the ssid and pwd of your router without WiFiManager or without them being included in a sketch.
So for WiFiManager to kick in the router needs to be off. Serial Monitor should then indicate the AP is available and at that point you can turn on the router.
In real life if you take your hardware to your neighbour’s house it will not know the router credentials and WiFiManager will kick in automatically.
If you don’t want to mess about with the router you can use a sketch with ssid and pwd of an AP on your Smartphone. Connect to it then switch of the AP on your phone and reboot the ESP. It will then ask for your router details when it boots up the ESP’s AP.
Okay, I’ll try this one last time.
For some reason this community keeps flagging my posts on open source software as “commercial”.
I’m just trying to let you know about something that might be useful to the community -
it’s not like it’s a commercial product - it’s a free download, and open source to boot…
Hi. I’ve been working on a garage opener using Blynk and so far all is working great.
However, I’m trying to figure out a way to be able to use a webpage to initially configure the Wifi and Blynk token parameters and I’m not getting anywhere.
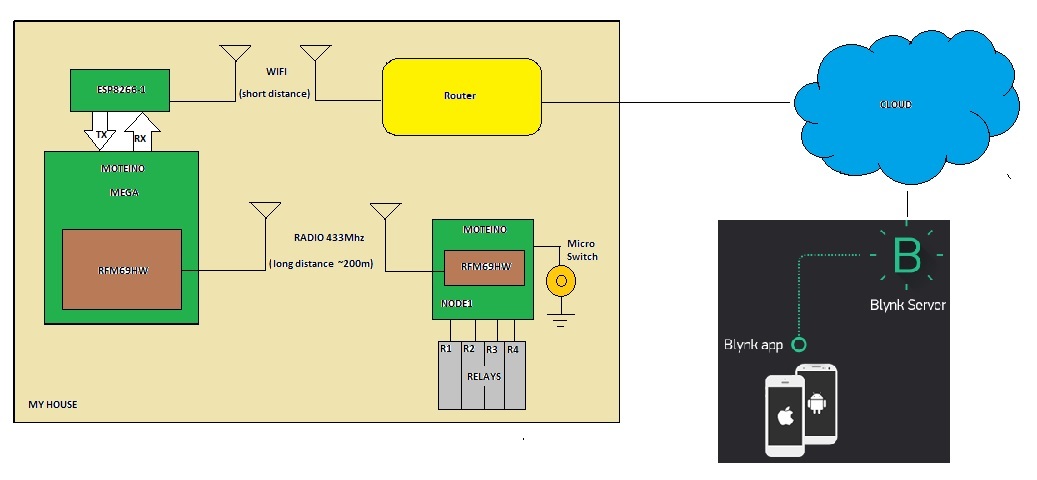
I’m using a ESP8266-1 connected to a Arduino Mega. But since the ESP8266 has very little penetration trough concrete buildings, I have a RFM69HW packet radio connected to it (its actually a Moteino Mega https://lowpowerlab.com/guide/moteino/), and with this setup I can reach trough 3 concrete floors with no problems whatsoever.
So I use the ESP8266-1 connected to the Moteino Mega (as a Wifi Gateway) which will get/send all the data to Blynk and the RFM69HW radio will relay that data back and forth to another Moteino that will act as a node and get any micro-switch status or actuate any number of relays directly connected to it.
So I have a Arduino Mega clone running as a Gateway and as a manager for my network. But all examples of how to use a webpage to initially program the SSID, password and Token expect the ESP8266 to be programmed as a standalone, without the Arduino. So they all request me to include a >ESP8266Wifi.h> library that will only compile if I choose a “Generic ENC8266” board. But I must use the Moteino Mega board.
Is there a good example on how to use the ESP8266 attached to an Arduino to do this instead os using the ESP8266 as a standalone?
Just to complement my previous message, I’m using the BlynkESP8266_Lib library. I looked at the work by @tzapulica, the WifiManager and I think that would be a good starting point but unfortunately i’m a copy/paste programmer and have no clue on how to approach this.
Can anyone please give me some pointers on how to approach this?