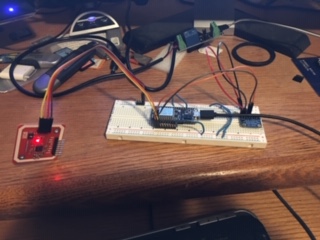
This is an ESP 8266 based project that uses NFC reader PN532 to secure and open doors.
the code here is not current. Please use the code at github!!
Here is the github link
now tested with 4 scanners and multiple cards. also added OTA for updates and wifi / BLYNK provisioning.
The code has two blynk tokens
one for the lock and one for the master/scanner these are default values.
I implemented it as a multi door system with a maximum of 500 cards per door. It could easily be upgraded to more cards per door.
The project is now in 7 files
main file
/*
Creative Commons License
NFC Door lock
by Michael Dale Burton
is licensed under a Creative Commons Attribution-NonCommercial
4.0 International License.
Impliments a door lock system using NFC reader and the Blynk app
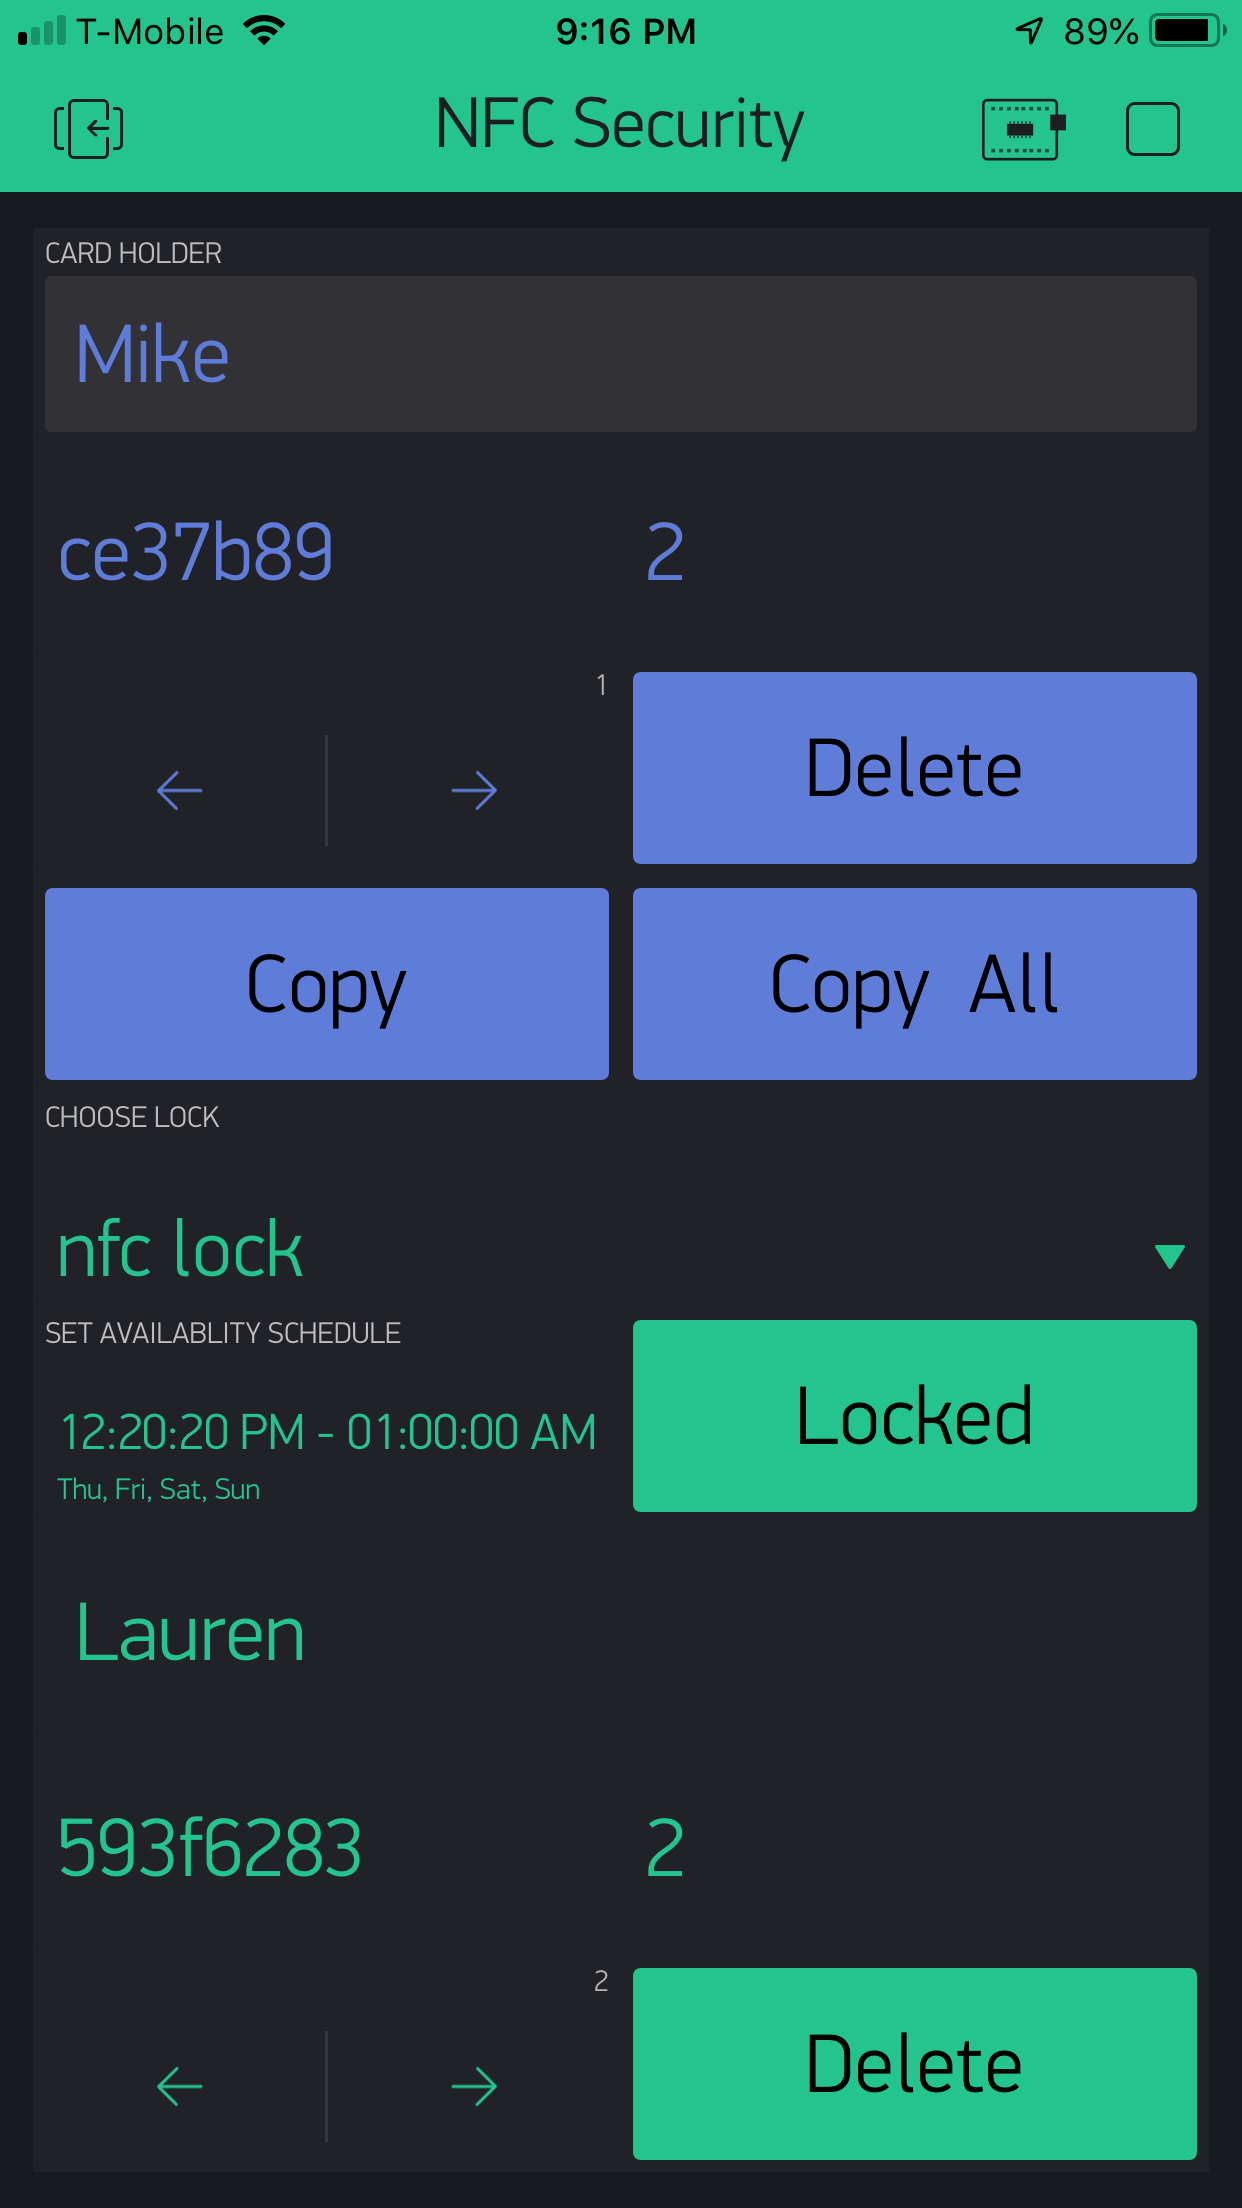
Blynk is used to store the data on the cloud and provide
a smart phone interface for adding, removing and assigning cards
Device selector is used to choose the lock/door
500 cards are supported
unlimited locks are supported
1 master is used as the scanner for adding cards it can also be used as a lock
Nodemcu esp8266 and PN532 hardware is used
V1 is a timer
V2 is a reset button
V3 ia a text input for the user name assigned to a card
V4 is a value display for the card id
V5 current card index "vcount"
V6 is a terminal window for debug information
V10 is the delete button
V24 is a value display for the number of valid cards
V25 - V26 are reserved for data bridge
*/
#include <Wire.h>
#include <PN532_I2C.h>
#include <PN532.h>
#include <NfcAdapter.h>
#include <ArduinoOTA.h>
#include <ESP8266WiFi.h>
#include <WiFiManager.h> //https://github.com/tzapu/WiFiManager WiFi Configuration Magic
#include <ArduinoJson.h> //https://github.com/bblanchon/ArduinoJson
#include <BlynkSimpleEsp8266.h>
#include <TimeLib.h>
#include <WidgetRTC.h>
#include "globals.h" // tab for other defines and globals
PN532_I2C pn532i2c(Wire);
PN532 nfc(pn532i2c);
//create terminal widget instance and attach it to the pin
WidgetTerminal terminal(terminaldisplay);
//Create the real time clock instance
WidgetRTC rtc;
//create timer instance
BlynkTimer timer;
//create bridge instance and assign pins
WidgetBridge bridge1(51);
WidgetBridge bridge2(52);
WidgetBridge bridge3(53);
// get the time and the day
void getCurrentTime() {
currentTime = String(hour() + ":" + minute());
currentDate = String(day());
}
void lockDoor() {
digitalWrite(LED_PIN, LOW); // turn off LED this causes the door to lock
Blynk.virtualWrite(lockbutton, 0); // display door locked on the app
flag = 0;
}
void unlockDoor() {
if (!flag) {
flag = 1;
digitalWrite(LED_PIN, HIGH); // send power to unlock the door
timer.setTimeout(5000L, lockDoor); // lock the door after 5 seconds
}
Blynk.virtualWrite(lockbutton, 1); // update the app
}
/**************************************
connect to wifi
connect to blynk server
create timer
start nfc
start I2c
set I2c rate and pins
start serial and set speed
**************************************/
void setup() {
pinMode(LED_PIN, OUTPUT);
pinMode(RTS_PIN, OUTPUT);
pinMode(DTR_PIN, OUTPUT);
Wire.setClock(wirespeed); // set the Ic2 buss speed
Serial.begin(serialspeed); // open the serial port
Wire.pins(SDA_PIN, SLC_PIN); // SDA, SLC pins
Wire.begin(); // start the Ic2 buss
nfc.begin(); // init the NFC Hardware
SPIFFS.begin();
Serial.print(currentTime);
// these two call get the data from the SPIFFS file and use the data to provision blynk and wifi
restoreparameters();
startmywifi();
Blynk.config(blynk_token); // config Blynk
getdatafromfile();
// Blynk.syncVirtual(vcount, datapins); // restore count and card data This is how all the card data gets restored from the cloud
// Blynk.syncVirtual(vcount); // restore count
timer.setInterval(500l, scanNfc); // scan the NFC every .5 seconds
ArduinoOTA.setHostname(modulename); // give an name to our module
ArduinoOTA.begin(); // OTA initialization
timer.setInterval(1200L, [] () { // <<=== set how often the code should run 1200L = Run every 1.2 seconds
ArduinoOTA.handle(); // check for OTA update
}); // END Timer Function
}
/**************************************
main loop
**************************************/
void loop()
{
if (Blynk.connected()){
Blynk.run();
} else Blynk.connect(1000l); // timeout 1 second
timer.run();
}
The Blynk Calls are in file 2.
#include <FS.h>

/*

   Creative Commons License
   NFC Door lock
   by Michael Dale Burton
   is licensed under a Creative Commons Attribution-NonCommercial
   4.0 International License.

    Impliments a door lock system using NFC reader and the Blynk app
    Blynk is used to store the data on the cloud and provide
    a smart phone interface for adding, removing and assigning cards
    Device selector is used to choose the lock/door

    20 cards are supported
    2 slaved locks are supported
    1 master  is used as the scanner for adding cards it can also be used as a lock

    Nodemcu esp8266 and PN532 hardware is used

    V1 is a timer
    V2 is a reset button
    V3 ia a text input for the user name assigned to a card
    V4 is a value display for the card id
    V5 current card index "vcount"
    V6 is a terminal window for debug information
    V10 is the delete button
    V24 is a value display for the number of valid cards
    V25 - V45 are reserved for data storage

*/

#include <Wire.h>
#include <PN532_I2C.h>
#include <PN532.h>
#include <NfcAdapter.h>
#include <ArduinoOTA.h>
#include <ESP8266WiFi.h>
#include <WiFiManager.h>          //https://github.com/tzapu/WiFiManager WiFi Configuration Magic
#include <ArduinoJson.h>          //https://github.com/bblanchon/ArduinoJson
#include <BlynkSimpleEsp8266.h>
#include <TimeLib.h>
#include <WidgetRTC.h>
#include "globals.h"                    // tab for other defines and globals


PN532_I2C pn532i2c(Wire);
PN532 nfc(pn532i2c);

//create terminal widget instance and attach it to the pin
WidgetTerminal terminal(terminaldisplay);

//Create the real time clock instance
WidgetRTC rtc;

//create timer instance
BlynkTimer timer;

//create bridge instance and assign pins
WidgetBridge bridge1(51);
WidgetBridge bridge2(52);
WidgetBridge bridge3(53);


// get the time and the day
void getCurrentTime() {
  currentTime = String(hour() + ":" + minute());
  currentDate = String(day());
}

void lockDoor() {
  digitalWrite(LED_PIN, LOW);             // turn off LED this causes the door to lock
  Blynk.virtualWrite(lockbutton, 0);      // display door locked on the app
  flag = 0;
}

void unlockDoor() {
  if (!flag) {
    flag = 1;
    digitalWrite(LED_PIN, HIGH);              // send power to unlock the door
    timer.setTimeout(5000L, lockDoor);        // lock the door after 5 seconds
  }
  Blynk.virtualWrite(lockbutton, 1);          // update the app
}


/**************************************
  connect to wifi
  connect to blynk server
  create timer
  start nfc
  start I2c
  set I2c rate and pins
  start serial and set speed

**************************************/
void setup() {
  pinMode(LED_PIN, OUTPUT);
  pinMode(RTS_PIN, OUTPUT);
  pinMode(DTR_PIN, OUTPUT);

  Wire.setClock(wirespeed);                     // set the Ic2 buss speed
  Serial.begin(serialspeed);                    // open the serial port
  Wire.pins(SDA_PIN, SLC_PIN);                  // SDA, SLC pins
  Wire.begin();                                 // start the Ic2 buss
  nfc.begin();                                  // init the NFC Hardware
  SPIFFS.begin();

  Serial.print(currentTime);
    // these two call get the data from the SPIFFS file and use the data to provision  blynk and wifi
  restoreparameters();
  startmywifi();

  Blynk.config(blynk_token);          // config Blynk

  getdatafromfile();
//  Blynk.syncVirtual(vcount, datapins);          // restore count and card data  This is how all the card data gets restored from the cloud
//  Blynk.syncVirtual(vcount);                    // restore count

  timer.setInterval(500l, scanNfc);             // scan the NFC every .5 seconds
  ArduinoOTA.setHostname(modulename); // give an name to our module
  ArduinoOTA.begin(); // OTA initialization
  timer.setInterval(1200L, [] () { //  <<=== set how often the code should run 1200L = Run every 1.2 seconds
    ArduinoOTA.handle();                        // check for OTA update
  });  // END Timer Function
}

/**************************************
  main loop
**************************************/
void loop()
{
  if (Blynk.connected()){
    Blynk.run();
  } else Blynk.connect(1000l);                // timeout 1 second
  timer.run();
}
The data is handled in the third file.
/*
   NFC Door lock
   Auther Michael Burton

   Creative Commons License
   NFC Door lock
   by Michael Dale Burton
   is licensed under a Creative Commons Attribution-NonCommercial
   4.0 International License.

*/
/**************************************
  compairUid return bool

  in: card ids

  out: true if they are the same else false
**************************************/

bool compairUid(uint8_t uid1[], uint8_t uid2[], uint8_t j) {
  for (int i = 0; i < j; i++) {
    if (uid1[i] != uid2[i]) {
      return false;
    }
  }

  return true;
}
/*****************************************************
   findUid
   takes uid and length
   return index of uid in array or 0 if not found

*/
int findUid(String suid) {
  for (int i = 1; i <= rowIndex; i++) {
    if (!(suid.compareTo(String(&cardId[i][0])))) {
      return i; // index of card found
    }

  }

  return 0;
}
/**************************************
  storeCard
  in: row index, card Id, id length, card holder name

  places the uid and the name in the hardware memory at index location ri

  out: none
**************************************/
//put card id  in memory
void storeCard(int ri, String suid2, String holder, int af) {
  if(openspiffs()){
    uint16_t buffer_offset;
    buffer_offset = ri * recordlength;
    cardId[ri] = suid2; // save uid as a string
    cardHolder[ri] = holder;        // save name of card holder
    accessFlags[ri] = af;
    Blynk.virtualWrite(vcount, rowIndex);                                                    //save the card count on the server
    write16data(0, rowIndex);                                                                //save the card count at offset 0

//  Blynk.virtualWrite(DATASTORE + ri, ri, cardHolder[ri], cardId[ri], accessFlags[ri]);     //save card data on server
    write16data(buffer_offset, ri);
    buffer_offset += 2;
    writestringdata(buffer_offset, maxnamelength, cardHolder[ri]);
    buffer_offset += maxnamelength;
    writestringdata(buffer_offset, maxuidlength, cardId[ri]);
    buffer_offset += maxuidlength;
    write16data(buffer_offset, accessFlags[ri]);
    buffer_offset += 2;
    Blynk.virtualWrite(indexdisplay, ri);
    closespiffs();
  }
}

void getCard(int index) {
  cardId[0] = cardId[index];                      //get cardId
  cardHolder[0] = cardHolder[index];              // get name of card holder
}


/***************************************
   get card id access flags and user name from the cloud

   in:  card Id, card holder name, access flags, index

   datastore is the virtual pin for the card data
**************************************/
void readFromCloud(int count) {
  getdatafromfile();
//  getdatafromfram();
//  for (int i = 0; i < count; i++) {
//    Blynk.syncVirtual(DATASTORE + count);                             //send the sync to the data pin to request card data
//  }
  getCard(1);
  Blynk.virtualWrite(namedisplay, cardHolder[0]);
  Blynk.virtualWrite(cardiddisplay, cardId[0]);
}
file four is the data handling
/*
   NFC Door lock
   Auther Michael Burton

   Creative Commons License
   NFC Door lock
   by Michael Dale Burton
   is licensed under a Creative Commons Attribution-NonCommercial
   4.0 International License.

*/
//#define BLYNK_PRINT Serial  // Comment this line out to disable prints and save space
//#define BLYNK_DEBUG

// only uncoment one at a time
//#define MASTER_LOCK true
#define LOCK1_LOCK  true
//#define LOCK2_LOCK  true
/*
   hardware defines
*/
#define wirespeed 400000L   // Ic2 buss speed
#define serialspeed 115200  // serial port speed
#define nfcretries 0x0f     // number of passive retries before timeout on nfc hardware

/*
                                PIN MAP for ESP8266
*/
#define DATASTART   0x0           // start address of data buffer
#define IC2_FRAM_ADDRESS 0x50     // address of the fram board
#define SDA_PIN     2             // I2C SDA pin
#define SLC_PIN     14            // I2C SCL pin

#define RTS_PIN     4             // RTS line for C17A - DB9 pin 7
#define DTR_PIN     5             // DTR line for C17A - DB9 pin 4

#define RELAY_PIN   8             // relay output pin
#define LED_PIN     16            // attached LED


/********************************************************************************************

   BLYNK V PIN MAP

 ********************************************************************************************/
#define clockpin        V1
#define resetallpin     V2
#define namedisplay     V3
#define cardiddisplay   V4
#define indexdisplay    V5
#define terminaldisplay V6
#define copybutton      V11
#define copyallbutton   V12
#define bridgewrite     V7
#define lockbutton      V8
#define bridgedata      V9
#define deletebutton    V10
#define eventorpin      V14
#define vcount          V24
#define DATASTORE       V25
#define datapins        V25, V26, V27, V28, V29, V30, V31, V32, V33, V34, V35, V36, V37, V38, V39, V40, V41, V42, V43, V44, V45


#define maxcards      20
#define maxnamelength 20
#define maxuidlength  15
#define flagslength   1
#define recordlength    (4 + maxnamelength + maxuidlength)   // 4 bytes for the two ints + the max string lengths  for the name and uid

const char*  daystrings[7]  =  {"Sun", "Mon", "Tues", "Wed", "Thurs", "Fri", "Sat"};

/* BLYNK tokens

*/
char reader_token[] = "blynk token1";
char lock1_token[] = "blynk token2";
char lock2_token[] = "blynk token 3";

char readername[] = "nfclockreader";
char lock1name[] = "nfclock1";
char lock2name[] = "nfclock2";

#if defined(MASTER_LOCK)

char blynk_token[34] = "blynk token1";
char modulename[] = "nfclockreader";

#elif defined(LOCK1_LOCK)

char blynk_token[34] = "blynk token2";
char modulename[] = "nfclock1";


#else

char blynk_token[34] = "blynk token 3";
char modulename[] = "nfclock2";


#endif
/*
    WiFi credentials.


char ssid[] = "ssid";
char pass[] = "password";
*/
/*
    Global data
*/
String  cardId[maxcards + 1];
String  cardHolder[maxcards + 1];
int     accessFlags[maxcards + 1];
String  SThour;
String  STmin;
String  SPhour;
String  SPmin;
int     days[7];
int     flag = 0;

int     cardIndex = 0;
int     rowIndex = 0;
String  currentTime;
String  currentDate;
int talktome = 0;

//define your default values here, if there are different values in config.json, they are overwritten.
char mqtt_server[40];
char mqtt_port[6] = "8080";

//flag for saving wifi data
bool shouldSaveConfig = true;

uint32_t versiondata = 0; // NFC hardware version
String carddatafile = "/carddata.txt";
File datafile;
Card reader file
// setupnfc does not block or wait for a success
// you will need to call it again if the global var versiondata is not set
// once it sees the hardware it sets the number of retries and configures the board
// it then prints the current time and "nfc started to the terminal
void setupnfc() {
  Serial.println("looking for NFC");
  //search for the NFC hardware
  versiondata = nfc.getFirmwareVersion();
  if (versiondata){
    nfc.setPassiveActivationRetries(nfcretries);  // Set the max number of retry attempts to read from a card
    nfc.SAMConfig();                              // configure board to read RFID tags
    terminal.println("NFC started");
    terminal.print(currentTime);
  }

}

/**************************************
  scanNfc
  Get card data from  NFC hardware
**************************************/
void scanNfc() {

  uint8_t uid[maxuidlength] = {0, 0, 0, 0, 0, 0, 0, 0}; // Buffer to store the returned UID
  String  suid;
  uint8_t uidLength = 0;                          // Length of the UID (4 or 7 bytes depending on ISO14443A card type)
  char holder[maxnamelength];

  if (versiondata) {
    nfc.readPassiveTargetID(PN532_MIFARE_ISO14443A, &uid[0], &uidLength);
    if (uidLength) {                                      // found a card
      for (int i = 0; i < uidLength; i++) {
        suid += String(uid[i], HEX);                      // convert the uid to a hex string
      }
      Blynk.virtualWrite(cardiddisplay, suid);           // display the uid
      cardIndex = findUid(suid);
      if (cardIndex) {
        unlockDoor();                                     // unlock the door if the card was valid
        Blynk.virtualWrite(namedisplay, cardHolder[cardIndex]); //display the card holder name on the app
        terminal.print(cardHolder[cardIndex]);  // send debug data to the terminal
        terminal.print(" ");
        terminal.print(currentTime);
        terminal.print(" ");
        terminal.println(currentDate);
        terminal.println(cardId[cardIndex]);
        terminal.flush();
        Blynk.virtualWrite(indexdisplay, cardIndex);  // display the card index on the app
        return;                                       // card found exit
      }
      storeCard(0, suid, String(" "), 0);             // no card found clear card display
      Blynk.virtualWrite(namedisplay, " ");           // clear name display on the app
      Blynk.virtualWrite(indexdisplay, 0);            // set index display to 0 on the app
    }
  } else {
    setupnfc();                                       // if hardware not found then start it now.
  }
}
SPIFFS file
bool openspiffs(){

    datafile = SPIFFS.open(carddatafile, "r+b");        // exsisting file opened
    if (!datafile){
          datafile = SPIFFS.open(carddatafile, "w+b");  // create new file
    }
  return datafile;
}

void closespiffs(){

    if (datafile){
          datafile.close();
    }
}


void writestringdata(uint16_t whatbyte, int howlong, String databuffer){
    byte s[maxnamelength+1];
    datafile.seek(DATASTART+whatbyte, SeekSet);

    databuffer.getBytes(s, howlong);
    datafile.write(s, howlong);
    datafile.flush();
}

String readstringdata(uint16_t whatbyte, int howlong){
  char s[maxnamelength+1];
  byte s2[maxnamelength+1];

  datafile.seek(DATASTART+whatbyte, SeekSet);
  datafile.read(s2, howlong);
  for ( int i = 0; i < howlong; i++)
    s[i] = char(s2[i]);
    s[howlong] = 0;
  return String(s);
}


uint16_t read16data(uint16_t whatbyte){
  uint16_t out;
  uint8_t high;
  uint8_t low;

  datafile.seek(DATASTART+whatbyte, SeekSet);
  datafile.read(&high, 1);
  datafile.read(&low, 1);

  out = high << 8;
  out += low;
  return out;
 }

void write16data(uint16_t whatbyte, uint16_t databuffer){
  uint8_t high;
  uint8_t low;
  high = highByte(databuffer);
  low = lowByte(databuffer);
  datafile.seek(DATASTART+whatbyte, SeekSet);
  datafile.write(&high, 1);
  datafile.write(&low, 1);
  datafile.flush();
 }

void getdatafromfile(){
  if (openspiffs()){
  rowIndex = read16data(0);                                                   //read the card count from spiffs

  uint16_t buffer_offset = recordlength;                                    //start at record 1
    Blynk.virtualWrite(vcount, rowIndex);       // write the rowIndex to the server

  for (int i = 1; i <= rowIndex; i++){                                             // read all the card data
//  read16data(buffer_offset, tempindex);                                       // skip the index
    buffer_offset += 2;
    cardHolder[i] = readstringdata(buffer_offset, maxnamelength);
    buffer_offset += maxnamelength;
    cardId[i] = readstringdata(buffer_offset, maxuidlength);
    buffer_offset += maxuidlength;
    accessFlags[i] = read16data(buffer_offset);
    buffer_offset += 2;
    yield();
  }
  closespiffs();
  }
}

void dumpdatafromfile(){
  String ch;
  String cId;
  int af;
  int ri;
  int tempIndex;
  uint16_t buffer_offset = recordlength;                                    //start at record 1

    if ( openspiffs()){
    tempIndex = read16data(0);                                                   //read the card count from fram address 0
    terminal.println("index "+String(tempIndex));
  for (int i = 1; i <= tempIndex; i++){                                             // read all the card data
    ri = read16data(buffer_offset);
    buffer_offset += 2;
    ch = readstringdata(buffer_offset, maxnamelength);
    buffer_offset += maxnamelength;
    cId = readstringdata(buffer_offset, maxuidlength);
    buffer_offset += maxuidlength;
    af = read16data(buffer_offset);
    buffer_offset += 2;
    terminal.println("index: " + String(ri) + " holder:  " + ch + " ID:  " + cId + " flags: " + String(af));
    yield();
  }
  terminal.flush();
  closespiffs();
    }
}
Wifi file
//callback notifying us of the need to save config
void saveConfigCallback () {
  shouldSaveConfig = true;
}

void restoreparameters() {

  if (SPIFFS.begin()) {
    if (SPIFFS.exists("/config.json")) {
      //file exists, reading and loading
      File configFile = SPIFFS.open("/config.json", "r");
      if (configFile) {
        size_t size = configFile.size();
        // Allocate a buffer to store contents of the file.
        std::unique_ptr<char[]> buf(new char[size]);
        configFile.readBytes(buf.get(), size);
        DynamicJsonBuffer jsonBuffer;
        JsonObject& json = jsonBuffer.parseObject(buf.get());
        //        json.printTo(Serial);
        if (json.success()) {
          // json will parse the file for the variable name and load it into the supplied variable
          strcpy(mqtt_server, json["mqtt_server"]);     //get the mqtt_server <== you need one of these for each param
          strcpy(mqtt_port, json["mqtt_port"]);         //get the mqtt port
          strcpy(blynk_token, json["blynk_token"]);     //get the blynk token
        }
        configFile.close();
      }
    }
  }
}


void startmywifi() {
  //Local intialization. Once its done, there is no need to keep it around
  WiFiManager wifiManager;

  //set config save notify callback
  wifiManager.setSaveConfigCallback(saveConfigCallback);

  // The extra parameters to be configured (can be either global or just here)
  // After connecting, parameter.getValue() will get you the configured value
  // id/name placeholder/prompt default length
  WiFiManagerParameter custom_mqtt_server("server", "mqtt server", mqtt_server, 40);
  WiFiManagerParameter custom_mqtt_port("port", "mqtt port", mqtt_port, 6);
  WiFiManagerParameter custom_blynk_token("blynk", "blynk token", blynk_token, 32);

  //set static ip if you want
  //  wifiManager.setSTAStaticIPConfig(IPAddress(10,0,1,99), IPAddress(10,0,1,1), IPAddress(255,255,255,0));

  //  <============== add all your parameters here
  wifiManager.addParameter(&custom_mqtt_server);
  wifiManager.addParameter(&custom_mqtt_port);
  wifiManager.addParameter(&custom_blynk_token);

  //reset settings - for testing
  //    wifiManager.resetSettings();    // <========= once you have this working you can comment out this line

  //set minimu quality of signal so it ignores AP's under that quality
  //defaults to 8%
  //wifiManager.setMinimumSignalQuality();

  //sets timeout until configuration portal gets turned off
  //useful to make it all retry or go to sleep
  //in seconds
  //wifiManager.setTimeout(120);

  //fetches ssid and pass and tries to connect
  //if it does not connect it starts an access point with the specified name
  //and goes into a blocking loop awaiting configuration
  if (!wifiManager.autoConnect("AutoConnectAP", "password")) {
    ESP.reset();    //reset and try again
  }

  //if you get here you have connected to the WiFi

  //get the custom parameters here
  strcpy(mqtt_server, custom_mqtt_server.getValue());
  strcpy(mqtt_port, custom_mqtt_port.getValue());
  strcpy(blynk_token, custom_blynk_token.getValue());

  //check the flag to see if we save the custom parameters to FS
  if (shouldSaveConfig) {
    DynamicJsonBuffer jsonBuffer;
    JsonObject& json = jsonBuffer.createObject();

    //set the custom parameters here
    json["mqtt_server"] = mqtt_server;
    json["mqtt_port"] = mqtt_port;
    json["blynk_token"] = blynk_token;

    File configFile = SPIFFS.open("/config.json", "w");
    if (configFile) {
      json.printTo(configFile);   //write the custom parameters here
      configFile.close();
    } else Serial.println("failed to open config file for writing");
    //end save
  }
}