Hey guys, I need a code that when i pressed v2(lock) and v3(unlock) its send to an email.
this is the code that I used.
#define BLYNK_PRINT Serial

#include <ESP8266WiFi.h>

#include <BlynkSimpleEsp8266.h>

#include <Servo.h>

// You should get Auth Token in the Blynk App.

// Go to the Project Settings (nut icon).

char auth[] = "..";

// Your WiFi credentials.

// Set password to "" for open networks.

char ssid[] = "testwifi1";

char pass[] = "admin123";

Servo servo;

BLYNK_WRITE(V3) {

servo.write(param.asInt());

}

void setup() {

// Debug console Serial.begin(115200);

Blynk.begin(auth, ssid, pass);


servo.attach(15); // 15 means D8 pin of ESP8266

}

void loop()

{


}
So i finally found my code. but i want it to send an email to me if i pressed V1 and V2.can you help me out?it only can send me 1 email so far my experiment.
#define BLYNK_PRINT Serial
#include <ESP8266WiFi.h>
#include <BlynkSimpleEsp8266.h>
#include <Servo.h>

Servo servo;

const char auth[] = "...";
char ssid[] = "testwifi1";
char pass[] = "admin123";

int buttonStatePrev;

void setup()
{
  Serial.begin(9600);
  Blynk.begin(auth, ssid, pass);
  while (Blynk.connect() == false) {
    // Wait until connected
  }

  servo.attach(15); // NodeMCU D8 pin
 buttonStatePrev = HIGH;
 }

void loop()
{

  Blynk.run();
   int buttonStateCurr = digitalRead(5);

}


BLYNK_WRITE(V1)
{
  servo.write(0);
   int buttonStateCurr = digitalRead(15);
  if (buttonStateCurr == LOW && buttonStatePrev == HIGH) {
    Serial.println("Button is held down but activated the function only ONCE.");
     Blynk.email("yourmail@gmail.com", "Door Unlock By Someone!"," ");

    delay(10);
  }
   buttonStatePrev = buttonStateCurr;

}
BLYNK_WRITE(V2)
{
  servo.write(90);
   int buttonStateCurr = digitalRead(15);
  if (buttonStateCurr == LOW && buttonStatePrev == HIGH) {
    Serial.println("Button is held down but activated the function only ONCE.");
     Blynk.email("yourmail@gmail.com", "Door Lock And Secure!", " ");

    delay(10);
  }
   buttonStatePrev = buttonStateCurr;

}
Why do you feel the need to capture the state of GPIO5 thousands of times per second and store this information in a variable that isn’t used elsewhere (and can’t be used elsewhere because you’ve declared it as a local variable)?
To be honest, I’m a bit baffled as to what this project is actually meant to do. It’s clearly something to do with a door lock and seems to involve some sort of servo, but the code to operate the servo (which presumably is meant to actuate the lock) seems incomplete.
You’ve not explained how any of this is connected-up, and if there’s any method - other than Blynk - to actuate the lock mechanism.
I don’t understand why you’re using two button widgets to perform a lock/unlock process (two states only) when a single widget would perform this task.
I’m also unclear as to why you’d want to recieve an email every time the lock is opened and closed. I would have thought that something like the Table widget would have been a better option, with an alert if the lock is left in the unlocked state for more than a certain duration, or after a certain time of night.
Once you’ve established what you want your project to do, you need to break it down into individual functions, then code and test these functions. Each line of code should have a purpose, and ideally it should have sufficient comments to explain what it’s doing and why. This makes debugging and future enhancements much simpler, and is something that should be done as the code is written, not afterwards.
If you don’t understand what each line of the code you’re using does then you need to learn more about coding.
@PeteKnight I really think there should be mandatory programming courses in junior year as a prerequisite for all these “senior year projects” that end up on our forum with a plea for help, due to not having much of a clue
@KanekiKen If you don’t understand coding… they try to just make a working example directly from the App digital pin controls and the eventor widget? Or take a crash course in C++ type Arduino programming
We are here to help you learn about Blynk… pointing out documentation, suggesting ideas, referencing relevant examples and so on… not teach programming or hands on assistance for your schooling needs.
Search this forum for other door lock related topics… perhaps you will find something.
yeah. not many people here know about programming and we dont have any programming class here . I’m just asking for opinion about my code on what i need to improved. Where I’m from only 4 or 5 people know your apps. I’m not living a modern city you know.
Then is your choice of senior project your own, or a requirement?? If no programming class exists then it seems odd if a requirement
Regardless…
Along with clicking on the door lock search link above (in green) I recommend you start out with the various component examples to learn how Blynk works with each component… then you can have a better understanding on how to merge various parts together (button widgets, servo action, timers & email).
And so on…
Also some tips on how to properly run Arduino code with Blynk…
Its my choice. Im just bored seeing the same login system projects over the years. when i discover iot and your apps i thought it will a fun way to learn coding and at the same time promote iot. Btw, thanks for the link.
Well, start by breaking your needs into steps and lay it out psudocode style…
Check for button/switch press
determine it’s state (ON or OFF)
open/close lock depending on state
send email as required
BLYNK_WRITE(V0) {  // This function is called eac time a Button, set for Switch Mode, on virtual Pin V0, is pressed
  if(param.asInt()==1) { // If button switch is ON
  // Open lock
  // send email saying unlocked
  } else { // If button switch is OFF
    // Close lock
    // send email saying locked
    }
}
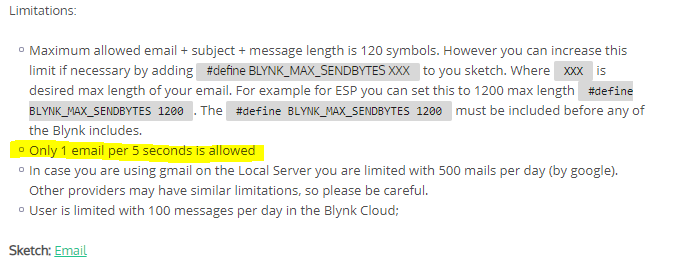
But since email can’t be sent so frequently… you need to add in additional logic and timers.
“Clear Flag” set for 5+ seconds before OK
If need to send email, check if clear flag is OK
If clear flag is OK, send email
if clear flag is NOT OK wait until OK to send email, then reset flag
Now this one can be done in a few different ways… BlynkTimer, logic flags (if x==1 then do something, else don’t do something), or a combo of both.
Lay out your goals/steps/problems… then start work on the first problem, but substitute sending the email with sending a serial print message instead (no limitations there )… then work on the next step, and so on.