Please Help, Im trying to connect DHT11 with a Moisture sensor the code up loads DH11 shows the reading on the gauge but the moisture sensor doesnt show anything on the gauge when placed into a cup of water, this is my code
#define BLYNK_PRINT Serial    // Comment this out to disable prints and save space
#include <SPI.h>
#include <ESP8266WiFi.h>
#include <BlynkSimpleEsp8266.h>
#include <SimpleTimer.h>
#include <DHT.h>


char auth[] = "*************"; //Auth code


char ssid[] = "********";  //WIFI Name
char pass[] = "***********";  //WIFI Password

#define DHTPIN 2          // Digital pin 4
#define soilPin 0

// Uncomment whatever type you're using!
#define DHTTYPE DHT11     // DHT 11

DHT dht(DHTPIN, DHTTYPE);
SimpleTimer timer;

void sendSensor()
{
  float h = dht.readHumidity();    // in %
  float t = dht.readTemperature(); // in C

  if (isnan(h) || isnan(t)) {
    Serial.println("Failed to read from DHT sensor!");
    return;
}

  Blynk.virtualWrite(V5, h);  //V5 is for Humidity
  Blynk.virtualWrite(V6, t);  //V6 is for Temperature
}

void sendsoilSensor()
{
   float s = analogRead(soilPin);

   if (isnan(s)) {
     Serial.println("Failed to read from Gas sensor!");
     return;
}

   Blynk.virtualWrite(V7, s);
}

void setup()
{
  Serial.begin(9600); // See the connection status in Serial Monitor
  Blynk.begin(auth, ssid, pass);

  dht.begin();

  timer.setInterval(1000L, sendSensor);
}

void loop()
{
  Blynk.run(); // Initiates Blynk
  timer.run(); // Initiates SimpleTimer
}
I got the sensor to work now, however its reading 1024 when dry and when wet it drops down to 500 something, i would like to make it to 0 dry and max 100 when wet any ideas how to do this ?
#define BLYNK_PRINT Serial    // Comment this out to disable prints and save space
#include <SPI.h>
#include <ESP8266WiFi.h>
#include <BlynkSimpleEsp8266.h>
#include <SimpleTimer.h>
#include <DHT.h>


char auth[] = "b3abafaab77243a88a0"; //Auth code


char ssid[] = "BEL";  //WIFI Name
char pass[] = "E4E49";  //WIFI Password

#define DHTPIN 2          // Digital pin 4
#define soilMoisterPin A0
#define soilMoisterVcc D4
int soilMoister = 0;


// Uncomment whatever type you're using!
#define DHTTYPE DHT11     // DHT 11

DHT dht(DHTPIN, DHTTYPE);
SimpleTimer timer;

void sendSensor()
{
  float h = dht.readHumidity();    // in %
  float t = dht.readTemperature(); // in C

  if (isnan(h) || isnan(t)) {
    Serial.println("Failed to read from DHT sensor!");
    return;
}

  Blynk.virtualWrite(V5, h);  //V5 is for Humidity
  Blynk.virtualWrite(V6, t);  //V6 is for Temperature
}

void getSoilMoisterData(void)
{
  soilMoister = 0;
  digitalWrite (soilMoisterVcc, HIGH);
  delay (500);
  int N = 3;
  for(int i = 0; i < N; i++) // read sensor "N" times and get the average
  {
    soilMoister += analogRead(soilMoisterPin);
    delay(150);
  }
  digitalWrite (soilMoisterVcc, LOW);
  soilMoister = soilMoister/N;
  Serial.println(soilMoister);
  soilMoister = map(soilMoister, 0, 1023, 1023, 0);


}


void setup()
{
  Serial.begin(9600); // See the connection status in Serial Monitor
  Blynk.begin(auth, ssid, pass);

  dht.begin();

  timer.setInterval(1000L, sendSensor);
}

void loop()
{
  Blynk.run(); // Initiates Blynk
  timer.run(); // Initiates SimpleTimer
}
Ok its done now sorry first time on here, if I short the two legs of the moisture sensor is goes to 0 but when I remove short it goes to 1024 I would like to make it the opposite and using value 100. No matter what I do in the mapping section it doesn’t change a thing
That is why there is a Welcome Topic for new users to read so they don’t use the “new here” excuse
As for your issue… we don’t really teach programming here… but try to focus on helping new users understand how Blynk works.
Not exactly sure if related to your issue… but you can reverse a Widgets MIN/MAX settings so they respond to reverse input. Or even negative settings, etc… experiment and see.
Heheh happens after programming for 7 hours anyways I did get it to read 100 now with your previous comment but the gauge is fully highlighted at 0 do you have any fixes for that ?
so now I put it to soilMoister = map(soilMoister, 0, 100, 100, 0); and on the widget i made i pressed the button inbetween 0 100 the squiggly line thingy but its still reading 100 if i reverse it it reads 0 but the widget is to 100%
Just never use that squiggly thing … it rarely seems to work properly.
map() is the way to go.
Again, sorry but my mind is not picking up this simple issue… Long day programming blinky LEDs with lambda functions… very worthy stuff
Not sure if it is related, but long ago I did some strangeness with widgets like this
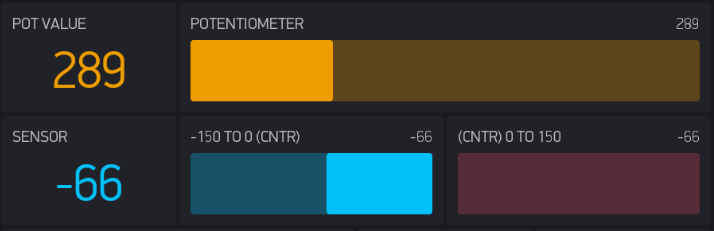
  LVLval = map(analogRead(2), 0, 1023, -150, 150); // Mapped from POT
  Blynk.virtualWrite(V28, LVLval);  // Mapped sensor simulation value
  Blynk.virtualWrite(V26, LVLval);  // Upper Bar (0 to 150)
  Blynk.virtualWrite(V27, LVLval);  // Lower Bar (-150 to 0)
lol idk what its called its in the screen when you edit widget but i got it to work now it reads 0%, when i put in the probe the moisture rises. BUT the issue now is the gauge is at max when reading 0 moisture and reading 75% moisture its at a quarter way up the gauge. and what is a lambda function like i said i have no clue what any of these things are everything is trial and error for me
It is called Data Mapping… and best ignored from now on (IMHO ) especially if also using map()
Sound like issues between the map() reversing and the “squiggly” thing… forget them and focus on the Widgets MIN/MAX values… if you set it to 100-0 and not bother with even map() reversing, what happens?
Well… it is doing what you ask, I think… the Gauge Widget doesn’t have a “flip axis” option if that is what you are looking for (AKA fill from right hand side instead of left hand). For that you would have to use the Level Widget
gauge works fine i will just keep the moisture probes in the dirt so it will always read properly i just don’t know why my mapping isn’t changing anything i will have to trouble shoot code thank you for your help i really appreciate it
Hmmm… I would have to built a sketch to test this… but it seems that this is your issue, as how can the map() adjust the variable soilMoister at the same time as reading the same variable?
I always have a 2nd variable to handle the mapping result
I just tried that it didnt work maybe i did it wrong tho ? but if you have the time and you get it going ill be checking this thread, once again thank you for all your help!
 … but FYI, I moderate the “trolls” that beg for help or get cranky when silly things like “rules” interfere
 but its still reading 100 if i reverse it it reads 0 but the widget is to 100%