I am new to coding. I have made the various lessons but now I am trying to make a thermostat with a NodeMCU and a DHT11. I can get it to read the DHT11 and display the value and the relay turns on and off when I move the Set temp slider but when the temp changes below the set temp value the relay does not activate. I do not know how to make the code check for that value. Any help would be appreciated.
**************************************************************
   Blynk is a platform with iOS and Android apps to control
   Arduino, Raspberry Pi and the likes over the Internet.
   You can easily build graphic interfaces for all your
   projects by simply dragging and dropping widgets.

     Downloads, docs, tutorials: http://www.blynk.cc
     Blynk community:            http://community.blynk.cc
     Social networks:            http://www.fb.com/blynkapp
                                 http://twitter.com/blynk_app

   Blynk library is licensed under MIT license
   This example code is in public domain.

 **************************************************************
   This example shows how value can be pushed from Arduino to
   the Blynk App.

   WARNING :
   For this example you ll need SimpleTimer library:
     https://github.com/jfturcot/SimpleTimer
   and Adafruit DHT sensor library:
     https://github.com/adafruit/DHT-sensor-library

   App project setup:
     Value Display widget attached to V5
     Value Display widget attached to V6

 **************************************************************/

#define BLYNK_PRINT Serial    // Comment this out to disable prints and save space
#include <SPI.h>
#include <ESP8266WiFi.h>
#include <BlynkSimpleEsp8266.h>
#include <SimpleTimer.h>
#include <DHT.h>

// You should get Auth Token in the Blynk App.
// Go to the Project Settings (nut icon).
char auth[] = "xxxxxxxxxxx";

// Your WiFi credentials.
// Set password to "" for open networks.
char ssid[] = "xxxxxxxxx";
char pass[] = "xxxxxxxx";

#define PIN D1, OUTPUT
#define DHTPIN 2          // What digital pin we're connected to

// Uncomment whatever type you're using!
#define DHTTYPE DHT11     // DHT 11
//#define DHTTYPE DHT22   // DHT 22, AM2302, AM2321
//#define DHTTYPE DHT21   // DHT 21, AM2301

DHT dht(DHTPIN, DHTTYPE);
SimpleTimer timer;

// This function sends Arduino's up time every second to Virtual Pin (5).
// In the app, Widget's reading frequency should be set to PUSH. This means
// that you define how often to send data to Blynk App.
void sendSensor()
{
  float h = dht.readHumidity();
  float t = dht.readTemperature(true); // or dht.readTemperature(true) for Fahrenheit


  if (isnan(h) || isnan(t)) {
    Serial.println("Failed to read from DHT sensor!");
    return;
  }
  // You can send any value at any time.
  // Please don't send more that 10 values per second.
  Blynk.virtualWrite(V5, h);
  Blynk.virtualWrite(V6, t);

}
BLYNK_WRITE(V1)
{
  int pinValue = param.asInt(); // assigning incoming value from pin V1 to a variable
  // You can also use:
  // String i = param.asStr();
  // double d = param.asDouble();
  float t = dht.readTemperature(true);
  Serial.print("V1 Slider value is: ");
  Serial.println(pinValue);
  Serial.print("V6 value is: ");
  Serial.println(t);
  if (pinValue <= t)
  {
  digitalWrite (D1, HIGH);
  }
  else
  {digitalWrite (D1, LOW);}
}
void setup()
{
  Serial.begin(9600); // See the connection status in Serial Monitor
  Blynk.begin(auth, ssid, pass);

  dht.begin();


  // Setup a function to be called every second
  timer.setInterval(1000L, sendSensor);
}


void loop()
{
   Blynk.run(); // Initiates Blynk
  timer.run(); // Initiates SimpleTimer


}
FYI, as per the instructions in the topic window, that you needed to erase to post this … when pasting code here, please follow the required formatting instructions… I edited your post to correct it.
As for your question… is is more programming 101 then Blunk specific.
Search this forum for keywords like thermostat, etc… as you will find many other topics and examples on various ways of regulating values.
NOTE: A BLYNK_WRITE() function is called only when the corresponding Widget is used… so you need to have your temperature checks and relay controls separate. from the slider function so that the temp value controls the relay, based on the slider, not controlled by the slider.
Thanks for the info on posting. I have been researching this for days and cannot find anything that helps me to understand how to code that part. Every post seems to manage it different and with different equipment so I get thoroughly confused when it comes to my application.
Unfortunately that is the nature of this whole IoT thing… unless you stick within a proprietary brand, everything is open, customisable and variable.
Only by studying/testing how others do things will you find that, even if different, there will be similar coding practices and ideas that you can use in your application.
Yes I understand. I am trying and have tried many various ways. I will keep at it. There’s just so much info out there its hard to wade through it all. I appreciate your help. I understand now this forum is more for Blynk problems then coding problems.
As recommended, use the slider only as a temperature level determinator…
int TempValue; // put this in your pre-setup as a Global variable

BLYNK_WRITE(V1)
{
 TempValue = param.asInt(); // assigning incoming value from pin V1 to a variable
}
Then you can use a timed function to routinely check the temperature, compare it with the set TempValue and react accordingly… NOTE: this is dirt simple and has no hysteresis, so prone to rapid cycling at set point.
RelayControl()
{
  float t = dht.readTemperature(true);

  if (TempValue <= t)
  {
  digitalWrite (D1, HIGH);
  }
  else
  {digitalWrite (D1, LOW);}
}
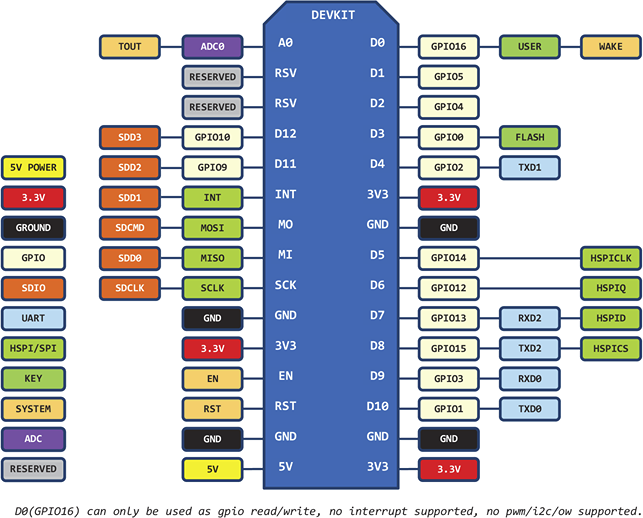
Also note… it is better to use the GPIO/Arduino pin numbering instead of the silkscreened label on the MCU…
The way I did something similar was to use two sliders, one to set the relay on temperature and the other to set the relay off temperature. Just be sure to have a degree or three difference between on and off temperatures. Below is a part of my code that I use, hope you find it helpful.
int fanOn;    // variable to hold temperature for fan to turn on
int fanOff;   // variable to hold temperature for fan to turn off

boolean flag = false;

void setup() {
pinMode(relayPin, OUTPUT);
timer.setInterval(30000L, sendAllData); // set interval and function to call
etc
etc
}

void sendAllData(){

    float temp = bme.readTemperature();
    float pres = bme.readPressure() / 100.0F;
    float humid = bme.readHumidity();

if (temp >= fanOn && flag == false)
    {
      digitalWrite(relayPin, HIGH);  //turn heater/fan on
	flag = true;
	}
else if(temp <= fanOff && flag == true)
    {
      digitalWrite(relayPin, LOW);   //turn heater/fan off
flag = false;
    }


BLYNK_WRITE(V25) // this function sets the heater on temperature via the slider
 {
  fanOn = param.asInt();
}

BLYNK_WRITE(V26) // this function sets the heater off temperature via the slider
{
  fanOff = param.asInt();
}
Your code for turning relay on/off is placed inside the slider code, so it will only be tested when you use the slider.
Move it to the sendSensor function and it will be fine. Like this:
void sendSensor()
{
  float h = dht.readHumidity();
  float t = dht.readTemperature(true); // or dht.readTemperature(true) for Fahrenheit

  if (isnan(h) || isnan(t)) {
    Serial.println("Failed to read from DHT sensor!");
    return;
  }

  Blynk.virtualWrite(V5, h);
  Blynk.virtualWrite(V6, t);

if (pinValue <= t)
  {
  digitalWrite (D1, HIGH);
  }
  else
  {digitalWrite (D1, LOW);}
  }
You can also move the Serial.print lines if you want to.
And your slider code should only check the state of the slider, like this:
BLYNK_WRITE(V1)
{
  int pinValue = param.asInt();
}
I suppose you want to control an air condition or a fan with this code? If it’s a heater the if-test should look like this:
Thanks, I’ve tried this many ways and I cannot get the temp slider to be read automatically.
Every time I move the temp slider the relay will activate properly but if the temp goes higher or
lower than the setting the relay does not change states. I’ve added the int pinValue globally and it
does not help. I ordered a book on Arduino code hopefully it will help but I’m afraid I still won’t understand it because it seems to be a Blynk specific programming problem.