For WeMos baud in sketch and Serial Monitor need both to be 115200.
If still nothing paste your sketch.
For WeMos baud in sketch and Serial Monitor need both to be 115200.
If still nothing paste your sketch.
    void setup() {
    // initialize digital pin LED_BUILTIN as an output.
    pinMode(LED_BUILTIN, OUTPUT);
    }

    // the loop function runs over and over again forever
    void loop() {
    digitalWrite(LED_BUILTIN, HIGH);   // turn the LED on (HIGH is the voltage level)
    delay(1000);                       // wait for a second
    digitalWrite(LED_BUILTIN, LOW);    // turn the LED off by making the voltage LOW
    delay(1000);                       // wait for a second
    }
All your sketch not a few random lines.
/*
  Blink
  Turns on an LED on for one second, then off for one second, repeatedly.

  Most Arduinos have an on-board LED you can control. On the UNO, MEGA and ZERO
  it is attached to digital pin 13, on MKR1000 on pin 6. LED_BUILTIN is set to
  the correct LED pin independent of which board is used.
  If you want to know what pin the on-board LED is connected to on your Arduino model, check
  the Technical Specs of your board  at https://www.arduino.cc/en/Main/Products

  This example code is in the public domain.

  modified 8 May 2014
  by Scott Fitzgerald

  modified 2 Sep 2016
  by Arturo Guadalupi

  modified 8 Sep 2016
  by Colby Newman
*/


// the setup function runs once when you press reset or power the board
void setup() {
  // initialize digital pin LED_BUILTIN as an output.
  pinMode(LED_BUILTIN, OUTPUT);
}

// the loop function runs over and over again forever
void loop() {
  digitalWrite(LED_BUILTIN, HIGH);   // turn the LED on (HIGH is the voltage level)
  delay(1000);                       // wait for a second
  digitalWrite(LED_BUILTIN, LOW);    // turn the LED off by making the voltage LOW
  delay(1000);                       // wait for a second
}
It is just from example sketch from basic category.
Go back to the Blynk sketch you had with 3, 4, 5 being repeated.
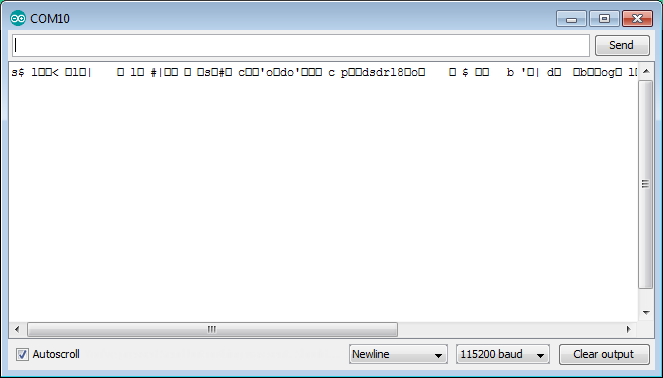
Sorry, if I set the baud rate on 115200, then the serial monitor just appear like this:
Then, can the diode and resistor be removed?
Yes as you are not using 5V then diode is not required. Some examples I have seen have a 10K resistor.
Paste a good sketch and then Serial Monitor will be OK.
#define BLYNK_PRINT Serial
#include <ESP8266WiFi.h>
#include <BlynkSimpleEsp8266.h>

// You should get Auth Token in the Blynk App.
// Go to the Project Settings (nut icon).
char auth[] = "*********************************************";

// Your WiFi credentials.
// Set password to "" for open networks.
char ssid[] = "Redmi 3s";
char pass[] = "***********";

int buzzer = D1 ;// define buzzer Interface
int pin = D0; // define the flame sensor interface
int analoog = A0; // define the flame sensor interface

int val ;// define numeric variables val
float sensor; //read analoog value

BlynkTimer timer;

void readSensor()
{
  sensor = analogRead(analoog);
  Serial.println(sensor);  // display temperature
  //long uptime = millis() / 60000L;

 // You can send any value at any time.
 // Please don't send more that 10 values per second.
 //Blynk.virtualWrite(V1, millis() / 1000);

val = digitalRead (pin) ;// digital interface will be assigned a value of 3 to read val
if (val == HIGH) // When the flame sensor detects a signal, buzzer beep
{
   digitalWrite (buzzer, HIGH);
   Blynk.email("nurlela.dabukke@gmail.com", "Flame!!!", "Sensor activated");
}
   else
{
   digitalWrite (buzzer, LOW);
}
  // Actually send the message.
  // Note:
  //   We allow 1 notification per 15 seconds for now.
  //Blynk.notify(String("Running for ") + uptime + " minutes.");
}

void setup()
{
  pinMode (buzzer, OUTPUT) ;// define buzzer as output interface
  pinMode (pin, INPUT) ;// output interface defines the flame sensor
  pinMode (analoog, INPUT) ;// output interface defines the flame sensor
  // Debug console
  Serial.begin(115200);

  Blynk.begin(auth, ssid, pass);
  // You can also specify server:
  //Blynk.begin(auth, ssid, pass, "blynk-cloud.com", 8442);
  //Blynk.begin(auth, ssid, pass, IPAddress(192,168,1,100), 8442);

  // Notify immediately on startup
  Blynk.notify("Device started");

  // Notify immediately on startup
   if(val==HIGH){
   //Blynk.notify("Flame!!!");
   //Blynk.email("nurlela.dabukke@gmail.com", "Flame!!!", "Sensor activated");
   // Setup a function to be called every minute
   timer.setInterval(10L, readSensor);
 }
  // Setup a function to be called every 200ms Costas
  timer.setInterval(150L, readSensor);  // Costas
  //Blynk.email("nurlela.dabukke@gmail.com", "Flame!!!", "Sensor activated");
 }

void loop()
{
   Blynk.run();
   timer.run();
}
The value in serial monitor amount 840 and 841 when the fire is off. Whereas the fire is on, the value is amount 40 and 41. But, the buzzer still can’t rang. Whereas, I have set the circuit like this:
Ok that’s some progress. Not sure it should be those numbers but if it’s consistent we could work with it.
It’s just a case of using Arduino’s map function (not Blynk’s map widget). Let me look over the code and get back to you but meanwhile study this map() - Arduino Reference
Use this as your new readSensor() function and hopefully the buzzer will work. Don’t try email / notify yet because you might get blocked for sending too frequently until the sketch has been thoroughly debugged.
void readSensor()
{
  sensor = analogRead(analoog);
  Serial.println(sensor);  // display temperature
  // You can send any value at any time but don't send more that 10 values per second.
  //Blynk.virtualWrite(V1, sensor);  // if you have a display widget set up on V1 you can uncomment this
  if (sensor < 100) // When the flame sensor detects a signal, buzzer beep
  {
    digitalWrite (buzzer, HIGH);
    // Send email and PUSH messages but max 1 every 15s, logic to be added for this
    //Blynk.email("nurlela.dabukke@gmail.com", "Flame!!!", "Sensor activated");
    //Blynk.notify("Flame detected") + uptime + " minutes.");
  }
    else
  {
    digitalWrite (buzzer, LOW);
  }
}
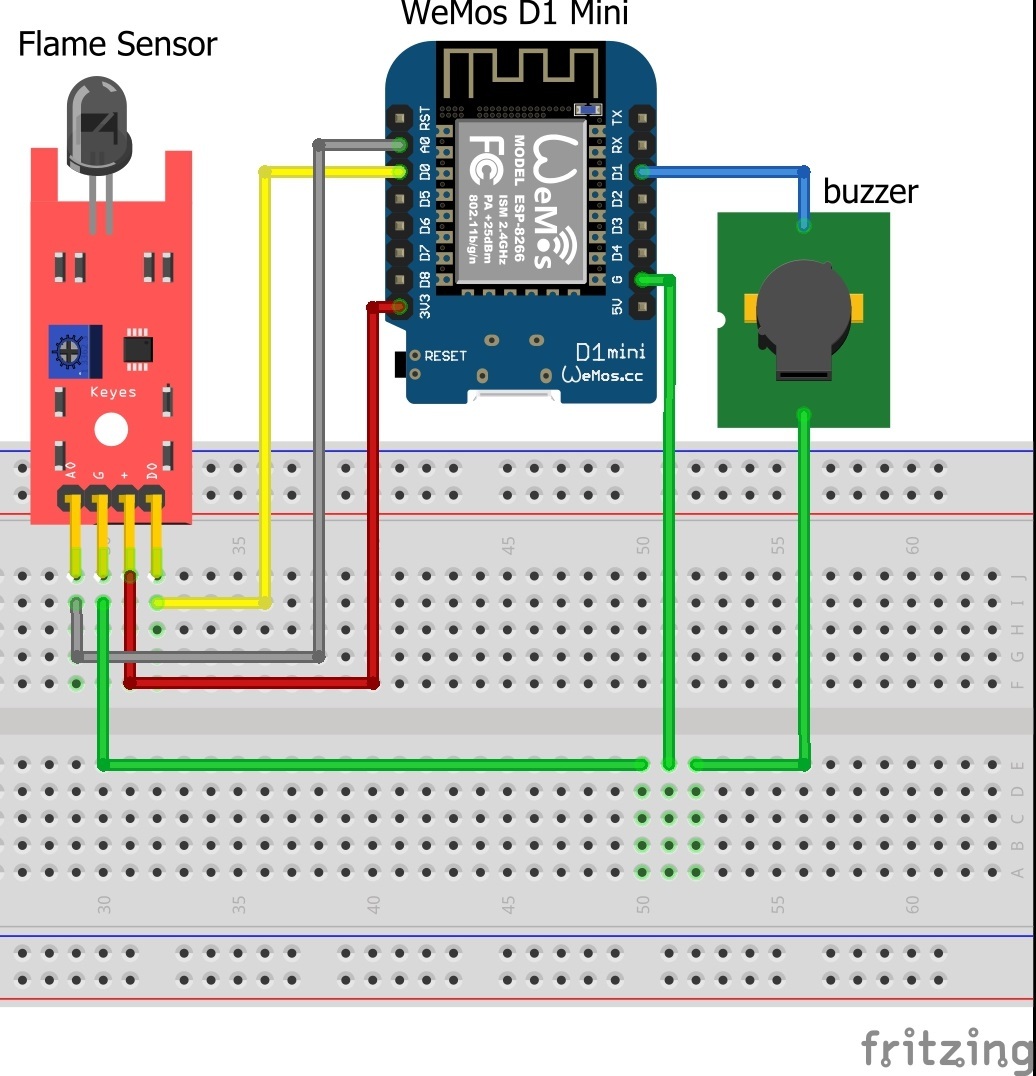
I set the GND from the sensor, buzzer, and Wemos parallel on the breadboard whereas the others directly to Wemos. Is it wrong?
Cause I have paste the new readSensor function, but the buzzer still can’t rang. Even the LED on the sensor is off. But, the GND pin on Wemos is only one, not like Arduino board have many GND pin.
Paralle GND should be fine.
Did you use the latest version of the function as originally I had > 100 (as that is the normal way)?
Is the secondary LED still coming on and off as you add and subtract the flame? Also are the sensor values still displaying correctly in Serial Monitor. You can send the values to Blynk now if you uncomment the virtualWrite() and you have a display widget (on V1 or whatever you set it at).
Yes, I have paste that function. Even all LEDs on the sensor is off.
Actually, my circuit is like this:
In the breadboard, there are only GND whereas the others connect directly to Wemos.
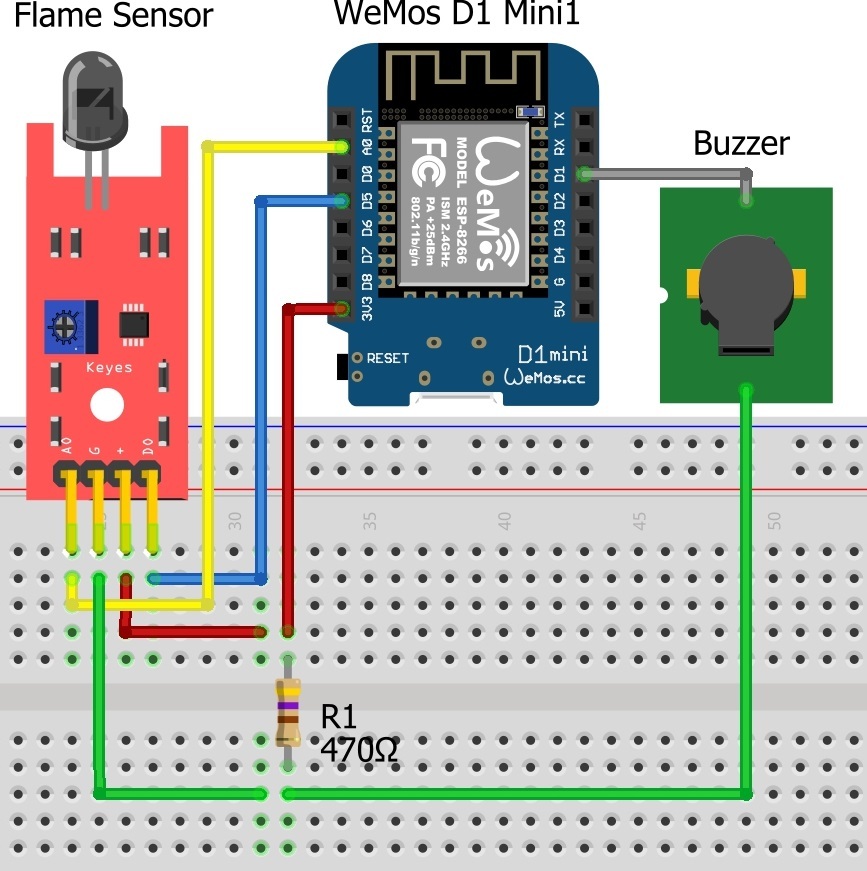
I don’t think you need the yellow wire because the sensor has a digital and an analog interface. The sketch is using the analog pin.
Paste your full sketch again.
#define BLYNK_PRINT Serial
#include <ESP8266WiFi.h>
#include <BlynkSimpleEsp8266.h>

// You should get Auth Token in the Blynk App.
// Go to the Project Settings (nut icon).
char auth[] = "f40e7c2f2e3245258332dbc89c7e9e78";

// Your WiFi credentials.
// Set password to "" for open networks.
char ssid[] = "Redmi 3s";
char pass[] = "69AEE473";

int buzzer = D1 ;// define buzzer Interface
int pin = D0; // define the flame sensor interface
int analoog = A0; // define the flame sensor interface

int val ;// define numeric variables val
float sensor; //read analoog value

BlynkTimer timer;

//void readSensor()
//{
//sensor = analogRead(analoog);
//Serial.println(sensor);  // display temperature
//long uptime = millis() / 60000L;

// You can send any value at any time.
// Please don't send more that 10 values per second.
//Blynk.virtualWrite(V1, millis() / 1000);

 //val = digitalRead (pin) ;// digital interface will be assigned a value of 3 to read val
 //if (val == HIGH) // When the flame sensor detects a signal, buzzer beep
 //{
 //digitalWrite (buzzer, HIGH);
 //Blynk.email("nurlela.dabukke@gmail.com", "Flame!!!", "Sensor activated");
 //}
 //else
 //{
 //digitalWrite (buzzer, LOW);
 //}
 // Actually send the message.
 // Note:
 //   We allow 1 notification per 15 seconds for now.
 //Blynk.notify(String("Running for ") + uptime + " minutes.");
 //}

void readSensor()
{
   sensor = analogRead(analoog);
   Serial.println(sensor);  // display temperature
   // You can send any value at any time but don't send more that 10 values per second.
   //Blynk.virtualWrite(V1, sensor);  // if you have a display widget set up on V1 you can uncomment this
   if (sensor < 100) // When the flame sensor detects a signal, buzzer beep
{
   digitalWrite (buzzer, HIGH);
   // Send email and PUSH messages but max 1 every 15s, logic to be added for this
   //Blynk.email("nurlela.dabukke@gmail.com", "Flame!!!", "Sensor activated");
   //Blynk.notify("Flame detected") + uptime + " minutes.");
 }
   else
{
   digitalWrite (buzzer, LOW);
}
}

void setup()
{
   pinMode (buzzer, OUTPUT) ;// define buzzer as output interface
   pinMode (pin, INPUT) ;// output interface defines the flame sensor
   pinMode (analoog, INPUT) ;// output interface defines the flame sensor
   // Debug console
   Serial.begin(115200);

   Blynk.begin(auth, ssid, pass);
   // You can also specify server:
   //Blynk.begin(auth, ssid, pass, "blynk-cloud.com", 8442);
   //Blynk.begin(auth, ssid, pass, IPAddress(192,168,1,100), 8442);

  // Notify immediately on startup
  Blynk.notify("Device started");

  // Notify immediately on startup
  if(val==HIGH){
  //Blynk.notify("Flame!!!");
  //Blynk.email("nurlela.dabukke@gmail.com", "Flame!!!", "Sensor activated");
  // Setup a function to be called every minute
  timer.setInterval(10L, readSensor);
 }
    // Setup a function to be called every 200ms Costas
    timer.setInterval(150L, readSensor);  // Costas
    //Blynk.email("nurlela.dabukke@gmail.com", "Flame!!!", "Sensor activated");
 }

 void loop()
 {
     Blynk.run();
     timer.run();
 }
I still use D0 for digital pin on my sketch.
Remove or uncomment all of this in setup():
  // Notify immediately on startup
  if(val==HIGH){
  //Blynk.notify("Flame!!!");
  //Blynk.email("nurlela.dabukke@gmail.com", "Flame!!!", "Sensor activated");
  // Setup a function to be called every minute
  timer.setInterval(10L, readSensor);
 }
I don’t know why adding the buzzer should stop your sketch working when it appeared OK without it.
Maybe the buzzer needs 5V. As a quick test switch the buzzer for an LED and resistor.
Anyway, how much resistor value is needed? Is any resistor still ok?
330R or 470R.
I have add resistor 470 ohm as the follow.
The email come in, but the buzzer still can’t rang.
And here is my code:
#define BLYNK_PRINT Serial
#include <ESP8266WiFi.h>
#include <BlynkSimpleEsp8266.h>

// You should get Auth Token in the Blynk App.
// Go to the Project Settings (nut icon).
char auth[] = "***********************************************";

// Your WiFi credentials.
// Set password to "" for open networks.
char ssid[] = "Redmi 3s";
char pass[] = "***********";

int buzzer = D1 ;// define buzzer Interface
int pin = D0; // define the flame sensor interface
int analoog = A0; // define the flame sensor interface

int val ;// define numeric variables val
float sensor; //read analoog value

BlynkTimer timer;
void readSensor()
{
  sensor = analogRead(analoog);
  Serial.println(sensor);  // display temperature
  // You can send any value at any time but don't send more that 10 values per second.
  //Blynk.virtualWrite(V1, sensor);  // if you have a display widget set up on V1 you can uncomment this
  if (sensor < 100) // When the flame sensor detects a signal, buzzer beep
  {
     digitalWrite (buzzer, HIGH);
     // Send email and PUSH messages but max 1 every 15s, logic to be added for this
     Blynk.email("nurlela.dabukke@gmail.com", "Flame!!!", "Sensor activated");
     //Blynk.notify("Flame detected") + uptime + " minutes.");
  }
     else
 {
     digitalWrite (buzzer, LOW);
  }
  }

 void setup()
 {
    pinMode (buzzer, OUTPUT) ;// define buzzer as output interface
    pinMode (pin, INPUT) ;// output interface defines the flame sensor
    pinMode (analoog, INPUT) ;// output interface defines the flame sensor
    // Debug console
    Serial.begin(115200);

    Blynk.begin(auth, ssid, pass);
    // You can also specify server:
    //Blynk.begin(auth, ssid, pass, "blynk-cloud.com", 8442);
    //Blynk.begin(auth, ssid, pass, IPAddress(192,168,1,100), 8442);

   // Notify immediately on startup
   Blynk.notify("Device started");

   // Notify immediately on startup
   if(val==HIGH){
   Blynk.notify("Flame!!!");
   Blynk.email("nurlela.dabukke@gmail.com", "Flame!!!", "Sensor activated");
   //Setup a function to be called every minute
   timer.setInterval(10L, readSensor);
}
   // Setup a function to be called every 200ms Costas
   timer.setInterval(150L, readSensor);  // Costas
   //Blynk.email("nurlela.dabukke@gmail.com", "Flame!!!", "Sensor activated");
}

void loop()
{
    Blynk.run();
    timer.run();
 }