Working with Blynk app and stepper motors for the first time
I am unable to control the motor. I also dont have much experience in coding and also couldn’t find much help regarding this project on internet. Hence, the code typed below is generated by ChatGPT. I would be really grateful if somebody helps me out with this or teaches me how to do the coding for this project . I have mentioned every detail of the project below.
• Hardware Used : Nema 17 Stepper Motor, A4988 Driver and NodeMCU.
• Communication type : WiFi using Blynk App ( Version - 3.5.1 (0) )
• Smartphone OS (iOS 16.3.1)
• Blynk Library version : 1.2.0
• Sketch Code:
#include <BlynkSimpleEsp8266.h>
#include <AccelStepper.h>

// Define the pins for the stepper motor
#define dirPin D2
#define stepPin D1
#define enablePin D3

// Initialize the stepper motor
AccelStepper stepper(1, stepPin, dirPin);

char auth[] = "your_auth_token";

void setup() {
  // Set the enable pin as an output
  pinMode(enablePin, OUTPUT);
  digitalWrite(enablePin, LOW);

  // Set the stepper motor properties
  stepper.setMaxSpeed(1000);
  stepper.setAcceleration(500);

  // Connect to Blynk
  Blynk.begin(auth, "NAYAK", "whitetiger065");
}

void loop() {
  Blynk.run();
}

BLYNK_WRITE(V1) {
  // This function will be called every time the button widget in V1 is pressed or released
  int value = param.asInt();
  if (value == 1) {
    digitalWrite(enablePin, HIGH); // Enable the driver
    stepper.move(1000); // Move the stepper motor 1000 steps
    stepper.runToPosition(); // Wait for the stepper motor to finish moving
    digitalWrite(enablePin, LOW); // Disable the driver
  }
}
Respected sir,
I am a complete newbie to this project. I am absolutely clueless about the entire coding and blynk integration. Could you please explain this to me in detail or can we get on a zoom call if you don’t mind? I will be requiring help throughout the project right from the start.
Thank you very much!
My advice to “newbies” is to start by reading the documentation…
then search this form, as opposed to the internet in general, for information that relates to what you are trying to achieve.
You seem to have the wrong idea about how this community of Blynk users works.
Many of us are happy to help by signposting other Blynk users in the right direction, but you’ll generally find that most of draw the line at zoom calls or extended periods of support for people who have little existing C++ and MCU knowledge.;
I’ve given you some signposting tips above, once you’ve read the documentation they should make more sense to you.
If you have any follow-up questions afterwards then feel free to ask.
Hey!
Thank you very much for the helpful information but these are the steps I’ve already read in the documentation. I have also succesfully set up my device online. The only issue is regarding the coding of the project. That is something for which I am unable to find any help online.
How can I get help for the coding counterpart now?
I’d start by answering each of my bullet point questions (except the tongue-in-cheek one about ChatGPT). That way we will be able to understand far more.
The next step after that will be to get you to add this line of code near the top of your sketch…
#define BLYNK_PRINT Serial
and this line of code at the beginning of your void setup()…
Serial.begin(74880);
Then to share your serial output by copying the text and pasting it between triple backticks the same way that you did with your code.
Do you have the correct port selected, and your baud rate set correctly in your serial monitor?
If so then disconnect everything from your NodeMCU apart from the USB cable close/re-open your serial monitor and press the RST button on your NodeMCU.
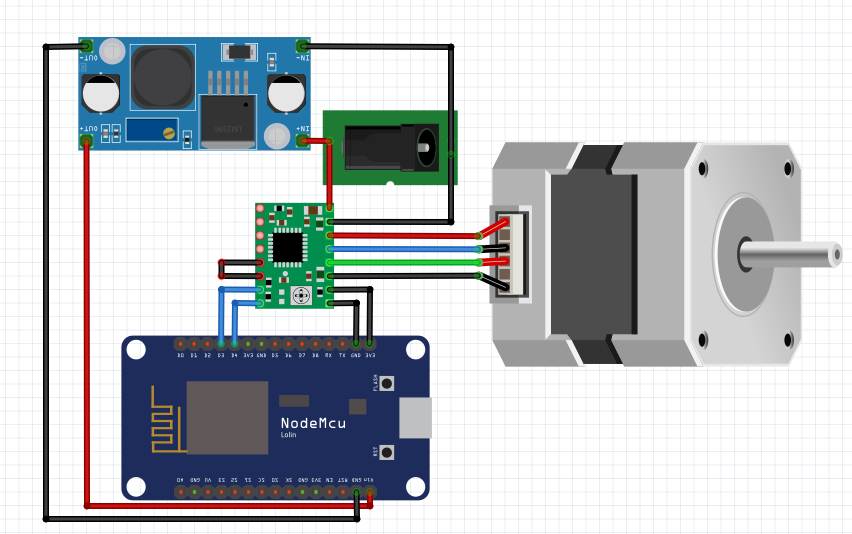
Can anybody just please give me the final corrected code? Its’ getting really confusing for me. The light blue component is just a LM2596 step down module I’ve used to give input voltage to the node MCU (12V to 4.5V). The green component at the centre is the A4988 Driver. Here is my circuit diagram…
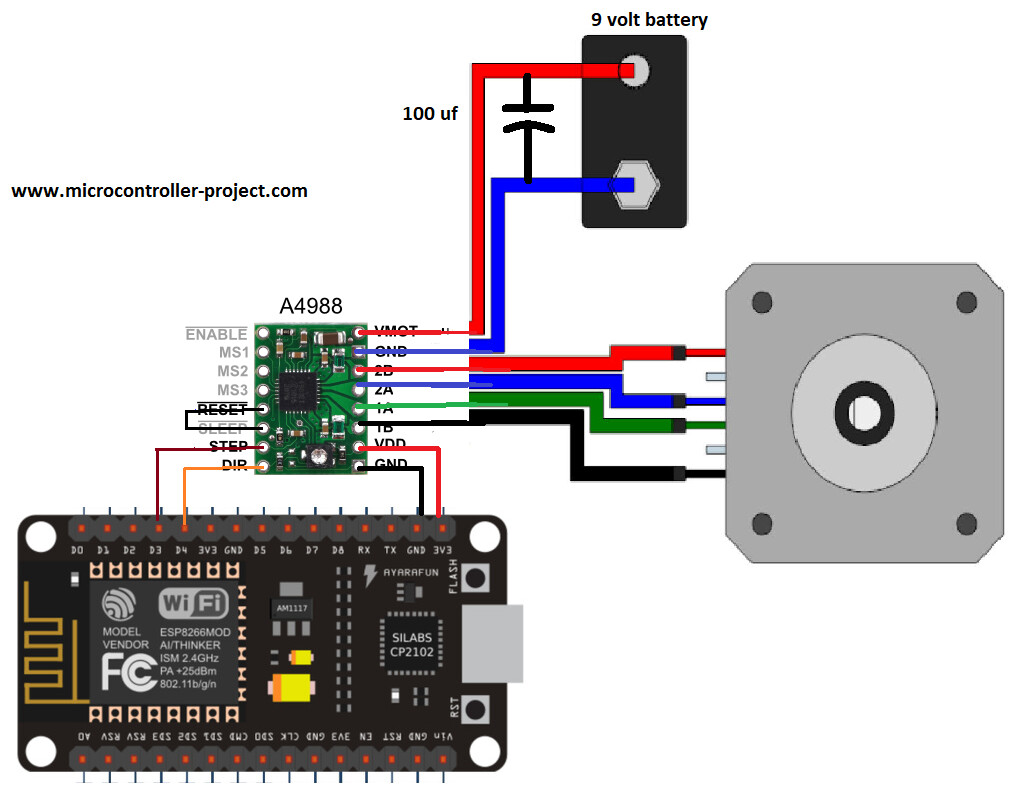
Can we please start from scratch? That way even I’ll get a hang of why and what I’m coding. The code I’m using right now was generated by ChatGPT and also the connections don’t match with my circuit diagram… Here is a circuit diagram with the labellings of components for your easier understanding…
I have tested many codes from ChatGPT, it’s suitable only for very basic sketches like blinking an led.
When you ask for complex codes, it just includes unknown/non-existing library and commands that don’t exist. 90% of the times the code doesn’t even compile.
To summarise, one cannot depend on GPT to get the code.
I would suggest you to learn the basics, so that you have enough knowledge to say whether the code given is correct or not. And you can rectify the code.
If you just try to copy paste the ready code, it will be hard to build projects.
/*************************************************************

  This is a simple demo of sending and receiving some data.

  Be sure to check out other examples!

 *************************************************************/

/* Fill-in information from Blynk Device Info here */

#define BLYNK_TEMPLATE_ID           "TMPLCdS_ZA1D"

#define BLYNK_TEMPLATE_NAME         "Quickstart Template"

#define BLYNK_AUTH_TOKEN            "C--BAcmgjpYGYXFIAashEf4Ub3b4_QzZ"

/* Comment this out to disable prints and save space */

#define BLYNK_PRINT Serial

#include <ESP8266WiFi.h>

#include <BlynkSimpleEsp8266.h>

// Your WiFi credentials.

// Set password to "" for open networks.

char ssid[] = "NAYAK";

char pass[] = "whitetiger065";

BlynkTimer timer;

// This function is called every time the Virtual Pin 0 state changes

BLYNK_WRITE(V0)

{

  // Set incoming value from pin V0 to a variable

  int value = param.asInt();

  // Update state

  Blynk.virtualWrite(V1, value);

}

// This function is called every time the device is connected to the Blynk.Cloud

BLYNK_CONNECTED()

{

  // Change Web Link Button message to "Congratulations!"

  Blynk.setProperty(V3, "offImageUrl", "https://static-image.nyc3.cdn.digitaloceanspaces.com/general/fte/congratulations.png");

  Blynk.setProperty(V3, "onImageUrl",  "https://static-image.nyc3.cdn.digitaloceanspaces.com/general/fte/congratulations_pressed.png");

  Blynk.setProperty(V3, "url", "https://docs.blynk.io/en/getting-started/what-do-i-need-to-blynk/how-quickstart-device-was-made");

}

// This function sends Arduino's uptime every second to Virtual Pin 2.

void myTimerEvent()

{

  // You can send any value at any time.

  // Please don't send more that 10 values per second.

  Blynk.virtualWrite(V2, millis() / 1000);

}

void setup()

{

  // Debug console

  Serial.begin(115200);

  Blynk.begin(BLYNK_AUTH_TOKEN, ssid, pass);

  // You can also specify server:

  //Blynk.begin(BLYNK_AUTH_TOKEN, ssid, pass, "blynk.cloud", 80);

  //Blynk.begin(BLYNK_AUTH_TOKEN, ssid, pass, IPAddress(192,168,1,100), 8080);

  // Setup a function to be called every second

  timer.setInterval(1000L, myTimerEvent);

}

void loop()

{

  Blynk.run();

  timer.run();

  // You can inject your own code or combine it with other sketches.

  // Check other examples on how to communicate with Blynk. Remember

  // to avoid delay() function!

}
Please edit your post and replace your last screenshot (the one showing part of your sketch) with the code copied and pasted from the IDE, with triple backticks at the beginning and end (as you did with the code you posted in in your first post in this topic).
When I ask a series of bullet-pointed questions that require yes/no answers it would be really helpful if you responded with yes/no answers.
Did it. Could you please tell me what to do right from the start. As I mentioned earlier, I have just connected my device by running the above code. Please don’t keep much expectations from me…
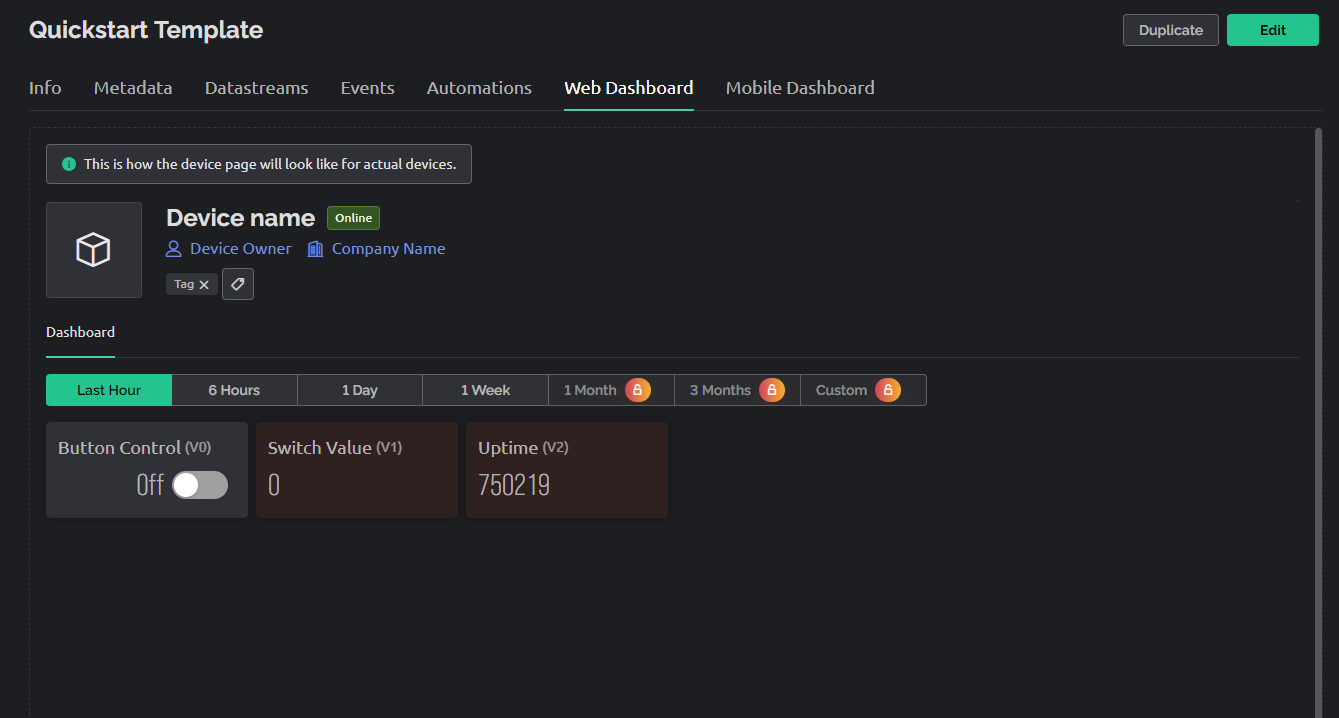
Okay, so you appear to have opened the Blynk web console, hit the “QuickStart” button and allowed it to create a sketch for you, which you’ve uploaded to your device.
The problem is that this sketch contains no code or libraries to control your stepper motor, so it is totally useless from your point of view.
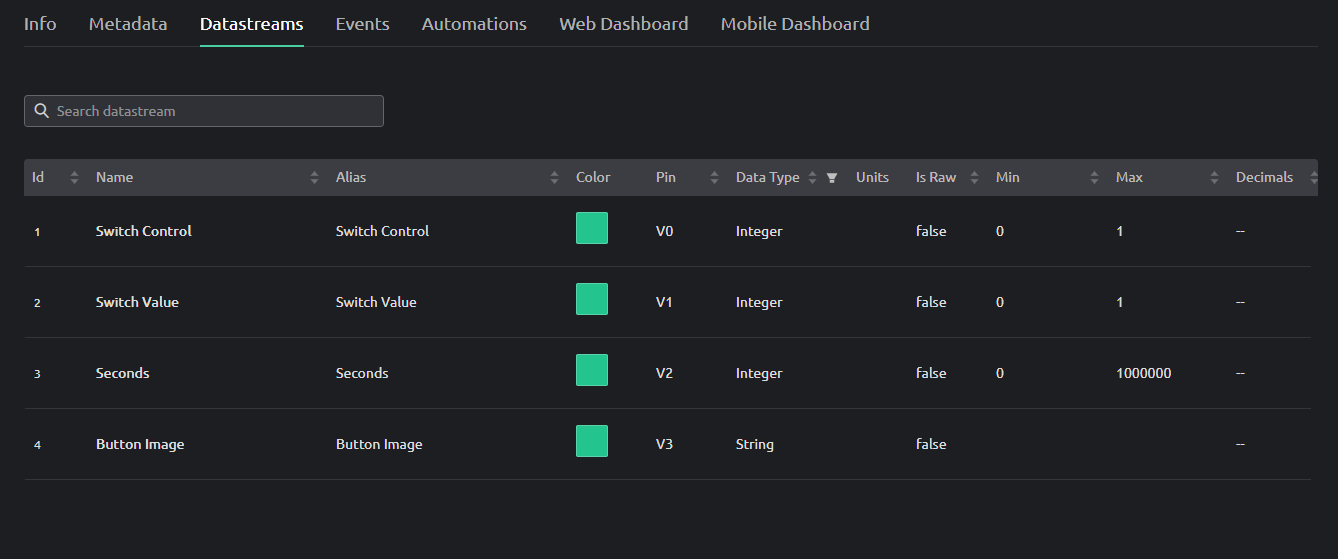
I would suggest that you delete the QuickStart template, which will also delete the QuickStart device, datastreams and dashboard.
Then, manually create a template, add the V1 datastream create a device based on the template, create a mobile dashboard in the iOS app and use the Auth token from the device in your ChatGPT sketch. Make the two other changes to that sketch that I suggested and upload it, then post your modified sketch and serial output text.

 . I have mentioned every detail of the project below.