Hey Pete!
Since you have advised me to edit my current sketch…
I have mentioned it earlier to you that the current sketch is generated by ChatGPT and also the connections are different compared to my circuit. Can you please tell me all the steps after installing Blynk? And also a code which is based on my circuit diagram attached above…
What’s the point in going any further until you’ve followed the steps that I’ve already outlined?
Pete.
Have you done the following:
- created a Template in the Blynk web console- YES
- created a virtual datastream attached to V1 with data type of Integer min/max values of 0/1- YES
- created a device from your template- YES
- created a mobile dashboard for your device with a switch widget attached to V1 and set to “push”- YES
- replaced
"your_auth_token"with theBLYNK_AUTH_TOKENin the device info screen of the web console- UNABLE TO DOTHIS
Why are you unable to do this?
Yesterday you lost the ability to post to the forum because you’d exceeded your daily posting limit. It might be sensible to make your posts count, by making them meaningful and self explanatory. Why use 5 posts to provide a complete answer to a question when with some forethought you could provide all the information in a single post.
Pete.
I am unable to find the "your_auth_token" in the device info screen of the web console.
Could you please tell me exactly where it is?
Please try to understand I am absolutely new to a community and also this technology. 
It was very confusing to me initially but now I’m kind of getting a hang of it…
“your_auth_token” is part of a line of code in in your ChatGPT generated code…l
The words your_auth_token need to be replaced by the actual Blynk Authorisation Token for the device you created in the Blynk web console.
That’s why I said…
The BLYNK_AUTH_TOKEN for your device is available in two places on the Device Info screen…
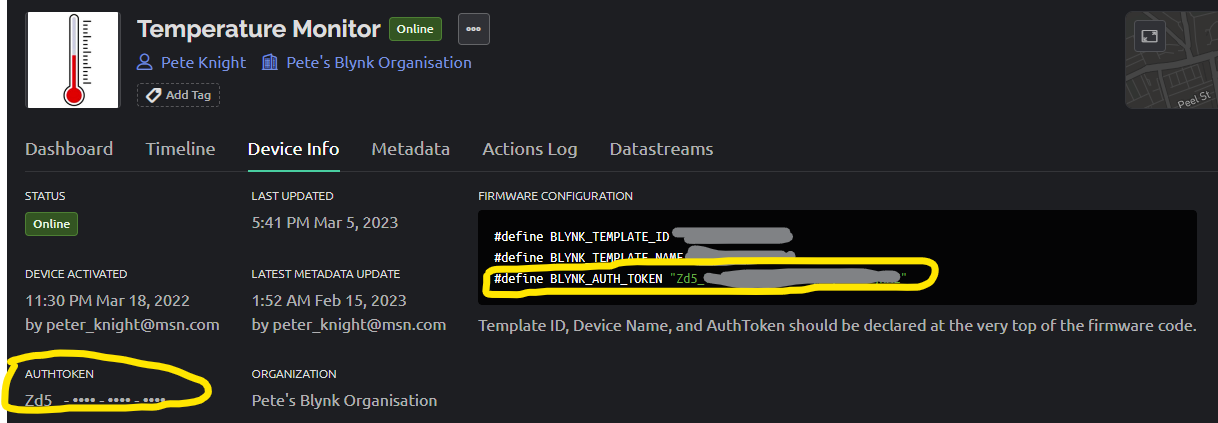
If you’d read the documentation, as I suggested and as you claimed to have done, then you’d already know this…
And, once again, you’ve used two posts when one would have sufficed, if you’d have taken a few seconds to think before hitting the “Reply” button.
Pete.
DONE.
Here is the updated code…
#include <BlynkSimpleEsp8266.h>
#include <AccelStepper.h>

// Define the pins for the stepper motor
#define dirPin D2
#define stepPin D1
#define enablePin D3

// Initialize the stepper motor
AccelStepper stepper(1, stepPin, dirPin);

char auth[] = "4Sm9AgR-1gqaldNAhK_E2qCFocYsAcK_";

void setup() {
  // Set the enable pin as an output
  pinMode(enablePin, OUTPUT);
  digitalWrite(enablePin, LOW);

  // Set the stepper motor properties
  stepper.setMaxSpeed(1000);
  stepper.setAcceleration(500);

  // Connect to Blynk
  Blynk.begin(auth, "NAYAK", "whitetiger065");
}

void loop() {
  Blynk.run();
}

BLYNK_WRITE(V1) {
  // This function will be called every time the button widget in V1 is pressed or released
  int value = param.asInt();
  if (value == 1) {
    digitalWrite(enablePin, HIGH); // Enable the driver
    stepper.move(1000); // Move the stepper motor 1000 steps
    stepper.runToPosition(); // Wait for the stepper motor to finish moving
    digitalWrite(enablePin, LOW); // Disable the driver
  }
}
I get the impression that you’re trying to make this process as painful as possible for yourself and for me!
Remember this stuff?..
When you PM’d me yesterday I said…
I think you have enough information to keep you busy for the next 17 hours. Try re-reading through that in s systematic and methodical way and you’ll find that you have most of the information you need already.
and it appears that advice fell on deaf ears, along with my earlier advice about trying to make the most of every post you make today.
Pete.