I’m trying to automate some of my projects with Google Home and IFTTT. What I’m trying to achieve is turning on and off multiple lights, connected to 2-3 different boards via voice command. As you may know IFTTT only accepts one “than” statement so I needed to find a way around this. Looking aroun I found a solution, using Glitch. It work ok, but the problem with this is the delay between the triggers and the chaos in my IFTTT lubrary as I need to create a different action for each light, so I tought another solution would br using a virtual pin for each light configuration. The problem is I’m using multiple NodeMCUs to control them so I’m not really sure how to link them together so I can use a virtual pin to control all of them. Is there any solution to this?
I’ve read your post a while back but it all seems so complicated. Do I need to run Blynk on a local server? How about MQTT, I assume I should have the server running on a PC or Raspi, right?
Wait until you start trying to do bi-directional bridge code on three devices. MQTT and Node-Red is so much easier than that.
No, I use the Blynk cloud servers.
Yes, a Raspberry Pi is what I use as my MQTT and Node-Red server. You could run it on a Windows machine, but it would need to be on 24/7 and the Pi in headless mode (no monitor, keyboard or mouse) lends itself to that much more.
There’s a link to Peter Scargill’s script in the topic I linked to, but I seem to recall that Peter has now changed the script to work in a different way, maybe using Docker.
I’ve not built a new server for a while and I’m still running the Stretch OS rather than upgrading to Buster.
Exploring the use of Docker is on my ‘to do’ list, especially after watching this:
@PeteKnight I have managed to setup a MQTT server on the RPi that works in console when tested. I’m currently at the NodeRED-Arduino part. I’ve established a connection between the board and the mqtt server but the command doesn’t work(I’m trying to switch on/off an LED). I’m using the PubSubClient library with the mqtt_esp8266 example, modified as in this tutorial:https://randomnerdtutorials.com/esp8266-and-node-red-with-mqtt/
The main problem is I don’t really understand the code so even if I get it to work I probably wouldn’t be able to implement it in future projects. Here’s the code I’m using:
/*
 Basic ESP8266 MQTT example
 This sketch demonstrates the capabilities of the pubsub library in combination
 with the ESP8266 board/library.
 It connects to an MQTT server then:
  - publishes "hello world" to the topic "outTopic" every two seconds
  - subscribes to the topic "inTopic", printing out any messages
    it receives. NB - it assumes the received payloads are strings not binary
  - If the first character ofthe topic "inTopic" is an 1, switch ON the ESP Led,
    else switch it off
 It will reconnect to the server if the connection is lost using a blocking
 reconnect function. See the 'mqtt_reconnect_nonblocking' example for how to
 achieve the same result without blocking the main loop.
 To install the ESP8266 board, (using Arduino 1.6.4+):
  - Add the following 3rd party board manager under "File -> Preferences -> Additional Boards Manager URLs":
       http://arduino.esp8266.com/stable/package_esp8266com_index.json
  - Open the "Tools -> Board -> Board Manager" and click install for the ESP8266"
  - Select your ESP8266 in "Tools -> Board"
*/

#include <ESP8266WiFi.h>
#include <PubSubClient.h>

// Update these with values suitable for your network.

const char* ssid = "****";
const char* password = "*******";
const char* mqtt_server = "192.168.***.***";

WiFiClient espClient;
PubSubClient client(espClient);
unsigned long lastMsg = 0;
#define MSG_BUFFER_SIZE	(50)
char msg[MSG_BUFFER_SIZE];
int value = 0;
const int led=D4;

void setup_wifi() {

  delay(10);
  // We start by connecting to a WiFi network
  Serial.println();
  Serial.print("Connecting to ");
  Serial.println(ssid);

  WiFi.begin(ssid, password);

  while (WiFi.status() != WL_CONNECTED) {
    delay(500);
    Serial.print(".");
  }

  randomSeed(micros());

  Serial.println("");
  Serial.println("WiFi connected");
  Serial.println("IP address: ");
  Serial.println(WiFi.localIP());
}

void callback(char* topic, byte* payload, unsigned int length) {
  Serial.print("Message arrived [");
  Serial.print(topic);
  Serial.print("] ");
  for (int i = 0; i < length; i++) {
    Serial.print((char)payload[i]);
  }
  Serial.println();

String messageTemp;

for(int i=0;i<length;i++){
  Serial.print((char)payload[i]);
  messageTemp+= (char)payload[i];
}
Serial.println();

  // Switch on the LED if an 1 was received as first character
  if ((char)payload[0] == '1') {
    digitalWrite(BUILTIN_LED, LOW);   // Turn the LED on (Note that LOW is the voltage level
    // but actually the LED is on; this is because
    // it is active low on the ESP-01)
  } else {
    digitalWrite(BUILTIN_LED, HIGH);  // Turn the LED off by making the voltage HIGH
  }

  if(topic=="test/led"){
    Serial.print("Changing Room lamp to");
    if(messageTemp == "on"){
      digitalWrite(led, HIGH);
      Serial.print("On");
    }
    else if(messageTemp== "off"){
      digitalWrite(led,LOW);
      Serial.print("Off");
    }
  }
Serial.println();
}

void reconnect() {
  // Loop until we're reconnected
  while (!client.connected()) {
    Serial.print("Attempting MQTT connection...");
    // Create a random client ID
    String clientId = "ESP8266Client-";
    clientId += String(random(0xffff), HEX);
    // Attempt to connect
    if (client.connect(clientId.c_str())) {
      Serial.println("connected");
      // Once connected, publish an announcement...
      client.publish("outTopic", "hello world");
      // ... and resubscribe
      client.subscribe("inTopic");
    } else {
      Serial.print("failed, rc=");
      Serial.print(client.state());
      Serial.println(" try again in 5 seconds");
      // Wait 5 seconds before retrying
      delay(5000);
    }
  }
}

void setup() {
  pinMode(BUILTIN_LED, OUTPUT);
  pinMode(led, OUTPUT);// Initialize the BUILTIN_LED pin as an output
  Serial.begin(115200);
  setup_wifi();
  client.setServer(mqtt_server, 1883);
  client.setCallback(callback);
}

void loop() {

  if (!client.connected()) {
    reconnect();
  }
  client.loop();

  unsigned long now = millis();
  if (now - lastMsg > 2000) {
    lastMsg = now;
    ++value;
    snprintf (msg, MSG_BUFFER_SIZE, "hello world #%ld", value);
    Serial.print("Publish message: ");
    Serial.println(msg);
    client.publish("outTopic", msg);
  }
}
I know this isn’t really Blynk related, but I’m trying to learn this method to use it with Blynk
I don’t use the Node-Red dashboard. It’s not very good compared to Blynk and things can get messy very quickly when trying to use Blynk and the dashboard together.
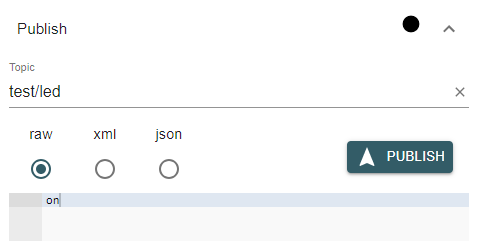
I’d start by downloading MQTT Explorere from here:
and install it on your Windows PC. Set-up a connection to your MQTT server, then publish “on” or “off” to test/led like this:
Hi @PeteKnight,
Is there any tutorial you can recommend to start “playing” with MQTT and Node-red? Do you have something in mind for beginners in that “world”?
Thanks in advance!
There’s some good YouTube tutorials from Nick O’leary, the guy who ‘invented’ Node-Red, and they’re nice bite-sized videos that don’t get boring or bogged-down. But, there lots of Node-Red stuff on YouTube that is a also good place to start.
Not much on using Blynk with Node-Red, but to be honest if you’re familiar with Blynk then the Blynk-plug-in is fairly intuitive once you’ve gotten used to the Node-Red system.
@PeteKnight Hi, sorry for the late reply. I have managed to control an LED using mosquitto_sub and mosquitto_pub in the RPi console. The problem was not replacing “inTopic” in the ‘client.subscribe’ function with my desired topic. I also got it to work with the inject Node(is that what it’s called?), as you suggested above. Next step would be Blynk integration. Could you suggest a starting point, or maybe a setup example?
Thanks for your help.
//I can now control the LED using a virtual pin, without adding any lines of code(besides the 3 lines necesarry to run blynk). This is great. But what if I wanted to control multiple Virtual Pins,from different devices with only one virtual pin? Do I use multiple ‘write’ nodes, each with the desired virtual pin and auth code?
I’d also like ti be able to control sliders. Is there a way to only receive int type values(0-1024)? My current callback function uses char type so I guess the mqtt servers is receiving 1/0 as charachter types. Here is the callback function;
void callback(char* topic, byte* payload, unsigned int length) {
  Serial.print("Message arrived [");
  Serial.print(topic);
  Serial.print("] ");
  for (int i = 0; i < length; i++) {
    Serial.print((char)payload[i]);
  }
  Serial.println();

  // Switch on the LED if an 1 was received as first character
  if ((char)payload[0] == '1') {
    digitalWrite(BUILTIN_LED, LOW);   // Turn the LED on (Note that LOW is the voltage level
    // but actually the LED is on; this is because
    // it is active low on the ESP-01)
  } else {
    digitalWrite(BUILTIN_LED, HIGH);  // Turn the LED off by making the voltage HIGH
  }

}
Are you running Blynk and MQTT on the device together? It’s best to just run MQTT and let Node-Red handle the Blynk stuff.
I think the way you’re handling the callbacks is a bit clunky. My preferred method is this:
void MQTTcallback(char* topic, byte* payload, unsigned int length)
{
  Serial1.print(F("Message arrived ["));
  Serial1.print(topic);
  Serial1.print(F("] ["));
  for (int i=0;i<length;i++)
  {
    Serial1.print((char)payload[i]);
  }
  Serial1.println(F("]"));

  String msg_topic = String((char *)topic);
  String msg_payload = String((char *)payload);
  msg_payload.remove(length); // Trim any unwanted characters off the end of the string
  // We now have two string variables, 'msg_topic' and 'msg_payload' that we can use in 'if' statements below...


  if (msg_topic==base_mqtt_topic + "/Load")
  {
    if (msg_payload=="1")
    {
      setOutputLoadPower(1);
      return;
    }

    if (msg_payload=="0")
    {
      setOutputLoadPower(0);
      return;
    }
  }

  // Handle messages from other topics in here,
  // just like we did with the CMD topic above.
  // DON'T FORGET to subscribe to the topic in void MQTT_Connect()

} // End of void MQTTcallback


Pete.
My code is just an enhancement of the basic code, aimed at trying to make things simpler.
I use a string that I call “base_mqtt_topic” that represents the device I’m working with. My base topic might be “Home/Lounge/Lamp” and I then append the required last part of the topic on to this. In my example that’s called “/Load” and is used to send a 1 or a 0 to turn the load on or off.
You could just as easily write this as “Home/Lounge/Lamp/Load”, but once you’ve gone through doing search and replaces on your code you’ll realise the benefit of using the base MQTT topic.
The rest is fairly self explanatory with the comments - you get 2 strings, one that represents the MQTT topic (or base topic that you append your last bit on to) and the other that represents the value that was sent in the MQTT message.
 where should I get started?