I needed in the project (NANO+ESP-01 serial hardware connection) to have possibility to change the SSID and pass without a change in the program. I prepared this part of the program. It works
New Wifi data are input from BLYNK terminal and stored in the EEPROM.
After reset login to wifi depends on the port 8 - HIGH = Default ssid and pass, LOW = new setup ssid and pass.
The program also has the ability to change the autch.
/*
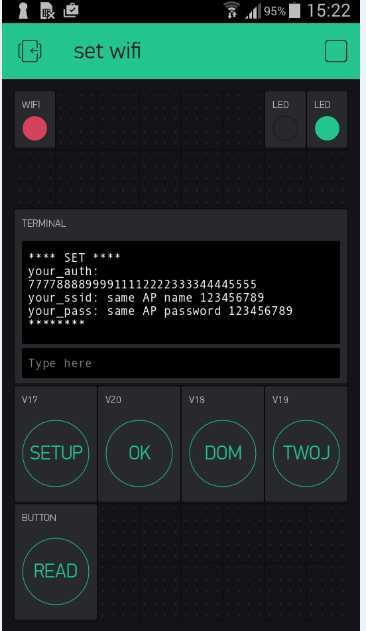
set new wifi
V15 - terminal
V17 - button SETUP - setup new wifi data
V18 - button -View default wifi data
V19 - button - View new setup wifi data
V20 - button OK - save to eeprom new setup wifi data
v21 - button RED - read from eeprom setup wifi data (test only)
*/
/*
char auth[] = "xxxxxxxxxxxxxxxxxxxxxxxxxxxxx"; //valid auth
char ssid[] = "aaaaaaaa"; // default ssid
char pass[] = "bbbbbbbbbbbb"; // default pass
*/
char auth[] = "6a9442c5d30d4e83a7d5c2xxxxxxxxx"; //valid auth
char ssid[] = "aaa";
char pass[] = "12345678";
char t_auth[] = "77778888999911112222333344445555"; // declare same 32 char
char t_ssid[] = "same AP name 123456789"; // declare
char t_pass[] = "same AP password 123456789"; // declare
#define BLYNK_PRINT Serial
#include <ESP8266_Lib.h>
#include <BlynkSimpleShieldEsp8266.h>
#include <EEPROM.h>
#define EspSerial Serial // Set ESP8266 Serial object
ESP8266 wifi(&EspSerial);
WidgetTerminal terminal(V15);
const int SW_pin = 8; //Working mode switch. HIGH = default WiFi. LOW = castom WiFi
String y_ssid = "";
String y_pass = "";
String y_auth = "";
int wpis = 0;
int dl_i = 0;
int dl_j = 0;
int dl_k = 0;
BLYNK_WRITE(V15)
{
String coscos = param.asStr(); // string from terminal
switch (wpis)
{
case 1:
y_auth = coscos; //from terminal
dl_i = y_auth.length() + 1; //change string to char[]
y_auth.toCharArray(t_auth, dl_i); //change string to char[]
break;
case 2:
y_ssid = coscos;
dl_j = y_ssid.length() + 1;
y_ssid.toCharArray(t_ssid, dl_j);
break;
case 3:
y_pass = coscos;
dl_k = y_pass.length() + 1;
y_pass.toCharArray(t_pass, dl_k);
break;
default: ;
}
}
BLYNK_WRITE(V17) //button SETUP
{
String coscos;
int klawin = param.asInt(); //klaw SETUP
if (klawin == 1) {
wpis = wpis + 1;
if ((wpis > 4) || (wpis < 1)) {
wpis = 1;
}
switch (wpis)
{
case 1:
terminal.println("print your auth: ");
terminal.flush();
break;
case 2:
terminal.println("print your ssid: ");
terminal.flush();
break;
case 3:
terminal.println("print your pass: ");
terminal.flush();
break;
case 4:
terminal.print("your auth: ");
terminal.println(t_auth);
terminal.print("your ssid: ");
terminal.println(t_ssid);
terminal.print("your pass: ");
terminal.println(t_pass);
terminal.println("data wifi OK ?");
terminal.flush();
break;
default: ;
}
}
}
BLYNK_WRITE(V18)
{
int klawplus = param.asInt();
if (klawplus == 1) {
terminal.println("**** DEF ****");
terminal.print("auth: ");
terminal.println(auth);
terminal.print("ssid: ");
terminal.println(ssid);
terminal.print("pass: ");
terminal.println(pass);
terminal.println("********");
terminal.flush();
}
}
BLYNK_WRITE(V19)
{
int klawminus = param.asInt();
if (klawminus == 1) {
terminal.println("**** SET ****");
terminal.print("your_auth: ");
terminal.println(t_auth);
terminal.print("your_ssid: ");
terminal.println(t_ssid);
terminal.print("your_pass: ");
terminal.println(t_pass);
terminal.println("********");
terminal.flush();
}
}
BLYNK_WRITE(V20) //button OK
{
int klawok = param.asInt();
if (klawok == 1) {
int eeAddr = 0;
EEPROM.put(eeAddr, auth); //................................auth not change
eeAddr = 50;
EEPROM.put(eeAddr, t_ssid);
eeAddr = 100;
EEPROM.put(eeAddr, t_pass);
terminal.println("save new WiFi data");
terminal.flush();
}
}
BLYNK_WRITE(V21) // button READ for test only
{
int klawread = param.asInt();
if (klawread == 1) {
int eeAddr = 0;
EEPROM.get(eeAddr, t_auth);
eeAddr = 50;
EEPROM.get(eeAddr, t_ssid);
eeAddr = 100;
EEPROM.get(eeAddr, t_pass);
terminal.print("your data from ee ");
terminal.println(t_auth);
terminal.println(t_ssid);
terminal.println(t_pass);
terminal.flush();
}
}
void wyborwifi() // choice wifi setup data after reset - SW_pin = HIGH > default wifi, LOW > new setup wifi
{
pinMode(SW_pin, INPUT_PULLUP);
int m = digitalRead(SW_pin);
if (m == 0) {
int eeAddr = 0;
EEPROM.get(eeAddr, t_auth);
eeAddr = 50;
EEPROM.get(eeAddr, t_ssid);
eeAddr = 100;
EEPROM.get(eeAddr, t_pass);
Blynk.begin(t_auth, wifi, t_ssid, t_pass);
}
else
{
Blynk.begin(auth, wifi, ssid, pass);
}
}
//+++++++++++++++++++++++++++++++++++++++++++++++++++ setup
void setup() {
Serial.begin(115200); // Set console baud rate
EspSerial.begin(115200); // Set ESP8266 baud rate
wyborwifi();
Serial.println("Arduino.cc 1.6.9"); // Arduino.org doesn't have EEPROM.get i EEPROM.put functions
}
void loop() {
Blynk.run();
}
@krzyspx any chance you could knock up a video or at least some photos?
It might persuade me to dig out my old school ESP01’s.
I’m guessing you can only change access details if you are still located “at your last location”. What I mean by this is if you are doing it with Blynk you need to be connected to be able to make a new connection i.e. you couldn’t just roam the high street connecting to different AP’s / Hotspots.
This feature allows you to log project to a previously unknown wifi (eg in the location of a client), without changing software. For the configuration I use my phone with the personal hotspot feature (mobile hotspot). In the program I put default parameters of hotspot on my phone . In customer location I change ssid and pass use my hotspot to users data (the customer can do this yourself by setting your phone to the default SSID and pass hotspot data).
I set in the program as SSID and PASS any value, for example, AAA and BBB. Client on your phone, set it as the parameters for mobile HOTSPOT. The module connects to the Internet via mobiles Hotspot and the client can put own network parameters to the program. After changing the status of the port 8 to LOW and reset program will log on to the network client.
I switched to EEPROM by default and Smartphone AP with pin 0 HIGH (not LOW).
So on a Wio Link it is, press the RESET button and then within a fraction of a second press the CONFIG button to ensure it boots to AP. You can’t hold pin 0 down and do a reset or you go into flashing mode.
@krzyspx could I please ask you to provide a sketch extract for us to attach to another button (in Switch mode) that would set the next boot up mode i.e. without the use of a physical button, into Smartphone AP connection or EEPROM connection.
So a flag would be set in the Blynk project to EEPROM for connection type 1 or 2 and if the physical button is not pressed it takes the EEPROM flag to determine the connection type.
See initial extract below, just needs the EEPROM flag write and read on bootup.
String nextbootstring;
BLYNK_WRITE(V14) // next boot, EEPROM flag to have 2 values,
                 // 0 normal boot based on physical button state of HIGH or LOW
                 // 1 boot from EEPROM credentials
{
  int nextboot = param.asInt(); // ON EEPROM, OFF AP CREDENTIALS
  if (nextboot == 1) {  // boot from EEPROM credentials
    nextbootstring = "ESP will boot from EEPROM credentials next time.";
    // code here, set an EEPROM flag to 1, read at bootup if physical button is not pressed
  }
  else{   // boot from AP credentials
    nextbootstring = "ESP will boot from AP credentials next time.";
    // code here, if EEPROM flag is 1, set to 0
  }
  terminal.println(nextbootstring);
  terminal.flush();
}
Ok I have made the required changes and it all seems fine.
So now wyborwifi() looks like this:
void wyborwifi() // Select WiFI boot up mode
{
  pinMode(PIN_CONFIG, INPUT_PULLUP);  // was pin 8
  int m = digitalRead(PIN_CONFIG);    // was pin 8
  EEPROM.begin(4); // read in first byte at address 0
  int eeAddr = 0;
  bootflag = EEPROM.read(eeAddr);// read EEPROM flag for boot mode
  delay(100);
  if ((m == 1) && (bootflag != 1)){ // if pin is HIGH (default) use Smartphone AP credentials, else use EEPROM credentials
    smartphoneconnect();   // use Smartphone AP credentials
  }
  else
  {
    eepromconnect();       // use EEPROM credentials
  }
}
And the button code is:
int bootflag; // 0 normal Smartphone AP boot, 1 EEPROM credentials boot
String nextbootstring;
BLYNK_WRITE(V14) // next boot, EEPROM flag to have 2 values,
                 // 0 normal boot based on physical button state of HIGH or LOW
                 // 1 boot from EEPROM credentials
{
  int nextboot = param.asInt(); // ON EEPROM, OFF AP CREDENTIALS
  if (nextboot == 1) {  // boot from EEPROM credentials
    nextbootstring = "ESP will boot from EEPROM credentials next time.";
    bootflag = 1;
    int eeAddr = 0;
    EEPROM.write(eeAddr, bootflag);
    EEPROM.commit();
  }
  else{   // boot from AP credentials
    nextbootstring = "ESP will boot from AP credentials next time.";
    if(bootflag == 1){  // only write value to EEPROM if flag is currently 1
      bootflag = 0;
      int eeAddr = 0;
      EEPROM.write(eeAddr, bootflag);
      EEPROM.commit();
    }
  }
  terminal.println(nextbootstring);
  terminal.flush();
}
Tested and works ok.
Edit: @krzyspx I have moved all your starting addresses from 0 to 1 and now the sketch with read and write is fine, rather than get and put.
It’s a great solution - replace the physical button on the record byte EEPROM
First - the customer does not have to open the case to change the wifi
second - it is able to support more than two networks stored in the program memory or EEPROM
Thank you very much Costas for the creative development of the project