I’m not a programmer, but the electronics only.![]()
I would put byte to memory by command EEPROM.write and read - EEPROM.read and should it work
But put and get is working for your strings so why not mine of “0” and “1”?
I can try read and write.
@krzyspx sketch extract above with the note about moving your addresses from 0 to 1 is now working OK.
I have a problem with the procedure EEPROM.begin (4) - compilation hangs
EEPROM.begin () is OK
what Arduino IDE you use? CC or ORG?
I had to change to the CC because in ORG did not work procedures put and get eeprom. And do not need call EEPROM.begin procedure
1 Like
I use CC.
However there is a specific library for ESP’s https://github.com/esp8266/Arduino/tree/master/libraries/EEPROM
I noticed that commit doesn’t appear to be in the CC library and the update that is in CC is not in the ESP library.
I just need to check a few things as I made some changes earlier and I introduced some more bugs.
Have you tried EEPROM.begin(512) to read in all the available bytes.
@krzyspx EEPROM.begin() is not permitted with the ESP library. EEPROM.begin(512) or EEPROM.begin(4) appear to be fine for the ESP and I use the latter to minimise program memory usage.
My sketch all checks out again now.
I noticed you don’t write the token to EEPROM even though you request the token details via Terminal.
So I set another button (SWITCH mode) and if it is ON it doesn’t ask for the token details and goes straight to asking for the SSID (set wpis to 2 in V17). I didn’t like having to enter the 32 character token if it wasn’t being used.
I guess it makes sense normally for the token to remain unchanged but I am working on the basis that sometimes you might want to change it. Edit: Basically you would be making the MCU run a different Blynk project but it would need to have the same basic content as the “master” project.
I see that there is little difference in the use EEPROM NANO and ESP - just EEPROM.begin procedure. Everything is well done in your code
I needed only to change the SSID and PASS in my module for the customer. AUTH I added extra only for tests.
1 Like
why don’t you change to pin 2 instead of pin 0 to choose the mode when start up?
and i have a idea, i wanna remove the physical button. just using bootflag to choose boot from eeprom (user info) or from default info (default SSID and default password).
but i wonder, if we do that, once custommer provide a wrong wifi info as a result the module cant not connect to wifi with user info. so how can point the module reconnect by using default info.
P/s: because i’m using esp-01 module, just have 2 pin I/O, so if i take one for mode select, just left 1 ![]()
1 Like
@longdv as per one of my earlier posts I am currently working with Wio Link’s and there is a hard wired button for flashing mode tied to GPIO 0. If users are wiring up their own button it makes sense to use a different pin.
I spent quite some time playing around with GPIO 0, Ticker and the on board LED to improve the boot selection options, as a fraction of a second to press the button was far from ideal. Sometimes my timing was ok and sometimes it wasn’t. Ticker and the on board LED are used to visualise the connection type.
In the end adding a short delay(1500) on bootup was the fix so I can now reliably select the boot method. With the following sketch extract I press reset, wait for the onboard LED to illuminate (ESP initial boot has finished) and then hold down the CONFIG button (GPIO 0) if I want the EEPROM boot. I simply press reset for a regular boot.
// ExtractEZ-Connect.ino by Costas 10/9/16
#include <EEPROM.h>
int bootflag;              // 0 normal Smartphone AP boot, 1 EEPROM credentials boot
const int PIN_LED = 2;     // D4 on NodeMCU and WeMos and Wio Link. Controls the onboard LED.
const int PIN_CONFIG = 0;  // Wio Link CONFIG button, D3 on WeMos

//+++++++++++++++++++++++++++++++++++++++++++++++++++   setup
void setup() {
  Serial.begin(115200);  // Set console baud rate
  delay(200);
  Serial.println("\Starting");
  pinMode(PIN_CONFIG, INPUT_PULLUP);
  pinMode(PIN_LED, OUTPUT);  //
  digitalWrite(PIN_LED, LOW);  // LED ON
  delay(1500);                 // hold CONFIG button down now
  digitalWrite(PIN_LED, HIGH); // LED OFF
  wyborwifi();
  Serial.println("Arduino.cc 1.6.9"); //  Arduino.org  doesn't have  EEPROM.get i EEPROM.put functions
}

void wyborwifi() // translates from Polish to "choice wifi" setup data after reset - pin 0 (was 8) = HIGH > default wifi, LOW > new setup wifi
{
  int m = digitalRead(PIN_CONFIG);
  EEPROM.begin(4); // read in first byte at address 0
  int eeAddr = 0;
  bootflag = EEPROM.read(eeAddr);// read EEPROM flag for boot mode
  delay(100);
  Serial.print("bootflag is <<<");  // just for debugging, comment out later
  Serial.print(bootflag);           // just for debugging, comment out later
  Serial.println(">>>");            // just for debugging, comment out later
  if ((m == 1) && (bootflag != 1)){ // if pin is HIGH (default) use Smartphone AP credentials, else use EEPROM credentials
    //smartphoneconnect();   // use Smartphone AP MTN ......
  }
  else
  {
    //eepromconnect();       // use EEPROM OfficeGargoyle ........
  }
}

void loop() {
  // put your main code here, to run repeatedly:
}
With reference to your idea of working without a button it is covered in my button code extract in post 18.
User error inputting the credentials is covered by having the Smartphone AP credentials hard coded in the sketch and being the default boot up mode. So if they enter the wrong EEPROM credentials it will always bootup to the Smartphone AP. The user then tries again to enter the correct EEPROM credentials.
In my full sketch I added details for token’s to be sent to the ESP, by another ESP or a PC, rather than manually entering the 32 character code. Invariably I would enter the token incorrectly and I was thinking of having variable tokens at the time.
You could do the same with SSID and password. So when the ESP receives them remotely it saves them to EEPROM and reboots from the EEPROM credentials.
1 Like
thanks for your answer, but it seem not very clearly with me, maybe because of my english so bad.
with your method (using a Config Button and the onboard led) it’s coherent and easy to implement but it’s not suitable with my single esp standalone type.
with my idea: working without a Physical Config Button, just using visual Button on Blynk apps
i mean if custommer enter wrong EEPROM credentials and change the bootflag == 1 into eeprom and make a reboot, it’s mean the Esp will be allways bootup to EEPROM credentials (because the bootflag is still ==1), so how to bootup back to Smartphone AP to re-enter the EEPROM credentials.
this is my sketch.
void load_eep()
{
   int eeAddr = 0;
    EEPROM.get(eeAddr, User_auth );
    eeAddr = 50;
    EEPROM.get(eeAddr, User_SSID);
    eeAddr = 100;
    EEPROM.get(eeAddr, User_Password);
Serial.println("Load eeprom ok");
}
//----------------------------------------------------------------
int bootflag; // 0 normal Smartphone AP boot, 1 EEPROM credentials boot
String nextbootstring;
BLYNK_WRITE(V10)
{
  int nextboot = param.asInt(); // ON EEPROM, OFF AP CREDENTIALS
  if (nextboot == 1) {  // boot from EEPROM credentials
    bootflag = 1;
    int eeAddr = 200;
    EEPROM.write(eeAddr, bootflag);
    EEPROM.commit();
    nextbootstring = "ESP will boot from USER INFO  next time.";
  }
  else {   // boot from AP credentials
    if(bootflag == 1){  // only write value to EEPROM if flag is currently 1
      bootflag = 0;
      int eeAddr = 0;
      EEPROM.write(eeAddr, bootflag);
      EEPROM.commit();
      nextbootstring = "ESP will boot from DEFAULT INFO next time.";
    }
  }
  terminal.println(nextbootstring);
  terminal.flush();
}
//------------------------------------------------------
void BootSelect() // Select WiFI boot up mode
{
 // EEPROM.begin(4); // read in first byte at address 0
  int eeAddr = 200;
  bootflag = EEPROM.read(eeAddr);// read EEPROM flag for boot mode
  delay(100);
  if (bootflag == 1)
{
 Blynk.begin(Default_auth, User_SSID, User_Password);
 Serial.println("bootup to User info");
}
  else // BOOT from default info
{
 Blynk.begin(Default_auth, Default_SSID, Default_Password);
 Serial.println("bootup to default info");
}
}
//---------------------------------------------------------
void setup()
{
  pinMode(0,OUTPUT);
  pinMode(2,OUTPUT);
  digitalWrite(0,LOW);
  digitalWrite(2,LOW);

  Serial.begin(115200);
  EEPROM.begin(512);
  load_eep();
  BootSelect();
}
@longdv it is possible without a physical button but much easier if you have one, that is why we don’t recommend the very limited ESP01’s.
Fortunately we recently posted a sketch extract that should work for you. Basically IF not connected with first set of credentials try another connection. The code extract is part of theSmartBlynkie™© ioT Game thread but reproduced here as:
 Serial.print("WiFi connected with IP address: ");
  Serial.println(WiFi.localIP());
  if(pinSda > 1){  // this is just a test to say if pinSda in WiFi Manager is set to > 1
    // sketch will try a few connections, in the order they were put in WiFi Manager
    Blynk.config(blynk_token1, blynk_server1); // Blynk Cloud Server
    int mytimeout = millis() / 1000;
    while (Blynk.connect() == false) { // try to connect to server for 10 seconds
      if((millis() / 1000) > mytimeout + 8){ // try local server if not connected in 9s
        // assume local server success if Blynk cloud failed
        strcpy(connectionStatus, "Connected to local server");
                          // failed to connect to Blynk cloud server so try local server
        Blynk.config(blynk_token2, blynk_server2); // Local Server access details
        mytimeout = millis() / 1000;
        while (Blynk.connect() == false) {  // try to connect to server for 10 seconds
          if((millis() / 1000) > mytimeout + 8){ // try for less than 9 seconds
            break;  // blynk.run() will kep trying to connect
          }
        }
      }
    }
  }
If you mix and match this extract with the extracts you already have you should be good to go i.e. if user enters duff info, fall back to good hard coded credentials (with a physical button as a backup).
1 Like
I’m done with my idea… (Select Bootup mode without physical Button)
following is the way that i did.
void BootUpSelect() // Select WiFI boot up mode
{
  int eeAddr = 200; //  bootflag duoc luu tai o nho 200
  int mytimeout =0;
  bootflag = EEPROM.read(eeAddr);// read EEPROM flag for boot mode
  delay(100);

  if (bootflag == 1) //BOOT from User info
    {
    Try_User:;
        Serial.println("Connecting to User WiFi");
        WiFi.begin( User_SSID, User_Password);
        mytimeout=0;
        while (1)
          {
            delay(500); mytimeout++;  Serial.print(mytimeout);
            if(mytimeout>20) goto Try_Default; //connecting timeout
            if(WiFi.status() == WL_CONNECTED) goto Exit_setup;
          }
     }
  else // BOOT from default info
    {
    Try_Default:;
        Serial.println("Connecting to Default WiFi");
        WiFi.begin( Default_SSID, Default_Password);
        mytimeout=0;
        while (1)
          {
            delay(500); mytimeout++;  Serial.print(mytimeout);
            if(mytimeout>20) goto Try_User; //connecting timeout
            if(WiFi.status() == WL_CONNECTED) goto Exit_setup;
          }
    }
Exit_setup:;
    Serial.print("\nIP address: ");
    Serial.println(WiFi.localIP());
    Blynk.config(Default_auth);
}
the final problem, that’s i can’t reset Esp using sofware.
I use the WDT like this:
 wdt_enable(WDTO_15MS);
   while(1)
      {}
but after reset by WDT. Sometimes the ESP bootup Ok but sometimes wasn’t bootup agian. Can u show me your way Costas?
@longdv the standard way to reboot an ESP is as follows:
delay(1000);
ESP.reset();
delay(5000);
The values for the delays are a little arbitrary but they are essential even though the one after reset looks like it never gets called (it does).
There is a bug with ESP. If you flash a sketch with this code and you don’t power off and back on it will hang. It only hangs on the first reset after the flash and only if it hasn’t been power cycled. So after each flash just power off and back on.
1 Like
After working on the code for a few days I finally decided that EEPROM.put() and EEPROM.get() do not work on ESP’s. Strangely when using them in a sketch there aren’t any compiler errors but they seem to be simply ignored.
I was thrown with the way the initial sketch has a hardcoded copy of the EEPROM data so on reboot it is actually taking the hardcoded data and not EEPROM data.
I have always used EEPROM,read() and EEPROM.write() with ESP’s and I used that for the bootflag. To be consistent I tried for ages with put and get before realising nothing was being stored in EEPROM.
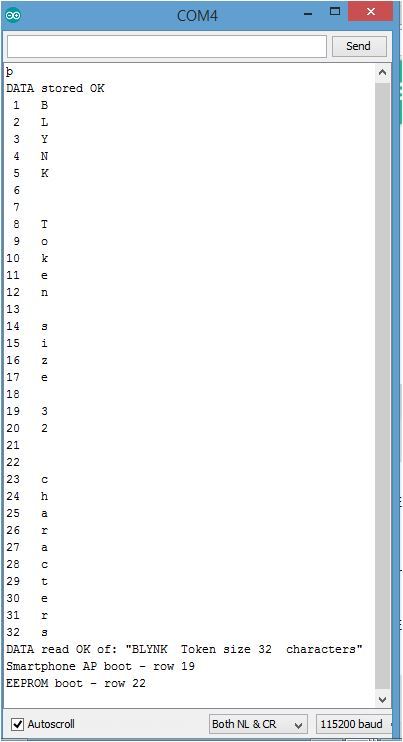
So I have built my own put and get functions called EEPROMputE() and EEPROMgetE() which use ESP’s EEPROM handler of EEPROM.write() and EEPROM.read().
Serial Monitor screenshot of the functions in action together with an arbitrary bootflag check:
Full Blynk compatible sketch, just including the EEPROM functions, below. Suggests Blynkers use Terminal widget to change the String and a couple of buttons to write and read EEPROM etc.
/* EEPROMhandler.ino  ESP EEPROM Read and write for Blynk by Costas 12th Sept 2016
 * Remember char myChar = 'A' and char myChar = 65 are equivalent   */
  #include <EEPROM.h>             // ESP8266 EEPROM library
  #define BLYNK_PRINT Serial      // Comment this out to disable prints and save space
  #include <ArduinoOTA.h>         // for local OTA updates
  #include <ESP8266WiFi.h>
  #include <BlynkSimpleEsp8266.h>
  #include <SimpleTimer.h>        // Essential for almost all sketches
  SimpleTimer timer;

  //********************* SECTION FOR YOU TO COMPLETE WITH YOUR DETAILS ***************************
  // You should get Auth Token in the Blynk App.
  char auth[] = "xxxxxxxxxxxxxxxxxxxxxxxxxxxxxxxx"; // Go to the Project Settings (nut icon).
  char cloudserver[16] = "blynk-cloud.com";
  char localserver[16] = "192.168.10.229";         // Enter your IP details for the local server
  char ssid[] = "MTN WIFI 19996";                  // Your WiFi credentials.
  char pass[] = "xxxxxxxxxx";                      // Set password to "" for open networks.
  char OTAhost[] = "EEPROMhandler";                // Optional, but very useful
  //***********************************************************************************************

  String theData = "BLYNK  Token size 32  characters";     // e.g Your String to be stored in EEPROM
  char DataRetrieved[33];  // char array of data retrieved from EEPROM
  int DataLocation;  // e.g. address 0 for bootflag, 1 to 33 for token, 34 to 66 for SSID and 67 to 99 for PWD

void setup() {
  Serial.begin(115200);
  Serial.println("\Starting");
  EEPROM.begin(100); // max 512 bytes of EEPROM starting at address 0
  DataLocation = 1; // e.g. for Blynk token
  EEPROMputE(DataLocation, theData);  // save the TOKEN in EEPROM
  delay(50);
  EEPROMgetE(DataLocation, theData);
  delay(50);
  // ****************************Now check EEPROM write and read******************************
  if(DataRetrieved[18] == '3'){
    Serial.println("Smartphone AP boot - row 36");
  }
  if(DataRetrieved[19] == '2'){
    Serial.println("EEPROM boot - row 39");
  }
  // ****************************End of checking EEPROM write and read************************
  Blynk.begin(auth, ssid, pass, localserver);   // change localserver to cloudserver for Blynk cloud server
  int mytimeout = millis() / 1000;
  while (Blynk.connect(1000) == false) {        // wait here until connected to the server
    if((millis() / 1000) > mytimeout + 8){      // try to connect to the server for less than 9 seconds
      break;                                    // continue with the sketch regardless of connection to the server
    }
  }
  ArduinoOTA.setHostname(OTAhost);
  ArduinoOTA.begin();                           // for local OTA updates
}

void EEPROMputE(int DataLocation, String theData){  // Store DATA in EEPROM
  int lenofstr = theData.length() + 1;  // holds length of the String PLUS 1 to cover null terminator of array
  char Data2bStored[lenofstr];  // e.g 32 characters + 1 null terminator for Blynk TOKEN field, also max for SSID and PWD
  theData.toCharArray(Data2bStored, lenofstr);
  for(int j = 0; j < (theData.length()); j++){
    EEPROM.write(DataLocation + j, Data2bStored[j]);
    EEPROM.commit();
    delay(5);
  }
  Serial.println("DATA stored OK");
}

void EEPROMgetE(int DataLocation, String theData){     // Read DATA from EEPROM
  char value;                                    // Each retrieved char from EEPROM
  for(int k = 0; k < (theData.length()); k++){   // Token, SSID and PWD 32 character fields
    value = EEPROM.read(DataLocation + k);
    DataRetrieved[k] = value;  // place characters retrieved from EEPROM in char array
                        // ****Comment out this Serial print section*******
    if((DataLocation + k)< 10){
      Serial.print(" ");                         // pad out address by 1 character for display purposes
    }
    Serial.print(DataLocation + k);
    Serial.print("   ");
    Serial.println(value);
                       //  ****End of Serial print section*****************
    delay(5);
  }
  Serial.print("DATA read OK of: \"");
  Serial.print(DataRetrieved);
  Serial.println("\"");
}

void reconnectBlynk() {                         // reconnect to server if disconnected, timer checks every 60 seconds
  if (!Blynk.connected()) {
    if(Blynk.connect()) {
      BLYNK_LOG("Reconnected");
    } else {
      BLYNK_LOG("Not reconnected");
    }
  }
}

void loop() {
  if (Blynk.connected()) {   // to ensure that Blynk.run() function is only called if we are still connected to the server
    Blynk.run();
  }
  timer.run();
  ArduinoOTA.handle();       // for local OTA updates
  yield();
}
2 Likes
The latest version of the program to change login wifi data
Hard - NANO+ESP-01
Soft - terminal + 1 button, setup flag in EEPROM, emergency switch on A5
/*
  set new wifi data

  V5 - terminal
  V14 - button SETUP - setup new wifi data
*/

char auth[] = "xxxxxxxxxxxxxxxxxxxxxxxxxxxxxxxxxxx"; //valid data
char ssid[] = "aaaa";
char pass[] = "bbbbbbbbbbb";

char t_auth[] = "77778888999911112222333344445555"; // declare same 32 char
char t_ssid[] = "same AP name 123456789"; // declare
char t_pass[] = "same AP password 123456789"; // declare

#define BLYNK_PRINT Serial
#include <ESP8266_Lib.h>
#include <BlynkSimpleShieldEsp8266.h>
#include <EEPROM.h>

//eeprom adr
#define adrauth 200
#define adrssid 250
#define adrpass 300
#define adrflagawifi 1
const byte defwifi = 3;
const byte  setwifi = 6;

#define EspSerial Serial // Set ESP8266 Serial object
ESP8266 wifi(&EspSerial);

WidgetTerminal terminal(V5);

const int SW_pin = A5; //emergency mode switch.

String      y_ssid = "";
String      y_pass = "";
String      y_auth = "";
int wpis = 0;
int dl_i = 0;
int dl_j = 0;
int dl_k = 0;

BLYNK_WRITE(V5)
{
  String  coscos = param.asStr(); // string from terminal
  switch (wpis)
  {
    case 1: {
        y_auth = coscos;  //from terminal
        dl_i = y_auth.length() + 1;  //change string to char[]
        y_auth.toCharArray(t_auth, dl_i); //change string to char[]
      } break;

    case 2: {
        y_ssid = coscos;
        dl_j = y_ssid.length() + 1;
        y_ssid.toCharArray(t_ssid, dl_j);
      } break;

    case 3: {
        y_pass = coscos;
        dl_k = y_pass.length() + 1;
        y_pass.toCharArray(t_pass, dl_k);
      } break;

    case 5: { // save new  login wifi data

        String b = "y";
        if (coscos == b) savewifi();
        b = "n";
        if (coscos == b) {
          terminal.println(F("-"));
          terminal.println(F("NOT SAVED"));
          terminal.flush();
        }
      } break;
    case 6: { // seve mode next login to wifi
        String b = "def";
        if (coscos == b) {
          settypewifi(defwifi);
          terminal.println(F("next login to def wifi"));
          terminal.flush();
        }
        b = "set";
        if (coscos == b) {
          settypewifi(setwifi);
          terminal.println(F("next login to set wifi"));
          terminal.flush();
        }
      } break;
    default: ;
  }
}

BLYNK_WRITE(V14) //button SETUP
{
  if (param.asInt()) {
    wpis++;
    if ((wpis > 9) || (wpis < 1))  wpis = 1;

    switch (wpis)
    {
      case 1: {
          terminal.println(F("print your auth: "));
          terminal.flush();
        } break;

      case 2: {
          terminal.println(F("print your ssid: "));
          terminal.flush();
        } break;

      case 3: {
          terminal.println(F("print your pass: "));
          terminal.flush();
        } break;

      case 4: {
          wpis = 5;
          terminal.println(F("-"));
          terminal.print(F("your auth: "));
          terminal.println(t_auth);
          terminal.print(F("your ssid: "));
          terminal.println(t_ssid);
          terminal.print(F("your pass: "));
          terminal.println(t_pass);
          terminal.println(F("data wifi OK ? y/n"));
          terminal.flush();
        } break;
      case 5: { } break;
      case 6: {
          terminal.println(F("login to ? def/set "));
          terminal.flush();
        } break;

      case 7:    printdef(); break;
      case 8:    printset(); break;
      case 9:    printread(); break;

      default: ;
    }
  }
}

void printdef() { // print def wifi data
  terminal.println(" ");
  terminal.println(F("**** DEF ****"));
  terminal.println(auth);
  terminal.println(ssid);
  terminal.println(pass);
  terminal.println("**************");
  terminal.flush();
}

void printset() { // print set wifi data
  terminal.println(" ");
  terminal.println(F("**** SET ****"));
  terminal.println(t_auth);
  terminal.println(t_ssid);
  terminal.println(t_pass);
  terminal.println(F("*************"));
  terminal.flush();
}

void savewifi()
{
  EEPROM.put(adrauth, auth); //................................not auth change
  EEPROM.put(adrssid, t_ssid);
  EEPROM.put(adrpass, t_pass);
  terminal.println(F("-"));
  terminal.println(F("save new WiFi data"));
  terminal.flush();
}

void settypewifi(byte set) { // save mode login flag
  EEPROM.put(adrflagawifi, set);
}

void printread() { // print login data from EEPROM
  EEPROM.get(adrauth, t_auth);
  EEPROM.get(adrssid, t_ssid);
  EEPROM.get(adrpass, t_pass);
  byte setp;
  EEPROM.get(adrflagawifi, setp);

  terminal.println(F("-"));
  terminal.println(F("**** FROM EE ****"));
  terminal.println(t_auth);
  terminal.println(t_ssid);
  terminal.println(t_pass);
  terminal.println(setp);
  terminal.println(F("*****************"));
  terminal.flush();
}

void wyborwifi() // choice wifi setup data after reset
{
  pinMode(SW_pin, INPUT_PULLUP);
  if (digitalRead(SW_pin)) {
    byte setp;
    EEPROM.get(adrflagawifi, setp);
    if (setp == setwifi) {

      EEPROM.get(adrauth, t_auth);
      EEPROM.get(adrssid, t_ssid);
      EEPROM.get(adrpass, t_pass);
      Serial.println("set wifi login ");
      Blynk.begin(t_auth, wifi, t_ssid, t_pass);

    }  else Serial.println("def wifi login "); Blynk.begin(auth, wifi, ssid, pass);

  } else Serial.println(" emergency login"); Blynk.begin(auth, wifi, ssid, pass);

  while (Blynk.connect() == false) { }    // Wait until connected }
}

//+++++++++++++++++++++++++++++++++++++++++++++++++++   setup

void setup() {

  Serial.begin(115200);  // Set console baud rate
  EspSerial.begin(115200);  // Set ESP8266 baud rate

  wyborwifi(); //login mode and BLYNK connection

  Blynk.setProperty(V14, "offLabel", "SETUP");
  Serial.println("Arduino.cc 1.6.12"); //  Arduino.org  doesn't have  EEPROM.get i EEPROM.put functions
}

void loop() {
  Blynk.run();
}
3 Likes
what’s the difference between krzyspx sketch and costa’s sketch?
On reflection it might have been better for me to have created a new thread for ESP in standalone mode and referenced the work done by @krzyspx in this thread.
I can see it is quite confusing now especially as some Blynkers don’t like to read threads from start to finish.
Maybe we need to add some sort of drawing or picture to indicate stuff. That might make a huge difference in understanding. Could be something for the documentation, @Dmitriy ? 
1 Like