BlynkESP32_BT_WF library : avoid coexistent issue of Blynk ESP32 BT and WiFi libraries

Just post the library mods to permit the inclusion of both ESP32 Blynk BT / BLE and WiFi libraries in one sketch. Then select one (WiFi or BT/BLE) to run at runtime. Just added BLE.

This is in infancy state, please have a try at

Inspired from @Crosswalkersam OP

See sample code, modified from OP’s code in

Update

@Crosswalkersam has posted the very good project (using this mod lib) on Intructables

Update Jan 27th 2020
This new version v1.0.1 enables user to include both Blynk BT / BLE and WiFi libraries in one sketch, and run both WiFi and BT/BLE simultaneously , or select one to use at runtime after reboot by pressing a switch.

All the previously-working widgets are still working correctly.

Terminal output when running WiFi and BT simultaneously using example Geiger_Counter_OLED_BT_WF :

Starting Geiger-Counter-OLED-BT-WF
Use WiFi to connect Blynk
[251] Connecting to HueNet1
[2412] Connected to WiFi
[2412] IP: 192.168.2.109
[2412] 
    ___  __          __
   / _ )/ /_ _____  / /__
  / _  / / // / _ \/  '_/
 /____/_/\_, /_//_/_/\_\
        /___/ v0.6.1 on ESP32

[2418] BlynkArduinoClient.connect: Connecting to account.duckdns.org:8080
[2524] Ready (ping: 6ms).
Use BT to connect Blynk
[2594] 
    ___  __          __
   / _ )/ /_ _____  / /__
  / _  / / // / _ \/  '_/
 /____/_/\_, /_//_/_/\_\
        /___/ v0.6.1 on ESP32

cpm = 0 - RadiationValue = 0.00uSv/h - Equivalent RadiationDose = 0.0000uSv
[25805] BT connect
[25831] Ready (ping: 25ms).
cpm = 0 - RadiationValue = 0.00uSv/h - Equivalent RadiationDose = 0.0000uSv

Terminal output when running WiFi and BLE simultaneously using example Geiger_Counter_OLED_BT_BLE_WF :

Starting Geiger-Counter-OLED-BT-BLE-WF
Use WiFi to connect Blynk
[248] Connecting to HueNet1
[2377] Connected to WiFi
[2377] IP: 192.168.2.126
[2377] 
   ___  __          __
  / _ )/ /_ _____  / /__
 / _  / / // / _ \/  '_/
/____/_/\_, /_//_/_/\_\
       /___/ v0.6.1 on ESP32

[2383] BlynkArduinoClient.connect: Connecting to account.duckdns.org:8080
[2429] Ready (ping: 15ms).
Use BLE to connect Blynk
[2499] 
   ___  __          __
  / _ )/ /_ _____  / /__
 / _  / / // / _ \/  '_/
/____/_/\_, /_//_/_/\_\
       /___/ v0.6.1 on ESP32

[16135] BLE connect
[17353] Ready
cpm =    0 - RadiationValue = 0.000 uSv/h - Equivalent RadiationDose = 0.0000 uSv
cpm =   30 - RadiationValue = 0.197 uSv/h - Equivalent RadiationDose = 0.0008 uSv
cpm =   60 - RadiationValue = 0.395 uSv/h - Equivalent RadiationDose = 0.0025 uSv
cpm =   90 - RadiationValue = 0.592 uSv/h - Equivalent RadiationDose = 0.0049 uSv
cpm =  120 - RadiationValue = 0.790 uSv/h - Equivalent RadiationDose = 0.0082 uSv
cpm =  150 - RadiationValue = 0.987 uSv/h - Equivalent RadiationDose = 0.0123 uSv

Update Jan 28th 2020

BlynkESP32_BT_WF libraries v1.0.1 just got included into Arduino Library Manager.
Now you can install this library directly from Arduino Library Manager.

1 Like

Update Feb 5th 2020

New in Version 1.0.2

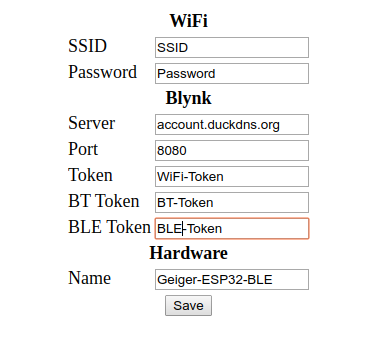
This new version enables user to eliminate hardcoding your Wifi and Blynk credentials, thanks to the Smart Config Portal, and have Credentials ( WiFi SID/PW, Blynk WiFi/BT/BLE Tokens/ Hardware Port ) saved in either SPIFFS or EEPROM.

Provide similar features as Blynk_WM

Selection_1

ConfigPortal

Update Feb 25th 2020

Releases v1.0.3

  1. Add checksum for config data integrity.
  2. Add clearConfigData() to enable forcing into ConfigPortal Mode when necessary
2 Likes

Update Mar 14th 2020

Releases v1.0.4

  1. Enhance Config Portal GUI.
  2. Reduce code size.

So, how it works?
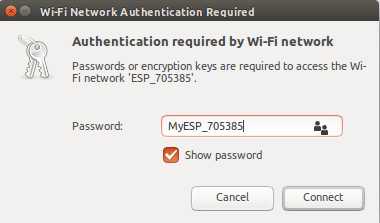
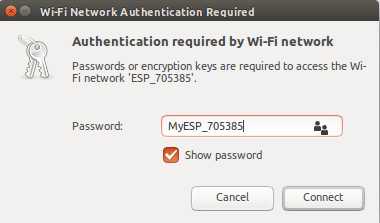
If the necessary credentials are not valid or it cannot connect to the Blynk server in 30 seconds, it will switch to Configuration Mode. You will see your built-in LED turned ON. In Configuration Mode, it starts an access point called ESP_xxxxxx. Connect to it using password MyESP_xxxxxx .

After you connected, please, go to http://192.168.4.1 or the configured AP IP. The Config Portal screen will appear:

Enter your WiFi and Blynk Credentials (Server, Port, WiFi/BT/BLE tokens)

Then click Save. After you restarted, you will see your built-in LED turned OFF. That means, it connected to your Blynk server successfully.

Updated April 19th 2020

Major Releases v1.0.5

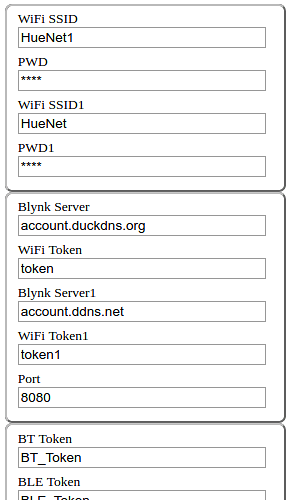
  1. Multiple WiFi Credentials (SSID, Password) and system will autoconnect to the best and available WiFi SSID.
  2. Multiple Blynk Credentials (Server, Token) and system will autoconnect to the available Blynk Servers.
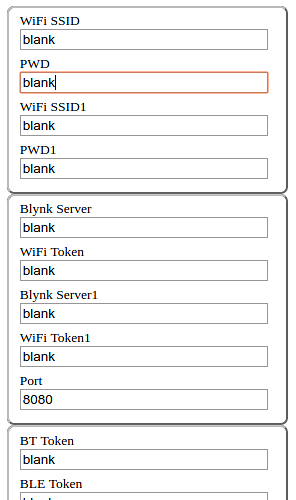
  3. New powerful-yet-simple-to-use feature to enable adding dynamic custom parameters from sketch and input using the same Config Portal. Config Portal will be auto-adjusted to match the number of dynamic parameters.
  4. Dynamic custom parameters to be saved automatically in EEPROM, or SPIFFS.
  5. WiFi Password max length increased to 63 from 31, according to WPA2 standard.
  6. Permit to input special chars such as % and # into data fields.
  7. Config Portal AP Channel is configurable (either static or random channel) to avoid channel conflict to other APs.

So, how it works?

If the necessary credentials are not valid or it cannot connect to the Blynk server in 30 seconds, it will switch to Configuration Mode. You will see your built-in LED turned ON. In Configuration Mode, it starts an access point called ESP_xxxxxx. Connect to it using password MyESP_xxxxxx .

Selection_1

After you connected, please, go to http://192.168.4.1 or the configured AP IP. The Config Portal screen will appear:

Enter your WiFi and Blynk Credentials (Server, Port, WiFi/BT/BLE tokens)

Then click Save. After you restarted, you will see your built-in LED turned OFF. That means, it connected to your Blynk server successfully.

How to add dynamic custom parameters from sketch

  • To add custom parameters, just modify from the example below
#define USE_DYNAMIC_PARAMETERS     true

/////////////// Start dynamic Credentials ///////////////

//Defined in <BlynkSimpleEsp32_WFM.h>
/**************************************
  #define MAX_ID_LEN                5
  #define MAX_DISPLAY_NAME_LEN      16

  typedef struct
  {
  char id             [MAX_ID_LEN + 1];
  char displayName    [MAX_DISPLAY_NAME_LEN + 1];
  char *pdata;
  uint8_t maxlen;
  } MenuItem;
**************************************/

#if USE_DYNAMIC_PARAMETERS

#define MAX_MQTT_SERVER_LEN      34
char MQTT_Server  [MAX_MQTT_SERVER_LEN + 1]   = "";

#define MAX_MQTT_PORT_LEN        6
char MQTT_Port   [MAX_MQTT_PORT_LEN + 1]  = "";

#define MAX_MQTT_USERNAME_LEN      34
char MQTT_UserName  [MAX_MQTT_USERNAME_LEN + 1]   = "";

#define MAX_MQTT_PW_LEN        34
char MQTT_PW   [MAX_MQTT_PW_LEN + 1]  = "";

#define MAX_MQTT_SUBS_TOPIC_LEN      34
char MQTT_SubsTopic  [MAX_MQTT_SUBS_TOPIC_LEN + 1]   = "";

#define MAX_MQTT_PUB_TOPIC_LEN       34
char MQTT_PubTopic   [MAX_MQTT_PUB_TOPIC_LEN + 1]  = "";

MenuItem myMenuItems [] =
{
  { "mqtt", "MQTT Server",      MQTT_Server,      MAX_MQTT_SERVER_LEN },
  { "mqpt", "Port",             MQTT_Port,        MAX_MQTT_PORT_LEN   },
  { "user", "MQTT UserName",    MQTT_UserName,    MAX_MQTT_USERNAME_LEN },
  { "mqpw", "MQTT PWD",         MQTT_PW,          MAX_MQTT_PW_LEN },
  { "subs", "Subs Topics",      MQTT_SubsTopic,   MAX_MQTT_SUBS_TOPIC_LEN },
  { "pubs", "Pubs Topics",      MQTT_PubTopic,    MAX_MQTT_PUB_TOPIC_LEN },
};

uint16_t NUM_MENU_ITEMS = sizeof(myMenuItems) / sizeof(MenuItem);  //MenuItemSize;

#else

MenuItem myMenuItems [] = {};

uint16_t NUM_MENU_ITEMS = 0;
#endif


/////// // End dynamic Credentials ///////////

  • If you don’t need to add dynamic parameters, just use the following in sketch
#define USE_DYNAMIC_PARAMETERS     false

That’s it.