and have successfully controlled it using the serial port of my laptop. Now I want to control it remotely through Wifi and Blynk App on my phone. I have added all the required specifications like board type and pin number etc. in the app. I have been able to send the LDR data successfully to ThingSpeak site, which means the connection of NodeMCU to the wifi is fine. But when I turn ON the light using button on Blynk App, the LED lights up for less than a second and then turns off. The serial monitor on Arduino IDE keeps showing the light is off. Here is the code that I uploaded on NodeMCU:
#include <ThingSpeak.h>
#include <ESP8266WiFi.h>
#define BLYNK_PRINT Serial
#include <BlynkSimpleEsp8266.h>
const char* ssid = "WifiName";
const char* password = "WifiPassword";
char auth[] = "AuthCode from Blynk App";
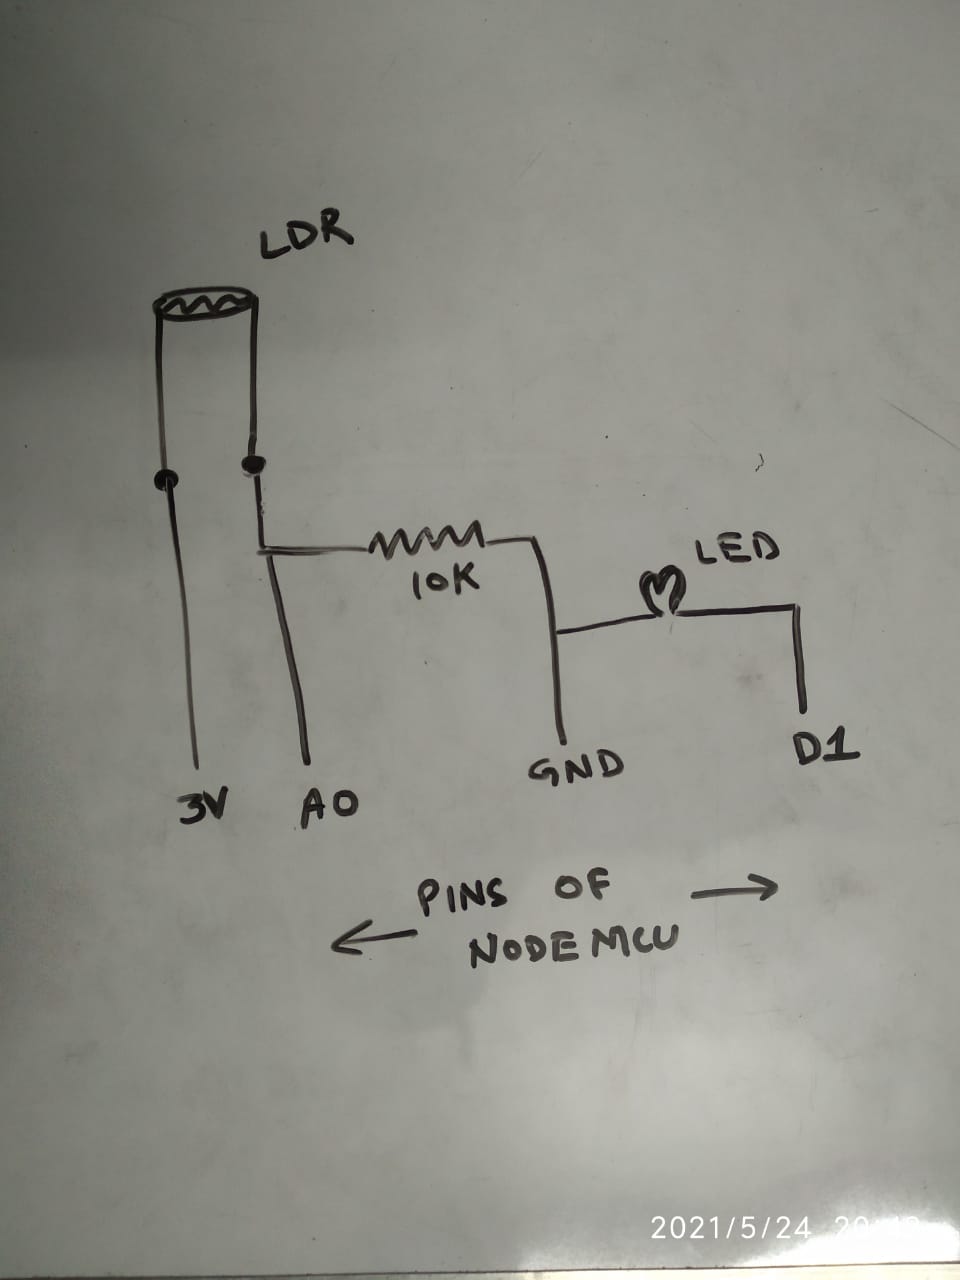
const int ldrPin = A0;
int ldrVal = 0;
int inputVal = 0;
const int ledPin = 5; //D1 pin on NodeMCU
WiFiClient client;
long myChannelNumber = ThingSpeak channel number;
const char myWriteApiKey[] = "Thingspeak write api key";
void setup() {
Serial.begin(9600);
Blynk.begin(auth, ssid, password);
delay(100);
pinMode(ledPin, OUTPUT);
digitalWrite(ledPin, 0);
pinMode(ldrPin, INPUT);
Serial.println();
Serial.println();
Serial.print("Connecting To: ");
Serial.println(ssid);
WiFi.begin(ssid, password);
while(WiFi.status() != WL_CONNECTED){
delay(200);
Serial.println("...");
}
Serial.println("");
Serial.println("Wifi Connected");
Serial.print("Ip Address: ");
Serial.println(WiFi.localIP());
ThingSpeak.begin(client);
}
void loop() {
// put your main code here, to run repeatedly:
Blynk.run();
while(Serial.available()>0){
inputVal = Serial.read();
}
ldrVal = analogRead(ldrPin);
Serial.println(ldrVal);
if(inputVal=='1'){
digitalWrite(ledPin, HIGH);
Serial.println("ON");
}
else{
digitalWrite(ledPin, LOW);
Serial.println("OFF");
}
Serial.println("");
ThingSpeak.writeField(myChannelNumber, 1, ldrVal, myWriteApiKey);
ThingSpeak.writeField(myChannelNumber, 2, inputVal, myWriteApiKey);
}
I have added Blynk Functionality to the already running code of my project where I take input from the serial port and turn the LED on or off based on that input. Why is the LED not turning on properly?
The library that I am using is blynk 0.6.1 on Windows 10 PC.
simply moving all of the problem code out of your void loop into another function, then calling that function directly from your void loop doesn’t solve the problem.
The MCU still has to process the same amount of code each time the void loop executes,
Your code is attempting to read the LDR value hundreds of times per second and print the result. It is also trying to write data to ThingSpeak hundreds of times per second.
You need to be calling these pieces of code using a timer which is set to a sensible frequency.
Also, trying to read a serial port with Blynk code needs some careful thought. This piece of code may well need to be in your void loop, but if you are simply trying to trigger an action from your PC then an API call may be a better solution. Reading the same serial port that you are sending data to from your sketch, using Serial.print statements, is also unlikely to work the away you want.
you say that:
You have added this piece of code:
which will print a 0 or 1 to the serial monitor, but it won’t do anything else.
Maybe if you explained more about what it is that you are actually trying to achieve using your project then we’d ne able to suggest a better approach than the one you’ve adopted.
Okay. I’ll describe what I want to do. Pls suggest an appropriate approach.
I have a python application from which I want to control this LED. I have made buttons in python GUI for ON and OFF. The arduino code reads serial input from python code in loop function and turns the LED on and off according to the input received. Also, using LDR, I want to print the amount of light that is present in the room. I have successfully done this part.
Now I want to remotely control the same LED through blynk app also, so as to apply the concept of IOT. I’m having problem in this part. Pls help.
Okay, simple solution is to use the Python GUI to send an API call to a Blynk virtual pin - the same one that your Blynk on/off button is attached to.
You then have the code in your sketch that will turn the LED on and off according to the state of the virtual pin, as described here:
The API documentation is here:
I’d recommend using the GET method for everything.
However, if you’re building a serious IoT home automation system then I’d suggest a different approach, which is to use Node-Red and MQTT plus the Blynk plugin for Node-Red.