Blynk ESP01 Not Responding (sensor reading Arduino Nano and DHT11)

Hello again guys,

I’am working on a project about on esp01 (based on esp8266) I just want to connect it to the blynk app for the time being. basically the connection is simple it is just esp01 module connected to arduino nano and I used the esp as a wifi transmitter reciever.

When i tried to run it using the code below I got the ESP not responding. I tried several wiring even using an external breadboard power supply (input from 12V adapter) but still not responding.

The problem I think is not from the ESP01 itself, because every time I tried a wiring I do AT command to check if the module is ok and these are the test that I do.

AT


OK
AT+CWLAP

+CWLAP:(0,"Elevenian",-55,"f0:7f:06:69:69:80",1,32767,0)
+CWLAP:(3,"Elevenia-BOD",-56,"f0:7f:06:69:69:82",1,32767,0)
+CWLAP:(3,"Elevenia-Guest",-57,"f0:7f:06:69:69:81",1,32767,0)
+CWLAP:(4,"Impact",-55,"78:11:dc:2a:e4:3f",1,68,0)
+CWLAP:(3,"CrackerziN",-36,"0a:c5:e1:d3:f0:9c",1,103,0)
+CWLAP:(3,"240173",-79,"30:b5:c2:b0:66:d0",1,68,0)
+CWLAP:(3,"EZVIZ_E20131519",-61,"80:9f:9b:0e:23:e3",3,58,0)
+CWLAP:(3,"INDO-LOTTE",-75,"d8:38:fc:11:31:28",1,32767,0)
+CWLAP:(0,"Elevenian",-67,"a0:23:9f:19:ae:20",6,32767,0)
+CWLAP:(3,"Management_15",-62,"f0:9f:c2:a4:bb:f1",6,55,0)
+CWLAP:(0,"Meeting Room TV.b",-61,"fa:8f:ca:9a:eb:7e",6,65,0)
+CWLAP:(3,"Guest_15",-62,"02:9f:c2:a4:bb:f1",6,55,0)
+CWLAP:(3,"LNV-0919",-69,"96:b8:6d:03:64:f7",6,56,0)
+CWLAP:(3,"Elevenia-BOD",-67,"a0:23:9f:19:ae:22",6,32767,0)
+CWLAP:(3,"Elevenia-Guest",-67,"a0:23:9f:19:ae:21",6,32767,0)
+CWLAP:(3,"DIRECT-pqDCP-T710W_BRbd90",-74,"9e:30:5b:83:bd:90",6,68,0)
+CWLAP:(0,"Elevenian",-63,"f0:7f:06:59:de:00",6,32767,0)
+CWLAP:(3,"Elevenia-BOD",-63,"f0:7f:06:59:de:02",6,32767,0)
+CWLAP:(3,"iPhone",-77,"22:9a:bd:7e:4c:ce",6,78,0)
+CWLAP:(3,"Staff_15",-63,"f2:9f:c2:a4:bb:f1",6,55,0)
+CWLAP:(3,"Elevenia-Guest",-64,"f0:7f:06:59:de:01",6,32767,0)
+CWLAP:(0,"ILOTTE Guest",-73,"d8:38:fc:51:31:28",1,50,0)
+CWLAP:(3,"TristanAbby",-74,"54:92:09:f6:53:bf",8,63,0)
+CWLAP:(0,"Elevenian",-61,"f0:7f:06:69:65:b0",11,32767,0)
+CWLAP:(3,"Management_15",-74,"f0:9f:c2:a4:bb:59",11,61,0)
+CWLAP:(3,"iLOTTE-AT",-80,"d8:38:fc:d1:31:68",11,53,0)
+CWLAP:(3,"Elevenia-Guest",-60,"f0:7f:06:69:65:b1",11,32767,0)
+CWLAP:(0,"ILOTTE Guest",-82,"d8:38:fc:51:31:68",11,53,0)
+CWLAP:(3,"INDO-LOTTE",-86,"d8:38:fc:11:31:68",11,32767,0)
+CWLAP:(3,"Staff_15",-73,"f2:9f:c2:a4:bb:59",11,60,0)
+CWLAP:(3,"Elevenia-BOD",-74,"f0:7f:06:59:e2:82",11,32767,0)
+CWLAP:(3,"Elevenia-BOD",-62,"f0:7f:06:69:65:b2",11,32767,0)
+CWLAP:(3,"Elevenia-Guest",-73,"f0:7f:06:59:e2:81",11,32767,0)
+CWLAP:(3,"ezviz_64F2FB23924B",-55,"64:f2:fb:23:92:4c",13,70,0)

OK
WIFI DISCONNECT
WIFI CONNECTED
WIFI GOT IP
AT+CIFSR

+CIFSR:APIP,"192.168.4.1"
+CIFSR:APMAC,"2e:f4:32:19:d4:f4"
+CIFSR:STAIP,"192.168.43.23"
+CIFSR:STAMAC,"2c:f4:32:19:d4:f4"

OK

Basically I use the AT command to check if the esp is responding and then search for wifi and connect to that wifi and get the IP adress. (that part that I got disconnected because it automatically connected to my Wifi and I tried to turn on and off the wifi to see if the esp automatically connected to the wifi again)

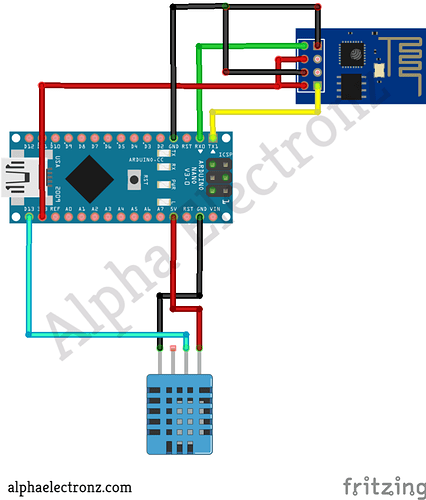
This is the Tutorial that I follow for the wiring and the Script Tutorial

This is the wiring that I follow. (from the tutorial)

for the wiring I’ve tried:

  1. follow it 100% (fail) (just saying for some reason the tutorial here the rx nano connected to tx esp and tx uno to rx esp i dont know why but i tried to flip the connection same result)
  2. use external power supply for breadboard (with 12V adapter) (fail)
  3. follow the wiring from this Link this is basically for flashing and programming the esp but I only follow the first part of wiring, this is mostly what I follow for the wiring knowing that it worked for AT commands all I do is just disconnect the nano RST jumper and using the voltage divider for RX.
    the guy use 10K and 20K I used 1k and 2k should be the same (I even use this wiring and connect the ESP rst jumper). (fail)
  4. using other pin other than rx tx (fail)
  5. changing arduino to uno (fail)
  6. changing esp (fail)

what I tried above the DHT11 is still disconnected just to eliminate other factors.

Now for my script its a example from the Tutorial and everytime I run it I always get not responding

[19] 
    ___  __          __
   / _ )/ /_ _____  / /__
  / _  / / // / _ \/  '_/
 /____/_/\_, /_//_/_/\_\
        /___/ v1.0.1 on Arduino Nano

[610] Connecting to CrackerziN
AT
[1620] ESP is not responding
AT+CIPCLOSE=1
AT+CIPCLOSE=1
AT+CIPSTART=1,"TCP","blynk-cloud.com",80
AT+CIPCLOSE=1

This will go on a loop the script trying to connect to server but unable because esp is not responding.

for the Script it’s basically from the tutorial that I follow, but all I add is SoftwareSerial, I tried with or without it but also fail.

#include <ESP8266_Lib.h>
#include <BlynkSimpleShieldEsp8266.h>
#include <SimpleDHT.h>

char auth[] = "OqLOk9AHObLAAdyK_05qx7ri4o0zrGIZ";

char ssid[] = "CrackerziN";
char pass[] = "Sherlock";

#include <SoftwareSerial.h>
SoftwareSerial EspSerial(1, 0); // RX, TX  <------this one here
// Your ESP8266 baud rate:
#define ESP8266_BAUD 9600
ESP8266 wifi(&Serial);

const int pinDHT11 = 2; // GPIO2 on your ESP8266 Wifi Module
SimpleDHT11 dht11;

void setup()
{
  Serial.begin(ESP8266_BAUD);
  delay(10);
  //Set ESP8266 baud rate
  // EspSerial.begin(ESP8266_BAUD);
  delay(10);
  Blynk.begin(auth, wifi, ssid, pass);
}

void sendSensor()
{
  // start working...
  Serial.println("=================================");
  Serial.println("Sample DHT11...");

  // read without samples.
  byte temperature = 0;
  byte humidity = 0;
  int err = SimpleDHTErrSuccess;
  if ((err = dht11.read(pinDHT11, &temperature, &humidity, NULL)) != SimpleDHTErrSuccess) {
    Serial.print("Read DHT11 failed, err="); Serial.println(err); delay(1000);
    return;
  }
  // for debug purposes.
  Serial.print("Sample OK: ");
  Serial.print((int)temperature); Serial.print(" *C, ");
  Serial.print((int)humidity); Serial.println(" H");
  // DHT11 sampling rate is 1HZ.
  delay(1000);
  Blynk.virtualWrite(V6, temperature);
  Blynk.virtualWrite(V5, humidity);
}

void loop()
{
  sendSensor();
  Blynk.run();
}

I don,t know if the fault is at the script or the wiring I’ve been meddling with this for a while and didn’t get any significant results. I need some help in identifying the problem.

If I miss anything please do tell :sweat_smile:

Hey there,

First, you should read this https://docs.blynk.io/en/legacy-platform/legacy-articles/keep-your-void-loop-clean

Second, use pins (2, 3) instead of (1, 0)

Third, use external power source and make sure it’s providing enough power and make sure it’s 3.3v as well

Pins 0 & 1 are the single hardware UART (serial port) on your Nano.
The SoftwareSerial library creates a simulated UART, allowing non hardware UART GPIO pins to be used for serial communication with a device such as your ESP-01.

Communication between the Nano and ESP-01 requires a dedicated channel, so you can’t use the same UART for both serial debugging and ESP-01 AT commands.

As @John93 has said, you should use non-UART pins. You should also stop doing this…

and instead use the EspSerial port you’ve created using SoftwareSerial. You also need to initialise that port in void setup, and that line of code is currently commented-out.

Pete.

1 Like

Second, use pins (2, 3) instead of (1, 0)

ok I tried doing this but the result still the same, I am also using 3.3v from external power supply but still not responding

sorry I dont quite understand here, because I also compare the code from this Blynk Example and it also have the esp serial and the one that is commented is esp baud settings i dont think that should be uncommented (?) knowing the baud is already set.

If you read the comments in the example you linked to then you’ll see that it is designed to be used with a variety of different boards, some of which (like the Mega) have multiple hardware UARTs, others (Uno, Nano etc) have only one.
Where only one hardware UART is available, a second one needs to be emulated using the SoftwareSerial library.

In either case, the ESP-01 needs to be attached to it’s own UART (whether that be a hardware or software emulated one) so that the debug data and AT commands don’t get mixed-up.

Pins 0 and 1 on the Nano are the one hardware UART and are used for serial debugging, as they are also connected to the onboard USB connector.
You need to emulate a second UART using SoftwareSerial, define which pins this will use (not 0 and 1), connect your ESP-01 to these and use this dummy port (EspSerial in the example) as your connection port. For that port to be initialised, it needs top have a Serial.begin entry in void setup, and you’ve currently commented that out.

If all of this seems very messy then you’re correct. This messiness is caused by you choosing a non-IoT device with one hardware UART for an IoT project, and therefore needing to add IoT connectivity via the ESP-01.
The best overall solution is to consign the Nano and the ESP-01 to the bin and use an IoT device for your project…

Pete.

@Bizko have you tried pins (10, 11) ?

ooooh ok ithought the serial begin is to set the ESP-01 because i already set it via AT commands so i got confused ok will try that

I tried changing it to other pin still wont work and using external powersupply the pin I tried

  1. 1,0
  2. 2,3
  3. 4,5
  4. 7,8
  5. 10,11

and also i tried PeteKnight suggestion

For that port to be initialised, it needs top have a Serial.begin entry in void setup, and you’ve currently commented that out.

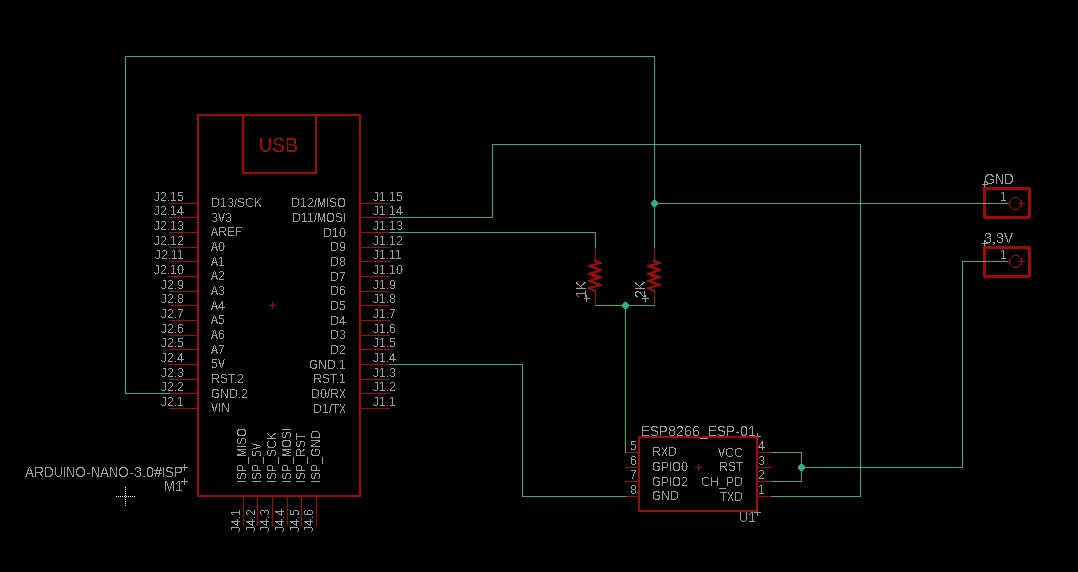
it is still not responding I tried to flip Rx and Tx but still wont work, I also try connecting the Rx pin directly without the voltage divider but same result (I’m still going to use the voltage divider for every connection just in case). Just saying i tried connecting to wifi with or without power supply and it still work normally but im still usingg the power supply just in case.

this is the current wiring (I’m supplying power to the nano with USB)

and this is the current code

#define BLYNK_PRINT Serial
#include <ESP8266_Lib.h>
#include <BlynkSimpleShieldEsp8266.h>
#include <SimpleDHT.h>

char auth[] = "OqLOk9AHObLAAdyK_05qx7ri4o0zrGIZ";

char ssid[] = "CrackerziN";
char pass[] = "Sherlock";


#include <SoftwareSerial.h>
SoftwareSerial EspSerial(10, 11); // RX, TX
// Your ESP8266 baud rate:
#define ESP8266_BAUD 9600
ESP8266 wifi(&Serial);

const int pinDHT11 = 4; // GPIO2 on your ESP8266 Wifi Module
SimpleDHT11 dht11;

void setup()
{
  Serial.begin(ESP8266_BAUD);
  delay(10);
  //Set ESP8266 baud rate
  EspSerial.begin(ESP8266_BAUD);
  delay(10);
  Blynk.begin(auth, wifi, ssid, pass);
}

void sendSensor()
{
  // start working...
  Serial.println("=================================");
  Serial.println("Sample DHT11...");

  // read without samples.
  byte temperature = 0;
  byte humidity = 0;
  int err = SimpleDHTErrSuccess;
  if ((err = dht11.read(pinDHT11, &temperature, &humidity, NULL)) != SimpleDHTErrSuccess) {
    Serial.print("Read DHT11 failed, err="); Serial.println(err); delay(1000);
    return;
  }
  // for debug purposes.
  Serial.print("Sample OK: ");
  Serial.print((int)temperature); Serial.print(" *C, ");
  Serial.print((int)humidity); Serial.println(" H");
  // DHT11 sampling rate is 1HZ.
  delay(1000);
  Blynk.virtualWrite(V6, temperature);
  Blynk.virtualWrite(V5, humidity);
}

void loop()
{
  sendSensor();
  Blynk.run();
}

This line of code is telling the Blynk library to use the hardware serial port (Serial) for AT communications with the ESP-01

You should be telling it to use the SoftwareSerial port that you’ve created here…

which you’ve called EspSerial So the line of code should read…

ESP8266 wifi(&EspSerial);

Your serial port, which is used for debug messages to your serial monitor can be initialised to any baud rate you wish. It doesn’t need to b the same baud rate as the SoftwareSerial port that is being used for communications with the ESP-01.
Using the ESP8266_BAUD value is going to confuse you at a later date, so it’s far better to use an actual number in this command, or create another variable and call it something like DEBUG_PORT_BAUD

This approach is extremely bad practice with Blynk. Instead you should use a timer to call the SendSensor function. Read this:

Also, I’d recommend not trying to read a DHT11 sensor any more frequently than once every 5 seconds.

Pete.

1 Like

Hello Guys

if the goal is to simply send the temperature from a DHT11 to Blynk, it is much easier to directly use a Wemos D1 mini card which will read the data from the DHT11 and make the WIFI connection itself. The assembly of two micro controller and the communication between them is always a source of problem and superfluous in this case

Plaurenc

1 Like

Hence my suggestion in post #6

Pete.

ok I see what you did, sorry took me a while to see that. i changed it to what you suggested but still not responding i also try to comment and uncomment the EspSerial.begin but still the same

ok I’ll keep that in mind, because I read some articles that you have to set the ESP-01 baud rate because some Esp baud rate is not 9600 and I already set mine to 9600 so i thought changing that would also change the esp baud rate.

ok thanks for the input I have clean up my script, then again I copy paste this code from te tutorial that I follow so I havent clean it up yet and my focus is just trying to make the ESP connect. this is the script right now.

#define BLYNK_PRINT Serial
#include <SimpleTimer.h>
#include <SoftwareSerial.h>
#include <ESP8266_Lib.h>
#include <BlynkSimpleShieldEsp8266.h>
#include <SimpleDHT.h>

char auth[] = "OqLOk9AHObLAAdyK_05qx7ri4o0zrGIZ";

char ssid[] = "DT_Wifi";
char pass[] = "Sherlock";

SoftwareSerial EspSerial(4, 3); // RX, TX
// Your ESP8266 baud rate:
ESP8266 wifi(&EspSerial);

const int pinDHT11 = 4; // GPIO2 on your ESP8266 Wifi Module
SimpleDHT11 dht11;

SimpleTimer timer;

void sendSensor()
{
  // start working...
  Serial.println("=================================");
  Serial.println("Sample DHT11...");

  // read without samples.
  byte temperature = 0;
  byte humidity = 0;
  int err = SimpleDHTErrSuccess;
  if ((err = dht11.read(pinDHT11, &temperature, &humidity, NULL)) != SimpleDHTErrSuccess) {
    Serial.print("Read DHT11 failed, err="); Serial.println(err); delay(1000);
    return;
  }
  // for debug purposes.
  Serial.print("Sample OK: ");
  Serial.print((int)temperature); Serial.print(" *C, ");
  Serial.print((int)humidity); Serial.println(" H");
  // DHT11 sampling rate is 1HZ.
  delay(1000);
  Blynk.virtualWrite(V6, temperature);
  Blynk.virtualWrite(V5, humidity);
}

void setup()
{
  Serial.begin(9600);
  //Set ESP8266 baud rate
  EspSerial.begin(9600);
  Blynk.begin(auth, wifi, ssid, pass);
  
  timer.setInterval(5000L,sendSensor); // 1000L
}

void loop()
{
  timer.run();
  Blynk.run();
}

It is still not responding the wiring is still the same with external power supply and also checked my Esp-01 with AT command still works.

I will take notes of this, my reason i’m not using the wemos cause im not really familliar with the platform, so i decided to use nano instead. but I will try it in the future for now I’m also trying to learn the connection and how the esp it self works.

Ok, I manage to get it connected, I think theres a problem on my external power supply, I currently using the nano as power and it works. I need to check it again with my external psu cause i need more power. also I flipped the Rx Tx the Rx pin from Esp connected to Tx nano and Tx esp to Rx nano.

I manage to get it connected with some issue but manage to find a way thanks to this post.

But the connection to my phone sometimes connected and disconnected, is it because of the power?

[0] 
    ___  __          __
   / _ )/ /_ _____  / /__
  / _  / / // / _ \/  '_/
 /____/_/\_, /_//_/_/\_\
        /___/ v1.0.1 on Arduino Nano

[588] Connecting to DT_Wifi
[3772] AT version:1.2.0.0(Jul  1 2016 20:04:45)
SDK version:1.5.4.1(39cb9a32)
v1.0.0
Mar 11 2018 18:27:31
OK
[9048] +CIFSR:STAIP,"192.168.137.65"
+CIFSR:STAMAC,"2c:f4:32:19:d4:f4"
[9057] Connected to WiFi
[19681] Ready (ping: 39ms).
[51335] Ready (ping: 39ms).
[82699] Ready (ping: 39ms).
[114262] Ready (ping: 39ms).
[145853] Ready (ping: 39ms).
[177483] Ready (ping: 39ms).
[209156] Ready (ping: 38ms).
[241268] Ready (ping: 39ms).
[273049] Ready (ping: 40ms).
[304845] Ready (ping: 40ms).
[336311] Ready (ping: 39ms).

this is what I get from the terminal. it’s connected to my phone but no data recieved i guess because of the Rx Tx purposely flipped? or the fact that it has unstable connection? I know I can trigger something I’m using D13 from my phone to trigger the nano onboard LED, the led on the esp is blinking everytime I press the button, but the led on the nano is not triggering.

I’m using another code that I mix match but it should be the same

#define BLYNK_PRINT Serial
#include <dht.h>
#include <SimpleTimer.h>
#include <SoftwareSerial.h>
#include <ESP8266_Lib.h>
#include <BlynkSimpleShieldEsp8266.h>

char auth[] = "OqLOk9AHObLAAdyK_05qx7ri4o0zrGIZ";

char ssid[] = "DT_Wifi";
char pass[] = "Sherlock";


SoftwareSerial EspSerial(4, 3); // RX, TX
ESP8266 wifi(&EspSerial);

WidgetTerminal terminal(V1);
SimpleTimer timer;

String vdata = "";

#define dht_apin A0 //Pin DHT_11
dht DHT;

void sendSensor()
{
  DHT.read11(dht_apin);
  long measurement1 = DHT.humidity;
  long measurement2 = DHT.temperature;
  delay(2000);
  Blynk.virtualWrite(V5, measurement1);
  delay(2000);
  Blynk.virtualWrite(V4, measurement2);

  vdata = vdata + "Humidity : " + measurement1 +"%"+", "+ "Temperature : " + measurement2 +" C";
  Blynk.virtualWrite(V2, vdata);
  vdata = "";
}

void setup()
{
  Serial.begin(9600);
  //Set ESP8266 baud rate
  EspSerial.begin(9600);
  Blynk.begin(auth, wifi, ssid, pass,"blynk-cloud.com", 8080);
  
  timer.setInterval(5000L,sendSensor); // 1000L
  terminal.println(F("Blynk v" BLYNK_VERSION ": Device started"));
  terminal.clear();
  terminal.flush();
}

void loop()
{
  timer.run();
  Blynk.run();
}

These two comments tell me that you haven’t understood anything that I wrote previously!

Pete.

Ok so basically what you meant is it doesn’t matter because the baud rate is for debugging purpose right? And I can set it to what ever I want and it does not affect the connection problem? Sorry took me a while to understand kinda confused with the baud rate and stuff