I have an blynk project with arduino controlling an old fuel oil fired heater in my holiday home (somewhere abroad). The project worked fine until recently where the arduino loses contact with the Blynk server on a frequent basis. I don’t know the exact reason , but my idea is to “wake” up the arduino with an external watchdog .Using the internal watchdog of the arduino is a bit risky, since I don’t know exactly the cycle time of my program and the watchdog timing is limited to 8 sec. I’ve found adafruit watchdog based on TPL5110.I want to use it generating an interrupt to the arduino.
Does anybody has experience with this kind of operation or alternatives
Hi Robert.
I have a very similar situation, with a holiday home in Spain and some devices that can from time to time stop responding until you do the old “turn it on and off again” routine.
I’ve long since given up on trying to discover why this happens, and decided that a hardware watchdog was the best option.
I’d looked at the hardware watchdog developed by the SuperHouseTV guy, but decided to do something different.
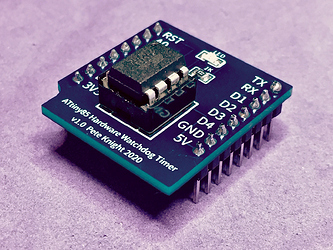
As I use Wemos D1 Mini boards for most of my projects, I decided to develop a shield that uses the same footprint as the D1 Mini and can be stacked on top of an existing board to enable watchdog hardware to be added easily.
That’s not how the watchdogs that I’ve seen, or the one that I use work.
If the board stops responding then you want to generate a Reset action to reboot the board, so most watchdog chips or circuits achieve this by pulling the RST pin on the board to GND.
My board uses an ATTiny 85 chip (which is an MCU that can be programmed via the Arduino IDE) to do the timing and reset process.
My ATTiny sketch has a programmable startup delay (so that it doesn’t keep rebooting while you wait for an internet connection and the rest of the void startup to be processed) and a programmable heartbeat interval.
The main board has a timer running that sends a pulse to a pin every 5 seconds. The ATTiny looks for this pulse, and if it hasn’t received one by the time that the heartbeat interval has passed, it reboots the board (and itself as well).
I normally set the heartbeat timeout to around 15 seconds, so three of the 5 second pulses would have to be missed before the board is reset.
This approach works really well for me. Now my problem is that my router in Spain occasionally locks-up and needs rebooting, but I’ve set-up a smart switch to ping an external website and if that ping fails multiple times it reboots the router - but that’s a different story!
This was what my version 1 circuit board looked like…
I’ve since modified the design to accommodate either through-hole or SMT versions of the ATtiny 85, and make it easier to choose between long or short startup and heartbeat delays via solder pads, as well as choosing which GPIO pin is used to send the heartbeat pulse…
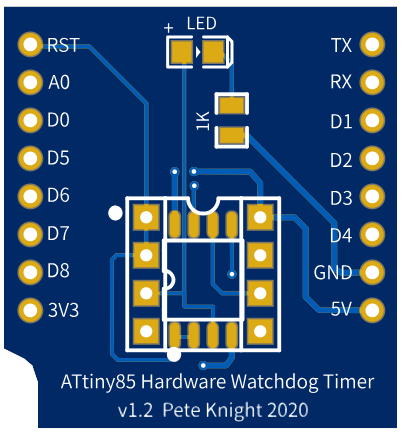
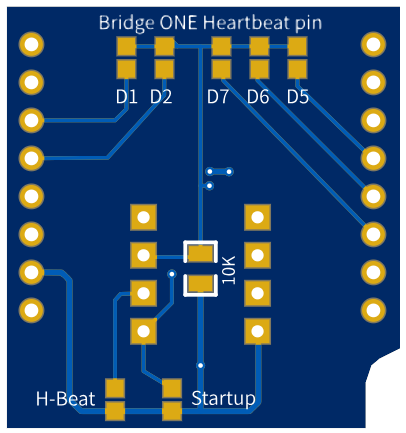
The original code came from here, but I’ve modified mine to allow the selection of the long/short delays via the solder pads, and tweaked a few other things too.
EDIT - Github page now created with the Gerber files needed to create the latest version of this hardware watchdog (now up to version 1.5) and all the other info needed - including code examples…
Pete.
Hi Pete,
Thanks a lot for your reply. I definitely will go the same way with the description you gave me. I suppose you never had problems with the ATTiny85 board from stopping to work ?
As for the router, I had a similar problem of the router blocking at a certain point so now I do it the hard way. I cut the power to it with a oldfashioned clock driven socket for a quarter of an hour during night time. So far so good !
Robert
The ATTiny seems rock solid, no problems so far.
They are a bit tricky to program, as they need an Arduino loaded with the appropriate code to act as a programming interface, and you have to remember to do the ‘burn bootloader’ stage to get the internal clock running at the correct rate.
Well worth the effort though.
I’ll post my code and some useful links in a while, busy doing some decorating at the moment!
Pete.
Thanks Pete,
Awaiting your code. Take your time.
Robert
This is a great guide on to how to program an ATtiny using an Arduino…
The pin numbers used in the code correspond to the ones in this diagram (top view)…
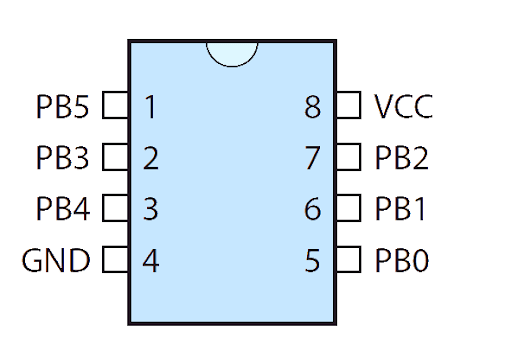
This is the main code ATtiny code…
/* --------------------------------------------------------------------------------- */

// Change these settings to alter the two available initial_delay times, selectable via the White jumper...
const unsigned long initial_delay_1 = (1000 * 10);            // give the host 10 seconds to boot (no link between PB0 and GND)
const unsigned long initial_delay_2 = (1000 * 20);            // give the host 20 seconds to boot (link in place between PB0 and GND)

// Change these settings to alter the two available heartbeat_timeout_delay times, selectable via the Blue jumper...
const unsigned long heartbeat_timeout_delay_1 = (1000 * 15);  // 15 second heartbeat cycle before reset (no link between PB1 and GND)
const unsigned long heartbeat_timeout_delay_2 = (1000 * 30);  // 30 second heartbeat cycle before reset (link in place between PB1 and GND)

/* --------------------------------------------------------------------------------- */


// This sketch is for an ATtiny85
//
// Original code from here https://www.instructables.com/id/External-Hardware-Watchdog/
// Modified by Pete Knight
//
// Arduino IDE Settings...
// Board - ATtiny/25/45/85
// Processor - ATtiny85
// Clock - Internal 8 MHz
// Programmer - Arduino as ISP (change this to suit your AVR Progremmer)
//

//

// This Hardware Watchdog timer circuit is intended to be built on a Wemos Prototyping board,
// and used alongside a Wemos D1 mini or D1 Mini Pro.
// The circuit is also suitable for use with a NodeMCU board, if the Wemos Proto board is replaced with something different

// The Watchdog LED will be lit during the initial_delay priod then will flash when
// a heartbeat pulse is recieved from the Wemos. If the initial_delay has passed
// and no heartbeat pulse is recieved from the Wemos for more than the period of the
// heartbeat_timeout then the Wemos Watchdog circuit will be rebooted.
//
// On startup and after a reset, initial_delay is invoked to insure the Wemos has time to
// properly boot up and begin emitting the heartbeat signal on either D1, D2, D5, D6 or D7 (the jumper on the Watchdog timer must match this)
// If no hearbeat pulses are recieved from the Wemos after staerup then the Wemos will be rebooted
// once the initial_delay and the heartbeat_timeout combined have passed

// NOTE - The Wemos and ATtiny Reset pins are tied together, so resetting the Wemos via the biult-in
// reset button also reboots the Watchdog Timer.


// ATting85 GPIO's (PB's)
// 0  initial_delay selector      Pull to GND via solder pad to enable initial_delay_2
// 1  heartbeat_timeout selector  Pull to GND via solder pad to enable heartbeat_timeout_delay_2
// 2  heartbeat_pin               Incomming pule from MCU on this pin. 10k pull-down resistor between here and GND
// 3  reset_signal                Pin that is pulled LOW to reset the Wemos and the Watchdog Timer. Connection between this pin and GND on the ATtiny 85
// 4  led_pin                     Pin that has the LED attached to indicate initial_delay period (On) and heartbeat recieved (flashes on). Other side of LED connected to GND via 1k resistor


#include "timer.h"
unsigned long initial_delay;
unsigned long heartbeat_timeout_delay;

// constants won't change -- used to set pin numbers and define delays
const int initial_delay_select_pin =  0;      // Used to choose between initial_delay_1 and 2 using solder link to GND
const int heartbeat_freq_select_pin = 1;      // Used to hoose between heartbeat_timeout_delay_1 and 2 using solder link to GND
const int heartbeat_pin =             2;      // Use the signal from the host to set the heartbeat status (Connected to either D1, D2, D5, D6 or D7 on Wemos D1 Mini)
const int reset_signal =              3;      // use this pin to reset the host (Connected to RST on Wemos)
const int led_pin =                   4;      // built-in LED (connected to ground via a 1k resistor, active HIGH)


// global variables
int currState = HIGH;
int prevState = LOW;

// Create timer instances
timer initialWaitTimer = timer(initial_delay);              // initial delay timer
timer heartbeat_timeout = timer(heartbeat_timeout_delay);   // heartbeat timer


/* --------------------------------------------------------------------------------- */
void setup()
{
  // Set pin modes
  pinMode(reset_signal, INPUT_PULLUP); // This pin is connected to RST on the ATtiny85. Keep HIGH by declaring as INPUT_PULLUP at boot
  pinMode(led_pin, OUTPUT);
  digitalWrite(led_pin, HIGH); // Turn the LED pin ON (HIGH) initially (until the initial_delay has passed)

  delay(10); // 100ms works <<<<<<<<<<<<<<<<<<<<<<<<<<<<<<<<<<<<<<<<<<<<<<<<<<<<<<<<<<<<<<<<<<<<<<<<<<<<<<<<<<<<<<<<<<<<<<<<<<<<<<<<<<<<<<<<<<<<<<<<<<<<<<<<<<<<<<<<<
  pinMode(reset_signal, OUTPUT);    // Now set the pin to OUTPUT
  digitalWrite(reset_signal, HIGH); // And make it HIGH

  pinMode(heartbeat_pin, INPUT);
  pinMode(initial_delay_select_pin, INPUT_PULLUP);
  pinMode(heartbeat_freq_select_pin, INPUT_PULLUP);

  readTimingSettings();             // Read which of the initial_delay and heartbeat_timeout_delay timing options is to be used

  // Update timers...
  initialWaitTimer = timer(initial_delay);            // reset initial delay timer
  heartbeat_timeout = timer(heartbeat_timeout_delay);       // heartbeat timer

  // Start with a zeroed out timers...
  initialWaitTimer.reset();
  heartbeat_timeout.reset();
}


/* --------------------------------------------------------------------------- */
void loop()
{
  if(initialWaitTimer.update() == 1) // if the initial_delay has passed
  {
    ledHeartbeat();
    if (heartbeat_timeout.update() == 1)
    {
      resetHost(reset_signal);
    }
  }
  else
  {
    heartbeat_timeout.reset(); // Keep resetting the heartbeat timeout timer until the initial_delay has passed
  }
}

/* --------------------------------------------------------------------------------- */

void ledHeartbeat(void)
{
  // Pulse the LED to show that a heartbeat has been recieved
  digitalWrite(led_pin, currState = digitalRead(heartbeat_pin));
  if ( currState != prevState)
  { // State has changed
    prevState = currState; // Update
    heartbeat_timeout.reset(); // Reset the timer
  }
}


/* -------------------------------------------------------------------------------- */
void resetHost(int reset_signal)
{
  digitalWrite(reset_signal, LOW); // Pull the MCU's RST pin LOW (Reboot)
  delay(500); // wait half a second before we do anything else

  // The code after this point won't execute if the Reset pin on the
  // ATtiny85 is tied to the RST pin on the Wemos D1 Mini, as the ATTiny will reboot
  // and the code execution will begin from the top.
  // This code is included to give the option not to configure the circuit that way
  // although that is not reccomended as resetting the Wemos won't reset the Watcvhdog timer
  // so the initial_delay won't be invoked and this may lead to a reboot loop by the Wemos.
  // This loop can ony be broken by removing power to the Watchdog timer (which is supplied bia the Wemos)

  digitalWrite(reset_signal, HIGH); // Turn it back on so the host can boot!
  initialWaitTimer.reset(); // Zero out the timers
  heartbeat_timeout.reset();
  digitalWrite(led_pin, HIGH); // Turn the LED back on again to indicate taht we are in initial_delay
}

/* -------------------------------------------------------------------------------- */

void readTimingSettings(void)
{
  int result;

  result = digitalRead (initial_delay_select_pin);
  if(result == 1)
  {
    initial_delay = initial_delay_1;
  }
  else
  {
    initial_delay = initial_delay_2;
  }


  result = digitalRead (heartbeat_freq_select_pin);
  if(result == 1)
  {
    heartbeat_timeout_delay = heartbeat_timeout_delay_1;
  }
  else
  {
    heartbeat_timeout_delay = heartbeat_timeout_delay_2;
  }
}
and this is the timer.h code…
// Class "timer" -- monitors a time instance and returns 1 if it is passed or 0 otherwise
// It requires a time interval in milliseconds

class timer
{
//Class variables initialized at startup
unsigned long timerDuration; // How long is this timer for?

// Runtime variables
unsigned long startMillis; // When did it start?

// Constructor
public:
timer(unsigned long timer) {
timerDuration = timer;
startMillis = millis();
}

int update(void) {
if (millis() - startMillis >= timerDuration) {
return 1;
} else {
return 0;
}
}

void reset(void) {
startMillis = millis();
}

};
It’s important to initially burn the bootloader to the ATtiny85 with clock frequency set to 8MHz then upload the code with the same settings, otherwise the timers won’t run correctly.
In my Wemos sketch I call this function every 5 seconds with a timer to send the heartbeat…
void send_heartbeat()
{
    digitalWrite(D7,HIGH);  // Pin D7 (GPIO13) used to send heartbeat to watchdog
    digitalWrite(2,LOW);    // turn on the Wemos's onboard LED
    delay(10);              // can be as low as 50 microsecond
    digitalWrite(D7,LOW);   // pull the heartbeat pin low again
    digitalWrite(2,HIGH);   // turn off the Wemos's onboard LED
    Serial.println("Heartbeat");
}
You would obviously change the heartbeat pin to suit, and use the correct onboard LED pin to suit your board (assuming you want it to flash when the heartbeat is sent).
The LED connected between the ATtiny’s pin PB2 and GND (via a 1k current limiting resistor) will be lit for the duration of the initial startup delay. It then goes out and flashes each time it sees a heartbeat pulse from the MCU.
When things are working well, (and after the initial startup phase) the LED on the MCU and the LED on the watchdog circuit should flash together every 5 seconds.
The jumpers to switch between long and short startup and long and short hearbeat (you can obviously change what these periods are in the code to suit yourself) may not be needed for your project, but I’d suggest that you leave them in place as it’s far easier to add a jumper than re-flash the ATtiny of you don’t have a dedicated flashing setup.
I’d also recommend fitting the ATtiny in a socket, so that it’s easier to remove if you want to tweak the code. Oh, and when you put the ATtiny back in it’s socket ensure that it’s the correct way around. I’d released some magic blue smoke from my Wemos D1 Minis on more than one occasion by making that mistake. It burns-out the Schottky diode on the power input rail when you do this, and although its easy enough to repair if you have a spare, its probably best avoided where possible!
Pete.
Thanks a lot Pete. This is a very clear explanation of the watch dogs functioning. I will use it to develop my own watchdog for my application. Have some experimenting to do 
I will post some feedback once the thing is running.
By the way, do you also use blynk to control your applications ?
Robert
I use Blynk to control lots of things here at home in London, or in Spain when we’re there. I also use it for monitoring quite a few things when I’m not there.
Pete.
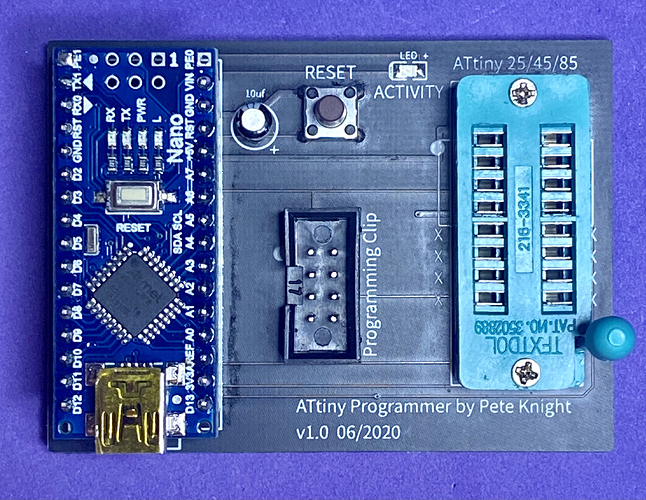
Hi Dave, I did but something like that, but I couldn’t get it to work. I read somewhere that once the ATTiny had been flashed with a bootloader then you could use something like that, but you need an Arduino to flash the bootloader…
I ended-up making a board that takes a Nano, on a socket, and has a a ZIF socket for the ATTiny. But that’s mostly because of my aversion to lashing things up with breadboards and jumper wires.
Pete.
Hi Pete, This is exactly what I am looking for for my Blynk project. It uses the Wemos D1 and occasionally hangs. It does not hinder my application much, but I stop receiving change notifications because the Wemos keeps current state.
Can I by any chance buy one or two of the bare (or populated) boards form you?
Hessel.
Give me a day or two and I’ll upload the Gerber files for the PCB, along with Bill of Materials and some additional resources to my GitHub site.
I’ll also upload the files for a Wemos D1 Mini sized watchdog shield, that allows the ATtiny85 watchdog circuit to be uses as a “shield” type board, along with the sketch that goes with it.
I’ll post links to the GitHub pages when this is done.
Pete.
Here’s the GitHub page for the ATTiny 25/45/85 programmer PCB and associated info:
Pete.
And a page for the Wemos D1 Mini form-factor Hardware Watchdog…
Pete.
