I am trying to get 3 DS18B20 temperature probes to read on 3 different widgets on my dashboard using one input pin… I have each sensors address to input into the code… Seems that I can read my sensors until I stack my ethernet shield on my arduino… Then my temp probes stop reading. I can still use button widgets and control relay board, so my device is connected.
Can you get readings when your shield is stacked, but without Blynk?
I can with Cayenne.
I would rather use Blynk however… I like your dashboard and app better
This is the code I used to be able to read my sensors… I am eventually trying to hook this up to a Jarduino reef tank controller
//#define CAYENNE_DEBUG
#define CAYENNE_PRINT Serial
#include <CayenneMQTTEthernet.h>
#include <OneWire.h>
#include <DallasTemperature.h>

// Cayenne authentication info. This should be obtained from the Cayenne Dashboard.
char username[] = "yourMQTTUsername";
char password[] = "yourMQTTPassword";
char clientID[] = "yourMQTTClientID";

unsigned long lastMillis = 0;

// Digital pin where both sensors are connected on the Arduino Mega
#define ONE_WIRE_BUS 49

// Setup a oneWire instance to communicate with any OneWire devices
OneWire oneWire(ONE_WIRE_BUS);

// Pass our oneWire reference to Dallas Temperature.
DallasTemperature sensors(&oneWire);

DeviceAddress tempSensorA = { 0x28, 0xFF, 0x30, 0xCA, 0x64, 0x15, 0x02, 0x7A };
DeviceAddress tempSensorB = { 0x28, 0xFF, 0x01, 0xB0, 0x64, 0x15, 0x02, 0x80 };

void setup() {
	Serial.begin(9600);
	Cayenne.begin(username, password, clientID);
  sensors.begin();
  //set the resolution to 10 bit (good enough?)
  sensors.setResolution(tempSensorA, 10);
  sensors.setResolution(tempSensorB, 10);
}

void loop() {
	Cayenne.loop();

	//Publish data every 10 seconds (10000 milliseconds). Change this value to publish at a different interval.
	if (millis() - lastMillis > 10000) {
		lastMillis = millis();
		//Write data to Cayenne here. This example just sends the current uptime in milliseconds.
		sensors.requestTemperatures();
    Cayenne.celsiusWrite(9, sensors.getTempC(tempSensorA));
    Cayenne.celsiusWrite(10, sensors.getTempC(tempSensorB));

    //Print Temperatures to the Serial Montior (optionally)
    Serial.print("Sensor A temperature is: ");
    printTemperature(tempSensorA);
    Serial.print("\n\r");
    Serial.print("Sensor B temperature is: ");
    printTemperature(tempSensorB);
    Serial.print("\n\r\n\r");
	}
}

//Default function for processing actuator commands from the Cayenne Dashboard.
//You can also use functions for specific channels, e.g CAYENNE_IN(1) for channel 1 commands.
CAYENNE_IN_DEFAULT()
{
	CAYENNE_LOG("CAYENNE_IN_DEFAULT(%u) - %s, %s", request.channel, getValue.getId(), getValue.asString());
	//Process message here. If there is an error set an error message using getValue.setError(), e.g getValue.setError("Error message");
}

void printTemperature(DeviceAddress deviceAddress)
{
  float tempC = sensors.getTempC(deviceAddress);
  if (tempC == -127.00) {
    Serial.print("Error getting temperature");
  } else {
    Serial.print("C: ");
    Serial.print(tempC);
    Serial.print(" F: ");
    Serial.print(DallasTemperature::toFahrenheit(tempC));
  }
}
Do you still have Cayenne installed? If I recall, there can be conflicts with Blynk if it is.
I see a lot of Cayenne references and commands in your code… Have you ported this to Blynk style yet?.. that is the code we should be looking at.
Can you post Blynk code, not Cayene? They are copy/pasting Blynk code base, but:
- it doesn’t mean they know how to do it right

- Their code won’t work with Blynk app
I do not currently have any Cayenne sketches uploaded to my Arduino… I tried to go through and change code to Blynk instead of cayenne, but got alot of errors and there are some libraries they use that Blynk does not. This is getting frustrating… I had Blynk working before except it would give me the same temp for all three widgets on my app. So it wasn’t reading individual sensors… Now I can’t get it to read any of them. I don’t remember how I got it to read before. Lol
Start from scratch. This project is a 5 min thing.
-
Make sure you can read all the 3 sensors while shield is on. Getiing the readings to serial Monitor is what you need.
-
Remove Cayenne library. Reinstall Blynk library
-
Use simple Blynk Sketch for your hardware to make sure you can connect
-
Choose Push Data from examples.blynk.cc
-
Use timer loop to send each sensot data to v pins
So I got my sensors reading independently in the serial port but when I upload the Blynk sketch to read them, my app has gauges on V5,V6,and V7 that is supposed to be reading each sensor, and all values are running off the same sensor. The following is the code that I use to get the individual temp sensors to read in serial port…
/* YourDuino Multiple DS18B20 Temperature Sensors on 1 wire
  Connections:
  DS18B20 Pinout (Left to Right, pins down, flat side toward you)
  - Left   = Ground
  - Center = Signal (Pin 2):  (with 3.3K to 4.7K resistor to +5 or 3.3 )
  - Right  = +5 or +3.3 V

   Questions: terry@yourduino.com
   V1.01  01/17/2013 ...based on examples from Rik Kretzinger

/*-----( Import needed libraries )-----*/
// Get 1-wire Library here: http://www.pjrc.com/teensy/td_libs_OneWire.html
#include <OneWire.h>

//Get DallasTemperature Library here:  http://milesburton.com/Main_Page?title=Dallas_Temperature_Control_Library
#include <DallasTemperature.h>

/*-----( Declare Constants and Pin Numbers )-----*/
#define ONE_WIRE_BUS_PIN 47
/*-----( Declare objects )-----*/
// Setup a oneWire instance to communicate with any OneWire devices
OneWire oneWire(ONE_WIRE_BUS_PIN);

// Pass our oneWire reference to Dallas Temperature.
DallasTemperature sensors(&oneWire);

/*-----( Declare Variables )-----*/
// Assign the addresses of your 1-Wire temp sensors.
// See the tutorial on how to obtain these addresses:
// http://www.hacktronics.com/Tutorials/arduino-1-wire-address-finder.html

DeviceAddress Probe01 = { 0x28, 0xAC, 0x35, 0xB9, 0x08, 0x00, 0x00, 0x4E  };
DeviceAddress Probe02 = { 0x28, 0xE6, 0x15, 0xBD, 0x08, 0x00, 0x00, 0x02  };
DeviceAddress Probe03 = { 0x28, 0xA3, 0x49, 0xBC, 0x08, 0x00, 0x00, 0xA7  };


void setup()   /****** SETUP: RUNS ONCE ******/
{
  // start serial port to show results
  Serial.begin(9600);
  Serial.print("Initializing Temperature Control Library Version ");
  Serial.println(DALLASTEMPLIBVERSION);

  // Initialize the Temperature measurement library
  sensors.begin();

  // set the resolution to 10 bit (Can be 9 to 12 bits .. lower is faster)
  sensors.setResolution(Probe01, 10);
  sensors.setResolution(Probe02, 10);
  sensors.setResolution(Probe03, 10);


}//--(end setup )---

void loop()   /****** LOOP: RUNS CONSTANTLY ******/
{
  delay(1000);
  Serial.println();
  Serial.print("Number of Devices found on bus = ");
  Serial.println(sensors.getDeviceCount());
  Serial.print("Getting temperatures... ");
  Serial.println();

  // Command all devices on bus to read temperature
  sensors.requestTemperatures();

  Serial.print("Probe 01 temperature is:   ");
  printTemperature(Probe01);
  Serial.println();

  Serial.print("Probe 02 temperature is:   ");
  printTemperature(Probe02);
  Serial.println();

  Serial.print("Probe 03 temperature is:   ");
  printTemperature(Probe03);
  Serial.println();


}//--(end main loop )---

/*-----( Declare User-written Functions )-----*/
void printTemperature(DeviceAddress deviceAddress)
{

float tempC = sensors.getTempC(deviceAddress);

   if (tempC == -127.00)
   {
   Serial.print("Error getting temperature  ");
   }
   else
   {
   Serial.print("C: ");
   Serial.print(tempC);
   Serial.print(" F: ");
   Serial.print(DallasTemperature::toFahrenheit(tempC));
   }
}// End printTemperature
//*********( THE END )***********
This is the Blynk code that makes my temp sensors all read the same.
/*******************************************************************
 This sketch allows you to send values of multiple DS18B20 sensors to your iOS or Android device.
 You will need to use the other sketch to read the sensor numbers for later identification.
 You need to fill in those numbers below.If you use less than seven sensors, delete the unused sections
 or you will get "expected primary-expression before '?' token" errors.
 I thank all the people whose code I have adapted for their effords and making this sketck possible.


 Blynk lets you create beautiful drag-and-drop visual interfaces
 for your projects in 5 minutes. And it works with almost every
 hardware out there.

 Docs, Tutorials, everything:  http://www.blynk.cc
 Github:                       http://github.com/blynkkk
 Blynk Community:              http://community.blynk.cc
 Follow Us:                    http://www.facebook.com/blynkapp
                               http://twitter.com/blynk_app

 Blynk library is licensed under MIT license
 This example code is in public domain.

*********************************************************************

 You’ll need, in general:
  - Blynk App (download from AppStore or Google Play)
  - Arduino UNO or similar microcontroller board
  - Decide how to connect Arduino to the Internet (USB, Ethernet,
    Wi-Fi, etc.). Bluetooth is on the way.

 There is a bunch of great example sketches included to show you how to get
 started. Think of them as LEGO bricks  and combine them as you wish.
 For example, take the Ethernet Shield sketch and combine it with the
 Servo example, or choose a USB sketch and add a code from SendData
 example.

*********************************************************************

 Let’s turn ON your LED with Blynk!
 In this example we'll use Arduino UNO + Ethernet Shield

 5 Steps guide:
 (watch video tutorial here: )

  1. Connect LED to Pin 9
  ( http://arduino.cc/en/uploads/Tutorial/simplefade_bb.png )

 In the Blynk App:
  2. Create New Project
  3. Email yourself Auth Token. You can do it later at any time
  4. Add a Button Widget. Select Pin D9 in Widget's Settings
  5. Press Play icon. Enjoy Blynking!

********************************************************************/

#define BLYNK_PRINT Serial // Enables Serial Monitor
#include <SPI.h>
#include <Ethernet.h>
#include <BlynkSimpleEthernet.h> // This part is for Ethernet stuff
#include <OneWire.h>

// OneWire DS18S20, DS18B20, DS1822 Temperature Example
//
// http://www.pjrc.com/teensy/td_libs_OneWire.html
//
// The DallasTemperature library can do all this work for you!
// http://milesburton.com/Dallas_Temperature_Control_Library

OneWire  ds(47);  // on pin 7 (a 4.7K resistor is necessary) make sure you change this from the original pin 10 to an unused pin.
int adr;
float s1;
float s2;
float s3;

char auth[] = "***********************cc79"; // Put your Auth Token here. (see Step 3 above)

void setup()
{
  Serial.begin(9600); // See the connection status in Serial Monitor
  Blynk.begin(auth);  // Here your Arduino connects to the Blynk Cloud.
}

void loop()
{
  Blynk.run(); // All the Blynk Magic happens here...

  // You can inject your own code or combine it with other sketches.
  // Check other examples on how to communicate with Blynk. Remember
  // to avoid delay() function!
    byte i;
  byte present = 0;
  byte type_s;
  byte data[12];
  byte addr[8];
  float celsius, fahrenheit;

  if ( !ds.search(addr)) {
    Serial.println("No more addresses.");
    Serial.println();
    ds.reset_search();
    delay(250);
    return;
  }

//  Serial.print("ROM =");
  for( i = 0; i < 8; i++) {           //we need to drop 8 bytes of data
  }
  adr = (addr[7]);

  if (OneWire::crc8(addr, 7) != addr[7]) {
      Serial.println("CRC is not valid!");
      return;
  }
  Serial.println();

  ds.reset();
  ds.select(addr);
  ds.write(0x44, 1);        // start conversion, with parasite power on at the end

  delay(1000);     // maybe 750ms is enough, maybe not
  // we might do a ds.depower() here, but the reset will take care of it.

  present = ds.reset();
  ds.select(addr);
  ds.write(0xBE);         // Read Scratchpad


  for ( i = 0; i < 9; i++) {           // we need 9 bytes to drop off
    data[i] = ds.read();
  }
  Serial.println();

  // Convert the data to actual temperature
  // because the result is a 16 bit signed integer, it should
  // be stored to an "int16_t" type, which is always 16 bits
  // even when compiled on a 32 bit processor.
  int16_t raw = (data[1] << 8) | data[0];
  if (type_s) {
    raw = raw << 3; // 9 bit resolution default
    if (data[7] == 0x10) {
      // "count remain" gives full 12 bit resolution
      raw = (raw & 0xFFF0) + 12 - data[6];
    }
  } else {
    byte cfg = (data[4] & 0x60);
    // at lower res, the low bits are undefined, so let's zero them
    if (cfg == 0x00) raw = raw & ~7;  // 9 bit resolution, 93.75 ms
    else if (cfg == 0x20) raw = raw & ~3; // 10 bit res, 187.5 ms
    else if (cfg == 0x40) raw = raw & ~1; // 11 bit res, 375 ms
    //// default is 12 bit resolution, 750 ms conversion time
  }
  celsius = (float)raw / 16.0;
  fahrenheit = celsius * 1.8 + 32.0;
  if(adr == 0x28, 0xAC, 0x35, 0xB9, 0x08, 0x00, 0x00, 0x4E )  {         //replace ??? with value of sensor number 1
    s1 = fahrenheit;           //change celsius to fahrenheit if you prefer output in Fahrenheit
  }

  if(adr == 0x28, 0xE6, 0x15, 0xBD, 0x08, 0x00, 0x00, 0x02 )  {         //replace ??? with value of sensor number 2
    s2 = fahrenheit;           //change celsius to fahrenheit if you prefer output in Fahrenheit
  }

  if(adr == 0x28, 0xA3, 0x49, 0xBC, 0x08, 0x00, 0x00, 0xA7 )  {         //replace ??? with value of sensor number 3
    s3 = fahrenheit;           //change celsius to fahrenheit if you prefer output in Fahrenheit
  }


Serial.print(" Sensor 1 = ");
Serial.print(s1);
Serial.print(" Sensor 2 = ");
Serial.print(s2);
Serial.print(" Sensor 3 = ");
Serial.print(s3);


  Blynk.virtualWrite(V5, s1);
  Blynk.virtualWrite(V6, s2);
  Blynk.virtualWrite(V7, s3); //add or delete if you need more or less


}
Looks like you missed both of these points
I uploaded the push data sketch, and not sure how to do the timer thing.
BlynkTimer is the same as the widely used SimpleTimer library, in that it works more elegantly than manually manipulating millis() and it is NOT dependent on a connection to a Blynk Server, and also fixes some minor issues with the original library.
A typical Interval Timer layout includes a definition, timer setup (pointing to a function) and a timer call in the void loop():
BlynkTimer Mytimer; // Sets up a timer object named Mytimer (could be any name)

Mytimer.setInterval(1000L, MyFunction);  // Goes in Setup() and will call the void MyFunction() every 1000 milis (one second - adjust to your needs).  Blynk Timer allows up to 16 of these same object named timers pointing to differing functions

void MyFunction()
{
// Mytimer runs stuff here every 1000 millis (one second)
}

void loop()
{
Blynk.run();
Mytimer.run();  // Goes in the void loop() so the BlynkTimer library can run.
}
That’s great that I know what the timer is, but I don’t know how to write the code to incorporate my sensors into it.
That’s where trial, error and practice come into play… along with a bit of reading.
Here is an example you should be able to install and play around with to get a feel for timed routines sending data to Display Widgets.
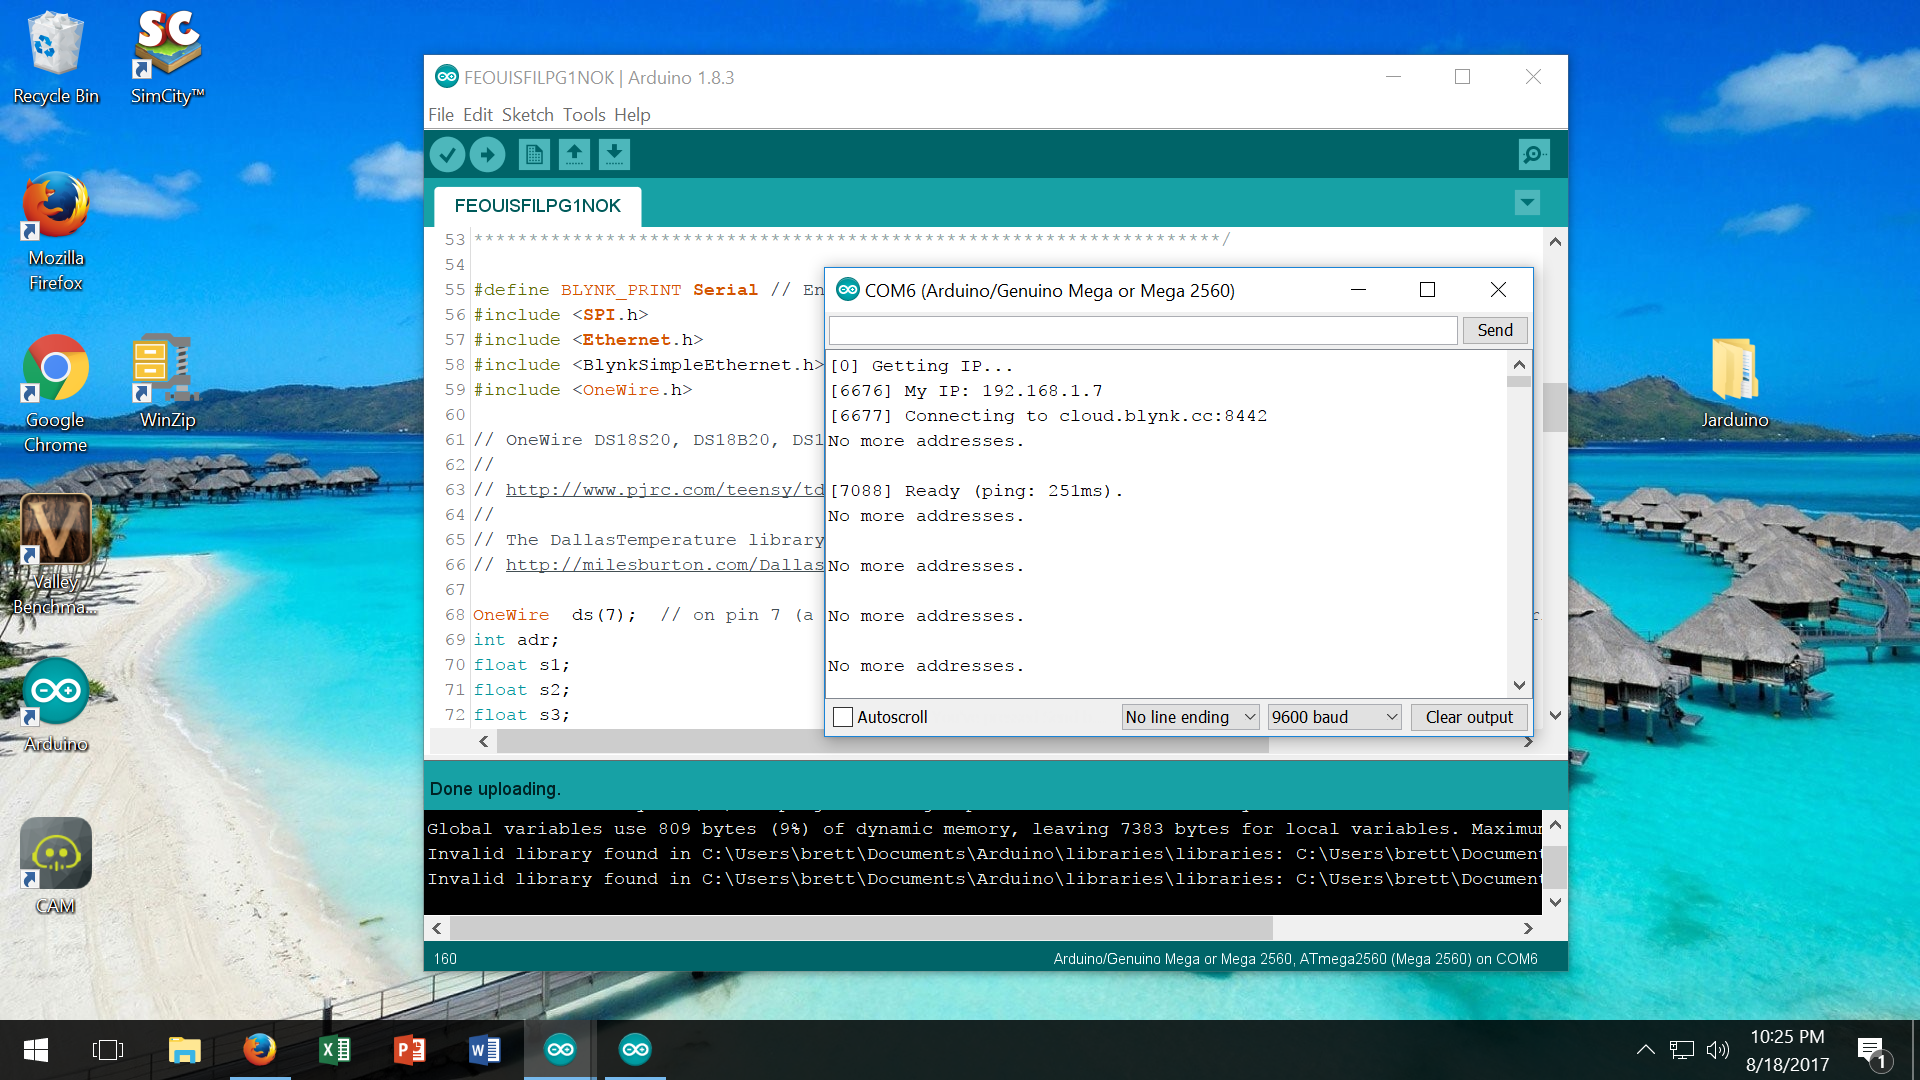
I put the following sketch into my arduino. I combined the simple blynk sketch, the push data sketch, and the sketch that reads the ds18 data… Uploaded to arduino, now the gauge widgets are all three counting up the scale and i’m at 162 on all of them. So they aren’t reading temp, they are counting. All are the same count as well. Here is the code I put in… Keep in mind that before I uploaded this sketch, having only uploaded the Dallas multiple sensor sketch, I was reading slightly different temps on all three sensors on the serial monitor… So it was working.
#define BLYNK_PRINT Serial // Enables Serial Monitor
#include <SPI.h>
#include <Ethernet.h>
#include <BlynkSimpleEthernet.h> // This part is for Ethernet stuff
#include <OneWire.h>

// OneWire DS18S20, DS18B20, DS1822 Temperature Example
//
// http://www.pjrc.com/teensy/td_libs_OneWire.html
//
// The DallasTemperature library can do all this work for you!
// http://milesburton.com/Dallas_Temperature_Control_Library

#define W5100_CS  10
#define SDCARD_CS 4
BlynkTimer timer;

OneWire  ds(47);  // on pin 7 (a 4.7K resistor is necessary) make sure you change this from the original pin 10 to an unused pin.
int adr;
float s1;
float s2;
float s3;

char auth[] = "**********************cc79"; // Put your Auth Token here. (see Step 3 above)

void myTimerEvent()
{
  // You can send any value at any time.
  // Please don't send more that 10 values per second.
  Blynk.virtualWrite(V5, millis() / 1000);
  Blynk.virtualWrite(V6, millis() / 1000);
  Blynk.virtualWrite(V7, millis() / 1000);
}

void setup()
{
  Serial.begin(9600); // See the connection status in Serial Monitor

  pinMode(SDCARD_CS, OUTPUT);
  digitalWrite(SDCARD_CS, HIGH); // Deselect the SD card

  Blynk.begin(auth);  // Here your Arduino connects to the Blynk Cloud.
  // You can also specify server:
  //Blynk.begin(auth, "blynk-cloud.com", 8442);
  //Blynk.begin(auth, IPAddress(192,168,1,100), 8442);

  // Setup a function to be called every second
  timer.setInterval(1000L, myTimerEvent);
}

void loop()
{
  Blynk.run(); // All the Blynk Magic happens here...
  timer.run(); // Initiates BlynkTimer

  // You can inject your own code or combine it with other sketches.
  // Check other examples on how to communicate with Blynk. Remember
  // to avoid delay() function!
    byte i;
  byte present = 0;
  byte type_s;
  byte data[12];
  byte addr[8];
  float celsius, fahrenheit;

  if ( !ds.search(addr)) {
    Serial.println("No more addresses.");
    Serial.println();
    ds.reset_search();
    delay(250);
    return;
  }

//  Serial.print("ROM =");
  for( i = 0; i < 8; i++) {           //we need to drop 8 bytes of data
  }
  adr = (addr[7]);

  if (OneWire::crc8(addr, 7) != addr[7]) {
      Serial.println("CRC is not valid!");
      return;
  }
  Serial.println();

  ds.reset();
  ds.select(addr);
  ds.write(0x44, 1);        // start conversion, with parasite power on at the end

  delay(1000);     // maybe 750ms is enough, maybe not
  // we might do a ds.depower() here, but the reset will take care of it.

  present = ds.reset();
  ds.select(addr);
  ds.write(0xBE);         // Read Scratchpad


  for ( i = 0; i < 9; i++) {           // we need 9 bytes to drop off
    data[i] = ds.read();
  }
  Serial.println();

  // Convert the data to actual temperature
  // because the result is a 16 bit signed integer, it should
  // be stored to an "int16_t" type, which is always 16 bits
  // even when compiled on a 32 bit processor.
  int16_t raw = (data[1] << 8) | data[0];
  if (type_s) {
    raw = raw << 3; // 9 bit resolution default
    if (data[7] == 0x10) {
      // "count remain" gives full 12 bit resolution
      raw = (raw & 0xFFF0) + 12 - data[6];
    }
  } else {
    byte cfg = (data[4] & 0x60);
    // at lower res, the low bits are undefined, so let's zero them
    if (cfg == 0x00) raw = raw & ~7;  // 9 bit resolution, 93.75 ms
    else if (cfg == 0x20) raw = raw & ~3; // 10 bit res, 187.5 ms
    else if (cfg == 0x40) raw = raw & ~1; // 11 bit res, 375 ms
    //// default is 12 bit resolution, 750 ms conversion time
  }
  celsius = (float)raw / 16.0;
  fahrenheit = celsius * 1.8 + 32.0;
  if(adr == 0x28, 0xAC, 0x35, 0xB9, 0x08, 0x00, 0x00, 0x4E )  {         //replace ??? with value of sensor number 1
    s1 = fahrenheit;           //change celsius to fahrenheit if you prefer output in Fahrenheit
  }

  if(adr == 0x28, 0xE6, 0x15, 0xBD, 0x08, 0x00, 0x00, 0x02 )  {         //replace ??? with value of sensor number 2
    s2 = fahrenheit;           //change celsius to fahrenheit if you prefer output in Fahrenheit
  }

  if(adr == 0x28, 0xA3, 0x49, 0xBC, 0x08, 0x00, 0x00, 0xA7 )  {         //replace ??? with value of sensor number 3
    s3 = fahrenheit;           //change celsius to fahrenheit if you prefer output in Fahrenheit
  }


Serial.print(" Sensor 1 = ");
Serial.print(s1);
Serial.print(" Sensor 2 = ");
Serial.print(s2);
Serial.print(" Sensor 3 = ");
Serial.print(s3);


  Blynk.virtualWrite(V5, s1);
  Blynk.virtualWrite(V6, s2);
  Blynk.virtualWrite(V7, s3); //add or delete if you need more or less


}
Please keep in mind that we are here to help you learn to use Blynk, not troubleshoot everything else ![]()
Keep those two lines (above) in your void loop() and move EVERYTHING else into a NEW void called void myTimerEvent() that will run every second (based on the 1000L, which stands for 1000 milliseconds LONG integer).
BTW… these lines that you DO have in the myTimerEvent() loop are all counting down the (same) seconds… as per the example ![]()
  // You can send any value at any time.
  // Please don't send more that 10 values per second.
  Blynk.virtualWrite(V5, millis() / 1000);
  Blynk.virtualWrite(V6, millis() / 1000);
  Blynk.virtualWrite(V7, millis() / 1000);
After you move everything else in the main void into this void, then you can change each line to match the associated data you wish to see on the App…
  Blynk.virtualWrite(V5, s1);
  Blynk.virtualWrite(V6, s2);
  Blynk.virtualWrite(V7, s3);
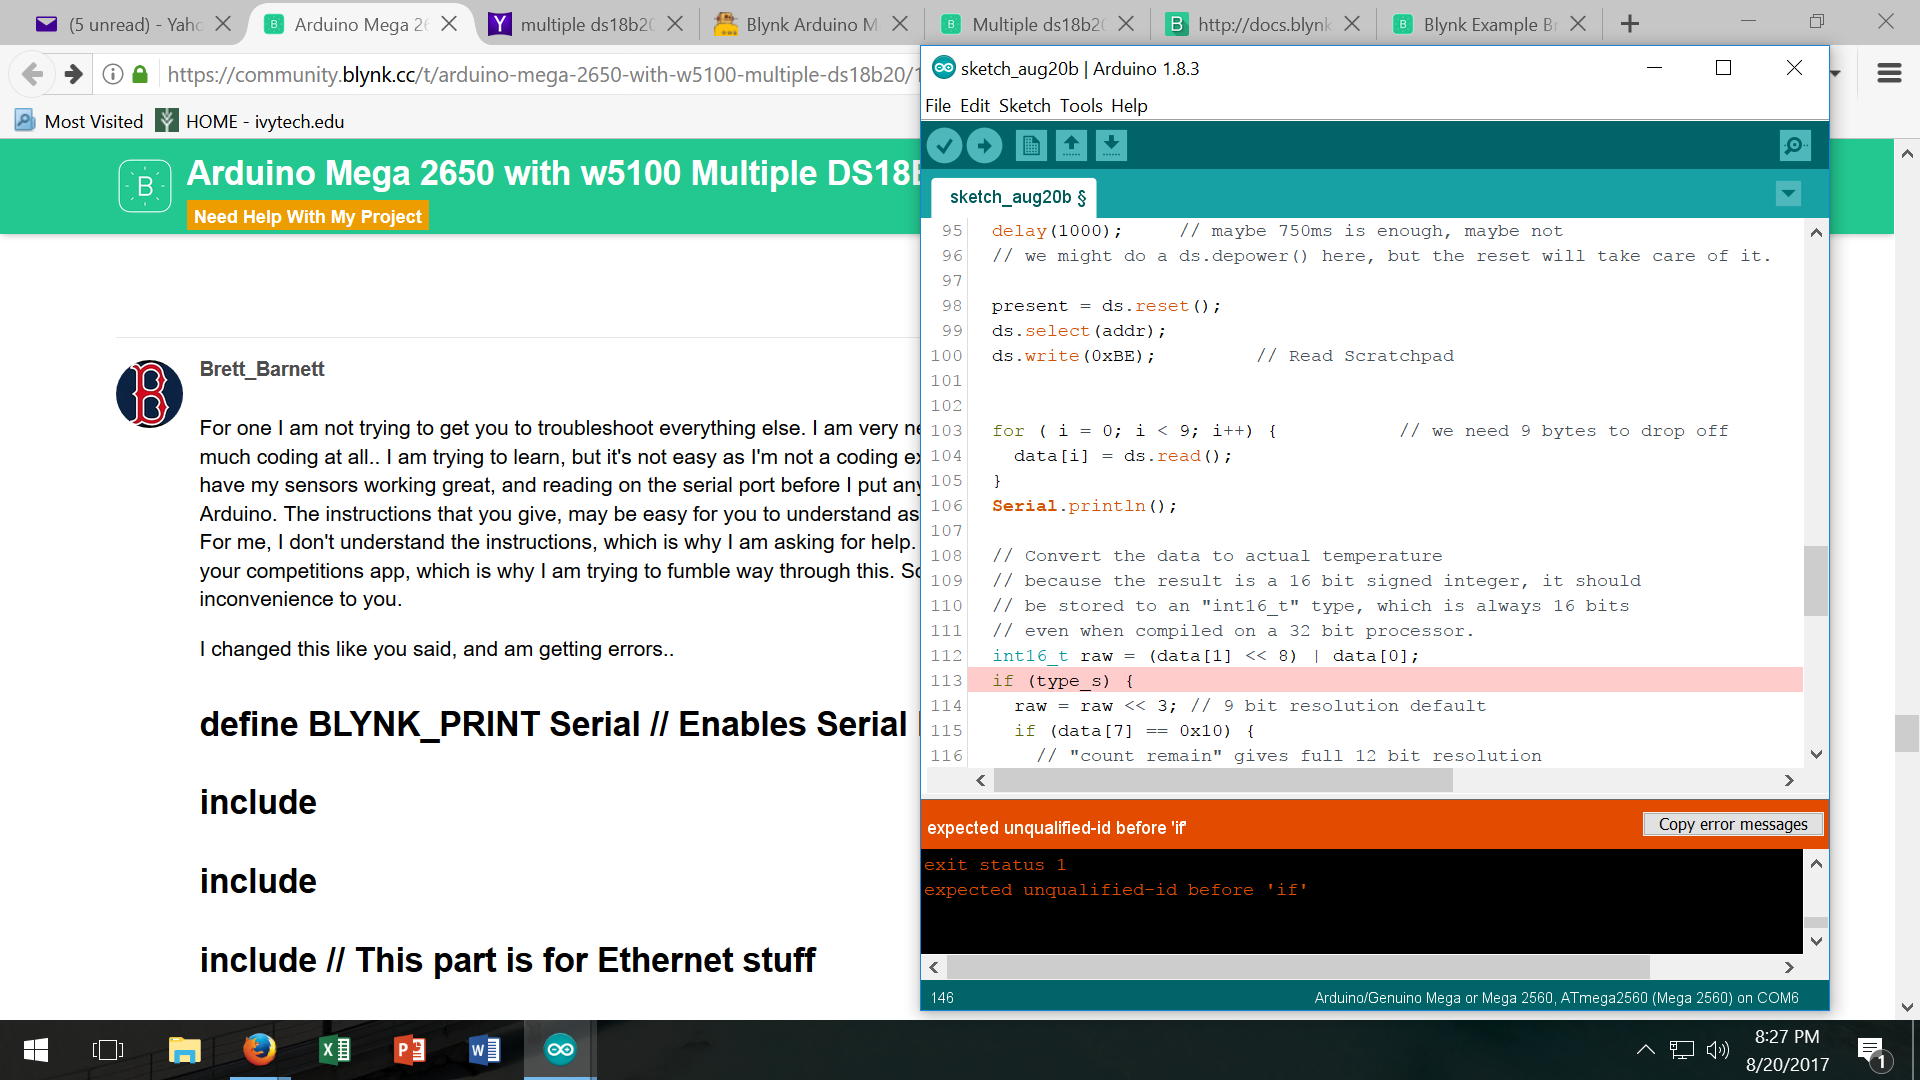
For one I am not trying to get you to troubleshoot everything else. I am very new to all of this, and I don’t know much coding at all… I am trying to learn, but it’s not easy as I’m not a coding expert like you guys. For two, I have my sensors working great, and reading on the serial port before I put anything Blynk related on my Arduino. The instructions that you give, may be easy for you to understand as I’m sure it is daily work for you. For me, I don’t understand the instructions, which is why I am asking for help. I like the Blynk App better than your competitions app, which is why I am trying to fumble way through this. Sorry if I seem like an inconvenience to you.
I changed this like you said, and am getting errors…
#define BLYNK_PRINT Serial // Enables Serial Monitor
#include <SPI.h>
#include <Ethernet.h>
#include <BlynkSimpleEthernet.h> // This part is for Ethernet stuff
#include <OneWire.h>

// OneWire DS18S20, DS18B20, DS1822 Temperature Example
//
// http://www.pjrc.com/teensy/td_libs_OneWire.html
//
// The DallasTemperature library can do all this work for you!
// http://milesburton.com/Dallas_Temperature_Control_Library

#define W5100_CS  10
#define SDCARD_CS 4
BlynkTimer timer;

OneWire  ds(47);  // on pin 7 (a 4.7K resistor is necessary) make sure you change this from the original pin 10 to an unused pin.
int adr;
float s1;
float s2;
float s3;

char auth[] = "**********************cc79"; // Put your Auth Token here. (see Step 3 above)


void setup()
{
  Serial.begin(9600); // See the connection status in Serial Monitor

  pinMode(SDCARD_CS, OUTPUT);
  digitalWrite(SDCARD_CS, HIGH); // Deselect the SD card

  Blynk.begin(auth);  // Here your Arduino connects to the Blynk Cloud.
  // You can also specify server:
  //Blynk.begin(auth, "blynk-cloud.com", 8442);
  //Blynk.begin(auth, IPAddress(192,168,1,100), 8442);

  // Setup a function to be called every second
  timer.setInterval(1000L, myTimerEvent);


}

void loop()
{
  Blynk.run(); // All the Blynk Magic happens here...
  timer.run(); // Initiates BlynkTimer
}
 void myTimerEvent()
{


  // You can send any value at any time.
  // Please don't send more that 10 values per second.
  Blynk.virtualWrite(V5, millis() / 300);
  Blynk.virtualWrite(V6, millis() / 600);
  Blynk.virtualWrite(V7, millis() / 900);
}

  // You can inject your own code or combine it with other sketches.
  // Check other examples on how to communicate with Blynk. Remember
  // to avoid delay() function!
    byte i;
  byte present = 0;
  byte type_s;
  byte data[12];
  byte addr[8];
  float celsius, fahrenheit;

  if ( !ds.search(addr)) {
    Serial.println("No more addresses.");
    Serial.println();
    ds.reset_search();
    delay(250);
    return;
  }

//  Serial.print("ROM =");
  for( i = 0; i < 8; i++) {           //we need to drop 8 bytes of data
  }
  adr = (addr[7]);

  if (OneWire::crc8(addr, 7) != addr[7]) {
      Serial.println("CRC is not valid!");
      return;
  }
  Serial.println();

  ds.reset();
  ds.select(addr);
  ds.write(0x44, 1);        // start conversion, with parasite power on at the end

  delay(1000);     // maybe 750ms is enough, maybe not
  // we might do a ds.depower() here, but the reset will take care of it.

  present = ds.reset();
  ds.select(addr);
  ds.write(0xBE);         // Read Scratchpad


  for ( i = 0; i < 9; i++) {           // we need 9 bytes to drop off
    data[i] = ds.read();
  }
  Serial.println();

  // Convert the data to actual temperature
  // because the result is a 16 bit signed integer, it should
  // be stored to an "int16_t" type, which is always 16 bits
  // even when compiled on a 32 bit processor.
  int16_t raw = (data[1] << 8) | data[0];
  if (type_s) {
    raw = raw << 3; // 9 bit resolution default
    if (data[7] == 0x10) {
      // "count remain" gives full 12 bit resolution
      raw = (raw & 0xFFF0) + 12 - data[6];
    }
  } else {
    byte cfg = (data[4] & 0x60);
    // at lower res, the low bits are undefined, so let's zero them
    if (cfg == 0x00) raw = raw & ~7;  // 9 bit resolution, 93.75 ms
    else if (cfg == 0x20) raw = raw & ~3; // 10 bit res, 187.5 ms
    else if (cfg == 0x40) raw = raw & ~1; // 11 bit res, 375 ms
    //// default is 12 bit resolution, 750 ms conversion time
  }
  celsius = (float)raw / 16.0;
  fahrenheit = celsius * 1.8 + 32.0;
  if(adr == 0x28, 0xAC, 0x35, 0xB9, 0x08, 0x00, 0x00, 0x4E )  {         //replace ??? with value of sensor number 1
    s1 = fahrenheit;           //change celsius to fahrenheit if you prefer output in Fahrenheit
  }

  if(adr == 0x28, 0xE6, 0x15, 0xBD, 0x08, 0x00, 0x00, 0x02 )  {         //replace ??? with value of sensor number 2
    s2 = fahrenheit;           //change celsius to fahrenheit if you prefer output in Fahrenheit
  }

  if(adr == 0x28, 0xA3, 0x49, 0xBC, 0x08, 0x00, 0x00, 0xA7 )  {         //replace ??? with value of sensor number 3
    s3 = fahrenheit;           //change celsius to fahrenheit if you prefer output in Fahrenheit
  }


Serial.print(" Sensor 1 = ");
Serial.print(s1);
Serial.print(" Sensor 2 = ");
Serial.print(s2);
Serial.print(" Sensor 3 = ");
Serial.print(s3);


  Blynk.virtualWrite(V5, s1);
  Blynk.virtualWrite(V6, s2);
  Blynk.virtualWrite(V7, s3); //add or delete if you need more or less


}