i tried installing it, it downloaded but didnt install socat and now im retrying and it says => Homebrew has enabled anonymous aggregate user behaviour analytics.
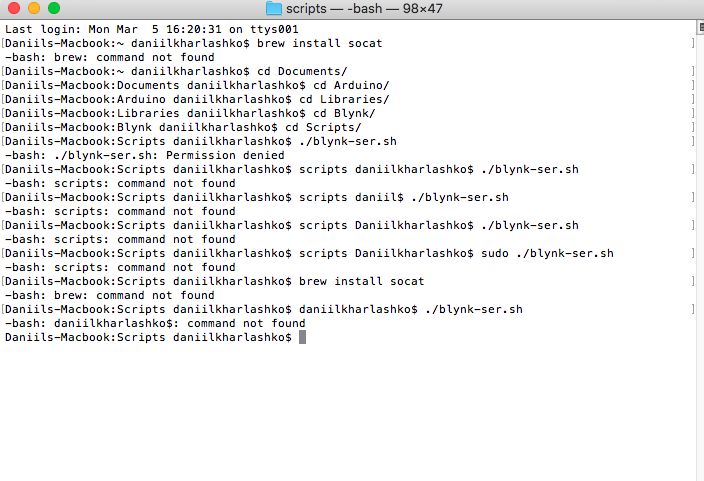
It for some reason keeps saying permission denied
-bash: ./blynk-ser.sh: Permission denied
Daniils-Macbook:scripts daniilkharlashko$
I’m not a MAC user but I know it has sudo like Unix for root access and using the USB port can require elevated privileges.
If you are SURE homebrew is installed try the script call command prefixed with sudo.
It still hasnt fixed it any other suggestions i am glad and thankful that you are helping me
OMFG i fixed it i found the way i searched other problems that people had i found the same one and it said place sh ./blynk-ser.sh THank you man i am happy now but i will have to now figure out how to use my PIR sensor and use it to send email to my email
Maybe, if you go back and edit the code to include backticks for forum posting. Google it if it doesn’t mean anything to you.
1 Like
The ever patient @Costas, @Gunner and @PeteKnight reiterating this time and again… Thanks to them.
1 Like
HERE IS MY CODE
void setup() {
  // put your setup code here, to run once:
}
void loop() {
  // put your main code here, to run repeatedly:
// Uses a PIR sensor to detect movement, buzzes a buzzer
// more info here: http://blog.makezine.com/projects/pir-sensor-arduino-alarm/
//
// based upon:
// PIR sensor tester by Limor Fried of Adafruit
// tone code by michael@thegrebs.com


int ledPin = 13;                // choose the pin for the LED
int inputPin = 2;               // choose the input pin (for PIR sensor)
int pirState = LOW;             // we start, assuming no motion detected
int val = 0;                    // variable for reading the pin status
int pinSpeaker = 10;           //Set up a speaker on a PWM pin (digital 9, 10, or 11)

void setup() {
  pinMode(ledPin, OUTPUT);      // declare LED as output
  pinMode(inputPin, INPUT);     // declare sensor as input
  pinMode(pinSpeaker, OUTPUT);
  Serial.begin(9600);
}

void loop(){
  val = digitalRead(inputPin);  // read input value
  if (val == HIGH) {            // check if the input is HIGH
    digitalWrite(ledPin, HIGH);  // turn LED ON
    playTone(300, 160);
    delay(150);


    if (pirState == LOW) {
      // we have just turned on
      Serial.println("Motion detected!");
      // We only want to print on the output change, not state
      pirState = HIGH;
    }
  } else {
      digitalWrite(ledPin, LOW); // turn LED OFF
      playTone(0, 0);
      delay(300);
      if (pirState == HIGH){
      // we have just turned of
      Serial.println("Motion ended!");
      // We only want to print on the output change, not state
      pirState = LOW;
    }
  }
}
// duration in mSecs, frequency in hertz
void playTone(long duration, int freq) {
    duration *= 1000;
    int period = (1.0 / freq) * 1000000;
    long elapsed_time = 0;
    while (elapsed_time < duration) {
        digitalWrite(pinSpeaker,HIGH);
        delayMicroseconds(period / 2);
        digitalWrite(pinSpeaker, LOW);
        delayMicroseconds(period / 2);
        elapsed_time += (period);
    }
}


/* Comment this out to disable prints and save space */
#define BLYNK_PRINT Serial
/* Set this to a bigger number, to enable sending longer messages */
//#define BLYNK_MAX_SENDBYTES 128

#include <SPI.h>
#include <Ethernet.h>
#include <BlynkSimpleEthernet.h>

// You should get Auth Token in the Blynk App.
// Go to the Project Settings (nut icon).
char auth[] = "1bcefc5dd4b645ad972362721939149f";

void emailOnButtonPress()
{
  // *** WARNING: You are limited to send ONLY ONE E-MAIL PER 15 SECONDS! ***

  // Let's send an e-mail when you press the button
  // connected to digital pin 2 on your Arduino

  int isButtonPressed = !digitalRead(2); // Invert state, since button is "Active LOW"

  if (pirState = HIGH) // You can write any condition to trigger e-mail sending
  {
    Serial.println("PIR Sensor Activated."); // This can be seen in the Serial Monitor
    Blynk.email("Dankharl12345678@gmail.com", "Subject:Motion Has Been Detected", "Motion Has Been Detected!.");

    // Or, if you want to use the email specified in the App (like for App Export):
    //Blynk.email("Subject: Button Logger", "You just pushed the button...");
  }
}

void setup()
{
  // Debug console
  Serial.begin(9600);

  Blynk.begin(auth);

  // Send e-mail when your hardware gets connected to Blynk Server
  // Just put the recepient's "e-mail address", "Subject" and the "message body"
  Blynk.email("Dankharl12345678@gmail.com", "Security System Online", "My Blynk project is online.");

  // Setting the button
  pinMode(2, INPUT_PULLUP);
  // Attach pin 2 interrupt to our handler
  attachInterrupt(digitalPinToInterrupt(2), emailOnButtonPress, CHANGE);
}

void loop()
{
  Blynk.run();
}


}
Looks like you have 3 setup() and 3 loop().
Post again.
i am not good at coding if you can help me fix the mistake its would be great i will fix them now
 // put your setup code here, to run once:
  // put your main code here, to run repeatedly:
// Uses a PIR sensor to detect movement, buzzes a buzzer
// more info here: http://blog.makezine.com/projects/pir-sensor-arduino-alarm/
//
// based upon:
// PIR sensor tester by Limor Fried of Adafruit
// tone code by michael@thegrebs.com


int ledPin = 13;                // choose the pin for the LED
int inputPin = 2;               // choose the input pin (for PIR sensor)
int pirState = LOW;             // we start, assuming no motion detected
int val = 0;                    // variable for reading the pin status
int pinSpeaker = 10;           //Set up a speaker on a PWM pin (digital 9, 10, or 11)

void setup() {
  pinMode(ledPin, OUTPUT);      // declare LED as output
  pinMode(inputPin, INPUT);     // declare sensor as input
  pinMode(pinSpeaker, OUTPUT);
  Serial.begin(9600);
}

void loop(){
  val = digitalRead(inputPin);  // read input value
  if (val == HIGH) {            // check if the input is HIGH
    digitalWrite(ledPin, HIGH);  // turn LED ON
    playTone(300, 160);
    delay(150);


    if (pirState == LOW) {
      // we have just turned on
      Serial.println("Motion detected!");
      // We only want to print on the output change, not state
      pirState = HIGH;
    }
  } else {
      digitalWrite(ledPin, LOW); // turn LED OFF
      playTone(0, 0);
      delay(300);
      if (pirState == HIGH){
      // we have just turned of
      Serial.println("Motion ended!");
      // We only want to print on the output change, not state
      pirState = LOW;
    }
  }
}
// duration in mSecs, frequency in hertz
void playTone(long duration, int freq) {
    duration *= 1000;
    int period = (1.0 / freq) * 1000000;
    long elapsed_time = 0;
    while (elapsed_time < duration) {
        digitalWrite(pinSpeaker,HIGH);
        delayMicroseconds(period / 2);
        digitalWrite(pinSpeaker, LOW);
        delayMicroseconds(period / 2);
        elapsed_time += (period);
    }
}


/* Comment this out to disable prints and save space */
#define BLYNK_PRINT Serial
/* Set this to a bigger number, to enable sending longer messages */
//#define BLYNK_MAX_SENDBYTES 128

#include <SPI.h>
#include <Ethernet.h>
#include <BlynkSimpleEthernet.h>

// You should get Auth Token in the Blynk App.
// Go to the Project Settings (nut icon).
char auth[] = "1bcefc5dd4b645ad972362721939149f";

void emailOnButtonPress()
{
  // *** WARNING: You are limited to send ONLY ONE E-MAIL PER 15 SECONDS! ***

  // Let's send an e-mail when you press the button
  // connected to digital pin 2 on your Arduino

  int isButtonPressed = !digitalRead(2); // Invert state, since button is "Active LOW"

  if (pirState = HIGH) // You can write any condition to trigger e-mail sending
  {
    Serial.println("PIR Sensor Activated."); // This can be seen in the Serial Monitor
    Blynk.email("Dankharl12345678@gmail.com", "Subject:Motion Has Been Detected", "Motion Has Been Detected!.");

    // Or, if you want to use the email specified in the App (like for App Export):
    //Blynk.email("Subject: Button Logger", "You just pushed the button...");
  }
}


{
  // Debug console
  Serial.begin(9600);

  Blynk.begin(auth);

  // Send e-mail when your hardware gets connected to Blynk Server
  // Just put the recepient's "e-mail address", "Subject" and the "message body"
  Blynk.email("Dankharl12345678@gmail.com", "Security System Online", "My Blynk project is online.");

  // Setting the button
  pinMode(2, INPUT_PULLUP);
  // Attach pin 2 interrupt to our handler
  attachInterrupt(digitalPinToInterrupt(2), emailOnButtonPress, CHANGE);
}

void loop()
{
  Blynk.run();
}


}
This is the first sketch you should run if you are using a USB connection. Look through the sketch including the important notes about the V5 widget and adding your token etc. Do you have a USB2TTL adaptor for Serial Monitor debugging as per the SoftwareSerial entries?
If you don’t you might have to work blind without any debugging options. Let us know if V5 updates in your project with uptime in millis().
/*************************************************************

  =>
  =>          USB HOWTO: http://tiny.cc/BlynkUSB
  =>

  This example shows how value can be pushed from Arduino to
  the Blynk App.

  NOTE:
  BlynkTimer provides SimpleTimer functionality:
    http://playground.arduino.cc/Code/SimpleTimer

  App project setup:
    Value Display widget attached to Virtual Pin V5 set to PUSH frequency.
 *************************************************************/

/* Comment this out to disable prints and save space */
#define BLYNK_PRINT SwSerial


#include <SoftwareSerial.h>
SoftwareSerial SwSerial(10, 11); // RX, TX

#include <BlynkSimpleStream.h>

// You should get Auth Token in the Blynk App.
// Go to the Project Settings (nut icon).
char auth[] = "YourAuthToken";

BlynkTimer timer;

// This function sends Arduino's up time every second to Virtual Pin (5).
// In the app, Widget's reading frequency should be set to PUSH. This means
// that you define how often to send data to Blynk App.
void myTimerEvent()
{
  // You can send any value at any time.
  // Please don't send more that 10 values per second.
  Blynk.virtualWrite(V5, millis() / 1000);
}

void setup()
{
  // Debug console
  SwSerial.begin(9600);

  // Blynk will work through Serial
  // Do not read or write this serial manually in your sketch
  Serial.begin(9600);
  Blynk.begin(Serial, auth);

  // Setup a function to be called every second
  timer.setInterval(1000L, myTimerEvent);
}

void loop()
{
  Blynk.run();
  timer.run(); // Initiates BlynkTimer
}
i dont have an adapters, so what do i do now do i use this code ? and combine it with my previous one?
Just muddle through without one for now.
Don’t combine yet. The first step is always to get a basic Blynk sketch running for your particular connection method. No point trying to land on Mars before we have built the rocket.
Run the sketch I posted and report back.
I have placed eveything in the code correctly and the app but it does not output the values, do i have to repeat all the same steps using terminal?
Sequence,
Build the project in the app (V5 and get token).
Flash the sketch to Arduino with token.
Run USB connection as you were doing earlier on and leave it running.
i did this but i am not getting any displayed information on my blynk phone app
what do you exactly mean by, flashing? i have copied the code edited it pasting the auth and then uploaded it.
Yes this is flashing.
Does MAC terminal suggest you are connected to the Blynk server?
Difficult to debug without Serial Monitor access from a USB2TTL adaptor.