In my project i want to send an email or a notification to a phone without buying new modules. If required i can only purchase the ESP8266 wifi arduino module.
I want to send an email when the PIR sensor detectes motion. In my project i dont have any modules i only have arudino uno, buzzer breadboard and PIR sensor. Please i need help and i am in a hurry, I want to send an email using the arudino board i am fine with it staying connected to my laptop if needed.
As i said previousl i have a project that includes a PIR sensor and whenever it is activated i want it to send an email do any of you know how to code because i really need help and i dont know how to code.
I think you’ve probably picked the wrong type of school project if you don’t know how to code and aren’t willing, or don’t have time, to put some effort into learning. Since joining this forum 10 hours ago you’ve spent 4 minutes reading:
Maybe you could bake a cake for your school project instead?
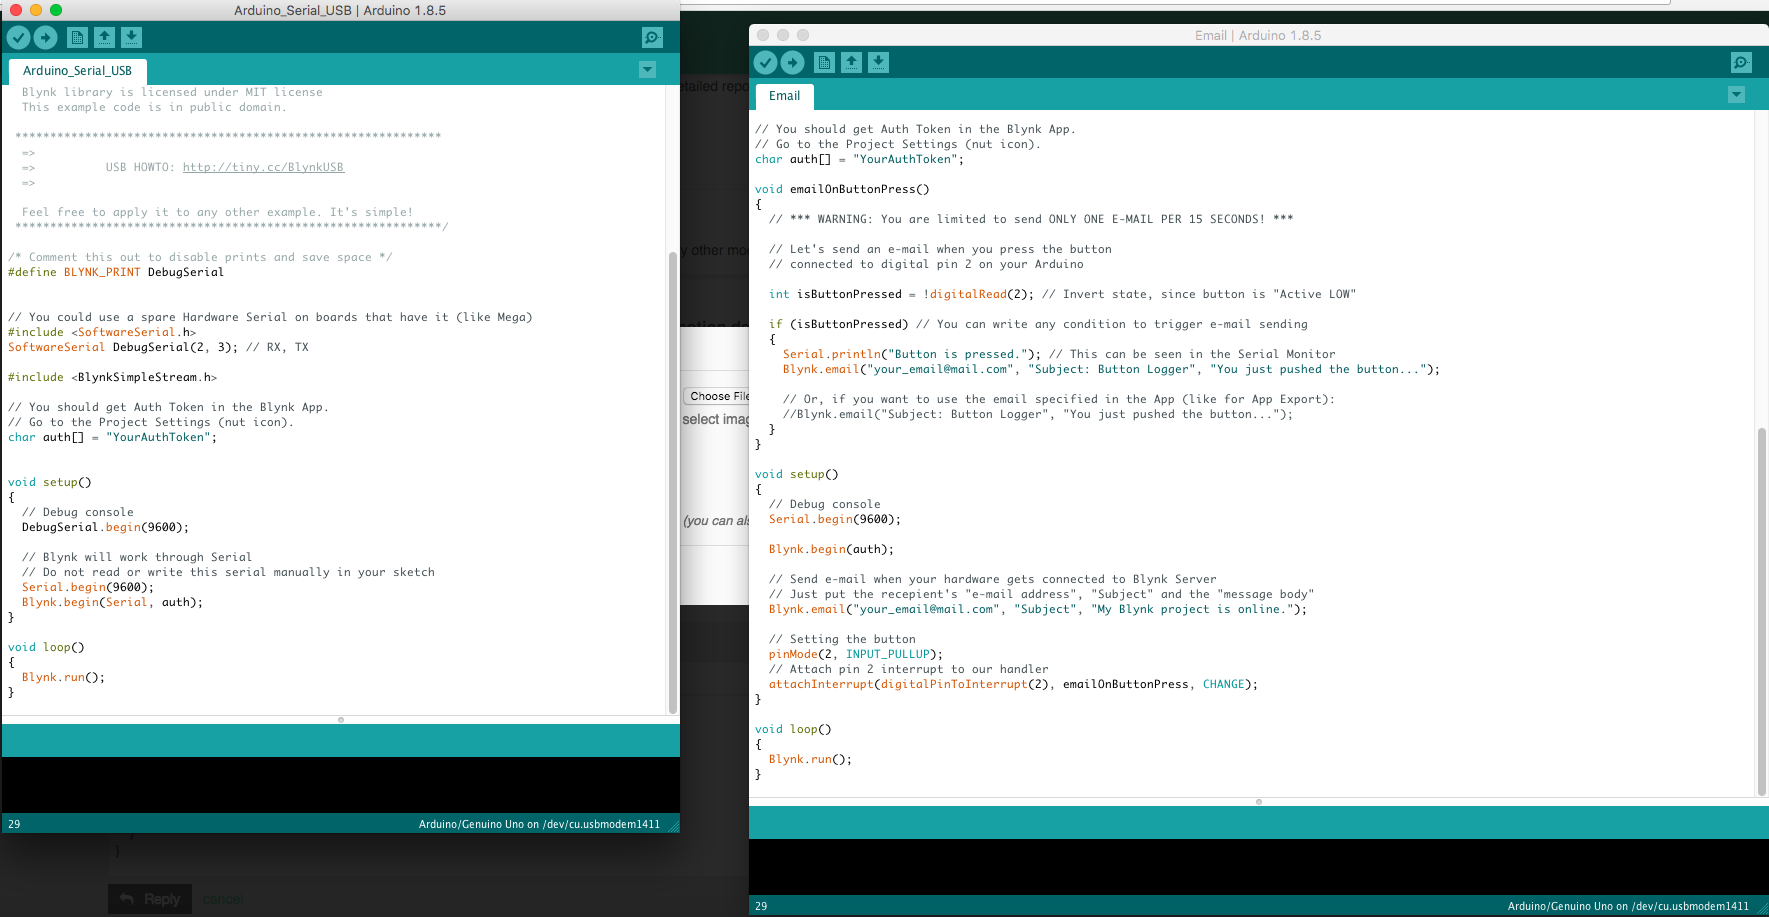
I have finally downloaded the blynk app onto the laptop on my macbook, i was having lots of issues now i have opened 2 sketches i am not sure which one to chose but i am thinking of the left one. My sketch is below but i am not sure how to combine them together if anyone can help me i will be sincerly happy and thankful. Thank you
MY SKETCH
// Uses a PIR sensor to detect movement, buzzes a buzzer
// more info here: http://blog.makezine.com/projects/pir-sensor-arduino-alarm/
//
// based upon:
// PIR sensor tester by Limor Fried of Adafruit
// tone code by michael@thegrebs.com


int ledPin = 13;                // choose the pin for the LED
int inputPin = 2;               // choose the input pin (for PIR sensor)
int pirState = LOW;             // we start, assuming no motion detected
int val = 0;                    // variable for reading the pin status
int pinSpeaker = 10;           //Set up a speaker on a PWM pin (digital 9, 10, or 11)

void setup() {
  pinMode(ledPin, OUTPUT);      // declare LED as output
  pinMode(inputPin, INPUT);     // declare sensor as input
  pinMode(pinSpeaker, OUTPUT);
  Serial.begin(9600);
}

void loop(){
  val = digitalRead(inputPin);  // read input value
  if (val == HIGH) {            // check if the input is HIGH
    digitalWrite(ledPin, HIGH);  // turn LED ON
    playTone(300, 160);
    delay(150);


    if (pirState == LOW) {
      // we have just turned on
      Serial.println("Motion detected!");
      // We only want to print on the output change, not state
      pirState = HIGH;
    }
  } else {
      digitalWrite(ledPin, LOW); // turn LED OFF
      playTone(0, 0);
      delay(300);
      if (pirState == HIGH){
      // we have just turned of
      Serial.println("Motion ended!");
      // We only want to print on the output change, not state
      pirState = LOW;
    }
  }
}
// duration in mSecs, frequency in hertz
void playTone(long duration, int freq) {
    duration *= 1000;
    int period = (1.0 / freq) * 1000000;
    long elapsed_time = 0;
    while (elapsed_time < duration) {
        digitalWrite(pinSpeaker,HIGH);
        delayMicroseconds(period / 2);
        digitalWrite(pinSpeaker, LOW);
        delayMicroseconds(period / 2);
        elapsed_time += (period);
    }
}
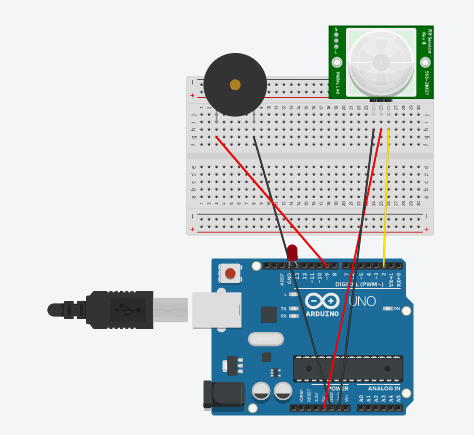
I am creating a project that uses arduino uno
I am not using any other module and i want to use a cable.
I want to be able to send the email like an alert whenever the PIR sensor is activated.
Here is my code
// Uses a PIR sensor to detect movement, buzzes a buzzer
// more info here: http://blog.makezine.com/projects/pir-sensor-arduino-alarm/
//
// based upon:
// PIR sensor tester by Limor Fried of Adafruit
// tone code by michael@thegrebs.com


int ledPin = 13;                // choose the pin for the LED
int inputPin = 2;               // choose the input pin (for PIR sensor)
int pirState = LOW;             // we start, assuming no motion detected
int val = 0;                    // variable for reading the pin status
int pinSpeaker = 10;           //Set up a speaker on a PWM pin (digital 9, 10, or 11)

void setup() {
  pinMode(ledPin, OUTPUT);      // declare LED as output
  pinMode(inputPin, INPUT);     // declare sensor as input
  pinMode(pinSpeaker, OUTPUT);
  Serial.begin(9600);
}

void loop(){
  val = digitalRead(inputPin);  // read input value
  if (val == HIGH) {            // check if the input is HIGH
    digitalWrite(ledPin, HIGH);  // turn LED ON
    playTone(300, 160);
    delay(150);


    if (pirState == LOW) {
      // we have just turned on
      Serial.println("Motion detected!");
      // We only want to print on the output change, not state
      pirState = HIGH;
    }
  } else {
      digitalWrite(ledPin, LOW); // turn LED OFF
      playTone(0, 0);
      delay(300);
      if (pirState == HIGH){
      // we have just turned of
      Serial.println("Motion ended!");
      // We only want to print on the output change, not state
      pirState = LOW;
    }
  }
}
// duration in mSecs, frequency in hertz
void playTone(long duration, int freq) {
    duration *= 1000;
    int period = (1.0 / freq) * 1000000;
    long elapsed_time = 0;
    while (elapsed_time < duration) {
        digitalWrite(pinSpeaker,HIGH);
        delayMicroseconds(period / 2);
        digitalWrite(pinSpeaker, LOW);
        delayMicroseconds(period / 2);
        elapsed_time += (period);
    }
}
I have researched alot and i have formatted the code, yesterday i couldnt download the blynk app on my laptop because i had issues.
This is my code can anyone please check if it will work thank you.
void setup() {
  // put your setup code here, to run once:
}
void loop() {
  // put your main code here, to run repeatedly:
// Uses a PIR sensor to detect movement, buzzes a buzzer
// more info here: http://blog.makezine.com/projects/pir-sensor-arduino-alarm/
//
// based upon:
// PIR sensor tester by Limor Fried of Adafruit
// tone code by michael@thegrebs.com


int ledPin = 13;                // choose the pin for the LED
int inputPin = 2;               // choose the input pin (for PIR sensor)
int pirState = LOW;             // we start, assuming no motion detected
int val = 0;                    // variable for reading the pin status
int pinSpeaker = 10;           //Set up a speaker on a PWM pin (digital 9, 10, or 11)

void setup() {
  pinMode(ledPin, OUTPUT);      // declare LED as output
  pinMode(inputPin, INPUT);     // declare sensor as input
  pinMode(pinSpeaker, OUTPUT);
  Serial.begin(9600);
}

void loop(){
  val = digitalRead(inputPin);  // read input value
  if (val == HIGH) {            // check if the input is HIGH
    digitalWrite(ledPin, HIGH);  // turn LED ON
    playTone(300, 160);
    delay(150);


    if (pirState == LOW) {
      // we have just turned on
      Serial.println("Motion detected!");
      // We only want to print on the output change, not state
      pirState = HIGH;
    }
  } else {
      digitalWrite(ledPin, LOW); // turn LED OFF
      playTone(0, 0);
      delay(300);
      if (pirState == HIGH){
      // we have just turned of
      Serial.println("Motion ended!");
      // We only want to print on the output change, not state
      pirState = LOW;
    }
  }
}
// duration in mSecs, frequency in hertz
void playTone(long duration, int freq) {
    duration *= 1000;
    int period = (1.0 / freq) * 1000000;
    long elapsed_time = 0;
    while (elapsed_time < duration) {
        digitalWrite(pinSpeaker,HIGH);
        delayMicroseconds(period / 2);
        digitalWrite(pinSpeaker, LOW);
        delayMicroseconds(period / 2);
        elapsed_time += (period);
    }
}


/* Comment this out to disable prints and save space */
#define BLYNK_PRINT Serial
/* Set this to a bigger number, to enable sending longer messages */
//#define BLYNK_MAX_SENDBYTES 128

#include <SPI.h>
#include <Ethernet.h>
#include <BlynkSimpleEthernet.h>

// You should get Auth Token in the Blynk App.
// Go to the Project Settings (nut icon).
char auth[] = "1bcefc5dd4b645ad972362721939149f";

void emailOnButtonPress()
{
  // *** WARNING: You are limited to send ONLY ONE E-MAIL PER 15 SECONDS! ***

  // Let's send an e-mail when you press the button
  // connected to digital pin 2 on your Arduino

  int isButtonPressed = !digitalRead(2); // Invert state, since button is "Active LOW"

  if (pirState = HIGH) // You can write any condition to trigger e-mail sending
  {
    Serial.println("PIR Sensor Activated."); // This can be seen in the Serial Monitor
    Blynk.email("Dankharl12345678@gmail.com", "Subject:Motion Has Been Detected", "Motion Has Been Detected!.");

    // Or, if you want to use the email specified in the App (like for App Export):
    //Blynk.email("Subject: Button Logger", "You just pushed the button...");
  }
}

void setup()
{
  // Debug console
  Serial.begin(9600);

  Blynk.begin(auth);

  // Send e-mail when your hardware gets connected to Blynk Server
  // Just put the recepient's "e-mail address", "Subject" and the "message body"
  Blynk.email("Dankharl12345678@gmail.com", "Security System Online", "My Blynk project is online.");

  // Setting the button
  pinMode(2, INPUT_PULLUP);
  // Attach pin 2 interrupt to our handler
  attachInterrupt(digitalPinToInterrupt(2), emailOnButtonPress, CHANGE);
}

void loop()
{
  Blynk.run();
}


}
Your reading time is now up to 40 minutes, but you still aren’t posting posting your code correctly on this forum, despite @Gunner posting this graphic of how it should be done
If you’re wanting people to take the time to test your code and provide you with feedback then it would help if you posted a diagram of the hardware that is needed and how it’s wired together, and to give some explanation of what results you’re seeing when you run it.
@Dankharl you now need to run a basic Blynk sketch without PIR for the Arduino.
It’s much easier with an ESP8266 but see how you go with the Arduino.
If you manage to get connected to the Blynk server with your Arduino post the Blynk sketch here. Basically you will then use PUSH_DATA example to call functions at timed intervals like the PIR, Buzzer and sending emails.
So you don’t have an Ethernet shield connected, and you’ve previously said that you’re going to connect to Blynk via the USB serial port of your laptop, yet you’re telling your code to connect to the Blynk server using an Ethernet adaptor connected to your Arduino.
I’d suggest you study the links that @Gunner already provided about using the serial connection. You should also use the Sketch Builder and choose Arduino as your board and “Serial or USB” as your connection and see what sort of Blynk code you should be running on your Arduino.