ADS1115 with Wemos Mini D1

Hi Blynkers,
I wanted to show a small set-up using the ADS1115 with the Wemos Mini D1. This is not a “project” by itself, I posted several photos and more details in the forum a few months ago but the info was a little bit disordered so I think it’s a good idea to post all info together… I guess it could be useful in order to spread the world about Blynk :relaxed:

-Description:

The ADS1115 is a 16 bit Analog Digital Converter:

-Library required:

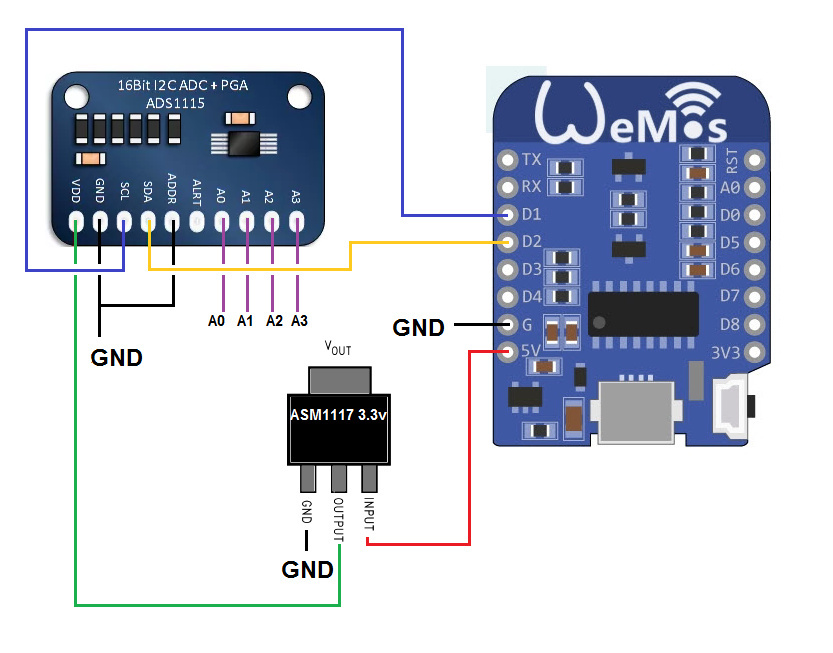
-Schematics:

-The code (Keep in mind I’m a Local Server guy, update the code accordingly…)

#include <ESP8266WiFi.h>
#include <BlynkSimpleEsp8266.h>
#include <SimpleTimer.h> //Blynk
#include <Wire.h>
#include <Adafruit_ADS1015.h>

#define server "xxx.xxx.xxx.xxx"  

char auth[] = "***************";
char ssid[] = "***************";
char pass[] = "**************";

bool isFirstConnect = true;
SimpleTimer timer;


 Adafruit_ADS1115 ads;  /* Use this for the 16-bit version */
//Adafruit_ADS1015 ads;     /* Use thi for the 12-bit version */
float Voltage0 = 0.0;
float Voltage1 = 0.0;
float Voltage2 = 0.0;
float Voltage3 = 0.0;

void setup() 
{
  Serial.begin(115200);
  Blynk.begin(auth, ssid, pass, server);
  int mytimeout = millis() / 1000;
  while (Blynk.connect() == false) { // try to connect to server for 10 seconds
    if((millis() / 1000) > mytimeout + 8){ // try local server if not connected within 9 seconds
       break;
    }
  }
  timer.setInterval(350L, ReadANAlOGS);
  timer.setInterval(30000L, reconnectBlynk);  // check every 30s if still connected to server 
  
  
  // The ADC input range (or gain) can be changed via the following
  // functions, but be careful never to exceed VDD +0.3V max, or to
  // exceed the upper and lower limits if you adjust the input range!
  // Setting these values incorrectly may destroy your ADC!
  //                                                                ADS1015  ADS1115
  //                                                                -------  -------
  // ads.setGain(GAIN_TWOTHIRDS);  // 2/3x gain +/- 6.144V  1 bit = 3mV      0.1875mV (default)
  ads.setGain(GAIN_ONE);           // 1x gain   +/- 4.096V  1 bit = 2mV      0.125mV
  // ads.setGain(GAIN_TWO);        // 2x gain   +/- 2.048V  1 bit = 1mV      0.0625mV
  // ads.setGain(GAIN_FOUR);       // 4x gain   +/- 1.024V  1 bit = 0.5mV    0.03125mV
  // ads.setGain(GAIN_EIGHT);      // 8x gain   +/- 0.512V  1 bit = 0.25mV   0.015625mV
  // ads.setGain(GAIN_SIXTEEN);    // 16x gain  +/- 0.256V  1 bit = 0.125mV  0.0078125mV
  
  ads.begin();
}

BLYNK_CONNECTED() {
if (isFirstConnect) {
 Blynk.syncAll(); 
 Blynk.notify("ADS1115 STARTING!!!!");
isFirstConnect = false;
}
}

void ReadANAlOGS()
{

  int16_t adc0, adc1, adc2, adc3;

  adc0 = ads.readADC_SingleEnded(0);
  adc1 = ads.readADC_SingleEnded(1);
  adc2 = ads.readADC_SingleEnded(2);
  adc3 = ads.readADC_SingleEnded(3);
  
  Voltage0 = (adc0 * 0.125)/1000;
  Voltage1 = (adc1 * 0.125)/1000; 
  Voltage2 = (adc2 * 0.125)/1000;
  Voltage3 = (adc3 * 0.125)/1000;
  
 //Serial.print("AIN0: "); Serial.println(Voltage0);
 //Serial.print("AIN1: "); Serial.println(Voltage1);
 // Serial.print("AIN2: "); Serial.println(Voltage2);
 // Serial.print("AIN3: "); Serial.println(Voltage3);
 // Serial.println(" ");
  

  Blynk.virtualWrite(V0, Voltage0);
  Blynk.virtualWrite(V1, Voltage1);
  Blynk.virtualWrite(V2, Voltage2);
  Blynk.virtualWrite(V3, Voltage3);  
}

void reconnectBlynk() {
  if (!Blynk.connected()) {
    if(Blynk.connect()) {
     BLYNK_LOG("Reconnected");
    } else {
      BLYNK_LOG("Not reconnected");
    }
  }
}

void loop()
{

  if (Blynk.connected()) {
    Blynk.run();
  }
  timer.run();
}

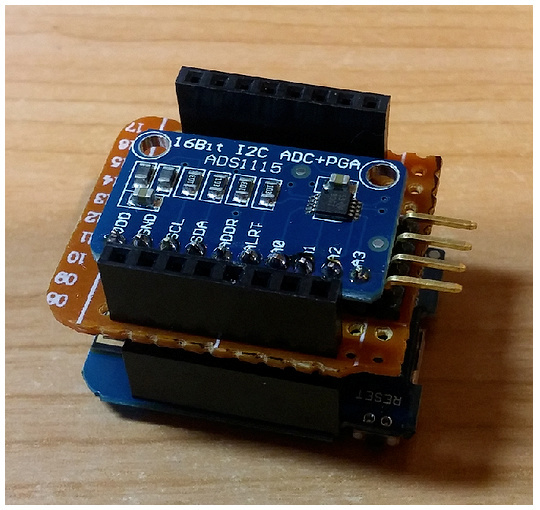
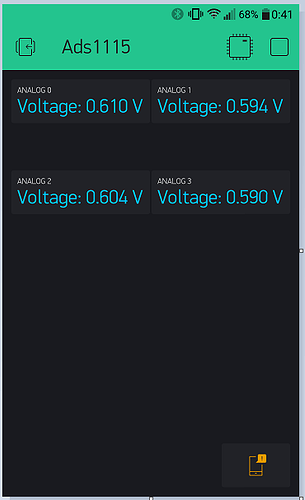
-Some Pictures:
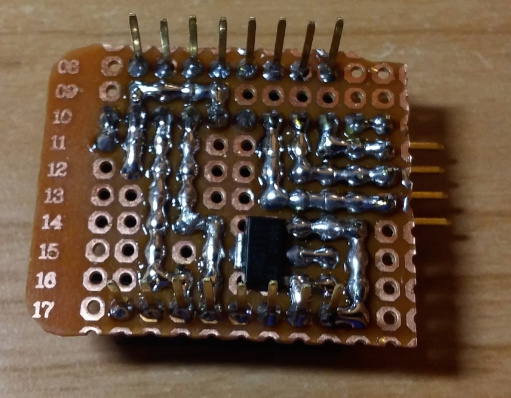
-Video:

-QR:

http://tinyurl.com/jr5rysc

I hope you like it!
Regards

6 Likes

There are many solutions out there but it’s very nice when someone brings it all together. Thank you very much for sharing!

1 Like

Great share!

For those looking for a cheaper ADC this is at 8-bit resolution although it comes with an DAC aswell

Look at this on eBay http://www.ebay.co.uk/itm/191901736037

1 Like

Nice chip and better price @Fettkeewl, the only concern is the resolution, its seems a little bit “outdated” with 8-bits…maybe I’ll give it a try :slight_smile:

1 Like

guess it comes down to the precision needed :wink:

1 Like

A post was split to a new topic: Need help hooking up IR sensor to Wemos

Hey,

This is just what I needed for my project. Well almost ^^

I just don’t get the extra mosfet part? what is that doing in there? And is that necessary?

Hi @BLCKPSTV, glad this is useful for you!, do you mean the AMS1117? It’s just a Voltage regulator to feed the ADS1115.

Could you explain more how the GAIN works. I have a Soil and Moist sensor with the including LM368 amplifier and I don’t know how to set the gain without maybe damaging the ads if I just try all the different possibilities.

I will do a little bit of “Googling” for you this time…:wink:

HTH,

Hi @psoro

Thanks for the guide!

Pfiew a mouthful, umh if I understand it correctly, I need to know the voltage of the sensor I have and than adjust the gain accordingly. So other guess (and something I didn’t read in the guide) is that I discard the amplification boards and connect the sensors directly to the ads1115.

At the moment my serial console shows this, with the sensor directly attached to the ads1115.
Gain is set at SIXTEEN

AIN0: 0.01
AIN1: 0.19 
AIN0: -0.23 => Here I touched the rain sensor (going in to minus??)
AIN1: 0.00
AIN0: 0.02
AIN1: 0.07
AIN0: 0.01
AIN1: 0.61 => Here I touched the soilmoist sensor => Up means more moist, correct? Sounds logic but need confirmation ^^
AIN0: 0.03
AIN1: 0.01
AIN0: 0.18
AIN1: 0.05

That’s correct! You have to adjust the Gain accordingly to the output voltage of your sensor.

Is your sensor giving you a +/- 0.256V range output? Can you tell me which sensor you are using?

Hi,
I’m not sure if the output is +/- 0.256

The output above is what the arduino console states, my multimeter gives the same.

I found some info on the soil sensor from here.

Here is how to use the YL-39 (logic) + YL-69 (probe) pair that form the soil humidity sensor.

The YL-39 module has 4 pins: 

- VCC: 3.3-5V

- GND

- A0 : analog output that can be easily read by Arduino

- D0 :  digital pin that goes LOW or HIGH depending on a preset value

The issue with such sensors is that the probe itself work by trying to measure the current that goes from one side of it to the other. Because of this electrolysis occurs so it can destroy the probe (YL-69) pretty fast in high-moisture soils. To bypass this, instead of directly linking the VCC to the Arduino's VCC/5V we simply link it to a digital pin and power it (digital pin goes HIGH) only before we do a readout (see the code for this).

To connect it to the Arduino you just need to connect A0 from YL-39 to A1 from the Arduino and VCC from YL-39 to digital pin 6 from the Arduino.. 

Then the rain sensor is some data I found from DX website. Very vague for me…

	No rain when the output is high LED lit up raindrops, the output of the ground level, LED light; Raindrops board and the control panel is separate, convenient line leads; A large area of raindrops board, more conducive to rain detected; Board with positioning holes to facilitate installation
Specification	Voltage: 5V; The power indicator, output signal LED indicator; TTL-level output, TTL output valid signal is low about drive capacity 100MA can directly drive relays, buzzer, a small fan, and so on. Sensitivity adjustable via potentiometer
Application	Connected to 5V power supply power lights, induction board no water droplets DO output is high, the switch lights off, dropping on a drop of water, DO output is low, the indicator light switch; Brush off the the above water droplets, has returned to output high state; AO analog output can be connected to the microcontroller AD port to detect the size of the drops in the above rainfall; DO TTL digital outputs can also be connected to the microcontroller detects whether there is rain.
English Manual/Spec	Yes
Packing List	1 x Raindrops sensor module

That’s all. Hope it’s a help.

I only need the data to be mapped to either raining or not raining and maybe 3 types of soil moist, very,medium,none moist at all.

Than I can start thinking to put in in a case and figure out how to power it all :slight_smile:

Thanks for the help! :slight_smile:

Both sensors should provide their signal from Vcc to 0 so, I would set the Gain to ONE.

  ads.setGain(GAIN_ONE);  //     +/- 4.096V  1 bit = 2mV      0.125mV

Check your sensor to be sure about the output/gain (with and without “rain”/“humidity”)

My soil humidity sensor provides 3.3V completely dry and goes to 0V when the sensor is wet… Using the multimeter is just a small test.

Hi,

Hmm when I measure the RAIN SENSOR DC voltage I get 1.24 +/- when it is not touched (by the multimeter) it’s around 0.7 in the serial monitor. That’s the same when I measure it while the it’s unplugged with the multimeter??

When I measure the SOIL SENSOR DC voltage I get 0.9 +/- on my multimeter and 0.18 to 0.65 in my serial monitor. I get nothing like 3.3v when not touched or 0 when thouched?

I checked an unused analog pin (from the ads1115) and there I get a steady 0.50 in the serial monitor.

A bit lost in understanding what’s wrong, to be honest.

Gain is set to ONE for the moment.

If I were you, I would forget those sensors at the moment and add a potentiometer to test your set-up between 3.3 and 0V… After that, checking everything is up and running, I would attach the other sensors…

Hi,

I detached the soil and moist sensor and attached a 100a potentionmeter to the gnd and v3 and the middle to the A0 from the ads1115. The data ranges from 0-3v BUT it’s everything but correct.
lets state the v+ is left and the ground is right, right.

Then following is the voltage output in the serial monitor.
I’ve retried 3times to make sure it’s repeating. At the end of the last left it keeps staying the same value either moving right or left (quite quickly). Checked the wiring multiple times. Hardware failure?
I’ve done tons of work with potentiometers (without ads1115) and always got steady and quick responding value’s. Tommorow I’ll try swapping with my only other ads1115 I have laying around at the moment.

AIN0: 3.28      right
AIN0: 3.28       ''
AIN0: 3.28       ''
AIN0: 1.94      middle
AIN0: 1.78       "
AIN0: 0.85        "
AIN0: 3.30     left
AIN0: 3.30      "
AIN0: 3.30      "
AIN0: 3.30      "
AIN0: 0.84    fast right to left 
AIN0: 0.81     left
AIN0: 0.80     "
AIN0: 1.12    middle
AIN0: 1.49    middle
AIN0: 0.85    left
AIN0: 0.52    left
AIN0: 0.52    left
AIN0: 1.82    middle
AIN0: 2.51
AIN0: 3.28   !! left 
AIN0: 3.28     left
AIN0: 3.28     left
AIN0: 3.28     left
AIN0: 1.38     middle
AIN0: 0.19     left
AIN0: 0.00     left
AIN0: 0.00     left
AIN0: 0.01 
AIN0: 0.01
AIN0: 0.00
AIN0: 0.00
AIN0: 0.00
AIN0: 0.00
AIN0: 0.00
AIN0: 0.80
AIN0: 3.28
AIN0: 3.28
AIN0: 3.28
AIN0: 0.00
AIN0: 0.00
AIN0: 0.00
AIN0: 0.83
AIN0: 1.99
AIN0: 1.99
AIN0: 2.46
AIN0: 2.86
AIN0: 3.24
AIN0: 3.28
AIN0: 2.26
AIN0: 1.03
AIN0: 3.30
AIN0: 3.30
AIN0: 3.30
AIN0: 3.21
AIN0: 2.99
AIN0: 3.28
AIN0: 3.29
AIN0: 3.30
AIN0: 3.29
AIN0: 3.29
AIN0: 3.29
AIN0: 3.29    left

Would you mind telling me why you used the 3.3V regulator? I see the datasheet says it can take 0.3V to 7V. What benefit does the voltage regulator offer?

Take into account that the Max Analog input voltage is Vdd + 0.3 V… if your range goes up to 3.3V, you need to feed the device with at least 3V.

I attempted to do this project last weekend, however in my case I had to make a few changes to replicate
the same results outlined in this post to make it successful. I used an ESP8266 version ESP12E pins D1 & D2 for IC2 data lines.

  1. ADS1115 module with the latest revision released does not require any connection to the ADDR pin, just leave it open to obtain the default code address to make the listed Ardunio code work which is 0x48 (1001000) ADR, however if you do choose to connect GND to ADDR pin you get 0x4B (1001011) ADR which is only useful if you are running two modules to give 8 separate analog inputs.
    This is shown in the Adufruit pdf manual - link to it here - https://cdn-learn.adafruit.com/downloads/pdf/adafruit-4-channel-adc-breakouts.pdf (however note that ADR lines shown are different from what I got).
    If you want to double check your ADS1115 version- I suggest you use the I2C address scanner from https://www.instructables.com/id/ESP8266-I2C-PORT-and-Address-Scanner/ in debugging any issues.

  2. If your WiFi Router is configured for DHCP, then static addressing is not necessary, you can delete
    #define server “xxx.xxx.xxx.xxx” in the code example, and just use the 3 arguments in the function Blynk.begin(auth, ssid, pass) and leave off the last argument “server”.

  3. An external 3.3V regulator is not necessary when using an ESP12E (ESP8266), since you have a couple of onboard 3.3V pins to power the ADS1115 module, so you can typically delete this hardware component from your project.

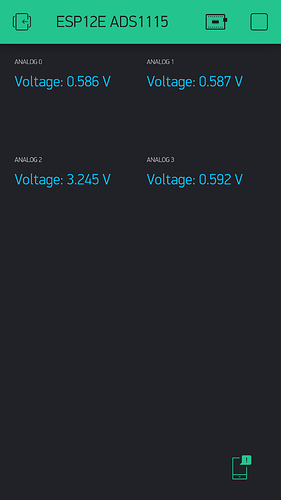
4, Attached is a screenshot using my Blynk application, I left ADS1115 analog pins 0,1 & 3 floating without a physical connection, and hooked up 3.3V ESP12E output power supply to Analog 2, only just for testing purposes.

  1. If your not using Blynk, then the same output measurement results are shown through your Arduino PC IDE “Serial Monitor” window at 115200 bps, but don’t forget to uncomment or remove the “//” in the section of code that he uses to activate this serial port logging of data to enable this to work.