With more than one project on the same network, there are connection conflicts

With more than one project on the same network, there are connection conflicts.

When I connect 2 Arduinos in this case Mega, in two different projects, within a same network, are disconnected, and there are connection problems, to be able to develop one or another project and to be able to test them I have to disconnect one of them.
My question is, why are they sharing the same port MQTT 84XX?
How can I make it possible to have more than one project in the same network and not have connection conflicts?
I write the question in my native Spanish language, and translate it for the Blynk community.
Congratulations to the Blynk developers, this application is very good. Greetings from Mar del Plata, Argentina.

……………………………………………….

Con más de un proyecto en la misma red, hay conflictos de conexión.

Cuando conecto 2 Arduinos en este caso Mega, en dos proyectos diferentes, dentro de una misma red, se desconectan, y hay problemas de conexiĂłn, para poder desarrollar uno u otro proyecto y poder probarlos tengo que desconectar uno de ellos.
Mi pregunta es, ¿porque están compartiendo el mismo puerto MQTT 84XX?
¿Cómo puedo hacer para poder tener en la misma red más de un proyecto y no tener conflictos de conexión?
Escribo la pregunta en mi idioma nativo español, y la traduzco para la comunidad Blynk.
Felicitaciones a los desarrolladores de Blynk, es muy buena esta aplicaciĂłn. Saludos desde Mar del Plata, Argentina.
Hello. What is configuration of your hardware? Ip, network gateway, etc? Look like you did wrong configuration.

What kind of issues do you see? The server should be able to handle multiple MQTT connections because the combination of sending port (Hardware side) and receiving side (MQTT) is unique for each connection. The sending port will always be random.

Are you sure there is not another problem like using the same two MAC addresses for your network interface of the hardware?

1 Like

As @Lichtsignaal says, check that you are giving each Arduino a unique MAC address. If you’re using an Ethernet shield then you specify the MAC in the Ethernet.begin statement.

Also, you need to specify a unique name for each device in the MQTT client connect statement:
MQTTclient.connect(“Unique Device Name”, “username”, “password”)

The other possibility is that if you’re using Ethernet shields you’ve made a change to the network that is preventing the shields from, working. The Ethernet shields don’t work with all Ethernet switches, so you should check that they work okay on their own when plugged into their current switch/router.

Pete.

1 Like

Thanks for answering.
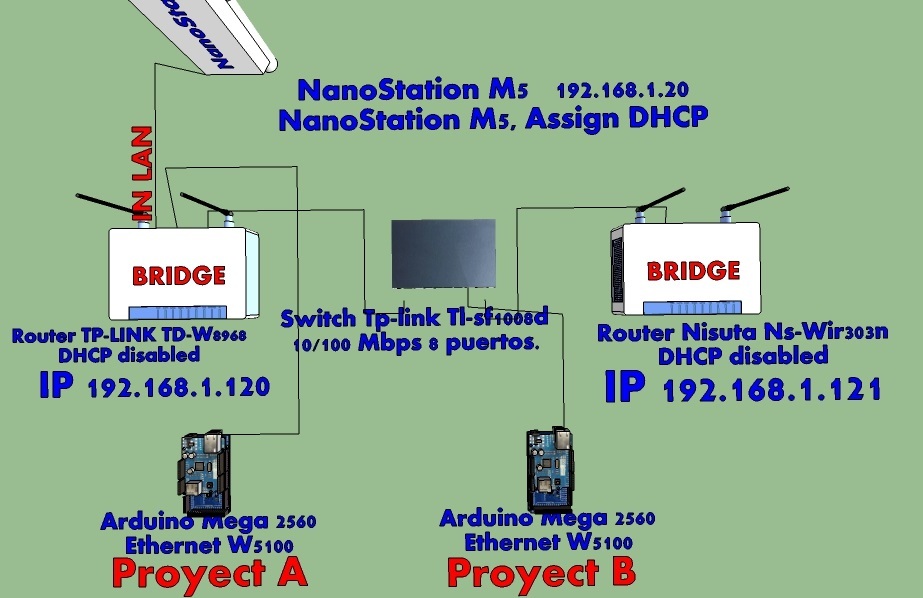
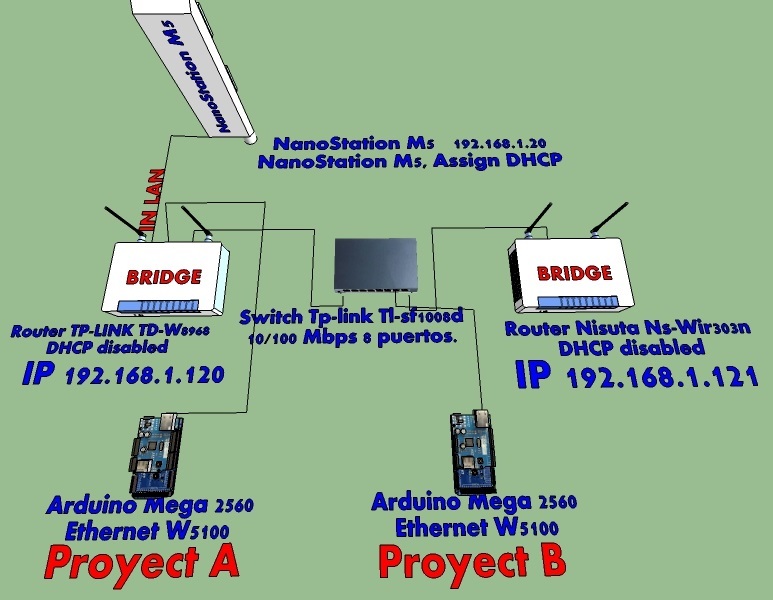
The configuration is as follows.
NanoStation M5, with IP. 192.168.1 20, as a router, assigns IP addresses. From 192.168.1.150 to 192.168.1.2001
Router TP-LINK TD-W8968, (IP 192.168.1.120), as Bridge, with DHCP disabled. The NanoStation router assigns the IP by MAC.
Router Nisuta Ns-Wir303n, (IP 192.168.1.121), as bridge, with DHCP disabled. The NanoStation router assigns the IP by MAC.
Switch Tp-link Tl-sf1008d 10/100 Mbps 8 ports.
To the 2 Arduinos I do not know how to assign them static IP, since I do not know how to know the MAC of each one. Both are connected by Lan network, Ethernet W5100.

When both are connected simultaneously, there is connection conflict, it takes time to connect, and when one is connected, a button pulse performs the task, and disconnects.

Attached a drawing of the connection, thank you very much.
Attached the link, the drawings.
https://drive.google.com/open?id=0B7FwelASARvUcVRGcXVTRWlDZ2c

………………………………………
Adjunto el link, de los dibujos.
https://drive.google.com/open?id=0B7FwelASARvUcVRGcXVTRWlDZ2c

………………………………………………………………………………….
Gracias por contestar.
La configuraciĂłn es la siguiente.
NanoStation M5, con IP. 192.168.1 20, como router, asigna las direcciones IP. Desde 192.168.1.150 a 192.168.1.200
Router TP-LINK TD-W8968, (IP 192.168.1.120), como Bridge, con DHCP deshabilitado. El router NanoStation le asigna la IP por MAC.
Router Nisuta Ns-Wir303n, (IP 192.168.1.121), como bridge, con DHCP deshabilitado. El router NanoStation le asigna la IP por MAC.
Switch Tp-link Tl-sf1008d 10/100 Mbps 8 puertos.
A los 2 Arduinos no sé cómo asignarles IP estático, ya que no sé cómo saber el MAC de cada uno. Ambos se conectan por red Lan, Ethernet W5100.

Cuando están conectados ambos simultáneamente, hay conflicto en conexión, tarda en conectarse, y cuando se conecta uno, pulso un botón realiza la tarea, y se desconecta.

Adjunto un dibujo de la conexiĂłn, muchas gracias.

I have a drawing, but I do not know how to upload it.
………………………………………………

Tengo un dibujo, pero no sé cómo subirlo.

Attached the link, the drawings.
https://drive.google.com/open?id=0B7FwelASARvUcVRGcXVTRWlDZ2c

………………………………………
Adjunto el link, de los dibujos.
https://drive.google.com/open?id=0B7FwelASARvUcVRGcXVTRWlDZ2c

Take a look at this:
https://www.arduino.cc/en/Reference/EthernetBegin

The line that says:
byte mac[] = { 0xDE, 0xAD, 0xBE, 0xEF, 0xFE, 0xED }
should have a different mac address for each shield (for example change the last part to 0xEE for one of the shields).

Pete.

1 Like

……………………………………………….
Gracias, Pete.
Pero ÂżcĂłmo averiguo el MAC, de la Shield Ethernet W5100?
ÂżO debo agregar lo que pusistes en el programa?
El scketch es asĂ­ como sigue.
…………………………….
Thanks, Pete.
But how do I find the MAC of the W5100 Ethernet Shield?
Or should I add what you put into the program?
The scketch is as follows.

/*************************************************************
  Download latest Blynk library here:
    https://github.com/blynkkk/blynk-library/releases/latest

  Blynk is a platform with iOS and Android apps to control
  Arduino, Raspberry Pi and the likes over the Internet.
  You can easily build graphic interfaces for all your
  projects by simply dragging and dropping widgets.

    Downloads, docs, tutorials: http://www.blynk.cc
    Sketch generator:           http://examples.blynk.cc
    Blynk community:            http://community.blynk.cc
    Social networks:            http://www.fb.com/blynkapp
                                http://twitter.com/blynk_app

  Blynk library is licensed under MIT license
  This example code is in public domain.

 *************************************************************
  This example shows how to use Arduino Ethernet shield (W5100)
  to connect your project to Blynk.

  NOTE: Pins 10, 11, 12 and 13 are reserved for Ethernet module.
        DON'T use them in your sketch directly!

  WARNING: If you have an SD card, you may need to disable it
        by setting pin 4 to HIGH. Read more here:
        https://www.arduino.cc/en/Main/ArduinoEthernetShield

  Feel free to apply it to any other example. It's simple!
 *************************************************************/

/* Comment this out to disable prints and save space */
#define BLYNK_PRINT Serial


#include <SPI.h>
#include <Ethernet.h>
#include <BlynkSimpleEthernet.h>

// You should get Auth Token in the Blynk App.
// Go to the Project Settings (nut icon).
char auth[] = "xxxxxxxxxxxxxxxxxxxxxxxxxxxxxx";

#define W5100_CS  10
#define SDCARD_CS 4

void setup()
{
  // Debug console
  Serial.begin(9600);

  pinMode(SDCARD_CS, OUTPUT);
  digitalWrite(SDCARD_CS, HIGH); // Deselect the SD card

  Blynk.begin(auth);
  // You can also specify server:
  //Blynk.begin(auth, "blynk-cloud.com", 8442);
  //Blynk.begin(auth, IPAddress(192,168,1,100), 8442);
  // For more options, see Boards_Ethernet/Arduino_Ethernet_Manual example
}

void loop()
{
  Blynk.run();
}

………………………………
……………………………….
…………………………………

Unless they have a sticker on them showing the MAC address (quality name brand shields might), they are generally user created, as demonstrated.

I edited your post to format your code properly for viewing… use this method for future, thanks:

1 Like

/*************************************************************
  Download latest Blynk library here:
    https://github.com/blynkkk/blynk-library/releases/latest

  Blynk is a platform with iOS and Android apps to control
  Arduino, Raspberry Pi and the likes over the Internet.
  You can easily build graphic interfaces for all your
  projects by simply dragging and dropping widgets.

    Downloads, docs, tutorials: http://www.blynk.cc
    Sketch generator:           http://examples.blynk.cc
    Blynk community:            http://community.blynk.cc
    Social networks:            http://www.fb.com/blynkapp
                                http://twitter.com/blynk_app

  Blynk library is licensed under MIT license
  This example code is in public domain.

 *************************************************************
  This example shows how to use Arduino Ethernet shield (W5100)
  to connect your project to Blynk.

  NOTE: Pins 10, 11, 12 and 13 are reserved for Ethernet module.
        DON'T use them in your sketch directly!

  WARNING: If you have an SD card, you may need to disable it
        by setting pin 4 to HIGH. Read more here:
        https://www.arduino.cc/en/Main/ArduinoEthernetShield

  Feel free to apply it to any other example. It's simple!
 *************************************************************/

/* Comment this out to disable prints and save space */
#define BLYNK_PRINT Serial


#include <SPI.h>
#include <Ethernet.h>
#include <BlynkSimpleEthernet.h>

// You should get Auth Token in the Blynk App.
// Go to the Project Settings (nut icon).
char auth[] = "xxxxxxxxxxxxxxxxxxxxxxxxxxxxxx";

#define W5100_CS  10
#define SDCARD_CS 4

void setup()
{
  // Debug console
  Serial.begin(9600);

  pinMode(SDCARD_CS, OUTPUT);
  digitalWrite(SDCARD_CS, HIGH); // Deselect the SD card

  Blynk.begin(auth);
  // You can also specify server:
  //Blynk.begin(auth, "blynk-cloud.com", 8442);
  //Blynk.begin(auth, IPAddress(192,168,1,100), 8442);
  // For more options, see Boards_Ethernet/Arduino_Ethernet_Manual example
}

void loop()
{
  Blynk.run();
}

When formatting the code, you did use the correct key, but don’t use the SHIFT key with it.

The Arduino shields don’t have a fixed MAC address, you specify it yourself in the code.

Take a look at these threads for info on configuring the MAC address:

You said earlier that you were using MQTT, but there’s no MQTT code in the sample you posted. Can you share your full code?

Pete.

Hi, Pete.
I assumed that Blynk, who uses MQTT, that’s why I said about the ports. Because when I open the serial port it says MQTT.
You tell me that within the code should I insert this?
byte mac[] = {0xDE, 0xAD, 0xBE, 0xEF, 0xFE, 0xED};
IPAddress ip(192, 168, 1, 19);
Blynk.begin(auth, mac, ip);
And assign a number of MAC, and IP, to each Arduino.
If so, in which part of the code should I insert it.
The whole code is up, it’s in the answers.
Thank you.

I found this video in Spanish, very useful to embed code to send e-mail, that I did not know how to send mail, once created the e-mail widget.
These explanations of how to combine Blynk with other functions is what I had doubts, and it would be good to upload videos to YouTube, like the example.
Thank you.

Replace the existing Blynk.begin with the code above. Specify a different MAC and IP address for each Arduino. Make sure the IP addresses you specify aren’t already on use on your home network.

I’m not sure why you’re seeing MQTT messages in your serial monitor.

Pete.

1 Like

This?
Blynk.begin(auth);
// You can also specify server:
//Blynk.begin(auth, “blynk-cloud.com”, 8442);
//Blynk.begin(auth, IPAddress(192,168,1,100), 8442);
// For more options, see Boards_Ethernet/Arduino_Ethernet_Manual example
}

For this?
byte mac[] = {0xDE, 0xAD, 0xBE, 0xEF, 0xFE, 0xED};
IPAddress ip(192, 168, 1, 19);
Blynk.begin(auth, mac, ip);

Yes, provided 192.168.1.19 isn’t already in use on your network.
The second Arduino will need a different MAC ({0xDE, 0xAD, 0xBE, 0xEF, 0xFE, 0xEE}) maybe and a differnet IP address (192, 168, 1, 20) maybe?).

Pete.

Thank you very much, Pete, very attentive.