I am just getting started with this project. I plan on making this project first and then another weight based project that is a bit more specific to aviation.
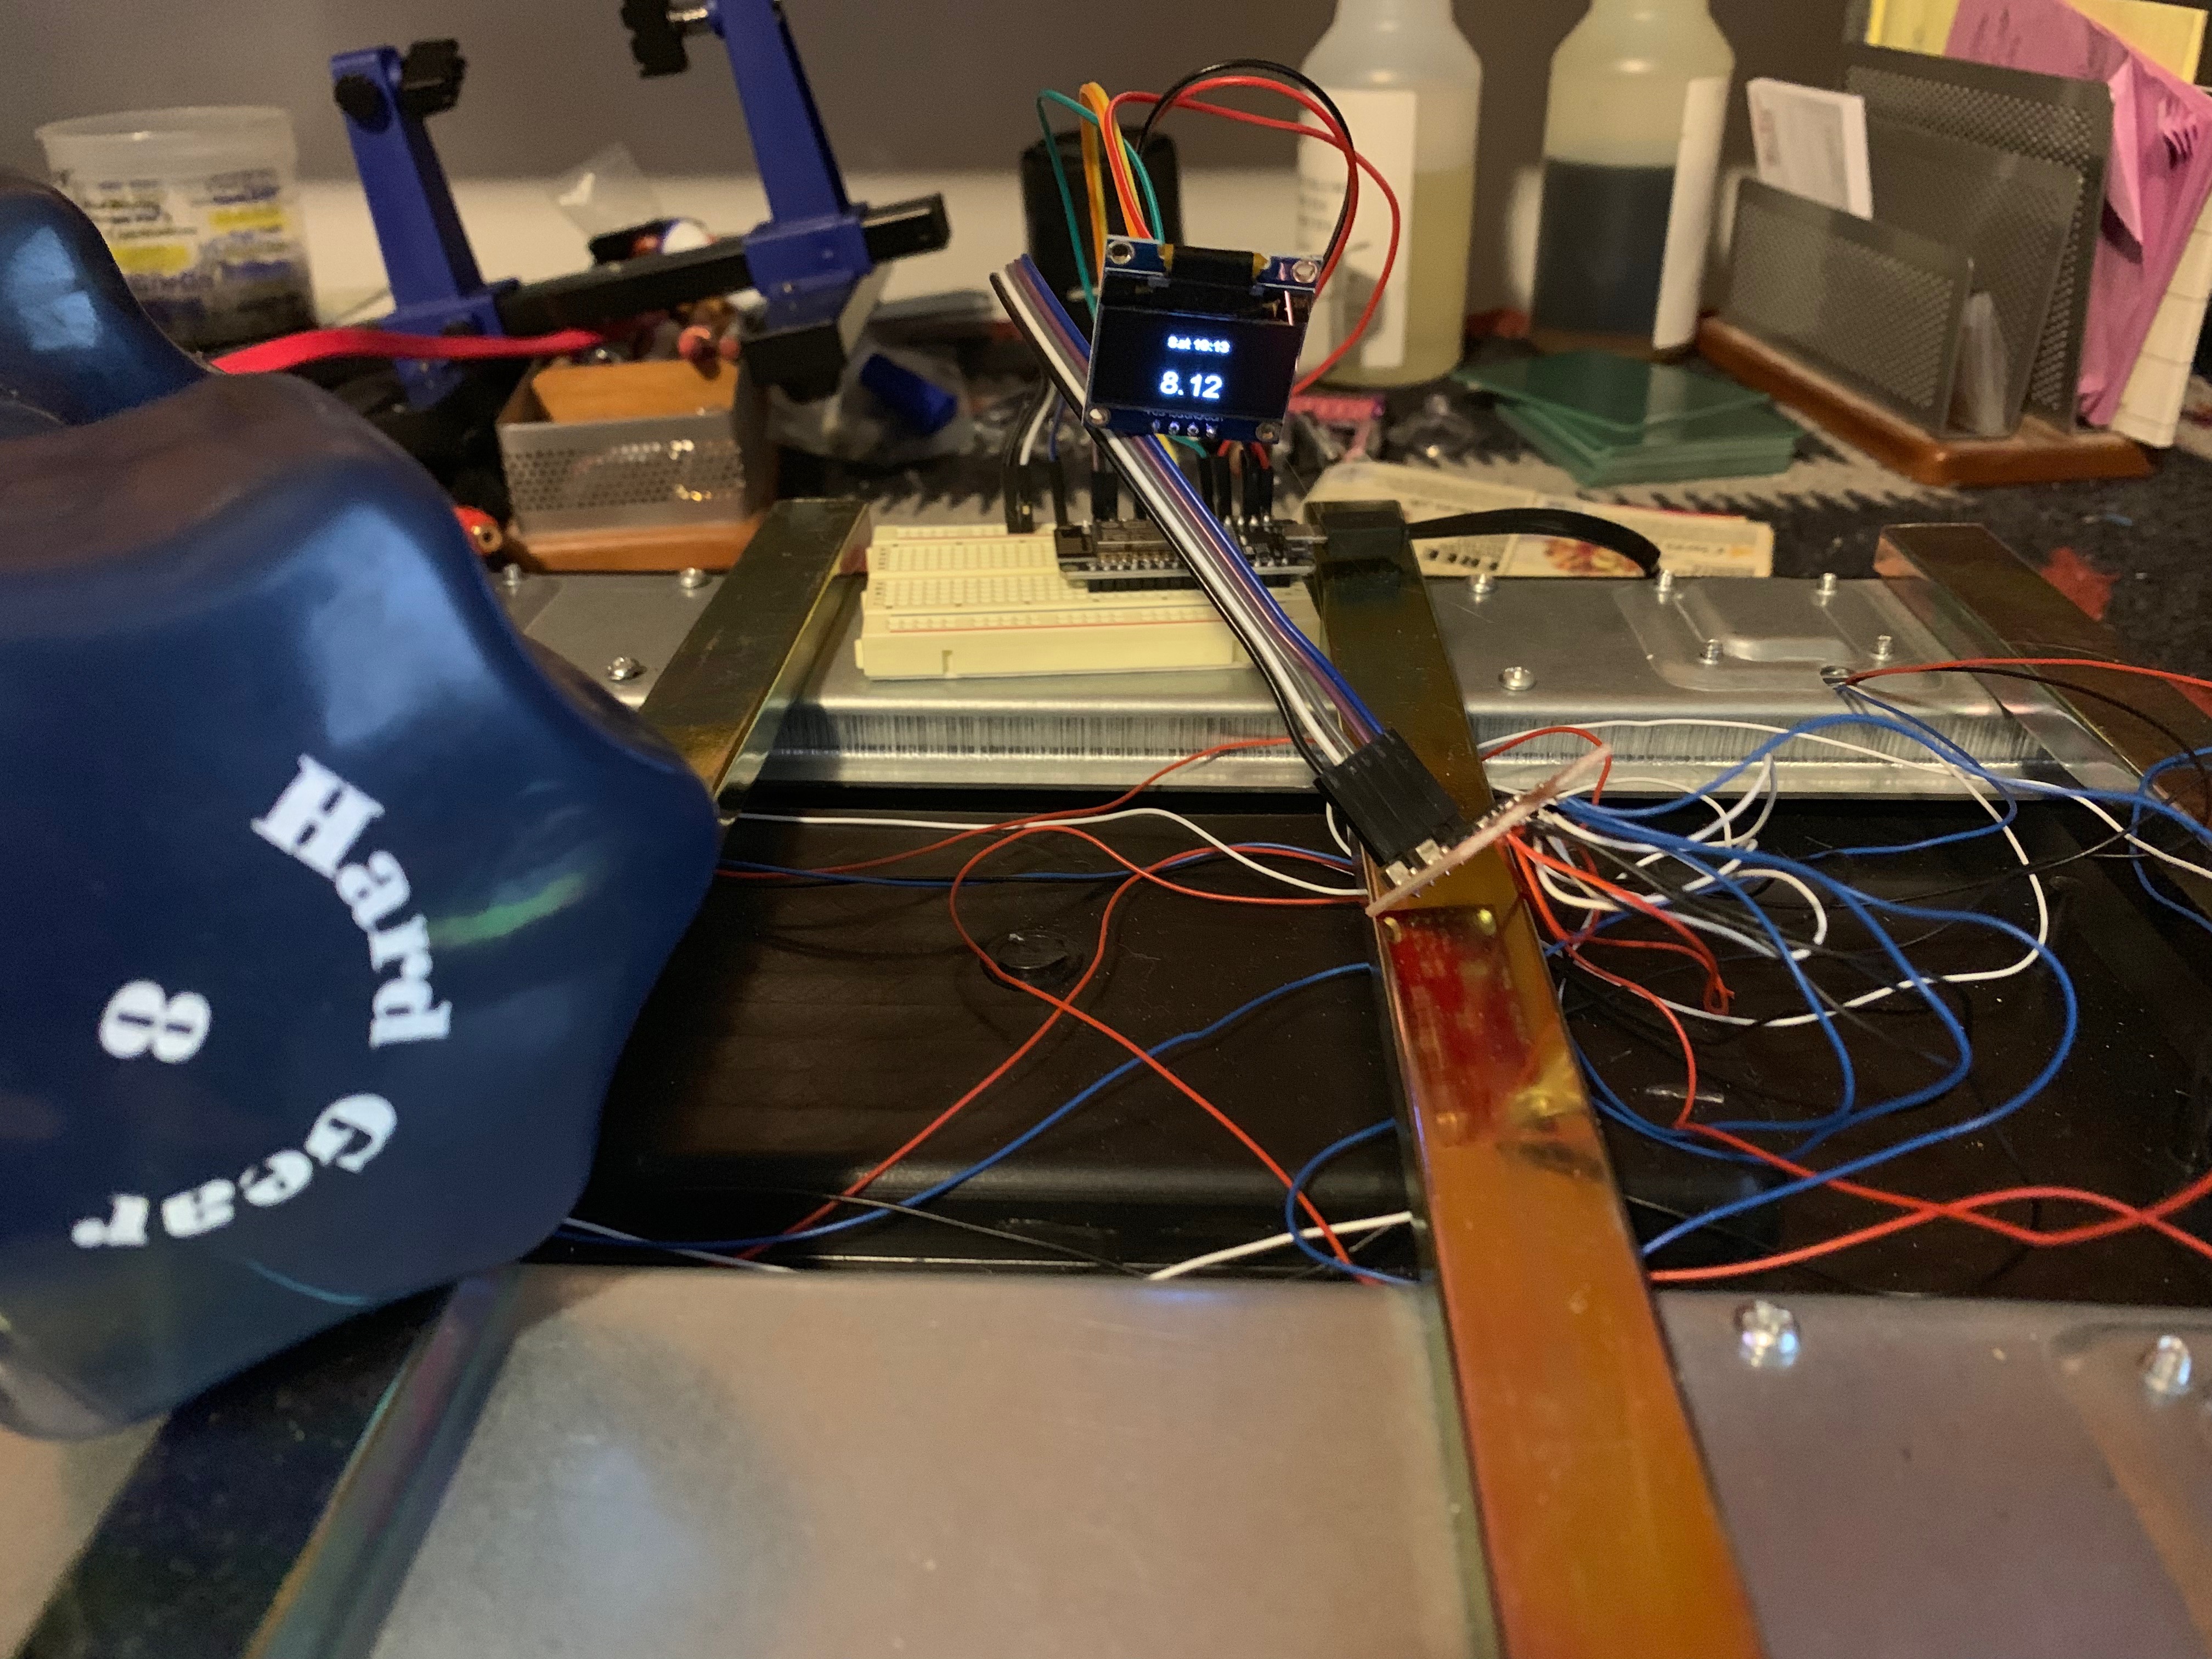
In this first test I created a scale that uses the HX711 and 4 load cells connected in a bridge.
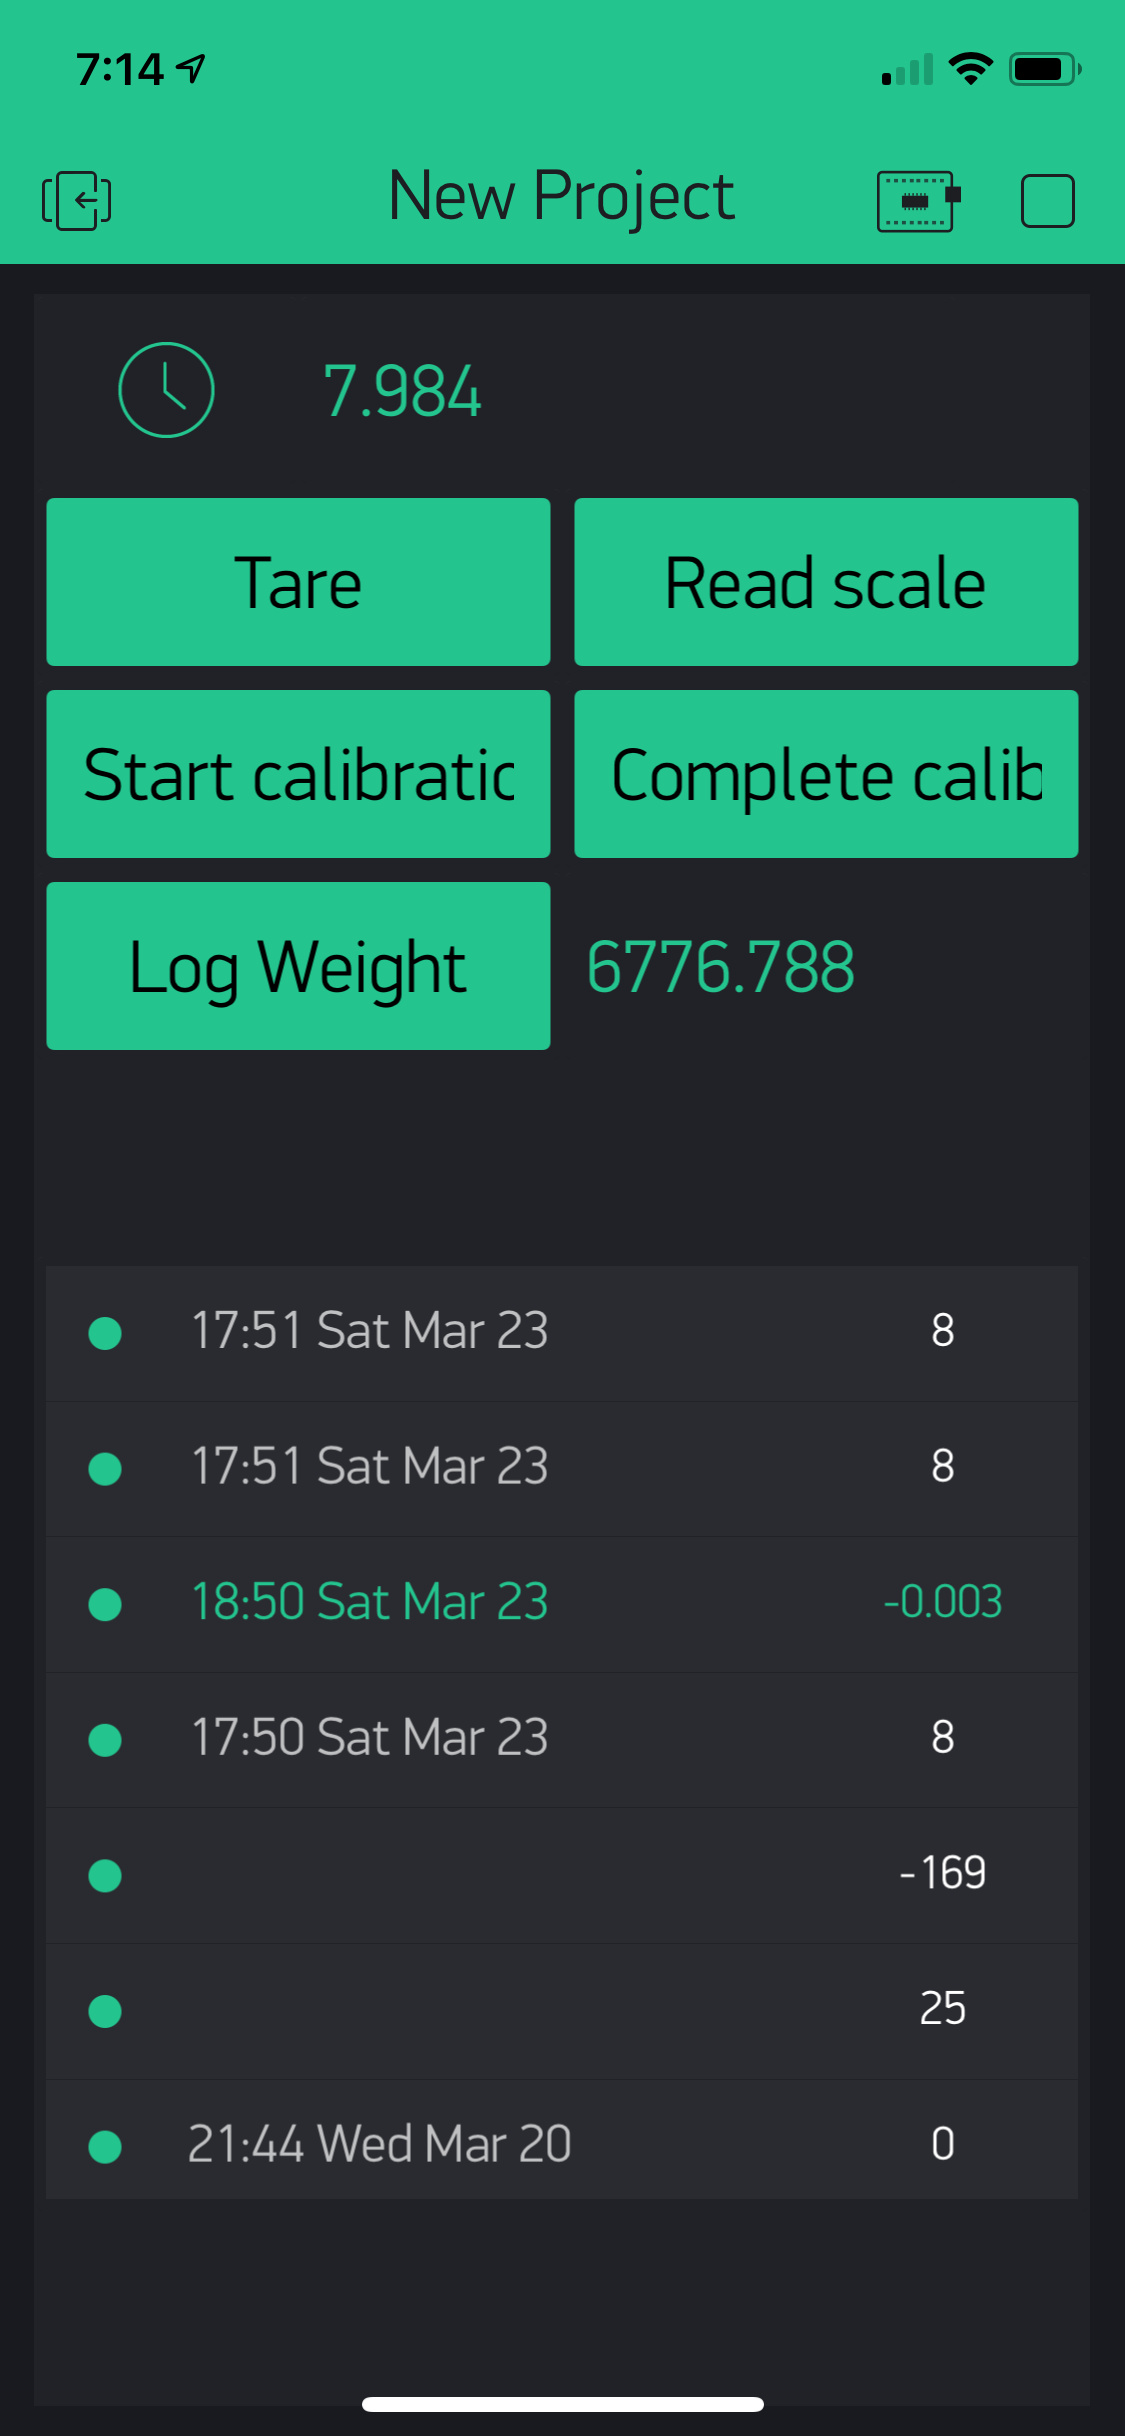
It allows the user to:
- Setup the scale.
- Calibrate the scale
- Read the scale.
- log the weight.
It also displays the day, time and weight to a small oled display.
I expect to add graphing of the captured readings
The calibration data is now saved to the cloud.
Removed unused code and data.
Added comments
Replaced duplicate files with the real files. oops
added ability to input the weight for calibration.
added tabs one for getting the weight and one for calibration.
#include <FS.h>                   //this needs to be first, or it all crashes and burns...

#include <ArduinoOTA.h>
#include <ESP8266WiFi.h>          //https://github.com/esp8266/Arduino
#include <BlynkSimpleEsp8266.h>
#include <WiFiManager.h>          //https://github.com/tzapu/WiFiManager
#include <ArduinoJson.h>          //https://github.com/bblanchon/ArduinoJson
#include "HX711.h"
#include <U8g2lib.h>
#include "SSD1306Wire.h"
#include <WidgetRTC.h>
#include "globals.h"

//create terminal widget instance and attach it to the pin
WidgetTerminal terminal(terminaldisplay);

//create timer instance
BlynkTimer timer;

// Initialize our HX711 interface
HX711 scale;

//Create the real time clock instance
WidgetRTC rtc;

// Initialize the OLED display using Wire library
SSD1306Wire  display(0x3c, 2, 14);


void setup() {
  // put your setup code here, to run once:
  Serial.begin(115200);

  // these two call get the data from the SPIFFS file and use the data to provision  blynk and wifi
  restoreparameters();
  startmywifi();

  Blynk.config(blynk_token);          // config Blynk

  setupdisplay();
  setupscale();

  // Timed Lambda code
  timer.setInterval(700L, [] () { // Run every .7 seconds
    // START timer Function    <--- put code lines here that you want to run repetedly in sync
    if (!calibrating)
      displayweight(readscale());
  });  // END Timer Function

}

void loop() {
  // in most cases you should not put code here
  if (Blynk.connected()) {
    Blynk.run();
  } else Blynk.connect(1000l);                // timeout 1 seconds
  timer.run();
}
BLYNK_WRITE(V9)
{
  if (param.asInt()) {
    Blynk.virtualWrite(V1, float(readscale()));
    displayweight(readscale());
  }

}

BLYNK_WRITE(V5)
{
  if (param.asInt()) {
    // adding 1 row to table
    String timestamp = currentTime + " " + currentDay + " " + currentMonth + " " + currentDate;
    Blynk.virtualWrite(V20, "add", rowIndex, timestamp, readscale());

    //highlighting latest added row in table
    Blynk.virtualWrite(V20, "pick", rowIndex++);
    Blynk.virtualWrite(indexpin, rowIndex);
  }
}

BLYNK_WRITE(V6) {
  if (param.asInt()) {
    scale.tare();                           // reset the scale to 0
  }
}

BLYNK_WRITE(V7) {
  if (param.asInt()) {
    calibrating = 1;
    startcalibration();
  }
}

BLYNK_WRITE(V8) {
  if (param.asInt()) {
    calibratescale();
    calibrating = 0;
  }
}

BLYNK_CONNECTED() {
  rtc.begin();                              // Synchronize time on connection
  //  bridge_master.setAuthToken(reader_token); // Token of reader
  Blynk.syncVirtual(adjpin, indexpin, knownweightpin);
}

BLYNK_WRITE(adjpin) {
  adjustment =  param.asFloat();
  scale.set_scale(adjustment);
}

BLYNK_WRITE(knownweightpin) {
  knownweight =  param.asInt();
}


BLYNK_WRITE(indexpin) {
  rowIndex =  param.asInt();
}
// utility function for digital clock display: prints leading 0
String twoDigits(int digits) {
  if (digits < 10) {
    String i = '0' + String(digits);
    return i;
  }
  else {
    return String(digits);
  }
}


void displayweight(float weight){
  display.clear();
  display.setTextAlignment(TEXT_ALIGN_CENTER);
  displayClock();                                                           // display the selected clock to the OLED
  display.setFont(ArialMT_Plain_24);
  display.drawString(displayCenterX, displayCenterY + 4,  String(weight,2));    // outpot the weight to the OLED
  display.display();
}

void timeanddate() {
  String timenow = String(hour()) + ":" + twoDigits(minute()) + ":" + twoDigits(second());
  display.setFont(ArialMT_Plain_10);
  display.drawString(displayCenterX, displayCenterY - 24, timenow + " " + currentDay + " " + currentMonth + " " + currentDate + " " + String( year())); // display time. day, month date and year
}

void timeandday() {
  getCurrentTime();
  display.setFont(ArialMT_Plain_10);
  display.drawString(displayCenterX, displayCenterY - 24, currentDay + " " + currentTime );     // display day and time
}


void timeonly() {
  getCurrentTime();
  display.setFont(ArialMT_Plain_24);
  display.drawString(displayCenterX, displayCenterY - 24, currentTime );                        // display only the time
}


void displayClock() {                                                                       // call the selected display for the clock
  switch (whatclock)
  {
    case 1: { // Item 1
        timeandday();
        break;
      }
    case 2: { // Item 2
        timeanddate();
        break;
      }
    case 3: { // Item 3
        timeonly();
        break;
      }
  }
}

/*
 * setup the OLED
 */
void setupdisplay() {
  display.init();
  display.setI2cAutoInit(true);
}

// get the time and the day
void getCurrentTime() {
  currentTime = String(hour()) + ":" + twoDigits(minute());
  currentMonth = monthstrings[month() - 1];
  currentDate = String(day());
  currentDay = daystrings[weekday() - 1];
}
//  Global data

#define SDA_PIN     2             // I2C SDA pin
#define SLC_PIN     14            // I2C SCL pin

int knownweight = 33;

// Define our data and clock pins for the scale
#define DOUT 4 // D2 maps to GPIO4
#define CLK 5  // D1 maps to GPIO5

#define BLYNKSIZE 34
#define MODULENAMESIZE 128

#define getweight       V0
#define docalibration   V1
#define weightpin       V2
#define terminaldisplay V10
#define adjpin V25
#define indexpin V26
#define knownweightpin V27

//define your default values here, if there are different values in config.json, they are overwritten.
// if you are using BLYNK you may not need the mqtt items
char mqtt_server[40] = "your mqtt server";    // <======= this is the default data
char mqtt_port[6] = "8080";                   // <========= this also
char blynk_token[BLYNKSIZE] = "YOUR_BLYNK_TOKEN";    //<======== and this
char modulename[MODULENAMESIZE] = "Thin K scale";   //<===== this is the name for the OTA updates using the arduino IDE


//flag for saving data
bool shouldSaveConfig = true;
float adjustment = 2280.0;
int   calibrating = 0;

// screen information
#define screenW  128
#define screenH  64
#define displayCenterX  screenW/2
#define displayCenterY  (screenH/2)

int rowIndex;
int whatclock = 1;

//days and months information
const char*  daystrings[7]  =  {"Sun", "Mon", "Tues", "Wed", "Thurs", "Fri", "Sat"};
const char*   monthstrings[12] = {"Jan", "Feb", "Mar", "Apr", "May", "Jun", "Jul", "Aug", "Sep", "Oct", "Nov", "Dec"};
int days[7];
int today;

String  currentTime;
String  currentDate;
String  currentMonth;
String  currentDay;
void setupscale() {
  // Initialize library with data output pin, clock input pin and gain factor.
  // Channel selection is made by passing the appropriate gain:
  // - With a gain factor of 64 or 128, channel A is selected
  // - With a gain factor of 32, channel B is selected
  // By omitting the gain factor parameter, the library
  // default "128" (Channel A) is used here.
  scale.begin(DOUT, CLK, 128);
  scale.set_scale(adjustment);                // this value is obtained by calibrating the scale with known weights;
  scale.tare();                           // reset the scale to 0
}

void startcalibration() {
  scale.set_scale();
  scale.tare();
}

void calibratescale() {
  // Place the known weight on  scale
  // Divide the result by known weight.
  adjustment = scale.get_units(20) / knownweight;
  scale.set_scale(adjustment);
  Blynk.virtualWrite(adjpin, adjustment);
}

float readscale() {
  if (scale.wait_ready_timeout(1000)) {
  float weightreading;
  weightreading = scale.get_units(15);
  return weightreading;
  } else return 9999;
}
 //callback notifying us of the need to save config
void saveConfigCallback () {
  shouldSaveConfig = true;
}

 void restoreparameters(){

  if (SPIFFS.begin()) {
    if (SPIFFS.exists("/config.json")) {
//file exists, reading and loading
      File configFile = SPIFFS.open("/config.json", "r");
      if (configFile) {
        size_t size = configFile.size();
// Allocate a buffer to store contents of the file.
        std::unique_ptr<char[]> buf(new char[size]);
        configFile.readBytes(buf.get(), size);
        DynamicJsonBuffer jsonBuffer;
        JsonObject& json = jsonBuffer.parseObject(buf.get());
//        json.printTo(Serial);
        if (json.success()) {
// json will parse the file for the variable name and load it into the supplied variable
          strcpy(mqtt_server, json["mqtt_server"]);     //get the mqtt_server <== you need one of these for each param
          strcpy(mqtt_port, json["mqtt_port"]);         //get the mqtt port
          strcpy(blynk_token, json["blynk_token"]);     //get the blynk token

        }
        configFile.close();
      }
    }
  }
  //end read
 }


void startmywifi(){
  //Local intialization. Once its done, there is no need to keep it around
  WiFiManager wifiManager;

  //set config save notify callback
  wifiManager.setSaveConfigCallback(saveConfigCallback);

  // The extra parameters to be configured (can be either global or just here)
  // After connecting, parameter.getValue() will get you the configured value
  // id/name placeholder/prompt default length
  WiFiManagerParameter custom_mqtt_server("server", "mqtt server", mqtt_server, 40);
  WiFiManagerParameter custom_mqtt_port("port", "mqtt port", mqtt_port, 6);
  WiFiManagerParameter custom_blynk_token("blynk", "blynk token", blynk_token, 32);

//set static ip if you want
//  wifiManager.setSTAStaticIPConfig(IPAddress(10,0,1,99), IPAddress(10,0,1,1), IPAddress(255,255,255,0));

//  <============== add all your parameters here
  wifiManager.addParameter(&custom_mqtt_server);
  wifiManager.addParameter(&custom_mqtt_port);
  wifiManager.addParameter(&custom_blynk_token);

  //reset settings - for testing
//    wifiManager.resetSettings();    // <========= once you have this working you can comment out this line

  //set minimu quality of signal so it ignores AP's under that quality
  //defaults to 8%
  //wifiManager.setMinimumSignalQuality();

  //sets timeout until configuration portal gets turned off
  //useful to make it all retry or go to sleep
  //in seconds
  //wifiManager.setTimeout(120);

  //fetches ssid and pass and tries to connect
  //if it does not connect it starts an access point with the specified name
  //and goes into a blocking loop awaiting configuration
  if (!wifiManager.autoConnect("AutoConnectAP", "password")) {
    ESP.reset();    //reset and try again
  }

  //if you get here you have connected to the WiFi

  //get the custom parameters here
  strcpy(mqtt_server, custom_mqtt_server.getValue());
  strcpy(mqtt_port, custom_mqtt_port.getValue());
  strcpy(blynk_token, custom_blynk_token.getValue());

  //check the flag to see if we save the custom parameters to FS
  if (shouldSaveConfig) {
    DynamicJsonBuffer jsonBuffer;
    JsonObject& json = jsonBuffer.createObject();

 //set the custom parameters here
    json["mqtt_server"] = mqtt_server;
    json["mqtt_port"] = mqtt_port;
    json["blynk_token"] = blynk_token;

    File configFile = SPIFFS.open("/config.json", "w");
    if (configFile) {
//      json.printTo(Serial);       // dump the data to the serial
      json.printTo(configFile);   //write the custom parameters here
      configFile.close();
    } else Serial.println("failed to open config file for writing");
    //end save
  }
}