[TUT] ESP8266 Wake ON LAN

Hi friends.

for those want to wake up PC with blynk and esp8266 ( WOL features )

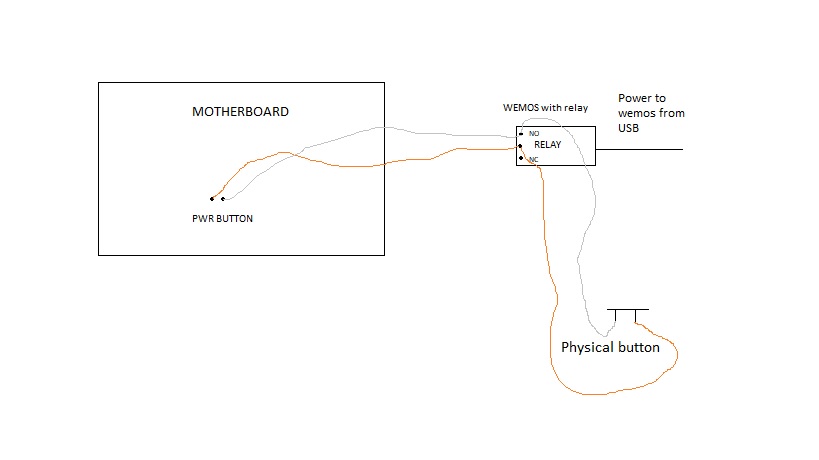
before start please enable WOL or wake on lan feature from your motherboard bios settings. it’s called “wake on lan” or “wake on pcie” :wink:

To begin, just replace the values to below sketch:

in line: byte macAddr[6] = {0xf4, 0x6d, 0x04, 0x96, 0xa4, 0xc1}; just replace your PC LAN mac address. for example my mac address is f4:6d:04:96:a4:c1 then the format should be in this form 0xf4, 0x6d, 0x04, 0x96, 0xa4, 0xc1

in line: IPAddress bcastAddr(your, pc, ip, address); just replace your PC LAN ip address like that: for example my ip is 10.5.51.2 then the format should be in this form 10, 5, 51, 2
Note: you can set your broadcast IP address for example 10, 5, 51, 255 but not working on all routers ( like mikrotik or juniper ) it can send the magic packet to all IP address network range with desired mac address.

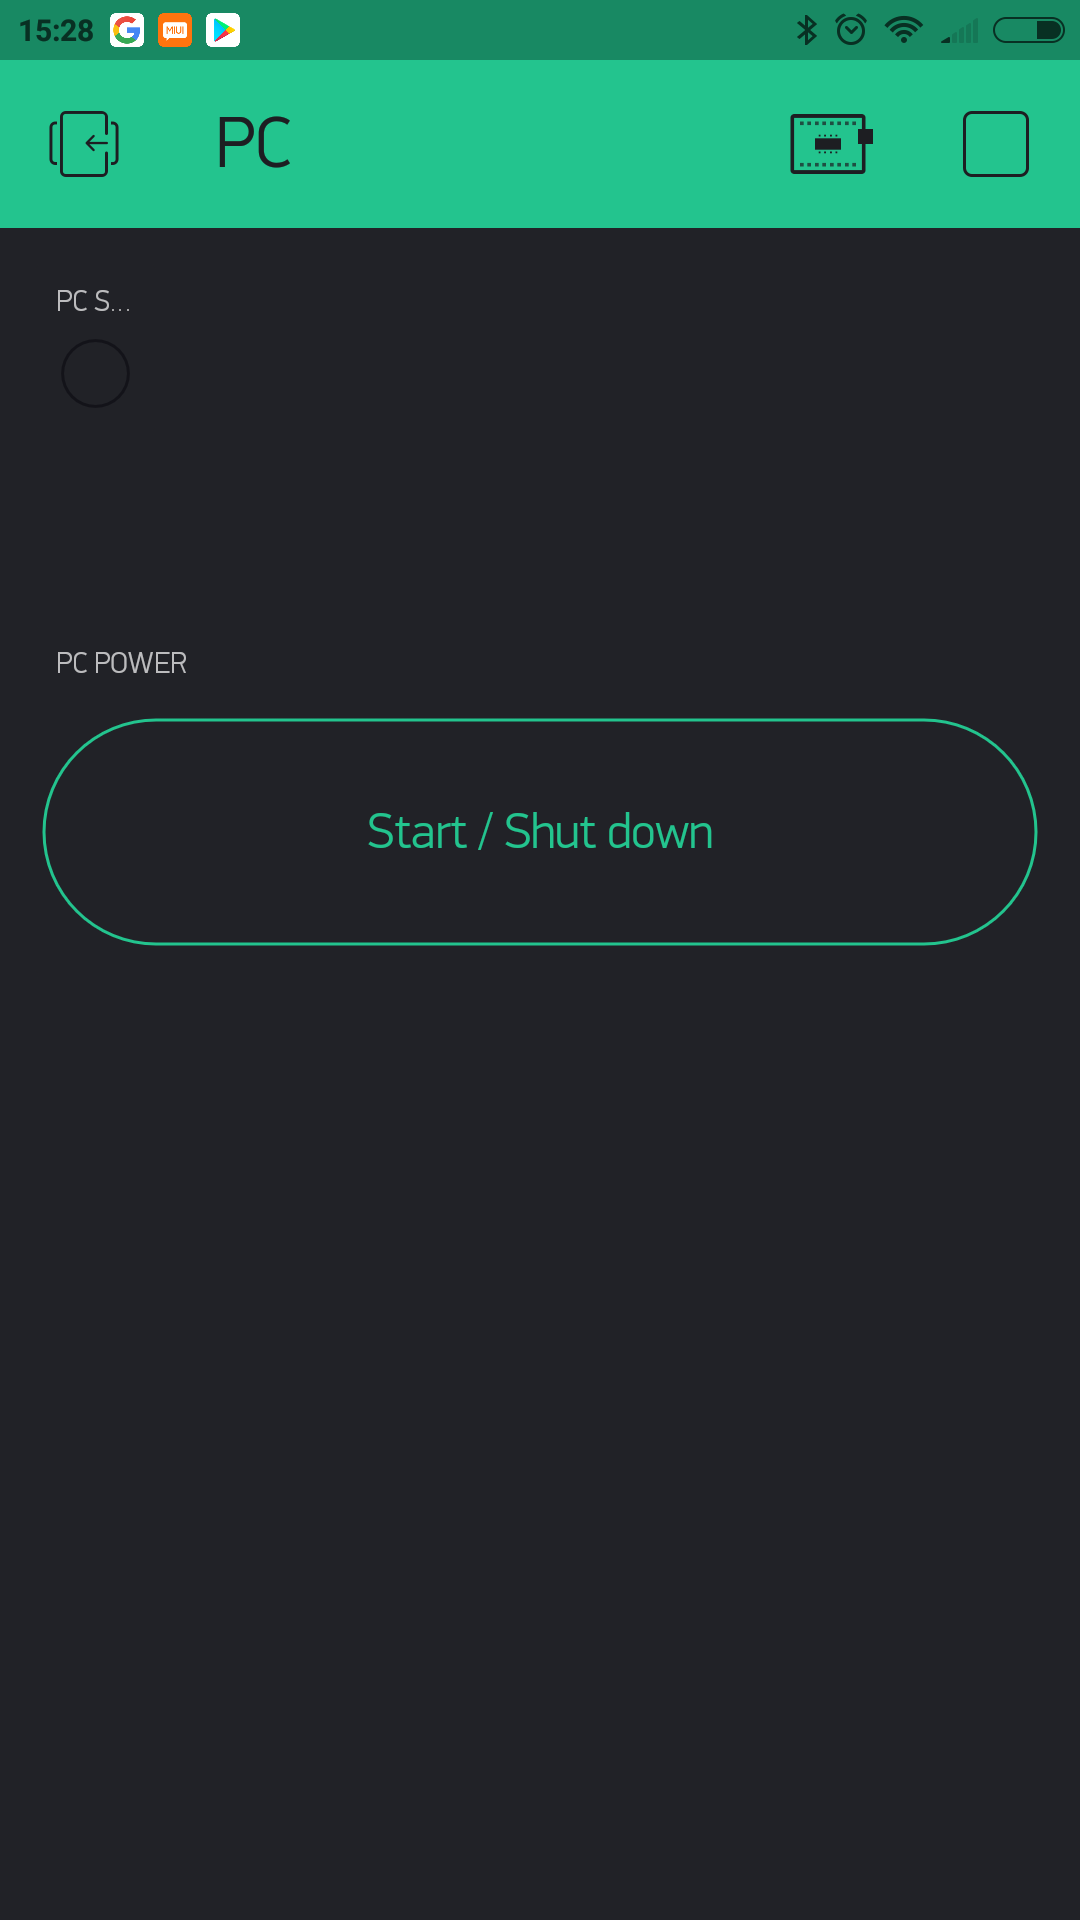
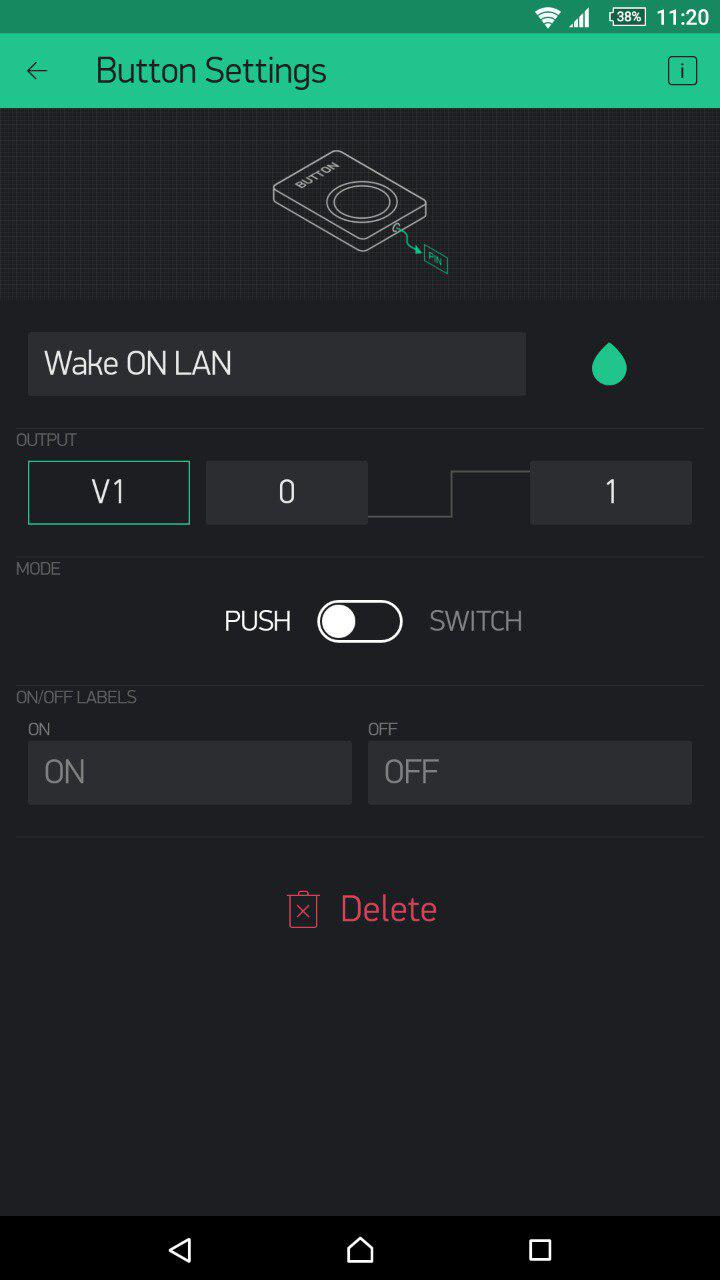
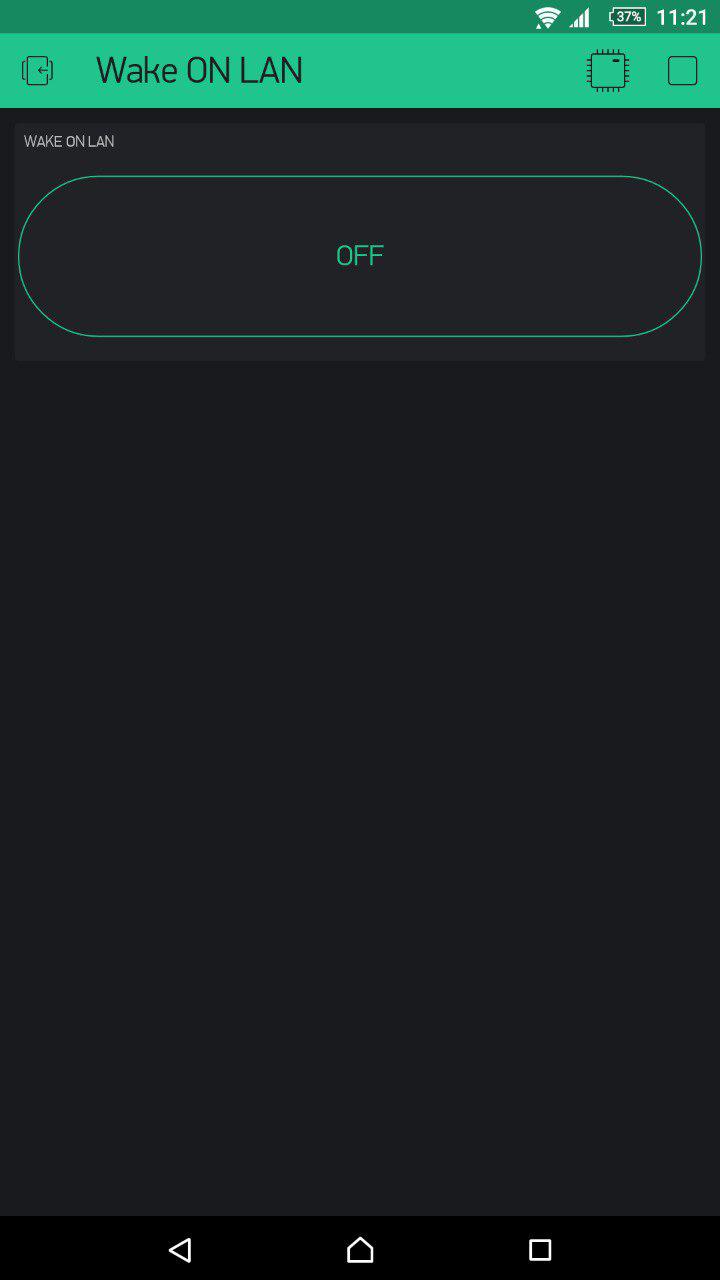
now on your blynk app add button with virtual pin V1

the sketch:

#define BLYNK_PRINT Serial

#include <ESP8266WiFi.h>
#include <BlynkSimpleEsp8266.h>
#include <WiFiUdp.h>
#include <SimpleTimer.h>

extern "C" {
#include "user_interface.h"
}

#define MAGIC_PACKET_LENGTH 102
#define PORT_WAKEONLAN 9

WiFiUDP udp;

// Wake On LAN PC MAC address
byte macAddr[6] = {0xf4, 0x6d, 0x04, 0x96, 0xa4, 0xc1};
// LAN Broadcast address
IPAddress bcastAddr(your, pc, ip, address);
byte magicPacket[MAGIC_PACKET_LENGTH];
unsigned int localPort = 9;

SimpleTimer timer;


// Virtual pin number to wake pc
#define APP_BUTTON_WAKEONLAN  V1

// Blynk App settings
char auth[] = "your auth token";
char ssid[] = "your ssid";
char pass[] = "your wifi pass";

void setup()
{
  Serial.begin(9600);  
  Blynk.begin(auth, ssid, pass);
  if (udp.begin(localPort) == 1) {
    BLYNK_LOG("udp begin OK");
    buildMagicPacket();
  }
  doConnect();
}

void loop()
{
  Blynk.run();
  timer.run();
}

// Blynk Connect to server
void doConnect()
{
  BLYNK_LOG("doConnect start");
  bool sts = false;
  Blynk.disconnect();
  sts = Blynk.connect(10000);
  BLYNK_LOG("Blynk.connect=%d", sts);
  if (!sts) {
    BLYNK_LOG("connect timeout. restarting..");
    doRestart();
  }
}

// Restart this device
void doRestart()
{
  system_restart(); // ESP8266 API
}

// Generate magic packet
void buildMagicPacket()
{
  memset(magicPacket, 0xFF, 6);
  for (int i = 0; i < 16; i++) {
    int ofs = i * sizeof(macAddr) + 6;
    memcpy(&magicPacket[ofs], macAddr, sizeof(macAddr));
  }
}

// BOOT PC button handler of application
BLYNK_WRITE(APP_BUTTON_WAKEONLAN)
{
  //BLYNK_LOG("AppButtonWakeOnLan: value=%d", param.asInt());
  udp.beginPacket(bcastAddr, PORT_WAKEONLAN);
  udp.write(magicPacket, MAGIC_PACKET_LENGTH);
  udp.endPacket();
}

good luck :wink:

4 Likes

To some of those reading this, please note some of the WOL is enabled from the properties of the networking controller Power management tab in the device manager. You dont need to use the BIOS.

2 Likes

Many people will be able to get WOL working when doing the simple test of shutting down their PC then sending a WOL magic packet to wake it up.

However, when they come to use their WOL system in real life they’ll probably find that it doesn’t work. The reason for this is that the router has flushed the ARP table and doesn’t know what IP address to send the magic packet to.
The ARP table is populated automatically by the router as it handles traffic on the network. It translates MAC addresses into IP addresses. Most domestic routers will delete entries from the ARP table when the device (PC in this case) hasn’t been seen on the network in the past 10 to 20 minutes.

Some routers allow you to set-up “Static Routes”, or to allocate specific ‘static’ IP addresses to particular devices on the network. This is often done from the configuration page that deals with DHCP options. If you’re lucky then adding a static route within your routers configuration will permanently store the MAC/IP address combination in the routers ARP table.

An alternative to using WOL magic packets is to set-up your PC’s BIOS to power-up the PC when the power is restored then use a Blynk controlled mains switch such as a Sonoff to remotely switch your PC on.

Pete.

3 Likes

WOL is a layer2 broadcast protocol. It has nothing to do with IP adresses. So ARP table is never even reached when sending a magic packet.

The Switch or router has to know the MAC address of the device in the Layer2 MAC table, not the Layer3 ARP table :slight_smile:

So this sketch is actually not correct. What you CAN do, instead of using the IP address of your PC, add the real broadcast address of your network. E.g. if your IP adress is 192.168.0.10 with subnetmask 255.255.255.0 your broadcast address is 192.168.0.255. If you send the Magic Packet to that address the router or switch knows that it has to send it so all network addresses, so it wouldn’t care about the actuall IP of your PC.

Disadvantage is of course that you would wake up all PC’s with WOL enabled.

4 Likes

yes that’s right. when you use broadcast address like 192.168.0.255 magic packet send to all network address and find the desired mac address. but not working on all router like mikrotik

I love it that so many PROs chime on that. Knowledge is power and your fame is bigger when you share it for free.

Long live Internet.

1 Like

That’s fine in theory, but in practice all the domestic routers that I’ve ever used will fail to route a WOL magic packet correctly once the target machine has been switched-off for a while. One Thomson made model even required the firmware to be edited to add an ARP entry for the machine that you wanted to be remembered by the router so that it could receive WOL packets.

If anyone is planning on implementing this or any other WOL solution they would be well advised to ensure that WOL still works after the machine they want to wake-up has been asleep for a while and if it doesn’t then see if creating a static route helps to overcome the problem - regardless of whether or not this approach should or shouldn’t work in theory. :grin:

Pete.

Not only in theory, but also in practice. There is nothing to be routed with a magic packet sent to the netwerk address. It will reach every device… and it still has nothing to do with ARP. ARP is on layer3, not layer2, where MAC addresses are.

A WOL packet is not send to an Layer3 IP but to a Layer2 MAC. It’s the OSI model and every router has to obey this and they do (well, 99,9% of the time anyway).

It never hurts to test like you say of course, but WOL works wether or not the IP is mapped to a MAC in the ARP table, that’s just the way the OSI model is because it gets sent on Layer2, not Layer3.

2 Likes

Hi,
I make somthing else. I use my wemos with relay and make wake on/off WiFi. I found on my motherboard button power connectors and hooked to my relay. Next power usb in the BIOS somthing like USB Latency to enable option. In next step power up wemos from USB I used internal usb connectors becouse I have PC housing with a lot plexi. In full metal body I expected low wifi signal. Then I`m upload simply esp8266 sketch and add button in my case is D1 gpio, setting as push. And voila like say Chinese people. Short 2 sec push wake PC and the long one turn off PC.

This thread is quite old (sorry) but I’d like to share my experience about WOL.
I think WOL is much easier than WOW.

WOL might has nothing to do with ARP table because you can broadcast the packet to every IP.
But when you want to wake up the pc across the internet when your target router just powered up ex. after outage.
Wake On WAN needs port 9 forwarded to the pc with static ip. You send the packet to the router that is just powered up and arp table is flushed then the packet won’t go to the pc you want to wake up.
You have to find the router that you can add static arp list or use DDWRT router that has WOL web interface.

Hi,
I’d like to achieve the exact same thing. Would you mind sharing your sketch with me?

Cheers

Hello,
responding to this quite old threads because it’s really working fine for me.
My question is if it’s possible to make it work for 2 PCs with a second virtual pin?
Maybe just copy the code and rename every variable?