Timer relay

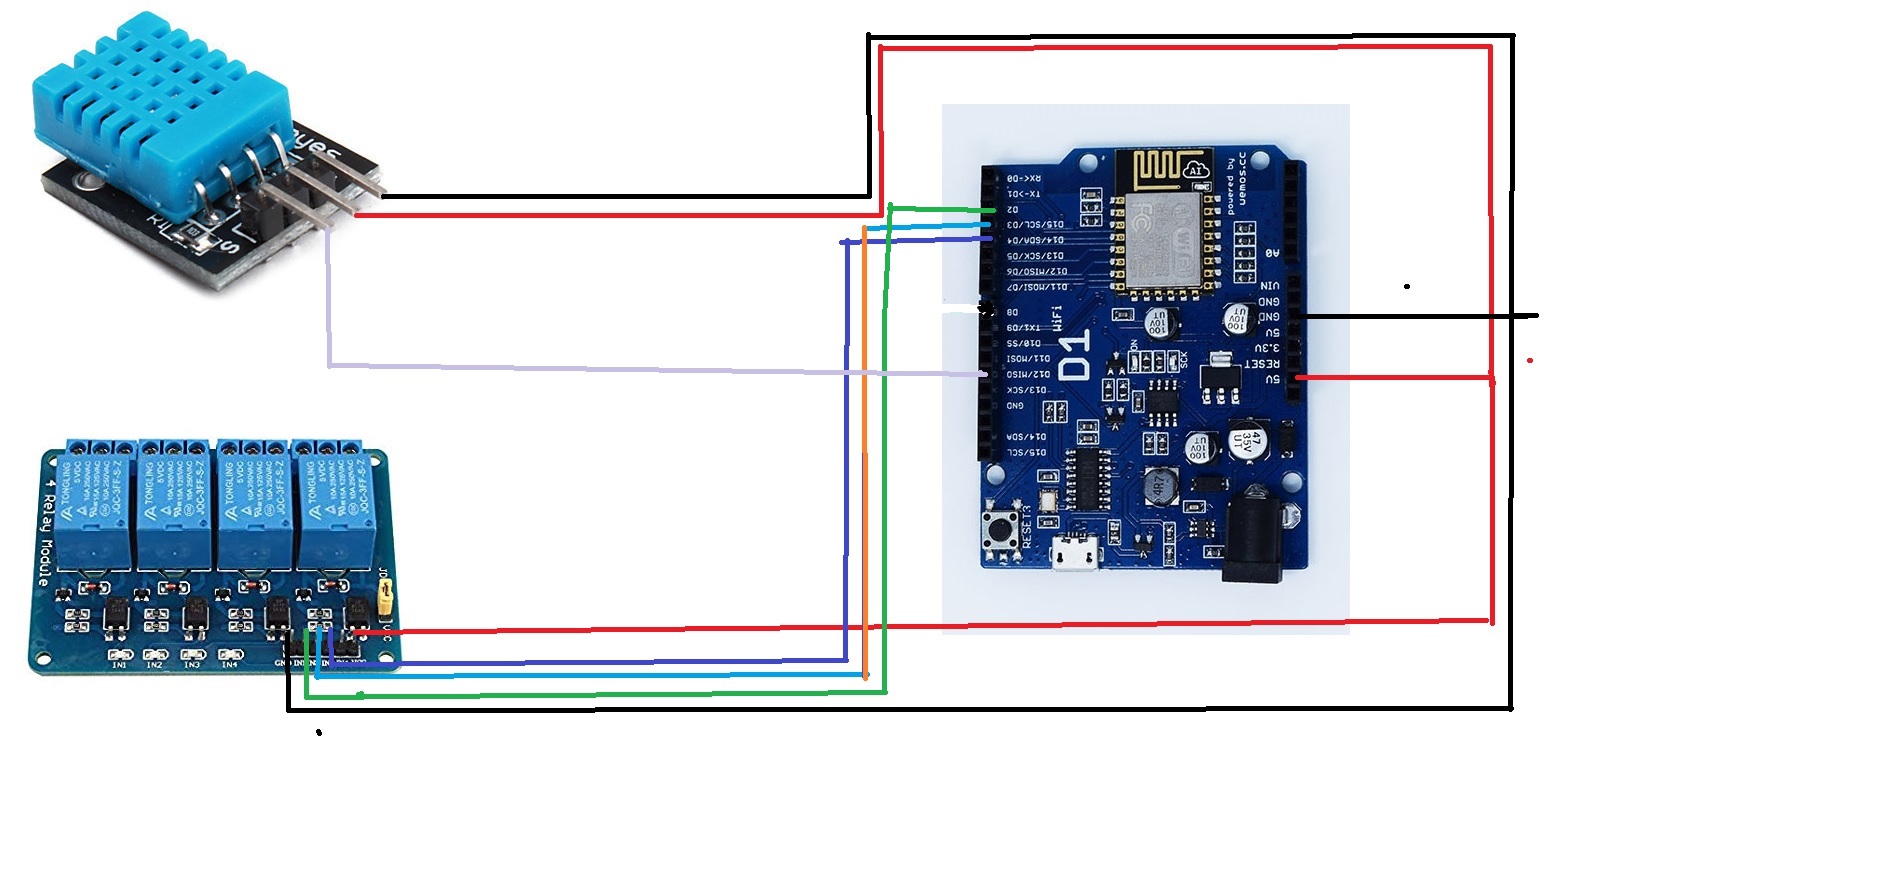
Hello friends, I have made a new project that I found on a programmer’s YouTube (Csongor Varga) I have it working very well.
But my question is how can I make the timer relay work in second now works in minutes and I have 2 minutes.
but I would need only 30 seconds.

#define BLYNK_PRINT Serial

#include <ESP8266WiFi.h>
#include <BlynkSimpleEsp8266.h>
#include <DHT.h>

// You should get Auth Token in the Blynk App.
// Go to the Project Settings (nut icon).
char auth[] = "xxxxxxxxxxxxxxxxxxxxxxxxxxxxxxxxxxxxx";

// Your WiFi credentials.
// Set password to "" for open networks.
char ssid[] = "xxxxxxxx";
char pass[] = "xxxxxxxxxxxx";
int chargeState = LOW;
int chargeTime = 2; // charge times in minutes
int chargeCounter = 0; // counting down the charge time in seconds

#define DHTPIN 12          // Pin the DHT sensor is connected to
//#define DHTTYPE DHT11     // DHT 11
#define DHTTYPE DHT21    // DHT 21, AM2301
#define CHARGEPIN 5       // Pin for the charger door relay
#define GARAGEPIN 4     // Pin for the garage door relay
#define GATEPIN 16        // Pin for the gate relay
DHT dht(DHTPIN, DHTTYPE);
BlynkTimer sensor;         // Timer object for the DHT sensor
BlynkTimer charger;        // Timer object for the charger

// This function reads the DHT 11 sensor and saved the temparature and humdity reading to V5 and V6
void sendSensor()
{
  float h = dht.readHumidity();
  float t = dht.readTemperature(); // or dht.readTemperature(true) for Fahrenheit

  if (isnan(h) || isnan(t)) {
    Serial.println("Failed to read from DHT sensor!");
    return;
  }
  // Please don't send more that 10 values per second.
  Blynk.virtualWrite(V5, h);
  Blynk.virtualWrite(V6, t);
}

// This function initiates, completed the charger relay, and counts down the charge time
void countCharger()
{
  if (chargeState) {
    // charger is running  
    chargeCounter--;
    Blynk.virtualWrite(V2, chargeCounter/60+1); // Update the counter to V2 to display the remaining time in the app (divide by 60 to show minutes)
    if (chargeCounter == 0) {
      // Counter has reached zero, the charge time is up
      Serial.println("Charging completed...");
      chargeState = LOW;                // Set the internal flag low
      digitalWrite(CHARGEPIN, HIGH);    // Turn off the relay  
      Blynk.virtualWrite(V1, LOW);      // Turn off the button state in the app
      Blynk.virtualWrite(V2, "-");      // Update the counter in the app to "-"
    }
  }
}

// This function gets called when the charger button is turned on/off in the app
BLYNK_WRITE(V1)
{
  int pinValue = param.asInt(); // assigning incoming value from pin V1 to a variable

  if (pinValue) {
    // Charger was turned on in the app
    Serial.println("Charger starting...");
    chargeState = HIGH;
    digitalWrite(CHARGEPIN, LOW);               // Turn on the relay
    chargeCounter = chargeTime * 60;            // Set the internal counter value in second
    Blynk.virtualWrite(V2, chargeCounter/60);   // Update the remaining time in the app (divide by 60 to show minutes)
  } else {
    // Charger was turned off in the app
    Serial.println("Charging stopped...");
    chargeState = LOW;
    digitalWrite(CHARGEPIN, HIGH);              // Turn on the relay
    Blynk.virtualWrite(V2, "-");                // Update the counter in the app to "-"
  }
}

void setup()
{
  // Debug console
  Serial.begin(9600);
  Serial.println("Booting up...");
  Serial.println("Setting initial pin states");
  // In the next few lines the initial states of the relay outputs are set
  pinMode(GARAGEPIN, OUTPUT);
  pinMode(GATEPIN, OUTPUT);
  pinMode(CHARGEPIN, OUTPUT);
  digitalWrite(GARAGEPIN, HIGH);
  digitalWrite(GATEPIN, HIGH);
  digitalWrite(CHARGEPIN, HIGH);

  Blynk.begin(auth, ssid, pass);
  // You can also specify server:
  //Blynk.begin(auth, ssid, pass, "blynk-cloud.com", 8441);
  //Blynk.begin(auth, ssid, pass, IPAddress(192,168,1,100), 8442);

  dht.begin();

  // Setup up the callback functions. DHT read every 2 seconds, charger countdown ever second.
  sensor.setInterval(2000L, sendSensor);
  charger.setInterval(1000L, countCharger);
}

void loop()
{
  Blynk.run();
  // You can inject your own code or combine it with other sketches.
  // Check other examples on how to communicate with Blynk. Remember
  // to avoid delay() function!

  // Kick off the timers
  sensor.run();
  charger.run();
}```

another question how to eliminate decimals of the temperature and humidity in the app I have them canceled but they continue appearing to me.

I put it complete in case any person is interested.

  1. how can I make the timer relay work in second

You have to read the code and understand what it’s trying to do and learn something new every day. That’s the way you’ll can become an expert in the future.

Anyway, the current code is not efficient as it uses unnecessarily 2 instances of BlynkTimer. The code uses divide by 60 to show minutes, so you just remove anything relating to that calculation to achieve your purpose.

  1. To eliminate the decimals, you can convert the variable to int or use String(var, decimal_point) in Blynk.virtualWrite() functions

For example:

...
BlynkTimer timer;         // Timer object for the DHT sensor

// This function reads the DHT 11 sensor and saved the temparature and humdity reading to V5 and V6
void sendSensor()
{
  ...
  // Please don't send more that 10 values per second.
  // 1 decimal
  Blynk.virtualWrite(V5, String(h, 1));
  Blynk.virtualWrite(V6, String(t, 1));
  // 0 decimal
  //Blynk.virtualWrite(V5, (int) h);
  //Blynk.virtualWrite(V6, (int) t);
}

// This function initiates, completed the charger relay, and counts down the charge time
void countCharger()
{
    ...
    Blynk.virtualWrite(V2, chargeCounter); // Update the counter to V2 to display the remaining time in the app  in seconds
    ...
}

// This function gets called when the charger button is turned on/off in the app
BLYNK_WRITE(V1)
{
  int pinValue = param.asInt();             // assigning incoming value from pin V1 to a variable in seconds

    ...
    chargeCounter = chargeTime;                // Set the internal counter value in second
    Blynk.virtualWrite(V2, chargeCounter);   // Update the remaining time in the app in seconds
   ...
}

void setup()
{
  ...
  // Setup up the callback functions. DHT read every 5 seconds, charger countdown ever second.
  timer.setInterval(5050L, sendSensor);
  timer.setInterval(1000L, countCharger);
}

void loop()
{
  Blynk.run();
  // Kick off the timers
  timer.run();
}

1 Like

thank you teacher now perfect, I try to learn but only at home is difficult, thank you very much

Now I try to study how to put an external button on the CHARGEPIN 5 relay
Can you help me?

What have your studies revealed so far?
Or does “can you help me” mean “can you do this for me”?

Pete.

1 Like

I feel you think that,
sorry for asking for help

I take it from your response that you don’t know where to start with this.

My approach would be…,

  1. change your app to use virtual pins rather than the digital pins you are using at the moment. This will require you to add BLYNK_WRITE(Vpin) callback functions that contain digitalWrite statements to control the GPIO pins of your relay, and also to add pinMode statements to your void setup for these GPIO pins.

  2. decide which GPIO pin you are going to use for your physical push button, and whether you are going to wire the other side to VCC or to GND. You’ll also need to add a pinMode declaration for this GPIO pin.

  3. decide if you are going to attach an interrupt to the physical button GPIO, or whether you are going to poll the button on a frequent basis - using a timer - to detect when it is pushed.

  4. when the button is used to change the state of the relay, you’ll also need to add a Blynk.virtualWrite command to update the button in the app to reflect the changed state of the relay. This will probably require a variable to track the relay state.

Does this list compare well to the list you’ve compiled as part of your research?

The Blynk sketch builder has some good examples of how to perform may of these actions, it’s a case of looking at them to understand how they work and tweaking the code to work the way you want it to.

Pete.

Thanks for the explanation and your time.
Post my results when I have it.