Thermal probes DS18B20

Hi I tested this code, and for my design is perfect but i would like to replace the DHT11 sensor with 2 or 3 DS18B20 stuff, how can i do ??? Thank you

     **************************************************************
     * This example shows how value can be pushed from Arduino to
     * the Blynk App.
     *
     * WARNING :
     * For this example you'll need SimpleTimer library:
     *   https://github.com/jfturcot/SimpleTimer
     * and Adafruit DHT sensor library:
     *   https://github.com/adafruit/DHT-sensor-library
     *
     * App project setup:
     *   Value Display widget attached to V5
     *   Value Display widget attached to V6
     *
     **************************************************************/

    #define BLYNK_PRINT Serial    // Comment this out to disable prints and save space
    #include <SPI.h>
    #include <ESP8266WiFi.h>
    #include <BlynkSimpleEsp8266.h>
    #include <SimpleTimer.h>
    #include <DHT.h>

    // You should get Auth Token in the Blynk App.
    // Go to the Project Settings (nut icon).
    char auth[] = "xxxxxxxxxxxxxxxxxxxxxx";

    // Your WiFi credentials.
    // Set password to "" for open networks.
    char ssid[] = "xxxx";
    char pass[] = "xxxxxxxx";

    #define DHTPIN 2          // D4 PIN NodeMCU What digital pin we're connected to

    // Uncomment whatever type you're using!
    #define DHTTYPE DHT11     // DHT 11
    //#define DHTTYPE DHT22   // DHT 22, AM2302, AM2321
    //#define DHTTYPE DHT21   // DHT 21, AM2301

    DHT dht(DHTPIN, DHTTYPE);
    SimpleTimer timer;

    // This function sends Arduino's up time every second to Virtual Pin (5).
    // In the app, Widget's reading frequency should be set to PUSH. This means
    // that you define how often to send data to Blynk App.
    void sendSensor()
    {
      float h = dht.readHumidity();
      float t = dht.readTemperature(); // or dht.readTemperature(true) for Fahrenheit

      if (isnan(h) || isnan(t)) {
        Serial.println("Failed to read from DHT sensor!");
        return;
      }
      // You can send any value at any time.
      // Please don't send more that 10 values per second.
      Blynk.virtualWrite(V5, h);
      Blynk.virtualWrite(V6, t);
    }

    void setup()
    {
      Serial.begin(9600); // See the connection status in Serial Monitor
      Blynk.begin(auth, ssid, pass);

      dht.begin();

      // Setup a function to be called every second
      timer.setInterval(1000L, sendSensor);
    }

    void loop()
    {
      Blynk.run(); // Initiates Blynk
      timer.run(); // Initiates SimpleTimer
    }

You are in luck. I was messing around with a DS18B20 just yesterday. This is for two probes, you can add more as needed. Although, I am not sure on the total amount allowed. Make sure you have the proper libraries installed as well.

You will need to add this,

#include <OneWire.h>
#include <DallasTemperature.h>

#define ONE_WIRE_BUS 14 //pin connected to DS18B20 Sensor(s)


OneWire oneWire(ONE_WIRE_BUS);
DallasTemperature sensors(&oneWire);

along with this in your setup()

 sensors.begin();

and this in a timer loop

  // request to all devices on the bus
  Serial.print("Requesting temperatures...");
  sensors.requestTemperatures(); // Send the command to get temperatures
  Serial.println("DONE");
  // After we got the temperatures, we can print them here.
  // We use the function ByIndex, and as an example get the temperature from the first sensor only.
  float temp1 = sensors.getTempCByIndex(0);
  float temp2 = sensors.getTempCByIndex(1);
  float temp1F = DallasTemperature::toFahrenheit(temp1);  //convert to F
  float temp2F = DallasTemperature::toFahrenheit(temp2); //convert to F
  Serial.print("Temperature for the device 1 (index 0) is: ");
  Serial.println(temp1F);
  Serial.print("Temperature for the device 1 (index 1) is: ");
  Serial.println(temp2F);
  Blynk.virtualWrite(V21, temp1F); //write to virtual pin for app
  Blynk.virtualWrite(V22, temp2F); //write to virtual pin for app

Hope this helps. Don’t forget to remove all the DHT11 stuff.

1 Like

I’ll pile on! :slight_smile:

Thank you. As soon as the probes come to me. I’ll try it right away.

Greetings from Italy

dont work

which code, post your code so we can see? How is it wired? Does it not compile? What is happening?

Don’t work is a very vague statement, and doesn’t give us much to go on in terms of helping you.

It works just fine for me.

I found this sketch that works perfectly with thingspeak how can i put blynk in code too?

PS. The probes are definitely 2 to insert

//nodeMCU v1.0 (black) with Arduino IDE
//stream temperature data DS18B20 with 1wire on ESP8266 ESP12-E (nodeMCU v1.0)
//shin-ajaran.blogspot.com
//nodemcu pinout https://github.com/esp8266/Arduino/issues/584
#include <ESP8266WiFi.h>
#include <OneWire.h>
#include <DallasTemperature.h>

//Def
#define myPeriodic 15 //in sec | Thingspeak pub is 15sec
#define ONE_WIRE_BUS 2  // DS18B20 on arduino pin2 corresponds to D4 on physical board
//#define mySSR 0  // Solid State Relay on pin 0

OneWire oneWire(ONE_WIRE_BUS);
DallasTemperature DS18B20(&oneWire);
float prevTemp = 0;
const char* server = "api.thingspeak.com";
String apiKey ="xxxxxxxxxxxxxxxxxxxxx"; // your apiKey 
const char* MY_SSID = "xxxxxxxxxxx"; // your ssid 
const char* MY_PWD = "xxxxxxxxxxx"; // your password ssi
int sent = 0;
void setup() {
  Serial.begin(115200);
  connectWifi();
}

void loop() {
  float temp;
  //char buffer[10];
  DS18B20.requestTemperatures(); 
  temp = DS18B20.getTempCByIndex(0);
  //String tempC = dtostrf(temp, 4, 1, buffer);//handled in sendTemp()
  Serial.print(String(sent)+" Temperatura: ");
  Serial.println(temp);
  
  //if (temp != prevTemp)
  //{
  //sendTeperatureTS(temp);
  //prevTemp = temp;
  //}
  
  sendTeperatureTS(temp);
  int count = myPeriodic;
  while(count--)
  delay(1000);
}

void connectWifi()
{
  Serial.print("Connecting to "+*MY_SSID);
  WiFi.begin(MY_SSID, MY_PWD);
  while (WiFi.status() != WL_CONNECTED) {
  delay(1000);
  Serial.print(".");
  }
  
  Serial.println("");
  Serial.println("Connesso");
  Serial.println("");  
}//end connect

void sendTeperatureTS(float temp)
{  
   WiFiClient client;
  
   if (client.connect(server, 80)) { // use ip 184.106.153.149 or api.thingspeak.com
   Serial.println("WiFi Client connected ");
   
   String postStr = apiKey;
   postStr += "&field1=";
   postStr += String(temp);
   postStr += "\r\n\r\n";
   
   client.print("POST /update HTTP/1.1\n");
   client.print("Host: api.thingspeak.com\n");
   client.print("Connection: close\n");
   client.print("X-THINGSPEAKAPIKEY: " + apiKey + "\n");
   client.print("Content-Type: application/x-www-form-urlencoded\n");
   client.print("Content-Length: ");
   client.print(postStr.length());
   client.print("\n\n");
   client.print(postStr);
   delay(1000);
   
   }//end if
   sent++;
 client.stop();
}//end send

You can make it work with BLYNK by reading the DOCS and seeing what the difference is between a typical sketch and one that is formatted for BLYNK. You can also work through some of the examples to get a better understanding.

If you are looking for someone to turn that code into one that will work with BLYNK, you are going to need to find someone else. Cause it aint gonna be me.

I provided you with the “meat” of code that I know for sure works (because I am using it to get temps as we speak), all you need to do if put it in a properly formatted sketch.

@structure7, has provided what looks to be a complete code that should work as well.

We are here to help, not do it for you. Sorry

2 Likes

Thank you for the answer, I’m not very experienced. I’m trying to find the solution alone but I can not help it so I asked for help, I do not want the job already ready

Have you gotten the probes to work? with BLYNK? I would start with that first. Then work on getting the values to thingspeak.

I tried writing this second you working?

#include <ESP8266WiFi.h>
#include <OneWire.h>
#include <DallasTemperature.h>


#define BLYNK_PRINT Serial
#include <SPI.h>
#include <ESP8266WiFi.h>
#include <BlynkSimpleEsp8266.h>
#include <SimpleTimer.h>

// You should get Auth Token in the Blynk App.
// Go to the Project Settings (nut icon).
char auth[] = "xxxxxxxxxxxxxxxxxxxxxxxxxxxxxx"; //blynk Token


//Def
#define myPeriodic 15 //in sec | Thingspeak pub is 15sec
#define ONE_WIRE_BUS 2  // DS18B20 on arduino pin2 corresponds to D4 on physical board
//#define mySSR 0  // Solid State Relay on pin 0

OneWire oneWire(ONE_WIRE_BUS);
DallasTemperature DS18B20(&oneWire);

SimpleTimer timer;

float prevTemp = 0;
const char* server = "api.thingspeak.com";
String apiKey ="xxxxxxxxxxxxx"; // your apiKey 
const char* MY_SSID = "xxxxxxxxxxx"; // your ssid 
const char* MY_PWD = "xxxxxxxxxxx"; // your password ssi
int sent = 0;

void sendSensor()
{
  float temp;
  // You can send any value at any time.
  // Please don't send more that 10 values per second.
  Blynk.virtualWrite(V5, temp);
  
}


void setup() {
  Serial.begin(115200);
  connectWifi();
  Blynk.begin(auth, MY_SSID, MY_PWD);

  DS18B20.begin();
}

void loop() {

  Blynk.run(); // Initiates Blynk
  timer.run(); // Initiates SimpleTimer
  
  float temp;
  //char buffer[10];
  DS18B20.requestTemperatures(); 
  temp = DS18B20.getTempCByIndex(0);
  //String tempC = dtostrf(temp, 4, 1, buffer);//handled in sendTemp()
  Serial.print(String(sent)+" Temperatura: ");
  Serial.println(temp);
  
  //if (temp != prevTemp)
  //{
  //sendTeperatureTS(temp);
  //prevTemp = temp;
  //}
  
  sendTeperatureTS(temp);
  int count = myPeriodic;
  while(count--)
  delay(1000);
}

void connectWifi()
{
  Serial.print("Connecting to "+*MY_SSID);
  WiFi.begin(MY_SSID, MY_PWD);
  while (WiFi.status() != WL_CONNECTED) {
  delay(1000);
  Serial.print(".");
  }
  
  Serial.println("");
  Serial.println("Connesso");
  Serial.println("");  
}//end connect

void sendTeperatureTS(float temp)
{  
   WiFiClient client;
  
   if (client.connect(server, 80)) { // use ip 184.106.153.149 or api.thingspeak.com
   Serial.println("WiFi Client connected ");
   
   String postStr = apiKey;
   postStr += "&field1=";
   postStr += String(temp);
   postStr += "\r\n\r\n";
   
   client.print("POST /update HTTP/1.1\n");
   client.print("Host: api.thingspeak.com\n");
   client.print("Connection: close\n");
   client.print("X-THINGSPEAKAPIKEY: " + apiKey + "\n");
   client.print("Content-Type: application/x-www-form-urlencoded\n");
   client.print("Content-Length: ");
   client.print(postStr.length());
   client.print("\n\n");
   client.print(postStr);
   delay(1000);
   
   }//end if
   sent++;
 client.stop();
}//end send

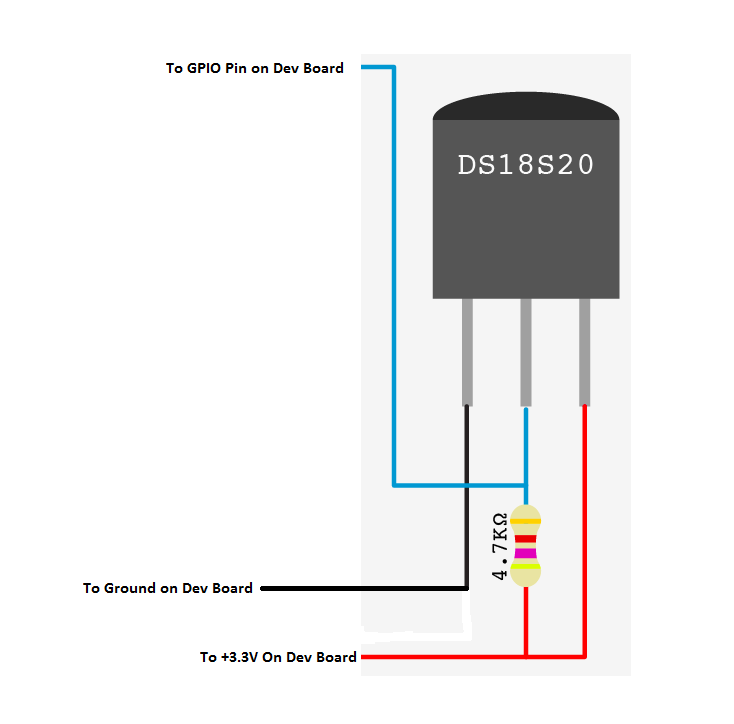
This should work to get you your temperatures. Wire the DS18B20 with red to +3.3V black to GND and Yellow to GPIO14 (D5 on NodeMcu). You will need to add your AUTH token and WIFi stuff. In the Blynk App, use a value display attached to Virtual pin 10.

I do not have any experience with thingspeak, but I would assume it would be handled in a similar fashion as the temp sensor. Basically put it in a timed loop that: connects to thingspeak, then passes the required values, then disconnect from thingspeak.

#include <OneWire.h>
#include <DallasTemperature.h>


#define BLYNK_PRINT Serial
#include <SPI.h>
#include <ESP8266WiFi.h>
#include <BlynkSimpleEsp8266.h>
#include <SimpleTimer.h>


#define ONE_WIRE_BUS 14 //pin connected to DS18B20 Sensor(s) D5 on NodeMCU

OneWire oneWire(ONE_WIRE_BUS);
DallasTemperature sensors(&oneWire);

SimpleTimer timer;

char auth[] = "AUTH"; 
char ssid[] = "WIFI";
char pass[] = "Password";

 
void sendSensor(){
 
  Serial.print("Requesting temperatures...");
  sensors.requestTemperatures(); // Send the command to get temperatures
  Serial.println("DONE");
  
  float temp1 = sensors.getTempCByIndex(0);
  float temp1F = DallasTemperature::toFahrenheit(temp1);  //convert to F
  Serial.print("Temperature for the device 1 (index 0) is: ");
  Serial.println(temp1F);
  Blynk.virtualWrite(V10, temp1F); //BLYNK Value Display set to Virtual Pin 10
 
}


void setup()
{

  Serial.begin(115200);
  
  sensors.begin();
  
  Blynk.begin(auth, ssid, pass);

  timer.setInterval(5000L, sendSensor); // Temp Sensor Function every 5 seconds
   
}

void loop()
{
  Blynk.run();
  timer.run();
}

temp in Celsius Is that all right?

#include <ESP8266WiFi.h>
#include <OneWire.h>
#include <DallasTemperature.h>


#define BLYNK_PRINT Serial
#include <SPI.h>
#include <ESP8266WiFi.h>
#include <BlynkSimpleEsp8266.h>
#include <SimpleTimer.h>


#define ONE_WIRE_BUS 14 //pin connected to DS18B20 Sensor(s) D5 on NodeMCU

OneWire oneWire(ONE_WIRE_BUS);
DallasTemperature sensors(&oneWire);

SimpleTimer timer;

char auth[] = "AUTH"; 
char ssid[] = "WIFI";
char pass[] = "Password";

 
void sendSensor(){
 
  Serial.print("Requesting temperatures...");
  
  Serial.println("DONE");
  
  float temp1 = sensors.getTempCByIndex(0);
  Serial.print("Temperature for the device 1 (index 0) is: ");
  Serial.println(temp1);
  Blynk.virtualWrite(V10, temp1); //BLYNK Value Display set to Virtual Pin 10
 
}


void setup()
{

  Serial.begin(115200);
  
  sensors.begin();
  
  Blynk.begin(auth, ssid, pass);

  timer.setInterval(5000L, sendSensor); // Temp Sensor Function every 5 seconds
   
}

void loop()
{
  Blynk.run();
  timer.run();
}

You got it. That’s it.

It does not work, the temperature remains fixed at 20.56

Sorry, I forgot to mention that there needs to be a 4.7K resistor from the pin the sensor is connected to, to +3.3V.

does not work. With the sketch think it also works without resistance

Try changing your code/wiring to use GPIO4 (D2).

From what I have read the 4.7K resistor is needed, and should go from +3.3V to the same pin as the signal wire is hooked up to (GPIO4, D2).

If this does not work (code provided, plus wiring as stated), then maybe you have a bad probe.

I am running this set-up as we speak to get two temperatures from two sensors (inside and outside of my garage), They are wired as I have stated, and use the same code as I have provided (I am using GPIO13, D7).

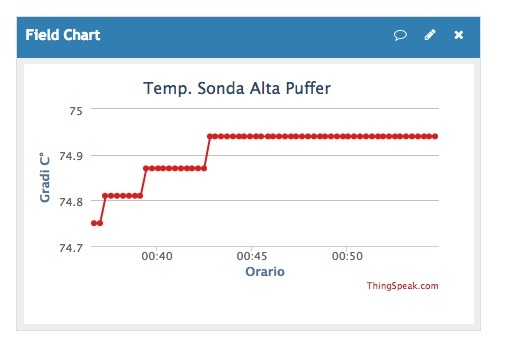
I’m already using the GPIO4 (D2) pin. I do not have a 4.7k resistance I put a 10k. The probe works well. With thingspeak works well. It is now mounted on the Puffer.

Well now I am confused.

First you say Does Not Work, now you say it does? Works with what sketch? the one provided, or a different one?

Is it when you try yo run it with BLYNK that you have the problem?