And a wise geek ;)… no hands on phone allowed when driving here.
Pretty sure thats the rule everywhere ![]()
We all know you were using the telepathy widget, reserved for the coolest geeks 
1 Like
From what I’ve read, it seems that simpletimer execute a function once every X seconds. I don’t really see how this can be applied to my application. But, maybe I’m just not understanding it well enough.
I think I used the wrong link last time… use this one.
Yes, and lots of other uses that I am still trying to master  try the proper link… more info than the other one I used
Thanks meng.
@jeebsinc I have been following your thread, as I follow all threads.
This is just one of many features of SimpleTimer.
As illustrated by @Jamin’s code you can stop and start timers, change the duration of the timer in fact all manner of things.
Are you iOS or Android?
I’m using IOS.
I just tried this but it did not work:
// Button variables
int mashButton = 0; // value read from button
long btnDnTime; // time the button was pressed down
#define holdTime 2000

BLYNK_WRITE(V9) {
  mashButton = param.asInt();
  if (mashButton == 1) {
    btnDnTime = millis();
  }
  if (mashButton == 1 && (millis() - btnDnTime) > long(holdTime)) {
    Alarm();
  }
}@jeebsinc the code from @Jamin seems to be fine.
Include these items and report back.
#include <SimpleTimer.h>
SimpleTimer timer;
int newTimer = 1;

BLYNK_WRITE(V9){
  if(param.asInt()){
    // button pressed
    newTimer = timer.setTimeout(2000,AlarmOn);
  }
  else {
    timer.disable(newTimer);
  }
}

void AlarmOn() {
  //tone(alarm, 2000);
  Serial.println("Tone ON");
}

void loop()
{
  Blynk.run();
  timer.run();
}
Awesome, @Costas it worked. Quick question: in the global vars, you have int newTimer = 1; Why? Is this just assigning a number to the timer? If I wanted to add another, would I type int newTimer = 2? Although, that wouldn’t make sense because the program wouldn’t be able to differentiate between the timers if they were all newTimer.
You need to understand what is happening, I’ll try to explain:
SimpleTimer timer;
This creates a new object of the class SimpleTimer. You can see an object as a sort of master template which you can use in your code to create instances (basically a working copy of a template).
If you want a second timer instance you need to give it a new name.
Usually setting up multiple timers looks like this:
int timerOne = timer.setTimeout(1000, runThisFunction);
int timerTwo = timer.setInterval(2000, runThatFunction);
Costas already assigned an “ID” to the timer, in my example SimpleTimer will generate those ID’s for you. What this does is creates an instance of the timer object with the name “timerOne” which has the functions of setting a timeout at 1 second and running runThisFunction when it times out. The second one, well, you can imagine
This is called object oriented programming. It’s not really easy to understand, but once you get you will go “OOOOO, now THAT is a neat trick!” 
@Lichtsignaal thanks, it’s become much more clear. Thanks for that explanation - that is a neat trick. Thanks for all the help @Jamin @Gunner and @Costas!
@jeebsinc some features of SimpleTimer like timeouts and deleting them require them to have a number allocated against them.
Each declaration of SimpleTimer allows up to 10 timers but if you needed 20 it would simply be:
SimpleTimer timer;     // first 10 timers and timer.run(); in loop()
SimpleTimer timer1;   // second 10 timers and timer1.run(); in loop()
This allows the “Simple” part of SimpleTimer to call up to 20 functions at your chosen times intervals for each of the timers. The power functions of SimpleTimer use an allocated number for each timer.
If you wanted a second timer with a timeout, within the first group of 10 timers it would take the following syntax:
int 2ndTimer = 2; // any name will do as long as you use this for the timeout / deletion etc.
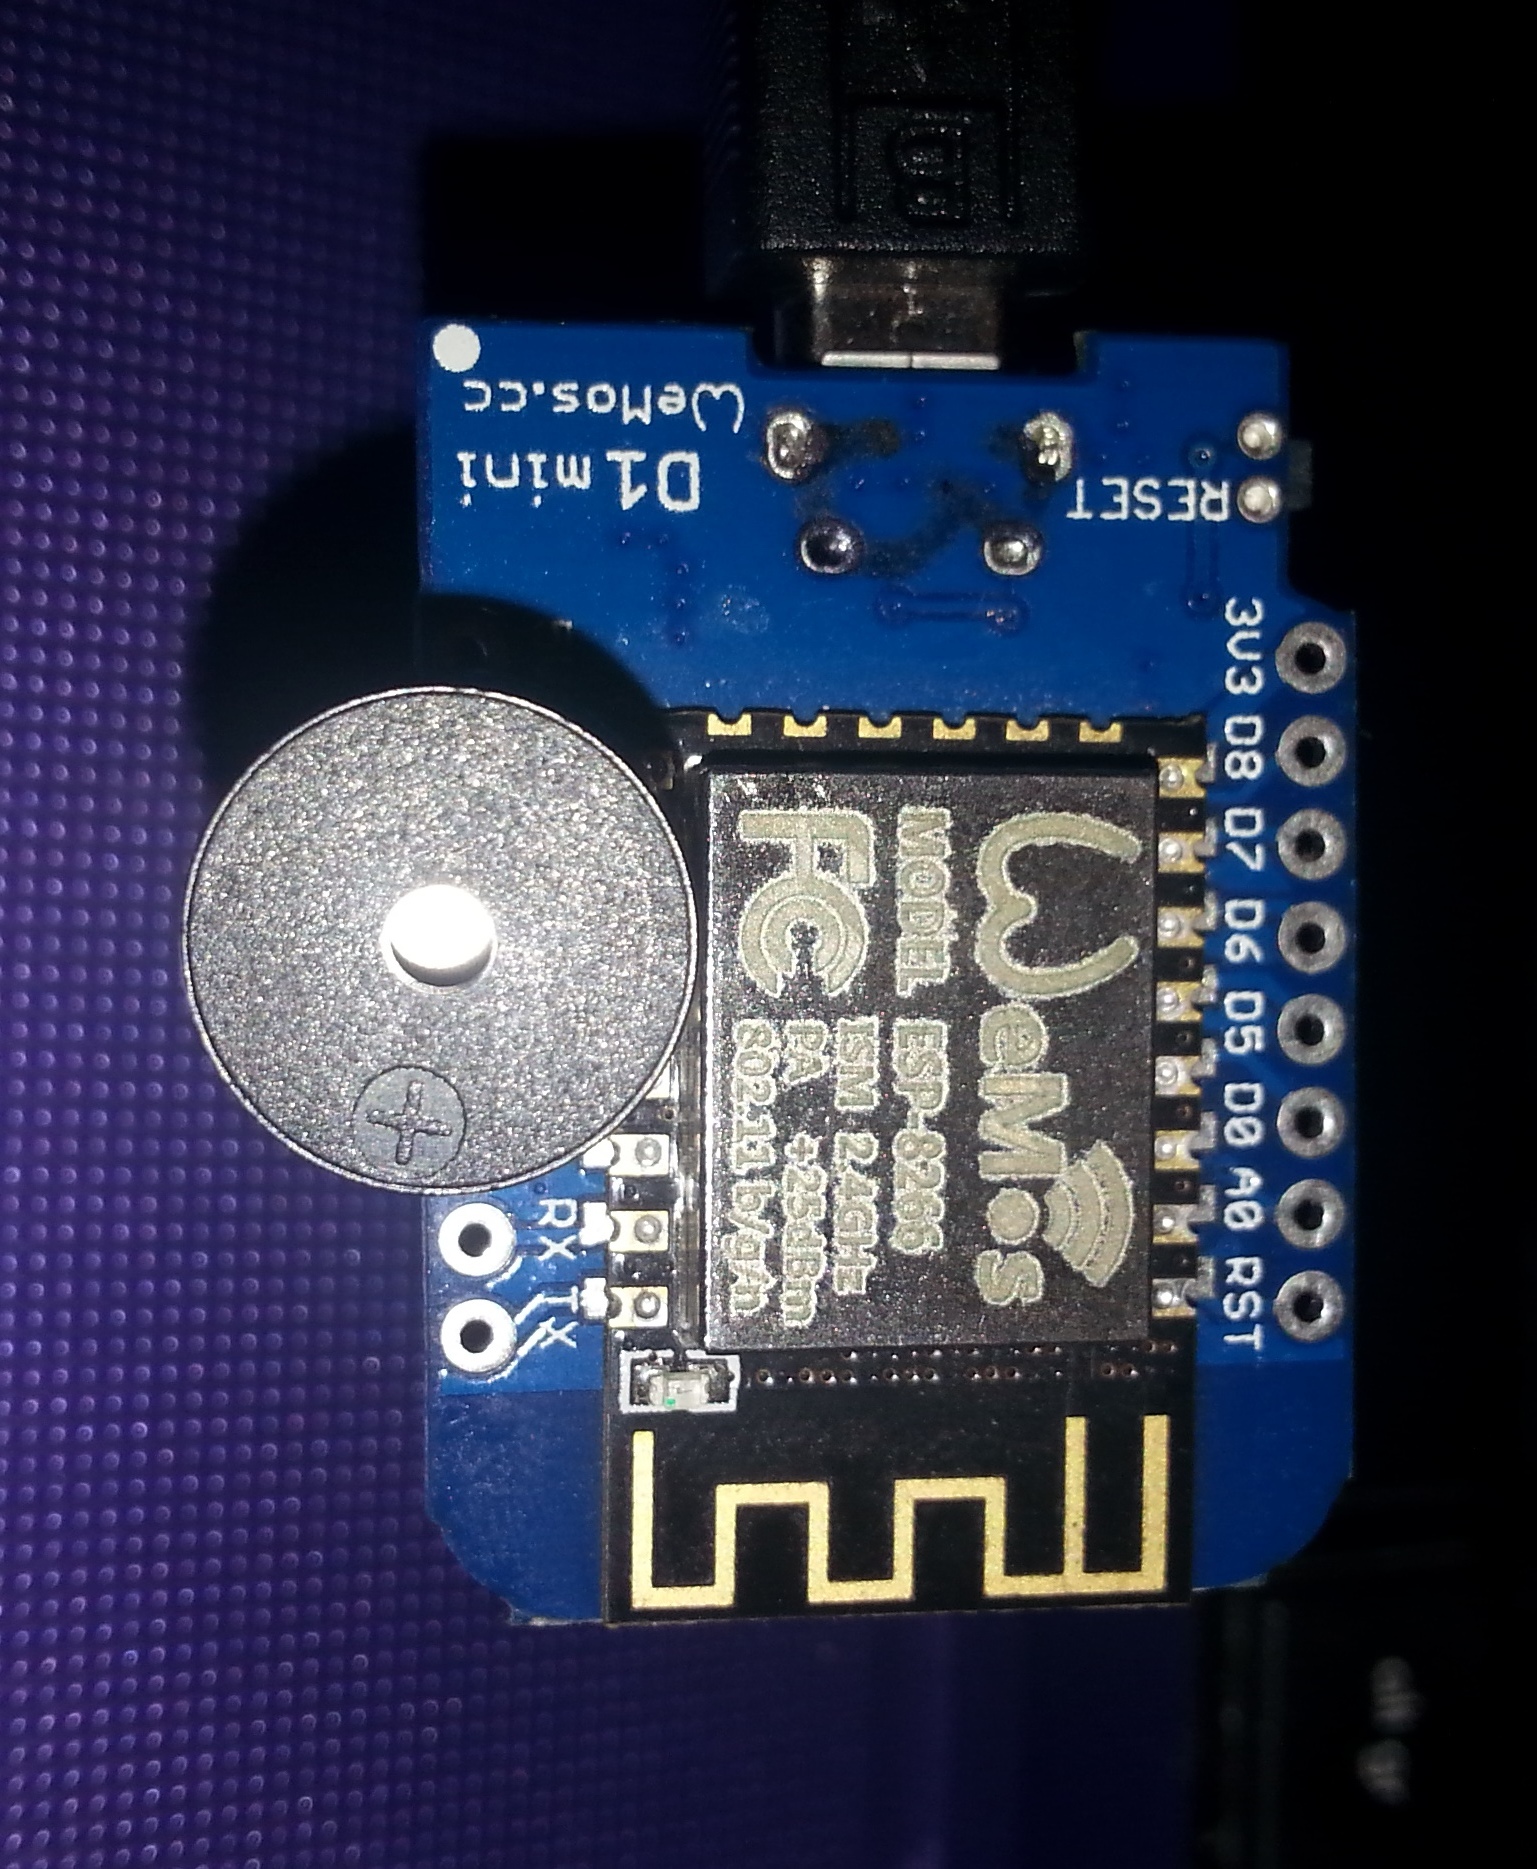
Photo of a buzzer between GND and D2 (GPIO 4) on a WeMos
Full code, just add your normal Blynk stuff
// WeMosBuzzer.ino by @jamin and Costas 3rd Feb 2017
// see http://community.blynk.cc/t/virtual-button-pressed-for-x-seconds/11379/33
// add all regular Blynk stuff to the sketch

#include <SimpleTimer.h>
SimpleTimer timer;
int newTimer = 1;
int alarm = 4;  // GPIO 4 WeMos D2

void setup(){
  pinMode (alarm, OUTPUT );
}

BLYNK_WRITE(V9){
  if(param.asInt()){
    // button pressed
    newTimer = timer.setTimeout(2000,AlarmOn);
  }
  else {
    timer.disable(newTimer);
  }
}

void AlarmOn() {
  Serial.println("Sound Alarm for 3S");
  tone(alarm, 2000, 3000); // sound buzzer a 2000Hz for 3s
}


void loop()
{
  Blynk.run();
  timer.run();
}
I’ll look this over when I get back from running some errands. But it looks like it should clear things up for me. Thank you.
It’s got nothing new, just adding the full tone implementation for other Blynkers to use.
I know, but you included a little more theory in the beginning that should be helpful. Thanks!
1 Like
As far as I know SimpleTimer assigns the ID’s itself. It’s not needed to put them there yourself. They can also be called using SimpleTimer functions.
With a static number of timers this is very nice, but if you have a more dynamic approach I think it’s advisable to have SimpleTimer assign it’s own ID’s and use the corresponding functions to do with the timers what you want